Download presentation
Presentation is loading. Please wait.

1
In The Name Of God

2
Diagnostic casts and surgical templates
Presented by:Dr.Ali Beygi Supervised by: Dr. Mansour Rismanchian And Dr.saied Nosouhian Dental of implantology Dental implants research center Isfahan university of mediacal science

4
Once the preimplant phase is satisfactory, prosthetically driven implant placement also must accommodate anatomical limitations, and possible adaptations of the original planning may be necessary. This set of requirements can he achieved using precise surgical guides

5
DIAGNOSTIC CASTS

6
DIAGNOSTIC CASTS The dentist selects before surgery
the final prosthesis the number and location of ideal optional abutment sites 3. the occlusal schemes

7
DIAGNOSTIC CASTS permit an open discussion of treatment with other practitioners and laboratory technicians assist with implant site selection and angulation requirements during the surgical phase by Surgical templates may be used for presentations to motivate the patient's acceptance of the proposed treatment

8
Diagnostic casts mounted using an accurate record
of centric jaw relationship and maxillomandibular occlusion on a semiadjustable articulator provide much information related to treatment that influences the final prosthodontic treatment plan. Important factors include the following: 1. Occlusal centric relation position, including premature occlusal contacts 2. Edentulous ridge relationships to adjacent teeth and opposing arches 3. Position of potential natural abutments, including inclination, rotation, extrusion, spacing, parallelism, and esthetic considerations 4. Tooth morphology, structure of potential abutments, and overall conditions (e.g., wear facets, fractures)
")
9
5. Direction of forces in future implant sites
6. Present occlusal scheme, including the presence of balancing or working contacts 7. Edentulous soft tissue angulation, length, width, locations, permucosal esthetic position, muscle attachments, and tuberosities 8. Interarch space 9. Overall occlusal curve of Wilson and curve of Spee 10. Arch relationships 11. Opposing dentition 12. Potential future occlusal schemes 13. Number of missing teeth 14. Arch location of future abutments 15. Arch form and asymmetry

10
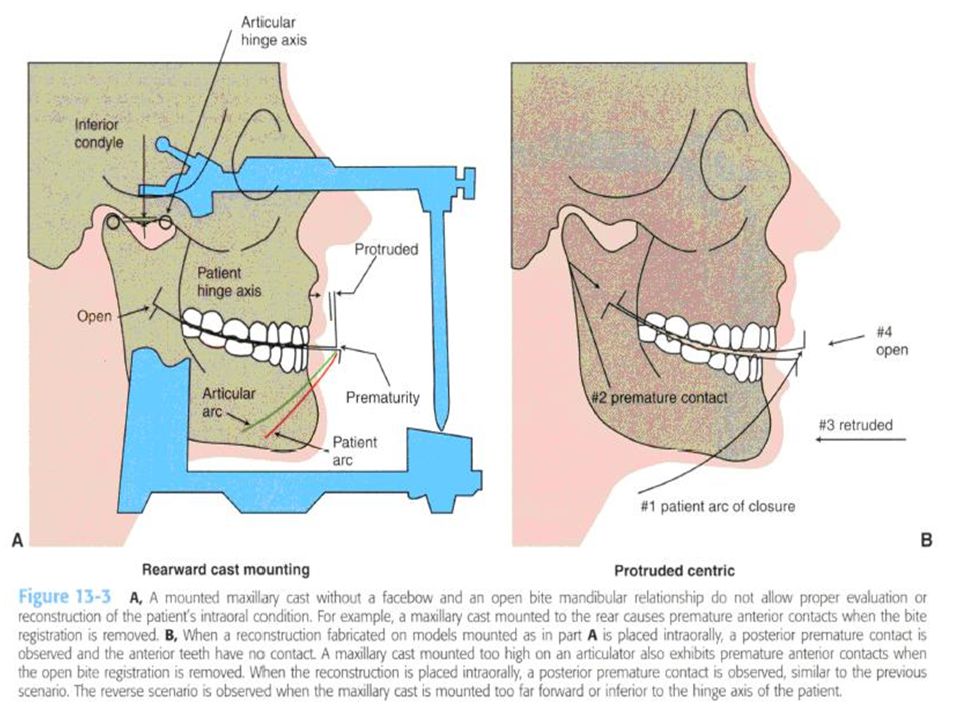
DIAGNOSTIC CASTS Partially edentulous patients often present occlusal interferences as a result of tooth migration The dentist identifies and eliminates deflective contacts before the implant prosthodontic phase: A face-bow transfer and centric and eccentric occlusal records should help mount the casts on a semiadjustable articulator (Figs to 13-5)
")
11
Diagnostic casts should be mounted with an openbite registration in centric relation
Face bow mounting

15
Kois Dento-Facial Analyzer System, Panadent

16
Kois has developed a unique facebow transfer that
corresponds to the facial midline and horizontal plane to the 100-mm distance of the conditional hinge position. This technique simplifies the process of the facebow transfer and ensures the occlusal plane of the teeth is evaluated and fabricated correctly

17
A considerable prosthetic advantage is present when centric relation occlusion is harmonious with centric relation. permits a closed-mouth centric recording during prosthetic reconstruction for the fabrication of the prosthesis without the need for an accurate hinge axis recording of the condyles or fully adjustable articulators When incisal edge position of the maxilla is determined, its position usually causes a steeper protrusive or excursive position than the condylar disk assembly. As a result, posterior disocclusion can be established easily. These conditions permit the reconstruction to be fabricated in the laboratory and transferred accurately to the patient.

18
Both arches may require prosthodontic treatment to establish the desired occlusal schemes.
a need to increase the anterior guidance for posterior disclusion in excursions warrants bilateral balance occlusion

19
DIAGNOSTIC CASTS Diagnostic casts also may be mounted on an
articulator for selective alterations and prewaxing The specific laboratory communication Occlusion Esthetics Edentulous ridge in relation to implant placement provide a guide for provisional restorations

20
DIAGNOSTIC CASTS underlying bone volume.
The dentist, in addition to using radiographic surveys, may also use the diagnostic casts to estimate the underlying bone volume. The dentist inserts a needle equipped with an endodontic stop through the patient's mucosa overlying the implant site measures the mucosal thickness on the crest, facial, and lingual areas Or use a bone caliper bone width can be measured by the calibrated instrument The edentulous region of the diagnostic cast is cut perpendicular to the ridge Cross section then is shaded with a pencil to represent the tissue thickness observed while probing

21
RESTORATIVE DIAGNOSIS VERSUS SURGICAL DIAGNOSIS

22
Although a prosthetically driven implant placement is best for:
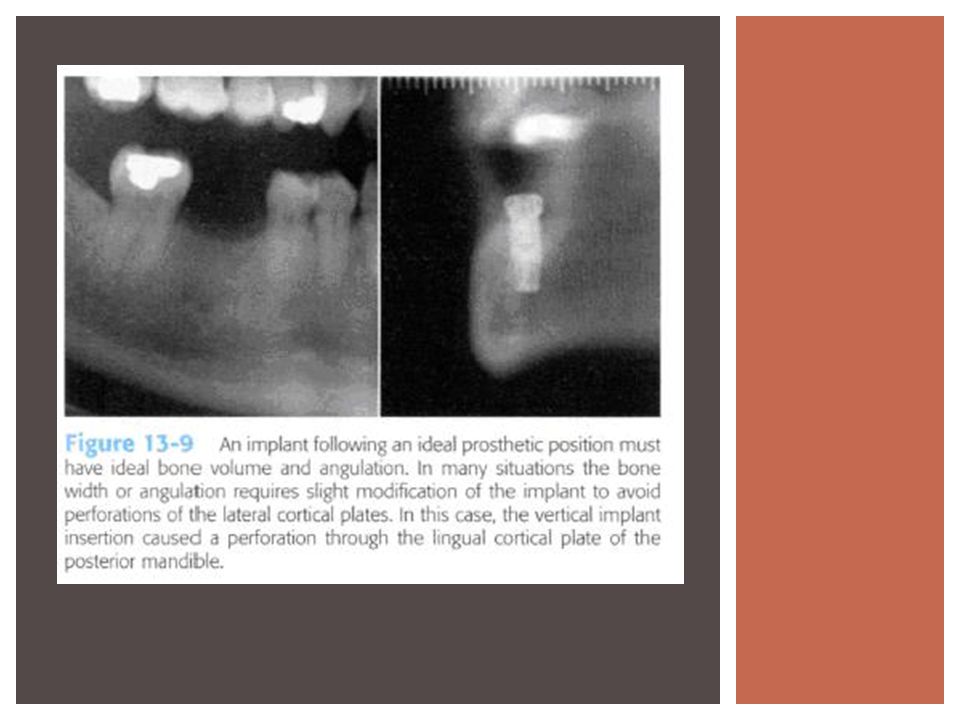
simplification of abutment selection ideal force distribution long-term success Anatomical limitations may force the surgeon to redirect the implant angulation the prosthetic requirement cannot be met surgically

23
the mandibular nerve is relatively high
buccal bone loss modification of the treatment plan and placement of a bone graft lingual concavity a change in angulations or implant selection is the only option If a concavity is suspected, further radiographs such as a traditional tomogram or a computed tomography scan, together with a diagnostic radiographic template, will reveal the angulation dilemma and allow for clear communication between the restorative dentist and the surgeon the mandibular nerve is relatively high Therefore the dentist must make a decision to modify the angulation and later redirect the implant path with an angulated abutment, position a shorter implant, or avoid this site all together

25
SURGICAL GUIDES

26
SURGICAL GUIDES The restoring dentist fabricates the surgical guide template after the presurgical restorative appointments surgical template dictates to the surgeon the implant body placement that offers the best combination of : (1)support for the repetitive forces of occlusion (2)esthetics (3)hygiene requirements
support for the repetitive forces of occlusion. (2)esthetics. (3)hygiene requirements.")
27
SURGICAL GUIDES should be stable and rigid when in correct position
should relate the ideal angulation for implant insertion on the diagnostic wax-up,during surgery This requires at least two reference points for each implant (respectively on the occlusal surface (central fossa or incisal edge) of the planned abutment crown and the crest of the ridge represents about 8 mm) joined by a line that represents the path of ideal implant insertion The ideal angulation is: perpendicular to the occlusal plane and parallel to the most anterior abutment (natural or implant) joined to the implant.
 of the planned abutment crown and the crest of the ridge represents about 8 mm) joined by a line that represents the path of ideal implant insertion. The ideal angulation is: perpendicular to the occlusal plane and parallel to the most anterior abutment (natural or implant) joined to the implant.")
28
SURGICAL GUIDES should not be bulky and difficult to insert or obscure surrounding surgical landmarks must not contaminate a surgical field during bone grafts or implant placement should be transparent and allow easy access for the surgeon and the assistant (what side of the arch is operated on, where the surgeon and assistant will be seated,and whether the surgeon is right- or left-handed)
")
29
SURGICAL GUIDES should relate the ideal facial contour
can determine the amount of augmentation required for implant placement or support of the lips and face template may be used for a bone graft later the same template may be used for insertion of implants and again for implant uncovery

30
SURGICAL GUIDES To construct a surgical guide, modification of the radiographic guide is often possible With ideal wax-up when the long axis of the teeth is visible and can be maintained,after verifying bone availability, then enlargement of the longaxis channel guarantees accurate implant guidance.

31
Use a modification of Preston's clear splint
Diagnostic wax-up No selective grinding or modification is performed on any teeth that have not been altered before surgery; otherwise, the template will not fit correctly irreversible, hydrocolloid impression is made of the diagnostic wax-up and poured in dental stone a vacuum acrylic shell (0.060 to inch) is pressed Trim To indicate the teeth position and the lingual contour in the posterior regions and facial contour in the anterior region. If no natural teeth remain, the posterior portion of the template should be maintained and cover the retromolar pads or tuberosities and palate to aid in positioning. This provides maximum freedom for implant placement yet communicates the ideal tooth position and angulation during surgery. A surgical guide template with 2-mm holes through the occlusal surface of a denture tooth is too limiting for the surgeon, although it identifies precisely the ideal implant placement
 is pressed. Trim. To indicate the teeth position and the lingual contour in the posterior regions and facial contour in the anterior region. If no natural teeth remain, the posterior portion of the template should be maintained and cover the retromolar pads or tuberosities and palate to aid in positioning. This provides maximum freedom for implant placement yet. communicates the ideal tooth position and angulation during. surgery. A surgical guide template with 2-mm holes through the. occlusal surface of a denture tooth is too limiting for the. surgeon, although it identifies precisely the ideal implant. placement.")
32
The template can be correctly positioned over the
In the edentulous arch the vacuum form may be fabricted from the existing removable prosthesis A soft liner Tuberosity or retromolar pad regions and other soft tissue areas not involved in surgery The acrylic resin over the occlusal portion of the template where no implants are planned The patient then occludes into this index The template can be correctly positioned over the edentulous ridge during surgery once the tissue is reflected.

33
A full wax-up of the missing teeth
A surgical template for the complete edentulous arch also may engage the occlusal aspect of the opposing teeth A full wax-up of the missing teeth A hole is prepared through the middle of the central fossa of each future posterior abutment and the incisal edge position of anterior teeth On the stone model, each site chosen should be drilled To a depth corresponding to the approximate soft tissue thickness measured on a panoramic radiograph (usually about 2 to 3 mm) An orthodontic wire is passed through the teeth and into the holes A small loop is made at the other end of the wire to create a retention form Each pin must be embedded fully in the acrylic at the proper centric and vertical relationships
 An orthodontic wire is passed through the teeth and into the holes. A small loop is made at the other end of the wire to create a retention form. Each pin must be embedded fully in the acrylic at the proper centric and vertical relationships.")
34
Once the soft tissue is reflected
A surgical template for the complete edentulous arch also may engage the occlusal aspect of the opposing teeth Once the soft tissue is reflected The surgical guide easily determines the implant position and angulation, yet the surgeon can have the patient open and drill into the bone with complete access and vision also may he used with a panoramic radiograph before surgery to determine vertical magnification or horizontal distortion at Stage II uncovery to find the position of each implant ---FP1

35
SURGICAL GUIDES FP1 , FP2 : FP3 :
straight abutment directly under the incisal edge of the final crown for a cemented prosthesis For screw-retained prostheses, the implant should emerge toward the cingulum FP3 : the mesiodistal position of implant abutments may be placed without regard to the actual position of the crowns

36
An implant placed adjacent to a natural tooth
SURGICAL GUIDES An implant placed adjacent to a natural tooth In esthetic regions 1.5 to 2 mm away from the crown , where the contour of the interdental papilla is a determining factor In unesthetic regions implant placed at least 1.5 mm away from an adjacent tooth ,minimizes the risk of surgical error and provides easier access for hygiene The treatment plan for an implant in the maxillary first premolar position must reflect careful consideration for the angulation of a natural canine when present implant should be angled to follow the root of the canine

37
ADVANCED SURGICAL GUIDANCE

38
ADVANCED SURGICAL GUIDANCE
Advanced surgical guides require computed tomography (CT) scanning as a prerequisite for analysis These guides also necessitate a software-supported rendering to improve planning by using three-dimensional (3D) visualization. (as demonstrated by Jacobs et al. who reported that dentists using two-dimensional (2D) cross sections make numerous modifications during the surgical phase of treatment, whereas the addition of a 3D representation improves the correlation between planned and actual placement) software rendering that includes CT data and implant planning can be exported later to a computer-aided design (CAD) software
 scanning as a prerequisite for analysis. These guides also necessitate a software-supported rendering to. improve planning by using three-dimensional (3D) visualization. (as demonstrated by Jacobs et al. who reported that dentists using two-dimensional (2D) cross sections make numerous modifications during. the surgical phase of treatment, whereas the addition. of a 3D representation improves the. correlation between planned and actual placement) software rendering that includes CT data. and implant planning can be exported later to a computer-aided. design (CAD) software.")
39
SURGICAL GUIDES use of computer-aided manufacturing of guides
Surgical guidance can be classified in two categories use of computer-aided manufacturing of guides using virtual planning of implant positions. Guides are delivered to surgeon before the procedure no modification is possible during surgery use of navigation techniques There is no guidance of the drill, but software provides real-time feedback to the surgeon in order to compare execution with planning

40
Computer-Assisted Design and Manufacturing of Surgical Guides

41
Computer-Assisted Design and Manufacturing of Surgical Guides
Stereolithography Drilling of guides

42
Computer-Assisted Design and Manufacturing of Surgical Guides
Stereolithography layer of liquid polymer is deposited and cured by a computerdriven laser. Additional layers or sections are stacked and polymerized until a final model is generated the data source is a CT

43
Computer-Assisted Design and Manufacturing of Surgical Guides
Stereolithography irrigation holes, sufficient surface areas while performing osteotomies, buccal extensions if a transversal retention screw is desired Serial templates-drill diameter CT files and dentist's plan is used to design the guides Software programs are capable of maximizing stability and implant retention by detecting the best insertion path while avoiding undercuts within the bone

44
Computer-Assisted Design and Manufacturing of Surgical Guides
Stereolithography Once designs are completed, the guides are processed with the stereolithographic method stainless steel tubes are later pressed into place

45
Computer-Assisted Design and Manufacturing of Surgical Guides
Drilling of guides The method necessitates the incorporation of metal markers at specific locations in the scannographic guide that therefore must be provided by the manufacturer The dentist then returns the plan, model, and scan nographic template for conversion of the template into the surgical guide Once returned and used during CT scanning, the dentist creates a surgical plan using a software

46
Computer-Assisted Design and Manufacturing of Surgical Guides
Drilling of guides the model is set onto a computer-controlled milling machine, which matches the fiducial landmarks to their CT-scanned images Because of the ability of the guide to rest on natural teeth, this method can be applied to small edentulous spans computer-driven drill press Metal guide sleeves then are added

47
Surgical Navigation

48
Surgical Navigation IGI
CT SCAN in the presence of the scannographic template attached to a manufactured arch registration device CT transferred to a custom software virual implant planning Before surgery registration device is repositioned matching process During surgery reference body to locate patient jaw and diod-equipped handpiece to locate the surgeon,s movement

49
times through glasses worn by the surgeon
Surgical Navigation VirtualScop Elimination of positioning markers during CT scanning This system offers a real-time three-dimensional capture of the arch via an ultrasound probe. This Mapping of the clinical image can be matched to the CT-scanned data and updated continuously the actual drill position are viewed at all times through glasses worn by the surgeon

50
THANKS FOR YOUR ATTENTION
Ali Beygi

Similar presentations


>")


