Download presentation
Presentation is loading. Please wait.

1
February 2014

2
Remove Version 7.5 from your computer Install NSTAR Version 10 Create the model and server connections

3
To uninstall Version 7.5 from your computer go to the Control Panel and select Add or Remove Programs

4
Select SAP BusinessObjects Planning and Consolidation for Office Client and Click Remove.

5
Click through the additional uninstall steps until the uninstall is complete. If prompted to restart your computer please do so.

6
NSTAR Upgrade to Version 10 ◦ Version 10 Computer Requirements and Installation Instructions can be found on the Budget website on the NSTAR page.

7
You can install NSTAR Version 10 with either Internet Explorer or Mozilla Firefox. To use Internet Explorer first check to ensure that the following Security settings have been adjusted to allow for easier download and install of the NSTAR Microsoft components and add-ins.

8
In Tools, under Internet Options, on the Security Tab under ‘Trusted Sites’ click ‘Sites’

9
To ensure the NAU domain and the NSTAR website are in trusted websites, you will need to type them in the box. You may need to uncheck the “Require server verification (https://)...” box. You can recheck the box after they are added.

10
Type in *.nau.edu and https://pinon.nau.froot.nau.edu/sap/bpc/web https://pinon.nau.froot.nau.edu/sap/bpc/web Click Add and click close. Then click close in the Internet options box.

11
In the web browsers address box, type in the new NSTAR address: https://pinon.nau.froot.nau.edu/sap/bpc/web You will get a Security Box. Enter your NAU User Name & Password. Click OK

12
The NSTAR Version 10 website will open. You should see your name in the upper left hand corner. Click on ‘Install EPM Add-in for Microsoft Office’.

13
Click ‘Install’ across from EPM add-in for Microsoft Office. Click run in the download box.

14
Follow the install steps: Click Next

15
Click ‘I accept the terms in the license agreement’ and click next.

16
Fill in your name and NAU for the Organization. Click either button for ‘Install this application for:’ Click next

17
Click ‘SAP BusinessObjects Planning and Consolidation, version for the Microsoft platform’. Click next.

18
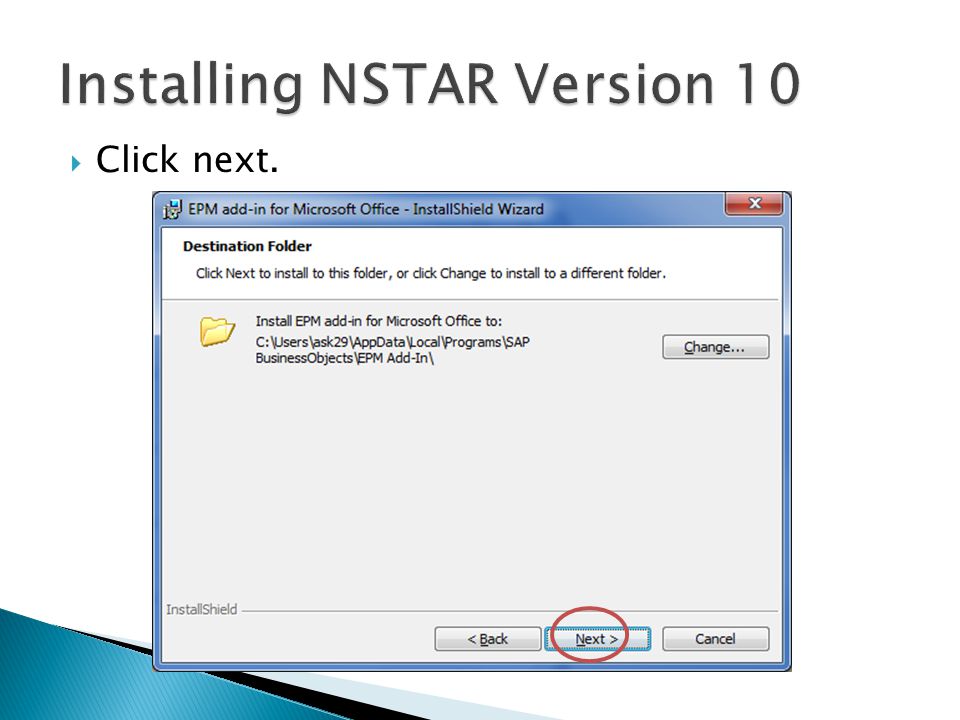
Click next.

20
Click Install.

21
The install will take a few minutes and status bar will not fill. Please wait.

22
This box confirms that the install was successful. Click Finish. You have completed the install.

23
Some of the verbiage has changed in Version 10. Below is a table to connect the new with the old:

24
Close Internet Explorer or Mozilla Firefox and reopen. You will need to re-enter the pinon web address. You should now have an option for ‘EPM Office Add-in Excel’. Click here to create the model and server connections.

25
When you click on the link for ‘EPM Office Add-in Excel’ a Connect to Environment box opens up. The Production Environment for Budgeting is A_NAU_PROD. Select A_NAU_PROD and click Connect.

26
As in the previous version you will be budgeting separate Environment for Finance and HR. You will need to create two connections. The Create Connection box will open. Use the dropdown for the Connection Type and choose Planning and Consolidation, version for the Microsoft platform. Use the Server URL dropdown and choose https://pinon.nau.froot.nau.edu/sap/bpc. Then click the Connect box. https://pinon.nau.froot.nau.edu/sap/bpc

27
The Environment and Model boxes will now populate. Choose A_NAU_PROD for the Environment and HR for the Model and click the ‘Generate Connection Name’ button.

28
The Connection manager will now show the Connection Name for HR. Click to highlight the connection name and Click OK.

29
This will open up Excel with a Data Connection to HR- A_NAU_PROD.

30
You will want to create a connection for Finance by using the Data Connection dropdown and choosing ‘Select Another Connection’.

31
This will open up the Connection Manager box. Click Create.

32
The Create Connection box will open. Use the dropdown for the Connection Type and choose Planning and Consolidation, version for the Microsoft platform(1). Use the Server URL dropdown and choose https://pinon.nau.froot.nau.edu/sap/bpc(2). https://pinon.nau.froot.nau.edu/sap/bpc Then click the Connect box (3). The Environment and Model boxes will now populate. Choose A_NAU_PROD for the Environment(4),and Finance for the Model(5) Click the ‘Generate Connection Name’ button(6) Click OK (7). Use the box below as a guide.
. Use the Server URL dropdown and choose Then click the Connect box (3). The Environment and Model boxes will now populate. Choose A_NAU_PROD for the Environment(4),and Finance for the Model(5) Click the ‘Generate Connection Name’ button(6) Click OK (7). Use the box below as a guide..")
34
NSTAR users entering budgets will need a connection for both HR and Finance. These connections will only have to be set up once. Once NSTAR is installed it can be accessed directly through Excel. Open Excel and you should now have a EPM tab. The first box should say ‘Log On Connection’, click the box

35
In the connection box, click the square Choose the connection Click OK

36
Click Log On This will open up a Microsoft Excel Spreadsheet connected to NSTAR.

37
You can use the Log Off to Disconnect.

38
Please view the navigation PowerPoint for NSTAR Version 10 to locate input templates and reports for budgeting. If you need help please contact your Budget Analyst.

Similar presentations


 Tutorial>")


Client, Facility and Staff Focus – What.>")


