Download presentation
Presentation is loading. Please wait.

1
HokieMart On-line Training Module
Revised

2
Virginia Tech Electronic Business System

3
Virginia Tech Electronic Business System
Getting Started in HokieMart: Setting Up Your User Profile Version 1.1

4
Virginia Tech Electronic Business System
Getting Started in HokieMart: Setting Up Your User Profile Version 1.1

5
VT’s electronic business system is known around campus as:

6
VT’s electronic business system is known around campus as:
HokieMart.

7
Before we get started…. Important:

8
Before we get started…. Important: Please note if you do not have a
Virginia Tech PID

9
Before we get started…. Virginia Tech PID Important:
Please note if you do not have a Virginia Tech PID

10
Before we get started…. set up your User Profile in HokieMart and
Important: You must set up your PID before you can set up your User Profile in HokieMart and attend HokieMart Training Classes

11
Before we get started…. set up your User Profile in HokieMart and
Important: You must set up your PID before you can set up your User Profile in HokieMart and attend HokieMart Training Classes

12
Before we get started…. set up your User Profile in HokieMart and
Important: You must set up your PID before you can set up your User Profile in HokieMart and attend HokieMart Training Classes

13
Before we get started…. If you have your PID – Lets go!
Later in the module you can work along with me to set up your user profile. You can view this module again or refer to the referenced Requestor Guide.

14
Before we get started…. If you have your PID – Lets go!
Later in the module you can work along with me to set up your user profile. You can view this module again or refer to the referenced Requestor Guide.

15
Before we get started…. If you have your PID – Lets go!
Later in the module you can work along with me to set up your user profile. You can view this module again or refer to the referenced Requestor Guide.

16
This module is designed to:
provide an overview of the main roles and terms used in the HokieMart system

17
This module is designed to:
provide an overview of the main roles and terms used in the HokieMart system give a quick reference of computer system requirements to run HokieMart on your computer

18
This module is designed to:
provide an overview of the main roles and terms used in the HokieMart system give a quick reference of computer system requirements to run HokieMart on your computer show you how to create (set up) or modify your personal profile
 or modify your personal profile.")
19
This module is designed to:
provide an overview of the main roles and terms used in the HokieMart system give a quick reference of computer system requirements to run HokieMart on your computer show you how to create (set up) or modify your personal profile prepare you to attend the HokieMart Requestor Training session
 or modify your personal profile. prepare you to attend the HokieMart Requestor Training session.")
20
HokieMart is designed to be

21
HokieMart is designed to be open to the entire university and

22
HokieMart is designed to be open to the entire university and to reduce paper processing.

23
Roles in HokieMart

24
Roles in HokieMart At this point:

25
Roles in HokieMart At this point: Your Supervisor or Department Head should have advised you which role or roles, you will have in HokieMart.
26
Roles in HokieMart At this point: Your Supervisor or Department Head should have advised you which role or roles, you will have in HokieMart. You need to be familiar with your role or roles when you set up your User Profile today and before attending Requestor Training Class.

27
Roles in HokieMart At this point: Your Supervisor or Department Head should have advised you which role or roles, you will have in HokieMart. You need to be familiar with your role or roles when you set up your User Profile today and before attending Requestor Training Class.

28
Roles in HokieMart At this point: Your Supervisor or Department Head should have advised you which role or roles, you will have in HokieMart. You need to be familiar with your role or roles when you set up your User Profile today and before attending Requestor Training Class.

29
Roles in HokieMart The full responsibilities of each user is described in one of three guides:

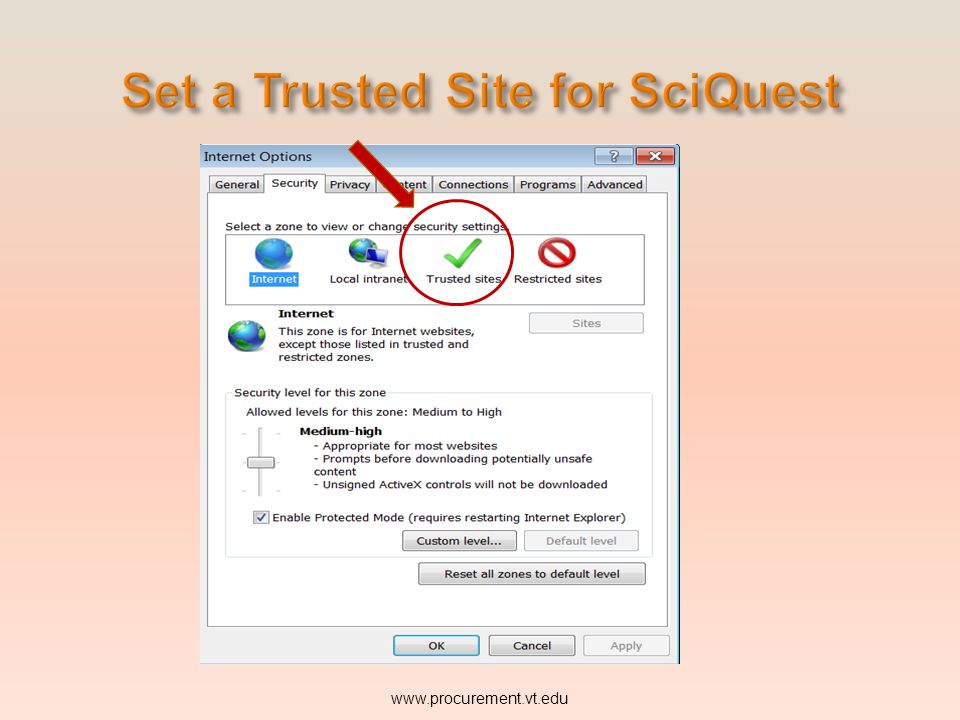
30
Roles in HokieMart The full responsibilities of each user is described in one of three guides: Requestor

31
Roles in HokieMart The full responsibilities of each user is described in one of three guides: Requestor Approver

32
Roles in HokieMart The full responsibilities of each user is described in one of three guides: Requestor Approver Receiver

33
Roles in HokieMart The full guides can be found on-line on the Procurement Department’s web-page:

34
Roles in HokieMart www.procurement.vt.edu.
The full guides can be found on-line on the Procurement Department’s web-page:

35
Roles in HokieMart www.procurement.vt.edu.
The full guides can be found on-line on the Procurement Department’s web-page: First we will take a quick view of the Procurement Department’s home page

36
Roles in HokieMart www.procurement.vt.edu.
The full guides can be found on-line on the Procurement Department’s web-page: First we will take a quick view of the Procurement Department’s home page show you where to locate all the User Guides

37
Roles in HokieMart www.procurement.vt.edu.
The full guides can be found on-line on the Procurement Department’s web-page: First we will take a quick look at the Procurement Department’s home page show you where to locate all the User Guides then we will provide a brief explain of the roles.

41
Roles in HokieMart: Requestor

42
Roles in HokieMart The Requestor is an individual who initiates the electronic purchase of goods and services by shopping and creating a “cart”
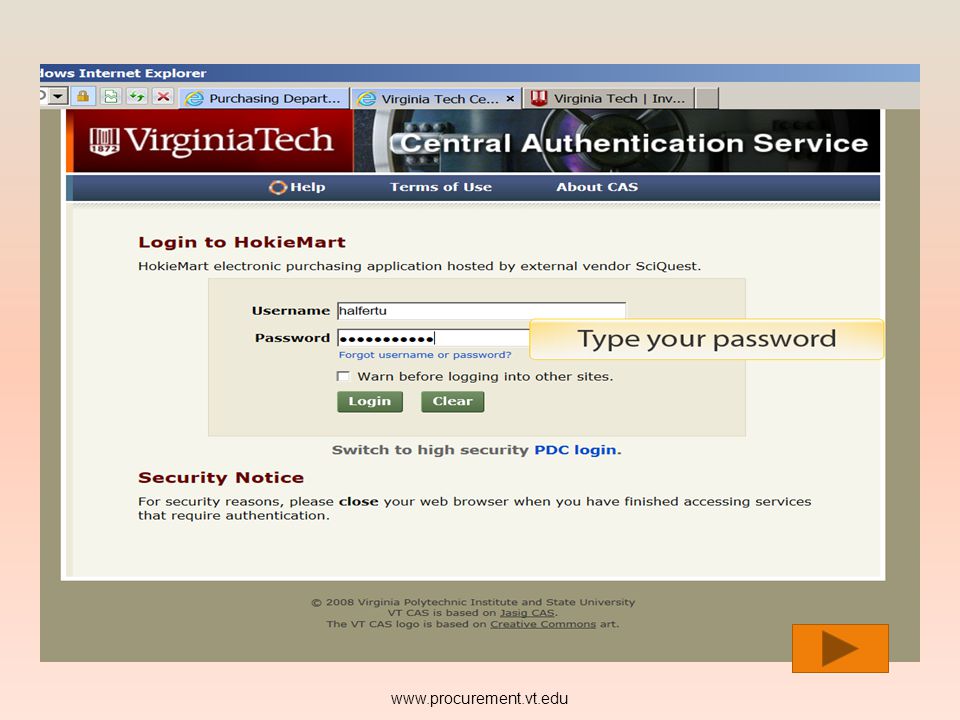
43
Roles in HokieMart The Requestor is an individual who initiates the electronic purchase of goods and services by shopping and creating a “cart”
44
Roles in HokieMart The Requestor is an individual who initiates the electronic purchase of goods and services by shopping and creating a “cart” After placing the items in the “shopping cart” the Requestor will “check out.”

45
Roles in HokieMart The Requestor is an individual who initiates the electronic purchase of goods and services by shopping and creating a “cart” After placing the items in the “shopping cart” the Requestor will “check out.”

46
Roles in HokieMart The Requestor is an individual who initiates the electronic purchase of goods and services by shopping and creating a “cart” After placing the items in the “shopping cart” the Requestor will “check out.”

47
Roles in HokieMart The Requestor is an individual who initiates the electronic purchase of goods and services by shopping and creating a “cart” After placing the items in the “shopping cart” the Requestor will “check out.”

48
Roles in HokieMart After “check-out” is complete:
49
Roles in HokieMart After “check-out” is complete:
a Purchase Requisition (PR) will be created and
 will be created. and.")
50
Roles in HokieMart After “check-out” is complete:
a Purchase Requisition (PR) will be created and will be sent electronically to a designated “Approver” for fund approval.
 will be created. and. will be sent electronically to a designated Approver for fund approval.")
51
Roles in HokieMart: On Behalf Of Requestor

52
Roles in HokieMart Some departments also have individuals who are identified as an:

53
“On Behalf-of-Requestor”
Roles in HokieMart Some departments also have individuals who are identified as an: “On Behalf-of-Requestor”

54
Roles in HokieMart An On Behalf-of-Requestor is a designated individual who initiates the electronic purchase of goods and services “on behalf of” the Requestor who is authorized to use the funds.

55
Roles in HokieMart An On Behalf-of-Requestor is a designated individual who initiates the electronic purchase of goods and services “on behalf of” the Requestor who is authorized to use the funds. An On Behalf-of-Requestor may be a graduate student or other administrative person in a department.

56
Roles in HokieMart: Approver

57
Roles in HokieMart The Approver electronically receives the PR for approval through the HokieMart system

58
Roles in HokieMart The Approver electronically receives the PR for approval through the HokieMart system An Approver is designated to electronically

59
Roles in HokieMart review and/or edit
The Approver electronically receives the PR for approval through the HokieMart system An Approver is designated to electronically review and/or edit

60
Roles in HokieMart review and/or edit
The Approver electronically receives the PR for approval through the HokieMart system An Approver is designated to electronically review and/or edit approve or reject all or part of the purchase requisitions within their assigned delegated purchasing authority.

61
Roles in HokieMart: Receiver

62
Roles in HokieMart A Receiver verifies receipt of goods and or services.

63
Roles in HokieMart A Receiver verifies receipt of goods and or services. The Receiver logs-in to HokieMart and electronically “receives” the goods and or services.

64
Roles in HokieMart A Receiver verifies receipt of goods and or services. The Receiver logs-in to HokieMart and electronically “receives” the goods and or services. A Receiver can receive all or part of the order depending on delivery.

65
Roles in HokieMart A Receiver verifies receipt of goods and or services. The Receiver logs-in to HokieMart and electronically “receives” the goods and or services. A Receiver can receive all or part of the order depending on delivery. The receiving process will be discussed in greater detail in the Receiver class or can be reviewed in the on-line guides.

66
Browser Requirements and Settings
67
Browser Requirements and Settings
HokieMart is a web-based product and is used in conjunction with the Internet.

68
Browser Requirements and Settings
HokieMart is a web-based product and is used in conjunction with the Internet. Effective July 1, 2013 the following browser supports have been added:

69
Browser Requirements and Settings
HokieMart is a web-based product and is used in conjunction with the Internet. Effective July 1, 2013 the following browser supports have been added: Foxfire – latest version

70
Browser Requirements and Settings
HokieMart is a web-based product and is used in conjunction with the Internet. Effective July 1, 2013 the following browser supports have been added: Foxfire latest version Chrome - latest version

71
Browser Requirements and Settings
HokieMart is a web-based product and is used in conjunction with the Internet. Effective July 1, 2013 the following browser supports have been added: Foxfire latest version Chrome - latest version Opera 10 and higher

72
Browser Requirements and Settings
HokieMart is a web-based product and is used in conjunction with the Internet. Effective July 1, 2013 the following browser supports have been added: Foxfire latest version Chrome - latest version Opera 10 and higher Internet Explore 7, 8, 9, 10

73
Browser Requirements and Settings
SciQuest Supported and Certified Brower/ Operating System Combinations Effective July 1, 2013

74
Browser Requirements and Settings
SciQuest Supported and Certified Brower/ Operating System Combinations Effective July 1, 2013 This information is provided for your reference only. If you experience any computer related difficulties running HokieMart on your computer, contact your Virginia Tech Departmental IT support person.

75
Browser Requirements and Settings
SciQuest Supported and Certified Brower/ Operating System Combinations Effective July 1, 2013 This information is provided for your reference only. If you experience any computer related difficulties running HokieMart on your computer, contact your Virginia Tech Departmental IT support person. Your IT personnel should contact HokieMart Help Desk

76
Browser Requirements and Settings
SciQuest Supported and Certified Brower/ Operating System Combinations Effective July 1, 2013 This information is provided for your reference only. If you experience any computer related difficulties running HokieMart on your computer, contact your Virginia Tech Departmental IT support person. Your IT personnel should contact HokieMart Help Desk

77
Browser Requirements and Settings
SciQuest Supported and Certified Brower/ Operating System Combinations Effective July 1, 2013 This information is provided for your reference only. If you experience any computer related difficulties running HokieMart on your computer, contact your Virginia Tech IT support person. Your IT personnel should contact HokieMart Help Desk

78
Set a Trusted Site for SciQuest

79
Set a Trusted Site for SciQuest
For all features to function fully in SciQuest,

80
Set a Trusted Site for SciQuest
For all features to function fully in SciQuest, HokieMart users should make SciQuest a trusted site.

81
Set a Trusted Site for SciQuest

82
Set a Trusted Site for SciQuest

83
Set a Trusted Site for SciQuest
84
Set a Trusted Site for SciQuest
From the Browser Menu Bar on your computer

85
Set a Trusted Site for SciQuest
From the Browser Menu Bar on your computer Select Tools

86
Set a Trusted Site for SciQuest
From the Browser Menu Bar on your computer Select Tools Internet Options

87
Set a Trusted Site for SciQuest
From the Browser Menu Bar on your computer Select Tools Internet Options Security

88
Set a Trusted Site for SciQuest
From the Browser Menu Bar on your computer Select Tools Internet Options Security Trusted Sites

89
Set a Trusted Site for SciQuest
From the Browser Menu Bar on your computer Select Tools Internet Options Security Trusted Sites Sites

90
Set a Trusted Site for SciQuest
From the Browser Menu Bar on your computer Select Tools Internet Options Security Trusted Sites Sites You can try that now.

91
Set a Trusted Site for SciQuest
From the Browser Menu Bar on your Computer:

92
Set a Trusted Site for SciQuest
From the Browser Menu Bar on your Computer: This will bring up the Trusted sites window:

93
Set a Trusted Site for SciQuest
From the Browser Menu Bar on your Computer: This will bring up the Trusted sites window:

94
Set a Trusted Site for SciQuest
Enter in the field as shown.

95
Set a Trusted Site for SciQuest
Enter in the field as shown.

96
Set a Trusted Site for SciQuest
Click Add

97
Set a Trusted Site for SciQuest
Click to close the box. Close

98
Set a Trusted Site for SciQuest
Once again this information is provided for your reference only. If you experience any computer related difficulties running HokieMart on your computer, contact your Virginia Tech IT support person. Your IT personnel should contact HokieMart Help Desk

99
Set a Trusted Site for SciQuest
Once again this information is provided for your reference only. If you experience any computer related difficulties running HokieMart on your computer, contact your Virginia Tech IT support person.

100
Set a Trusted Site for SciQuest
Once again this information is provided for your reference only. If you experience any computer related difficulties running HokieMart on your computer, contact your Virginia Tech IT support person. Your IT personnel should contact HokieMart Help Desk

101
Set a Trusted Site for SciQuest
Once again this information is provided for your reference only. If you experience any computer related difficulties running HokieMart on your computer, contact your Virginia Tech IT support person. Your IT personnel should contact HokieMart Help Desk

102
Creating and Managing Your User Profile

103
Creating and Managing Your User Profile
Each HokieMart user has a “personalized” profile which must be created prior to performing functions in HokieMart.

104
Creating and Managing Your User Profile
Each HokieMart user has a “personalized” profile which must be created prior to performing functions in HokieMart. You need to do this in the following location:

105
Creating and Managing Your User Profile
Each HokieMart user has a “personalized” profile which must be created prior to performing functions in HokieMart. You need to do this in the following location: Production URL where orders are entered

106
Creating and Managing Your User Profile
Each HokieMart user has a “personalized” profile which must be created prior to performing functions in HokieMart. You need to do this in the following location: Production URL where orders are entered

107
Creating and Managing Your User Profile
Each HokieMart user has a “personalized” profile which must be created prior to performing functions in HokieMart. You need to do this in the following location: Production URL where orders are entered You can pause and go there now or continue to follow the module.

111
Creating and Managing Your User Profile
If you have trouble logging in…… Hint: It’s the same password that you use to log into to view your .

112
Creating and Managing Your User Profile
Navigation in HokieMart is done by using Tabs.

114
Creating and Managing Your User Profile
Navigation in HokieMart is done by using Tabs.

115
Creating and Managing Your User Profile
Navigation in HokieMart is done by using Tabs. Not every tab is pertinent to every user.

116
Creating and Managing Your User Profile
Navigation in HokieMart is done by using Tabs. Not every tab is pertinent to every user Tabs that are not pertinent to the Requestor will not be discussed in this module.

117
Creating and Managing Your User Profile
The Profile tab allows the user to view and manage personal information.

118
Creating and Managing Your User Profile
Tabs under User Profile: User Settings

119
Creating and Managing Your User Profile
Tabs under User Profile: User Settings The first tab “User Settings” is divided into various sub tabs.

120
Creating and Managing Your User Profile
Tabs under User Profile: User Settings The first tab “User Settings” is divided into various sub tabs.

121
Creating and Managing Your User Profile
Tabs under User Profile: User Settings The first tab “User Settings” is divided into various sub tabs.

122
Creating and Managing Your User Profile
Tabs under User Profile: User Settings The first tab “User Settings” is divided into various sub tabs.

123
Creating and Managing Your User Profile
Tabs under User Profile: User Settings The first tab “User Settings” is divided into various sub tabs.

124
Creating and Managing Your User Profile
Tabs under User Profile: User Settings The first tab “User Settings” is divided into various sub tabs.

125
Creating and Managing Your User Profile
User Identification:

126
Creating and Managing Your User Profile
User Identification: Is the first sub- tab User Settings

127
Creating and Managing Your User Profile
User Identification: Is the first sub- tab User Settings

128
Creating and Managing Your User Profile
User Identification: The sub tab, “User Identification,” allows users to:

129
Creating and Managing Your User Profile
User Identification: The sub tab, “User Identification,” allows users to: view their name

130
Creating and Managing Your User Profile
User Identification: The sub tab, “User Identification,” allows users to: view their name phone number

131
Creating and Managing Your User Profile
User Identification: The sub tab, “User Identification,” allows users to: view their name phone number address

132
Creating and Managing Your User Profile
User Identification: The sub tab, “User Identification,” allows users to: view their name phone number address department and

133
Creating and Managing Your User Profile
User Identification: The sub tab, “User Identification,” allows users to: view their name phone number address department and user name

134
Creating and Managing Your User Profile
User Identification: Is the first sub- tab User Settings

135
Creating and Managing Your User Profile
User Identification: Is the first sub- tab User Settings

136
Creating and Managing Your User Profile
User Identification: Is the first sub- tab User Settings

137
Creating and Managing Your User Profile
User Identification: Is the first sub- tab User Settings

138
Creating and Managing Your User Profile
User Identification: If changes are needed, send an to:

139
Creating and Managing Your User Profile
User Identification: If changes are needed, send an to: Penny Falck at

140
Creating and Managing Your User Profile
Roles

141
Creating and Managing Your User Profile
Roles Click on the “Roles” tab.

142
Creating and Managing Your User Profile
Roles Roles are assigned to a particular user based on information received from departments

143
Creating and Managing Your User Profile
Roles Roles are assigned to a particular user based on information received from departments Levels of responsibilities within individual departments and are controlled within the HokieMart application.

144
Creating and Managing Your User Profile
Roles Users can view their assigned roles.

145
Creating and Managing Your User Profile
Roles If role (or roles) need to be changed, complete the HokieMart Departmental Functions form found at:
 need to be changed, complete the. HokieMart Departmental Functions form found at:")
146
Creating and Managing Your User Profile
Roles If role (or roles) need to be changed, complete the HokieMart Departmental Functions form found at:
 need to be changed, complete the. HokieMart Departmental Functions form found at:")
147
Creating and Managing Your User Profile
Roles If roles need to be changed, complete the HokieMart Departmental Functions form found at: Mail the form to:

148
Creating and Managing Your User Profile
Roles If roles need to be changed, complete the HokieMart Departmental Functions form found at: Mail the form to: Penny Falck Mail Code: 0312

149
Creating and Managing Your User Profile
Roles If roles need to be changed, complete the HokieMart Departmental Functions form found at: Mail the form to: Penny Falck Mail Code: 0312 in the Controller’s Office.

150
Creating and Managing Your User Profile
Preferences Let’s go back to the HokieMart Home page Click on the Profile Tab again

151
Creating and Managing Your User Profile
Preferences Let’s go back to the HokieMart Home page Click on the Profile Tab again profile

152
Creating and Managing Your User Profile
Preferences Let’s go back to the HokieMart Home page Click on the Profile Tab again profile

153
Creating and Managing Your User Profile
Preferences: Now click on the “ Preferences” tab:

154
Creating and Managing Your User Profile
Preferences: Now click on the “ Preferences” tab:

156
Creating and Managing Your User Profile
Preferences: This will bring up options for you to personalize the notifications that you can receive from the system.

157
Creating and Managing Your User Profile
Preferences: When actions are performed in HokieMart, s can automatically be generated to notify users of these actions.

158
Creating and Managing Your User Profile
Preferences: By placing the cursor over the description, a brief definition will be displayed to assist users in making a decision.

159
Creating and Managing Your User Profile
Preferences: We recommend users check the following notification boxes to increase the level of individual notification.

160
Creating and Managing Your User Profile
Preferences: Place check marks in the Override Role boxes.

161
Creating and Managing Your User Profile
Preferences: Place check marks in the Override Role boxes.

162
Creating and Managing Your User Profile
Preferences: This will activate the Role box.

164
Creating and Managing Your User Profile
Purchasing: Custom Fields The Custom Fields sub tab under the Purchasing tab

165
Creating and Managing Your User Profile
Purchasing: Custom Fields The Custom Fields sub tab under the Purchasing tab

166
Creating and Managing Your User Profile
Purchasing: Custom Fields The Custom Fields sub tab under the Purchasing tab

167
Creating and Managing Your User Profile
Purchasing: Custom Fields The Custom Fields sub tab under the Purchasing tab provides access to other individual tabs allowing users

168
Creating and Managing Your User Profile
Purchasing: Custom Fields The Custom Fields sub tab under the Purchasing tab provides access to other individual tabs allowing users to store specific data associated with their profile.

169
Creating and Managing Your User Profile
Purchasing: Custom Fields The Custom Fields sub tab under the Purchasing tab provides access to other individual tabs allowing users to store specific data associated with their profile.

170
Creating and Managing Your User Profile
Purchasing: Custom Fields The Custom Fields sub tab under the Purchasing tab provides access to other individual tabs allowing users to store specific data associated with their profile.

171
Creating and Managing Your User Profile
Purchasing: Custom Fields The Custom Fields sub tab under the Purchasing tab provides access to other individual tabs allowing users to store specific data associated with their profile.

172
Creating and Managing Your User Profile
Purchasing: Custom Fields The Custom Fields sub tab under the Purchasing tab provides access to other individual tabs allowing users to store specific data associated with their profile.

173
Creating and Managing Your User Profile
Purchasing: Custom Fields The Custom Fields sub tab under the Purchasing tab provides access to other individual tabs allowing users to store specific data associated with their profile.

174
Creating and Managing Your User Profile
Purchasing: Custom Fields

175
Creating and Managing Your User Profile
Purchasing: Custom Fields - Codes

176
Creating and Managing Your User Profile
Purchasing: Custom FIELDS - CODES The Codes Tab under Custom Fields Tab provides access to other individual tabs allowing users to store specific data associated with their profile.

177
Creating and Managing Your User Profile
Purchasing: Custom FIELDS - CODES The Codes Tab under Custom Fields Tab provides access to other individual tabs allowing users to store specific data associated with their profile.

178
Creating and Managing Your User Profile
Purchasing: Custom FIELDS - CODES The Codes Tab under Custom Fields Tab provides access to other individual tabs allowing users to store specific data associated with their profile.

179
Creating and Managing Your User Profile
Purchasing: Custom Fields - CODES Let’s look briefly at two of the fields required when processing a purchase requisition (PR) Fund and Account.
 Fund and Account.")
180
Creating and Managing Your User Profile
Purchasing: Custom Fields - CODES Let’s look briefly at two of the fields required when processing a purchase requisition (PR) Fund and Account.
 Fund and Account.")
181
Creating and Managing Your User Profile
Purchasing: Custom FIELDS - CODES For each field Edit is available. Edit

182
Creating and Managing Your User Profile
Purchasing: Custom FIELDS - CODES For each field Edit is available. Again the only Edit

183
Creating and Managing Your User Profile
Purchasing: Custom FIELDS - CODES For each field Edit is available. Again the only required fields when processing a requisition are Edit

184
Creating and Managing Your User Profile
Purchasing: Custom FIELDS - CODES For each field Edit is available. Again the only required fields when processing a requisition are Fund and Edit

185
Creating and Managing Your User Profile
Purchasing: Custom FIELDS - CODES For each field Edit is available. Again the only required fields when processing a requisition are Fund and Edit

186
Creating and Managing Your User Profile
Purchasing: Custom FIELDS - CODES For each field Edit is available. Again the only required fields when processing a requisition are Fund and Account. Edit

187
Creating and Managing Your User Profile
Purchasing: Custom FIELDS - CODES For each field Edit is available. Again the only required fields when processing a requisition are Fund and Account. Edit

188
Creating and Managing Your User Profile
Adding Fund information to user profile

189
Creating and Managing Your User Profile
Adding Fund information to user profile As funds are selected by the user, they will appear in a list on the left of the screen.

190
Creating and Managing Your User Profile
Adding Fund information to user profile As funds are selected by the user, they will appear in a list on the left of the screen. If a default fund is selected, it will appear in BOLD type.

191
Creating and Managing Your User Profile
Adding Fund information to user profile:

192
Creating and Managing Your User Profile
Adding Fund information to user profile: Select “Edit” under the “Edit Values” column on the far right.

193
Creating and Managing Your User Profile
Adding Fund information to user profile: Select “Edit” under the “Edit Values” column on the far right. Follow along to view how:

196
Creating and Managing Your User Profile
Adding Fund information to user profile: Select “Edit” under the “Edit Values” column on the far right. Then click “Create New Value.”

197
Creating and Managing Your User Profile
Adding Fund information to user profile: Select “Edit” under the “Edit Values” column on the far right. Then click “Create New Value.”

198
Creating and Managing Your User Profile
Enter the name of the department, as identified

199
Creating and Managing Your User Profile
Enter the name of the department, as identified in Banner, in the description field.

200
Creating and Managing Your User Profile
Enter the name of the department, as identified in Banner, in the description field.

201
Creating and Managing Your User Profile
Enter the name of the department, as identified in Banner, in the description field.

202
Creating and Managing Your User Profile
Enter the name of the department, as identified in Banner, in the description field. Click “Search.”

203
Creating and Managing Your User Profile
Enter the name of the department, as identified in Banner, in the description field. Click “Search.”

204
Creating and Managing Your User Profile
A list of available funds for the department will appear. Place a check mark in the “Select” box. Click “Add Values.” The fund number will be added to your listing.

205
Creating and Managing Your User Profile
Place a check mark in the “Select” box.

206
Creating and Managing Your User Profile
Place a check mark in the “Select” box.

207
Creating and Managing Your User Profile
Place a check mark in the “Select” box.

208
Creating and Managing Your User Profile
Click Add Values The fund number will be added to your listing. Add Values

209
Creating and Managing Your User Profile
Click Add Values The fund number will be added to your listing. Add Values

210
Creating and Managing Your User Profile
Users may edit fund numbers.

211
Creating and Managing Your User Profile
If you wish to make a particular fund the default for all purchases:

212
Creating and Managing Your User Profile
Select the “fund number” and a box will display to the right.

213
Creating and Managing Your User Profile
Select the “fund number” and a box will display to the right. Check the “Default” box.

214
Creating and Managing Your User Profile
Click “Save.”

215
Creating and Managing Your User Profile
Click “Save.”

216
Creating and Managing Your User Profile
Users may have only one default.

217
Creating and Managing Your User Profile
Users may have only one default. Users may add additional funds as necessary as long as they have access to use them.

218
Creating and Managing Your User Profile
Adding Account Codes to Your Profile

219
Creating and Managing Your User Profile
Adding Account Codes to Your Profile

220
Creating and Managing Your User Profile
Adding Account Codes to Your Profile As accounts are selected by the user,

221
Creating and Managing Your User Profile
Adding Account Codes to Your Profile As accounts are selected by the user, they will appear in a list on the left of the screen.

222
Creating and Managing Your User Profile
Adding Account Codes to Your Profile As accounts are selected by the user, they will appear in a list on the left of the screen.

223
Creating and Managing Your User Profile
Adding Account Codes to Your Profile It is recommended that

224
Creating and Managing Your User Profile
Adding Account Codes to Your Profile It is recommended that default account codes not be created.

225
Creating and Managing Your User Profile
Adding Account Codes to Your Profile Users should verify the account code .

226
Creating and Managing Your User Profile
Adding Account Codes to Your Profile Users should verify the account code at the time the requisition is being prepared.

227
Creating and Managing Your User Profile
Adding Addresses to Your Profile This information should be populated

228
Creating and Managing Your User Profile
Adding Addresses to Your Profile This information should be populated prior to using HokieMart.

229
Creating and Managing Your User Profile
Adding Addresses to Your Profile This information should be populated prior to using HokieMart. The “Ship To” addresses in HokieMart .

230
Creating and Managing Your User Profile
Adding Addresses to Your Profile This information should be populated prior to using HokieMart. The “Ship To” addresses in HokieMart

231
Creating and Managing Your User Profile
Adding Addresses to Your Profile This information should be populated prior to using HokieMart. The “Ship To” addresses in HokieMart are the current addresses in Banner.

232
Creating and Managing Your User Profile
Adding Addresses to Your Profile This information should be populated prior to using HokieMart. The “Ship To” addresses in HokieMart are the current addresses in Banner.

233
Creating and Managing Your User Profile
Adding Addresses to Your Profile The addresses available are:

234
Creating and Managing Your User Profile
Adding Addresses to Your Profile The addresses available are: “Ship To” and

235
Creating and Managing Your User Profile
Adding Addresses to Your Profile The addresses available are: “Ship To” and “Bill To.”

236
Creating and Managing Your User Profile
Adding Addresses to Your Profile The addresses available are: “Ship To” and “Bill To.” The addresses may be viewed by selecting

237
Creating and Managing Your User Profile
Adding Addresses to Your Profile The addresses available are: “Ship To” and “Bill To.” The addresses may be viewed by selecting “Profile” tab

238
Creating and Managing Your User Profile
Adding Addresses to Your Profile The addresses available are: “Ship To” and “Bill To.” The addresses may be viewed by selecting “Profile” tab “Purchasing” tab

239
Creating and Managing Your User Profile
Adding Addresses to Your Profile The addresses available are: “Ship To” and “Bill To.” The addresses may be viewed by selecting “Profile” tab “Purchasing” tab “Addresses” tab

240
Creating and Managing Your User Profile
Adding Addresses to Your Profile The addresses available are: “Ship To” and “Bill To.” The addresses may be viewed by selecting “Profile” tab “Purchasing” tab “Addresses” tab “Ship To” tab or

241
Creating and Managing Your User Profile
Adding Addresses to Your Profile The addresses available are: “Ship To” and “Bill To.” The addresses may be viewed by selecting “Profile” tab “Purchasing” tab “Addresses” tab “Ship To” tab or “Bill To” tab

242
Creating and Managing Your User Profile
SETTING Up a “Ship to” Address

243
Creating and Managing Your User Profile
SETTING Up a “Ship to” Address The “Ship To” address will be the address users would like the item(s) delivered.
 delivered.")
244
Creating and Managing Your User Profile
SETTING Up a "SHIP TO" Address The “Ship To” address will be the address users would like the item(s) delivered. For some departments, addresses will vary.
 delivered. For some departments, addresses will vary.")
245
Creating and Managing Your User Profile
SETTING Up a "SHIP TO" Address The “Ship To” address will be the address users would like the item(s) delivered. For some departments, addresses will vary. For this reason, users have the ability to select multiple “Ship To” addresses.
 delivered. For some departments, addresses will vary. For this reason, users have the ability to select multiple Ship To addresses.")
246
Creating and Managing Your User Profile
SETTING Up a "SHIP TO" Address The “Ship To” address will be the address users would like the item(s) delivered. For some departments, addresses will vary. For this reason, users will have the ability to select multiple “Ship To” addresses. To create a “Ship To” address in HokieMart, users are able to search all available addresses.
 delivered. For some departments, addresses will vary. For this reason, users will have the ability to select multiple Ship To addresses. To create a Ship To address in HokieMart, users are able to search all available addresses.")
247
Creating and Managing Your User Profile
SETTING Up a "SHIP TO" Address Click “Select Addresses for Profile”

248
Creating and Managing Your User Profile
SETTING Up a "SHIP TO" Address Click “Select Addresses for Profile.” Users may find it easier to enter their department name or building name in the “Address Text” field.

249
Creating and Managing Your User Profile
SETTING Up a "SHIP TO" Address Click “Select Addresses for Profile.” Users may find it easier to enter their department name or building name in the “Address Text” field.

250
Creating and Managing Your User Profile
SETTING Up a "SHIP TO" Address Click “Select Addresses for Profile.” Users may find it easier to enter their department name or building name in the “Address Text” field.

251
Creating and Managing Your User Profile
SETTING Up a "SHIP TO" Address Click “Select Addresses for Profile.” Users may find it easier to enter their department name or building name in the “Address Text” field. The text field is not case sensitive.

252
Creating and Managing Your User Profile
SETTING Up a "SHIP TO" Address Select Search

253
Creating and Managing Your User Profile
SETTING Up a "SHIP TO" Address Select Search

254
Creating and Managing Your User Profile
SETTING Up a "SHIP TO" Address The address information will then be displayed.

255
Creating and Managing Your User Profile
SETTING Up a "SHIP TO" Address The address information will then be displayed.

256
Creating and Managing Your User Profile
SETTING Up a "SHIP TO" Address Depending on information entered, the listing may be long.

257
Creating and Managing Your User Profile
SETTING Up a "SHIP TO" Address To add this address to your Profile

258
Creating and Managing Your User Profile
SETTING Up a "SHIP TO" Address Place the cursor in the “radio” button and click.

259
Creating and Managing Your User Profile
SETTING Up a "SHIP TO" Address Place the cursor in the “radio” button and click.

260
Creating and Managing Your User Profile
SETTING Up a "SHIP TO" Address Place the cursor in the “radio” button and click.

261
Creating and Managing Your User Profile
SETTING Up a "SHIP TO" Address The address will be displayed.

262
Creating and Managing Your User Profile
SETTING Up a "SHIP TO" Address Type users name in Contact name field.

263
Creating and Managing Your User Profile
SETTING Up a "SHIP TO" Address Type users name in Contact name field.

264
Creating and Managing Your User Profile
SETTING Up a "SHIP TO" Address Click Save

265
Creating and Managing Your User Profile
SETTING Up a "SHIP TO" Address Click Save

266
Creating and Managing Your User Profile
SETTING Up a "SHIP TO" Address

267
Creating and Managing Your User Profile
SETTING Up a "SHIP TO" Address If only one address is needed, it will appear as the default.

268
Creating and Managing Your User Profile
SETTING Up a "SHIP TO" Address If only one address is needed, it will appear as the default. If additional addresses are necessary, users have the ability to select a particular address as their default.

269
Creating and Managing Your User Profile
SETTING Up a "SHIP TO" Address If only one address is needed, it will appear as the default. If additional addresses are necessary, users have the ability to select a particular address as their default. Users have the ability to select multiple “Ship To” addresses based on their needs and the needs of their department.

270
Creating and Managing Your User Profile
SETTING Up a "SHIP TO" Address To select additional addresses:

271
Creating and Managing Your User Profile
SETTING Up a "SHIP TO" Address To select additional addresses: Click “Select Addresses for Profile.”

272
Creating and Managing Your User Profile
SETTING Up a "SHIP TO" Address To select additional addresses: Click “Select Addresses for Profile.”

273
Creating and Managing Your User Profile
SETTING Up a "SHIP TO" Address To select additional addresses: Click “Select Addresses for Profile.” Follow the same steps for adding address information that we just learned.

274
Creating and Managing Your User Profile
SETTING Up a "SHIP TO" Address The query box will display. The steps are the same as outlined above.

275
Creating and Managing Your User Profile
SETTING Up a "SHIP TO" Address User has now added multiple addresses in the “Ship To” section.

276
Creating and Managing Your User Profile
SETTING Up a "SHIP TO" Address This address will appear as an option in the drop-down menu of the “Ship To” address.

277
Creating and Managing Your User Profile
SETTING Up a "SHIP TO" Address When adding multiple addresses, if users select a default address, it will be in BOLD type.

278
Creating and Managing Your User Profile
SETTING Up a "SHIP TO" Address When adding multiple addresses, if users select a default address, it will be in BOLD type.

279
Creating and Managing Your User Profile
About addresses:

280
Creating and Managing Your User Profile
About addresses: We encourage users to verify all address information.

281
Creating and Managing Your User Profile
About addresses: We encourage users to verify all address information. If changes need to be made, a form is provided by the Procurement Department for these changes.

282
Creating and Managing Your User Profile
About addresses: We encourage users to verify all address information. If changes need to be made, a form is provided by the Procurement Department for these changes.

283
Creating and Managing Your User Profile
About addresses: We encourage users to verify all address information. If changes need to be made, a form is provided by the Procurement Department for these changes. We suggest that the “Nick Name” option not be used.

284
Creating and Managing Your User Profile
Bill To:

285
Creating and Managing Your User Profile
Bill To: With central invoicing required in HokieMart, invoices will be received only by the Controller’s Office.

286
Creating and Managing Your User Profile
Bill To: With central invoicing required in HokieMart, most invoices will be received by the Controller’s Office.

287
Creating and Managing Your User Profile
Bill To: With central invoicing required in HokieMart, invoices will be received only by the Controller’s Office. The “Bill To” address may be added by selecting:

288
Creating and Managing Your User Profile
Bill To: With central invoicing required in HokieMart, invoices will be received only by the Controller’s Office. Departments should not receive an invoice. The “Bill To” address may be added by selecting: “Profile” tab

289
Creating and Managing Your User Profile
Bill To: With central invoicing required in HokieMart, invoices will be received only by the Controller’s Office. Departments should not receive an invoice. The “Bill To” address may be added by selecting: “Profile” tab “Purchasing” tab

290
Creating and Managing Your User Profile
Bill To: With central invoicing required in HokieMart, invoices will be received only by the Controller’s Office. Departments should not receive an invoice. The “Bill To” address may be added by selecting: “Profile” tab “Purchasing” tab “Addresses” tab

291
Creating and Managing Your User Profile
Bill To: With central invoicing required in HokieMart, invoices will be received only by the Controller’s Office. Departments should not receive an invoice. The “Bill To” address may be added by selecting: “Profile” tab “Purchasing” tab “Addresses” tab “Bill To” tab

292
Creating and Managing Your User Profile
To create a “Bill To” address in HokieMart

293
Creating and Managing Your User Profile
To create a “Bill To” address in HokieMart Click “Select Addresses for Profile.”

294
Creating and Managing Your User Profile
To create a “Bill To” address in HokieMart Click “Select Addresses for Profile.”

295
Creating and Managing Your User Profile
To create a “Bill To” address in HokieMart From the drop-down list, select Accounts Payable

296
Creating and Managing Your User Profile
To create a “Bill To” address in HokieMart From the drop-down list, select Accounts Payable Note: This is the only option

297
Creating and Managing Your User Profile
To create a “Bill To” address in HokieMart Accounts Payable is the only address which can be chosen and will always be the default.

298
Creating and Managing Your User Profile
To create a “Bill To” address in HokieMart Accounts Payable is the only address which can be chosen and will always be the default.

299
Creating and Managing Your User Profile
To create a “Bill To” address in HokieMart Click Save

300
Creating and Managing Your User Profile
To create a “Bill To” address in HokieMart Click Save

301
Before we finish….

302
Before we finish…. If you haven’t worked along with me during the

303
Before we finish…. If you haven’t worked along with me during the this module to set up your user profile

304
be sure to take time and set it up now.
Before we finish…. If you haven’t worked along with me during the this module to set up your user profile be sure to take time and set it up now.

305
Before we finish…. If you have any questions please the HokieMart Help desk

306
Before we finish…. If you have any questions please the HokieMart Help desk

307
Before we finish…. If you have any questions please the HokieMart Help desk We will be glad to assist you.

308
Before we finish…. If you have any questions please the HokieMart Help desk We will be glad to assist you. Thanks and see you in class.

Similar presentations


>")


