Download presentation
Presentation is loading. Please wait.

1
Drawing Concepts

2
The first thing we do when beginning to draw is contour drawing, which is another name for drawing the outline and inner details of objects. Contour Line Drawing

7
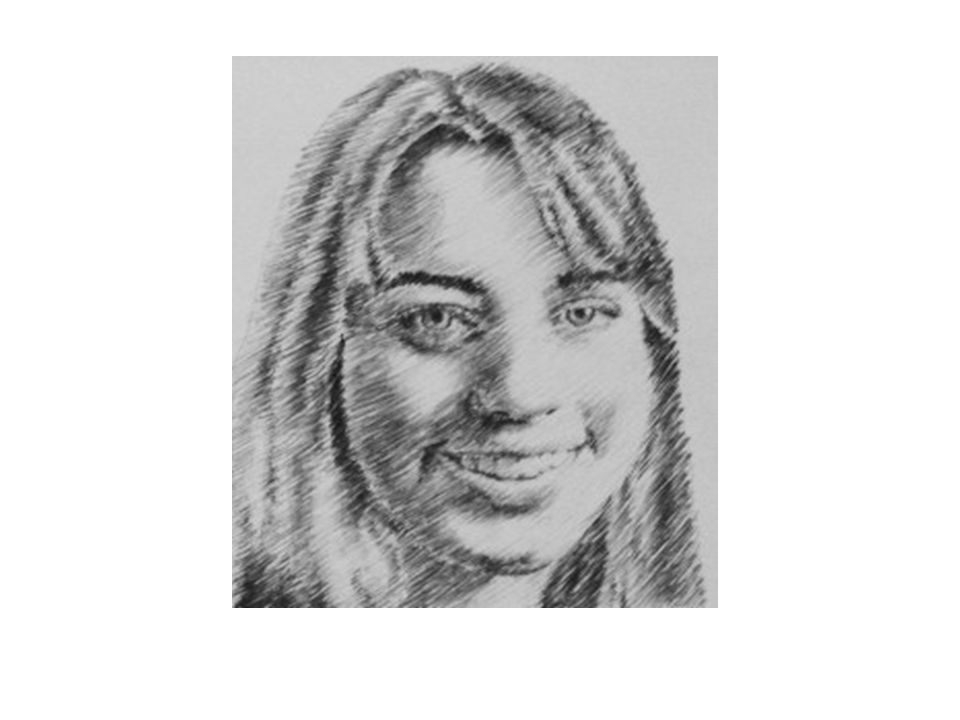
Blind Contour Line Drawing Blind Contour drawing is a favorite with drawing teachers to develop hand-eye communication. Blind contour drawing means drawing the outline and inner details of the subject without looking at the paper. The end result doesn't matter - what is important is carefully observing the subject.

12
VALUE SCALE MIDDLE GRAY

14
WAYS TO SHOW VALUE SHADING/BLENDING GRADATION HATCHING CROSS HATCHING STIPPLING SCRIBBLE

15
SHADING/BLENDING

16
Shading Examples

17
GRADATION

19
HATCHING

21
CROSS HATCHING

23
STIPPLING

25
SCRIBBLE

28
Drawing Basic Shapes All objects are made up from four basic shapes—cube, sphere, cylinder, or cone. You can use the box method to accurately draw these shapes to round out your body of knowledge of all basic shapes needed to create accurate drawings. If you learn to see objects as basic shapes, you will more easily be able to draw the objects.

29
SPHERE

30
To the right is a study of shading which add dimension to a flat object. The circle is flat and has no dimension. As we shade the circle it become a ball. Cast Shadow Highlight Tone (color of object) Halftone (turning away from light) Shade (turned away from light) Direction of Light Shading
 Halftone (turning away from light) Shade (turned away from light) Direction of Light Shading.")
31
CONE

32
CUBE

33
PYRAMID

34
CYLINDER

35
Circles and Ellipses To draw a perfect circle, first draw a square and then draw a circle inside the square. Drawing an ellipse is a simple process. Begin by drawing a perfect circle using the previous technique, except draw the square in perspective this time. When drawn in perspective, the circle in the square is an ellipse.

36
Definition: Artists obtain this perspective effect through an oblique representation of the object, as though it were either moving away from or moving toward the spectator. In order for the illusion to be apprehended correctly, the length of the object must be: shortened - hence the term "foreshortening" for this representational technique. Foreshortening Forced perspective is an optical illusion that makes things look bigger or smaller than they actually are. It makes objects of vastly different sizes, that are at significantly different distances, appear to be of proportionate sizes and at the same focal length. Forced perspective uses visual tricks to give a warped perception of reality.

37
Proportion Proportion is the comparison of dimensions or distribution of forms. It is the relationship in scale between one element and another, or between a whole object and one of its parts. When drawing a still life the first object that you draw will determine the size of all the objects in relation to it. It determines the proper size relationship

38
Composition The composition is an arrangement of elements of the artwork that unites the elements into one whole.

39
THUMBNAIL SKETCH Term used by artists to describe a small drawing on paper (usually part of a group) to explore multiple ideas quickly. Thumbnail sketches are similar to doodles, but include as much detail as possible.

41
Three Point: ‘when lines appear to converge at three given points either to the sides of the picture plane or at the top or bottom of the page, depending on where your eye level line is.’ One point: ‘when parallel lines appear to converge and disappear at one point on the horizon.’ Perspective Two Point: ‘when, from a given edge, parallel lines converge at two single points on the horizon line at opposite sides of your paper.’

42
Creating a 3-D look on a 2-D surface

43
Looks flat like a circle instead of a sphere

44
Creating a 3-D look on a 2-D surface Add Perspective Perspective

45
Creating a 3-D look on a 2-D surface Add Proportion Perspective Proportion

46
Creating a 3-D look on a 2-D surface Perspective Proportion Add Cast Shadows Cast Shadows

47
Creating a 3-D look on a 2-D surface Perspective Proportion Cast Shadows Add Shading Highlight Halftone Shade

48
Creating a 3-D look on a 2-D surface Perspective Proportion Cast Shadows Highlight Halftone Shade Now a Sphere

49
Creating a 3-D look on a 2-D surface Perspective Proportion Cast Shadows Highlight Halftone Shade

50
Creating a 3-D look on a 2-D surface Perspective Proportion Cast Shadows Highlight Halftone Shade

51
Creating a 3-D look on a 2-D surface Perspective Proportion Cast Shadows Highlight Halftone Shade

52
Perspective Proportion Cast Shadows Highlight Halftone Shade Creating a 3-D look on a 2-D surface

53
Example of a glass drawing

54
Example of a chrome drawing

55
Example of a wood drawing

56
Example of a cloth drawing

Similar presentations


>")


