Download presentation
Presentation is loading. Please wait.

1
Photoshop

2
Photoshop works with bitmapped, digitized images (that is, continuous-tone images that have been converted into a series of small squares, or picture elements, called pixels). You can also work with vector graphics, which are drawings made of smooth lines that retain their crispness when scaled-such as text. You can create original artwork in Photoshop, or you can import images into the program from many sources, such as: Photographs from a digital camera. Commercial CDs of digital images. Scans of photographs, transparencies, negatives, graphics, or other documents. Captured video images. Artwork created in drawing programs.

3
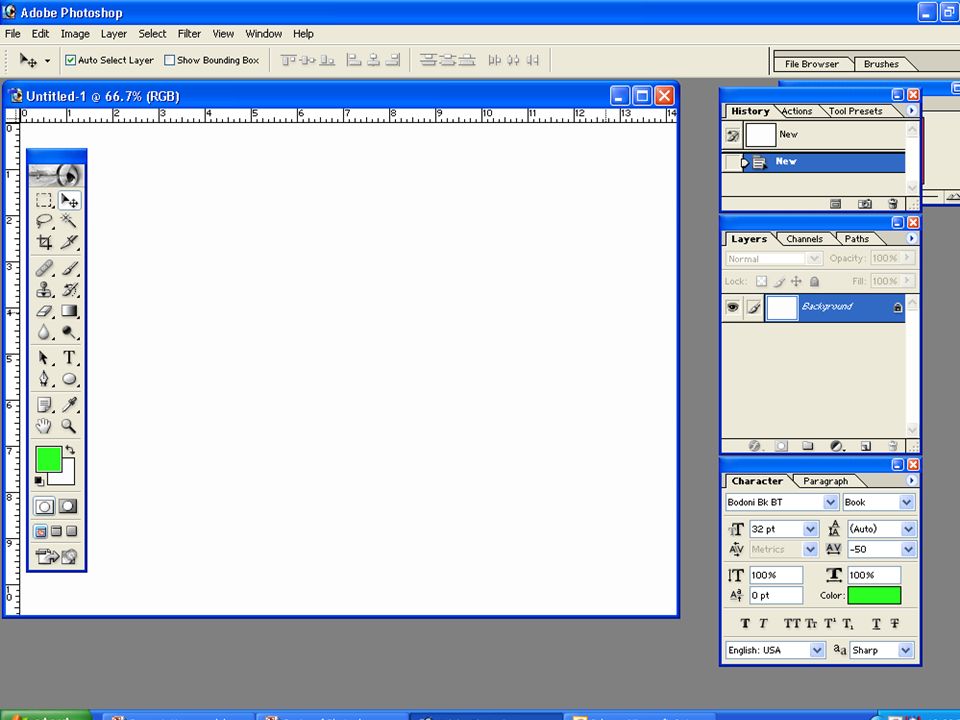
Menu Bar contains all of Photoshop’s available options Options Bar set the options for the currently selected tool Toolbox has various tools for editing the image Palettes various panes to control different aspects of the project. Includes layers, channels, paths, history, etc. Image Area the currently open image(s)
.")
4
Photo bin Tools Palette Cascade window Tile windows Quick fix- simply changes Full edit-What I usually use

5
Selecting and using a hidden tool The toolbox arranges some of the tools in groups, with only one tool shown for each group. The other tools in the group are hidden behind that tool. A small triangle in the lower right corner of a button is your clue that other tools are available but hidden under that tool. You can also select the tool in the option panel above

6
Tools in the Toolbox By using the Navigation Tools, you can move to different sections of an image, or change magnification of the image. The Zoom Tool allows users to magnify and reduce areas of images. Click the Zoom Tool to zoom in (magnify); press the Alt key and click the Zoom Tool to zoom out. The Hand Tool allows users to slide the image around the Image Area in order to view different sections of the image.
; press the Alt key and click the Zoom Tool to zoom out. The Hand Tool allows users to slide the image around the Image Area in order to view different sections of the image..")
7
Zoom tool Hold down the Alt key so that the Zoom tool pointer appears with a minus sign (–) in the center of the magnifying glass, and then click anywhere in the image. Then release the Alt or Option key. Hold down the Alt key so that the Zoom tool pointer appears with a minus sign (–) in the center of the magnifying glass, and then click anywhere in the image. Then release the Alt or Option key. …or…Space bar and control and click …or…Space bar and control and click …or…Ctrl and the + and – key …or…Ctrl and the + and – key …or use your wheel on the mouse …or use your wheel on the mouse If you want to zoom to a particular area you can use the zoom toll and draw a square around it. If you want to zoom to a particular area you can use the zoom toll and draw a square around it.
 in the center of the magnifying glass, and then click anywhere in the image. Then release the Alt or Option key. …or…Space bar and control and click …or…Space bar and control and click …or…Ctrl and the + and – key …or…Ctrl and the + and – key …or use your wheel on the mouse …or use your wheel on the mouse If you want to zoom to a particular area you can use the zoom toll and draw a square around it. If you want to zoom to a particular area you can use the zoom toll and draw a square around it..")
8
Tools in the Toolbox The Selection Tools allow you to use various techniques to select specific sections of an image, rather than the entire graphic.

9
Tools in the Toolbox The Enhancement Tools allow you to clone portions of an image, blur or enhance backgrounds, fill an area with a selected color, or further emphasize focal points.

10
Tools in the Toolbox The Eyedropper Tool allows you to select a color from an existing image.

11
Tools in the Toolbox The Vector Tools allow users to create vector-based objects in Photoshop.

12
Tools in the Toolbox The Color Tools control the foreground and background colors. In this example, Black is the current foreground color and White is the background color. When used in conjuction with the Color Palette and the Swatches Palette, users can select from millions of different colors to use in their images.

13
Layers Layers are like transparencies stacked one on top of one another. Each layer can have different images and effects. When the layers are stacked, the images appear as if they are all a single image.

14
Layer Pallet Options This image acts as a show/hide feature for the corresponding layer. It shows the layer that is active, in other words, the layer which is currently editable. This links two layers together This creates a new layer

16
Status bar The status bar at the bottom of the image window shows the percentage listed on the far left end. This represents the current enlargement view of the image, or zoom level. Doc- document size of the saved file Document Profile- the colour profile (B & W, RBG etc.) Document Dimensions the physical size in your chosen unit of measure(ie. mm.) Scratch Disc-memory hard drive that is used by all the documents open in Photoshop- first number the memory so far, second the total amount available to elements to edit your image.
 Document Dimensions the physical size in your chosen unit of measure(ie. mm.) Scratch Disc-memory hard drive that is used by all the documents open in Photoshop- first number the memory so far, second the total amount available to elements to edit your image..")
17
Opening New Image Ctrl N

18
Opening New Image

21
Resolution It's measured in terms of ppi, or 'pixels per inch' when viewed in an image or on the monitor. It's referred to as dpi or 'dots per inch' in terms of printing. It's measured in terms of ppi, or 'pixels per inch' when viewed in an image or on the monitor. It's referred to as dpi or 'dots per inch' in terms of printing. Any way you call it, resolution determines how the image will appear on the screen and how it will print -- more importantly, how the pixels are distributed in the document Any way you call it, resolution determines how the image will appear on the screen and how it will print -- more importantly, how the pixels are distributed in the document Resolution is the number of units that occupy a linear inch in an image. Resolution is the number of units that occupy a linear inch in an image.

22
Setting Image size Resolution is the number of pixels or dots per inch (ppi/dpi). The higher the resolution, the more detail is stored for the graphic. This means that a higher resolution image is higher quality, but also is a larger in size.

23
Setting Image size Web Graphics 72 dpi Low-end printing 150 dpi Professional quality printing 300 dpi It cannot be revert back to a higher resolution Once the Resolution is made lower

24
Web images -72 dpi Web images -72 dpi Black and White -266 dpi Black and White -266 dpi Quality Colour Print -300 dpi Quality Colour Print -300 dpi The camera shoots at 72 dpi but the images are large (35 in x 26 in my camera) Photoshop compresses these pixels and makes them smaller- you can make it 300 dpi but it will be a smaller picture If you increase the size and keep the resolution the pixel squares just get bigger and it becomes fuzzy
 Photoshop compresses these pixels and makes them smaller- you can make it 300 dpi but it will be a smaller picture If you increase the size and keep the resolution the pixel squares just get bigger and it becomes fuzzy")
25
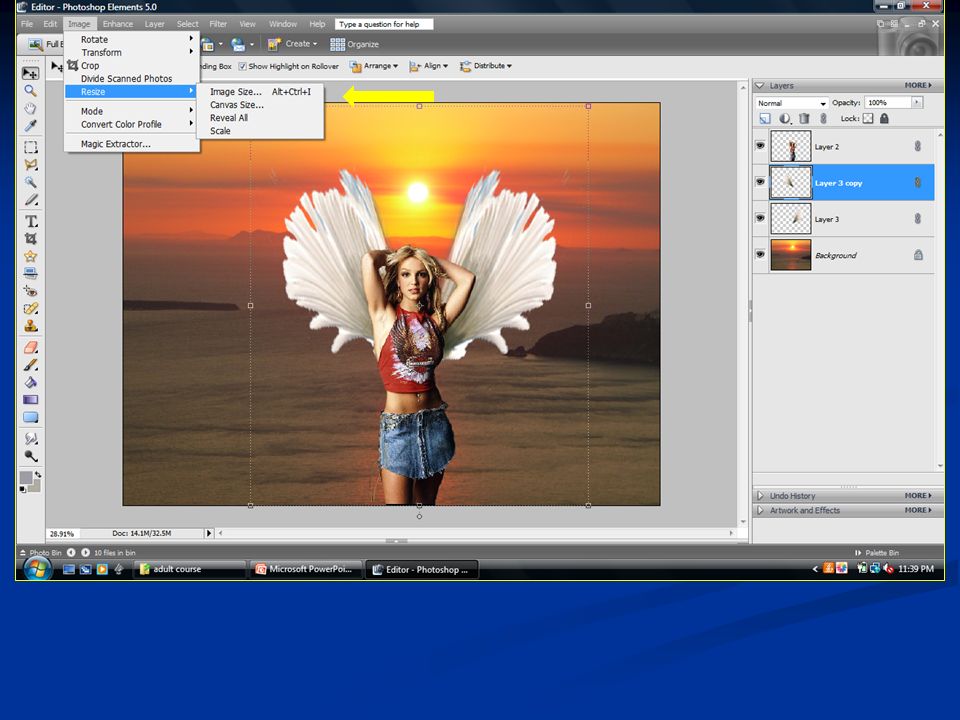
Changing Resolution (but not size) for Web Images Sometimes you’ll have an image that was scanned at a higher or lower resolution than you need. Its size is fine, you’ll only need to change the resolution. Sometimes you’ll have an image that was scanned at a higher or lower resolution than you need. Its size is fine, you’ll only need to change the resolution. Click IMAGE-> IMAGE SIZE Click IMAGE-> IMAGE SIZE Uncheck Resample Image Uncheck Resample Image Change the Resolution to 72 Change the Resolution to 72

26
Changing Size, but not Resolution for Web Images Click IMAGE-> IMAGE SIZE Click IMAGE-> IMAGE SIZE Make sure there is a check in Resample Image "Resample Image" instructs PhotoShop to keep the resolution the same, no matter what you do to the size. If you make an image bigger, PhotoShop will have to add pixels. If you shrink the image, PhotoShop will have to remove pixels. There are three resample image choices. Use "Bicubic" its the best. Make sure there is a check in Resample Image "Resample Image" instructs PhotoShop to keep the resolution the same, no matter what you do to the size. If you make an image bigger, PhotoShop will have to add pixels. If you shrink the image, PhotoShop will have to remove pixels. There are three resample image choices. Use "Bicubic" its the best. Change the Pixel Dimensions of the image, not the print size. Change the Pixel Dimensions of the image, not the print size. Click OK Click OK

27
Common File Formats PSD (Photoshop Data) files preserve layer and channel information, users can continually edit and adjust images using the PSD file. JPEG (Joint Photographic Experts Group) Every time a JPEG file is saved, the file recompresses and make a lighter file size but losses quality. TIFF (Tagged Image File Format) files are not compressed format and make larger file size. Widely used for printing/publication purposes. GIF (CompuServe Graphic Interchange Format) files are most commonly used for Web-based line art such as logos and buttons since this format can only support a maximum of 256 colors and lighter in size. BMP (Bitmap) files are mostly used in windows paint program.
 Every time a JPEG file is saved, the file recompresses and make a lighter file size but losses quality. TIFF (Tagged Image File Format) files are not compressed format and make larger file size. Widely used for printing/publication purposes. GIF (CompuServe Graphic Interchange Format) files are most commonly used for Web-based line art such as logos and buttons since this format can only support a maximum of 256 colors and lighter in size. BMP (Bitmap) files are mostly used in windows paint program..")
28
Time to have some fun- Fruitman Time to have some fun- Fruitman

Similar presentations