Download presentation
Presentation is loading. Please wait.

1
What is the Photoshop interface? Adobe Photoshop is a powerful tool for editing photographs and graphics. The first step in learning Photoshop is to familiarize yourself with the Photoshop interface, which consists of five basic components: 1) Menu Bar — contains all of Photoshop’s available options 2) Toolbox — has various tools for editing the image 3) Options Bar — set the options for the currently selected tool 4) Palettes — various panes to control different aspects of the project. Includes layers, channels, paths, history, etc. 5) Image Area — the currently open image(s) Each component is labeled below:
 Menu Bar — contains all of Photoshop’s available options 2) Toolbox — has various tools for editing the image 3) Options Bar — set the options for the currently selected tool 4) Palettes — various panes to control different aspects of the project. Includes layers, channels, paths, history, etc. 5) Image Area — the currently open image(s) Each component is labeled below:.")
2
The toolbox has various tools for editing an image. The toolbox is divided into several sections of similar tools: Selection Tools Enhancement Tools Vector Tools Navigation Tools Color Tools The toolbox is pictured to the left. It contains all of the various Photoshop tools. In addition to the visible tools, the tools with a small black arrow in the lower-right corner contain fly-out menus with other related tool choices. In the example to the left, the Dodge Tool is depressed, displaying the Burn Tool and the Sponge Tool in the fly-out menu. To select a tool to use: If the tool is visible on the toolbox, click it once to activate it. OR If the tool is hidden, point to the appropriate tool family icon and hold the mouse button down; the fly-out menu will appear. Click on the desired tool in the menu to activate it. What is a Toolbox?

3
Enhancement Tools Selection Tools What are Selection Tools? The Selection Tools allow you to use various techniques to select specific sections of an image, rather than the entire graphic. These tools create “marching-ant” marquees around the selected areas and fade the unselected areas so users can determine exactly which area they have selected. Once selected, you can edit and manipulate a section of an image while leaving the rest untouched. The Selection Tools are discussed in more detail in the Blending Images section of this tutorial. The Enhancement Tools allow you to clone portions of an image, blur or enhance backgrounds, fill an area with a selected color, or further emphasize focal points. The Enhancement Tools are discussed in more detail in the Enhancing Images section of this tutorial. What are Enhancement Tools?

4
By using the Navigation Tools, you can move to different sections of an image, or change magnification of the image. The Zoom Tool allows users to magnify and reduce areas of images. Click the Zoom Tool to zoom in (magnify); press the Alt key and click the Zoom Tool to zoom out. The Hand Tool allows users to slide the image around the Image Area in order to view different sections of the image. Navigation Tools Vector Tools The Vector Tools allow users to create vector-based objects in Photoshop. The Vector Tools are discussed in more detail in the Drawing Tools section of this tutorial. What are Vector Tools? What are Navigation Tools?
; press the Alt key and click the Zoom Tool to zoom out. The Hand Tool allows users to slide the image around the Image Area in order to view different sections of the image. Navigation Tools Vector Tools The Vector Tools allow users to create vector-based objects in Photoshop. The Vector Tools are discussed in more detail in the Drawing Tools section of this tutorial. What are Vector Tools. What are Navigation Tools .")
5
The Color Tools control the foreground and background colors. In this example, white is the current foreground color and red is the background color. When used in conjunction with the Color Palette and the Swatches Palette, users can select from millions of different colors to use in their images. The Eyedropper Tool allows you to select a color from an existing image. The Color Tools are discussed in more detail in the Enhancing Images and the Drawing Tools sections of this tutorial. What are Color Tools?

6
Palettes are areas where extra features or settings for tools are found. This is where you can fine-tune the functions of the tools. The Palettes are located under the Window menu. They include: What are palettes? Channels Paths History Actions Character Paragraph Navigator Info Color Swatches Styles Layer The default layout that is displayed when you first open Photoshop displays 10 out of the 12 available palettes in three floating windows (shown below). Each one has its own tab: You can arrange and reposition the available palettes either individually or in groups. The floating palette system incorporated into Photoshop lets you drag each palette away from the existing cluster to create a separate window for that palette. The reverse is also true; you can cluster individual palette tabs into groups of your preference.
. Each one has its own tab: You can arrange and reposition the available palettes either individually or in groups. The floating palette system incorporated into Photoshop lets you drag each palette away from the existing cluster to create a separate window for that palette. The reverse is also true; you can cluster individual palette tabs into groups of your preference..")
7
Layers are like transparencies stacked one on top of one another. Each layer can have different images and effects. When the layers are stacked, the images appear as if they are all a single image. What are layers? Layers allow users to work on separate images in order to modify sections without changing the entire image. The example below contains three layers: the background yellow layer, the red square layer and the green circle layer. If, for example, the circle in this image were in the wrong place, you could easily change its location by selecting the circle layer and moving the circle without affecting the rest of the image. Why use layers?

8
Notice the red arrow on the Layers window to the left. It is pointing to an image that looks like an eye. This image acts as a show/hide feature for the corresponding layer. When the eye is open, that layer is visible. When the eye is shut, the layer is not visible. The green arrow points to an image that looks like a paint brush. It shows the layer that is active, in other words, the layer which is currently editable. The blue arrow points to an image that looks like a vertical chain link. This links two layers together. For example, since the square layer and the circle layer are linked together, moving the position of the circle in the image would also change the position of the square. The purple arrow points to the new layer icon. A single- click on this icon will result in the automatic creation of a new layer. The Layers palette has various icons that control the functions of the layers in the image. Following is a description of some of the most useful ones: What are the icons in the layers palette?

9
Photoshop can recognize many different image formats. Some of the formats and their file extensions are: Photoshop Format: PSD files are Photoshop specific. Since they preserve layer and channel information, users can continually edit and adjust images using the PSD file. CompuServe Graphic Interchange Format: GIF files are most commonly used for Web-based line art such as logos and buttons. Since this format can only support a maximum of 256 colors, GIFs are also popular for images that have only a few colors. Joint Photographic Experts Group: JPEG files support full color palettes; therefore, when saving photographic images to use on the Web, the best format is JPEG. A word of caution when using JPEG format: Every time a JPEG file is closed, the file recompresses; therefore, editing and adjusting should be done using the PSD file so image quality is not lost with multiple recompressions. Bitmap: BMP files Tagged Image File Format: TIFF files Portable Networks Graphic: PNG files are a relatively recent graphic format, designed for use on the web. However, not all web browsers recognize PNG files, so be aware of this if you are creating graphics for use on the web. What files does Photoshop recognize?

10
How do I open images that are stored in various formats? Select the desired file by clicking on it, then click Open to display the graphic in the Photoshop work area. With All Formats selected, all image files in the selected directory that Photoshop can read will be displayed. To open a graphic that is not stored in Photoshop format (.psd), pull down the File menu and select Open. The "Open" dialog window will appear. Make sure that the "Files of type:" field reads "All Formats." If it does not, click on the down arrow to the right of the field and choose "All Formats" from the drop down list.
, pull down the File menu and select Open. The Open dialog window will appear. Make sure that the Files of type: field reads All Formats. If it does not, click on the down arrow to the right of the field and choose All Formats from the drop down list..")
11
Resolution is the number of pixels or dots per inch (ppi/dpi). The higher the resolution, the more detail is stored for the graphic. This means that a higher resolution image is higher quality, but it also is larger. The most common setting for computer monitors is 72 dpi; therefore, images intended for web-based or other on-screen projects should have a resolution of 72 dpi. This lower resolution will reduce file sizes and download times. The normal resolution for low- end printing is 150 dpi, and for high-end, professional, quality photographs the resolution should be 300 dpi or higher. What is resolution? Which resolution should I use?

12
How do I change the resolution? To change the resolution of a graphic, pull down the Image menu and select Image Size. The following dialog box will appear: Change the resolution in the Resolution box (in blue above). Keep these facts in mind: If you have a 72-dpi graphic and you change it to a higher resolution, you will not increase the quality of the graphic. The information was originally stored at 72 dpi, and the computer cannot “make up” more information to improve the graphic quality. If you have a 300-dpi graphic and you change it to a lower resolution (say, 72 dpi), you will decrease the quality of the graphic. This is because you will lose the extra pixels of information. If you need to reduce the resolution of a graphic, save the original, high-resolution image in case you need it in the future.
. Keep these facts in mind: If you have a 72-dpi graphic and you change it to a higher resolution, you will not increase the quality of the graphic. The information was originally stored at 72 dpi, and the computer cannot make up more information to improve the graphic quality. If you have a 300-dpi graphic and you change it to a lower resolution (say, 72 dpi), you will decrease the quality of the graphic. This is because you will lose the extra pixels of information. If you need to reduce the resolution of a graphic, save the original, high-resolution image in case you need it in the future..")
13
SO LETS GET STARTDED WITH THE LESSON… CHANGING HISTORY PHOTOSHOP UNIT LESSON THREE

14
IDEA… The idea is to change history. Alter an instantly recognizable photograph so that the context has been significantly changed. The recognizablily of the original photograph must remain intact. The new situation must still look believable. *DISCLAIMER* This project is not intended to make light of some very serious and often tragic situations. Rather, it is an effort to teach Photoshop skills in a manner which turns tragedy into creativity. The idea is to change the historical context of very famous photographs.

15
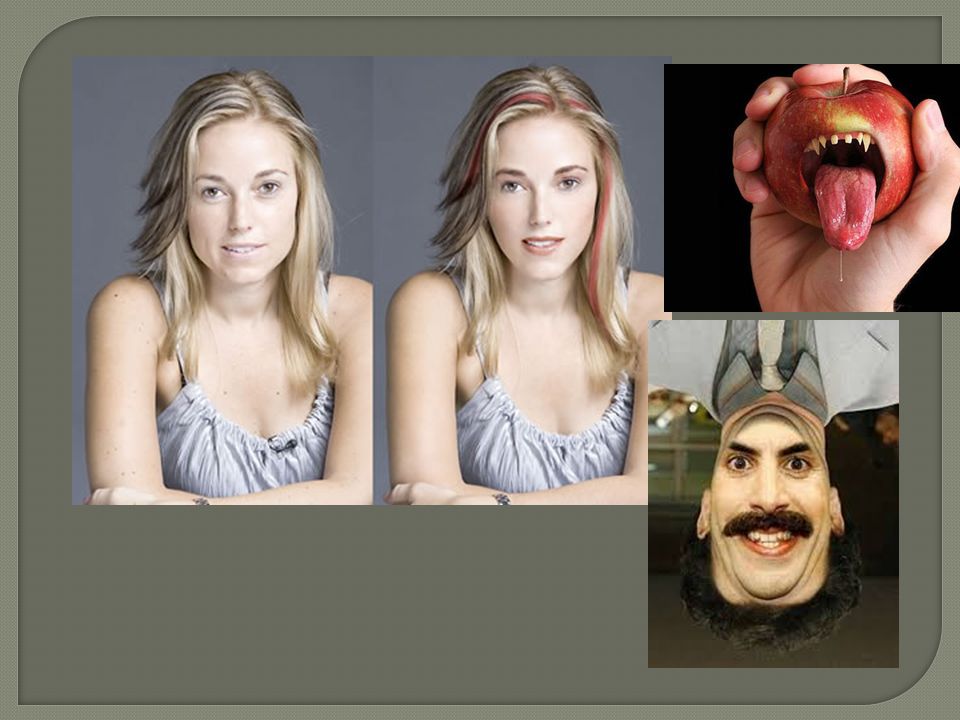
Step one: Choose 10 different photos and ADD OR SUBTRACT IMAGES TO change the context of the photo using THESE PHOTOSHOP TOOLS… Lasso tool, eraser tool, magic wand tool ALSO… Opacity Color layers Step two: Make sure the photo still has its realistic look to it

16
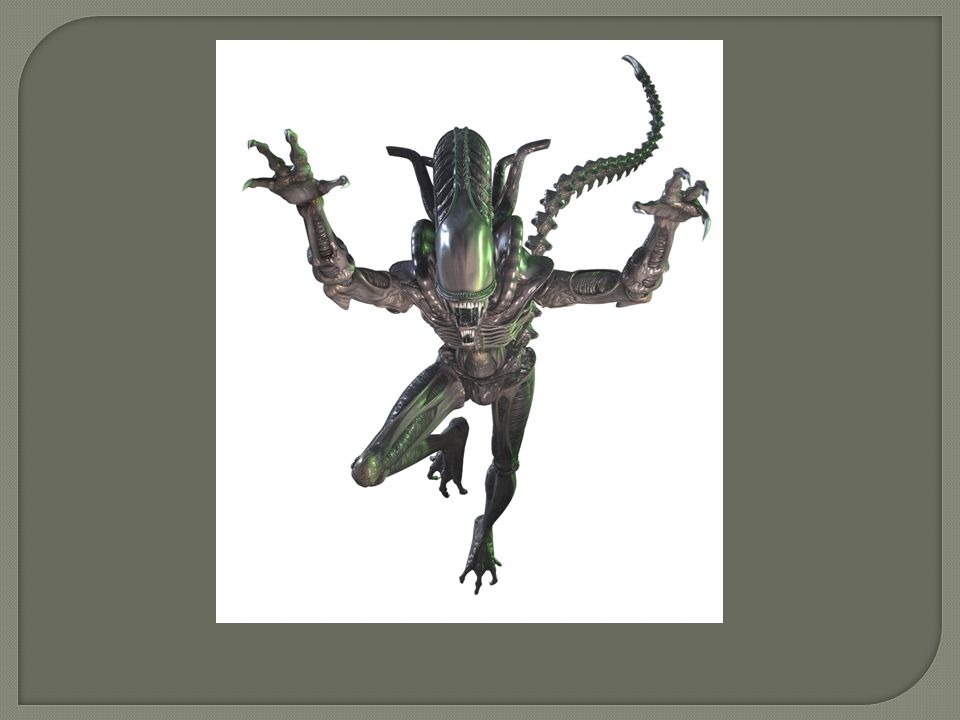
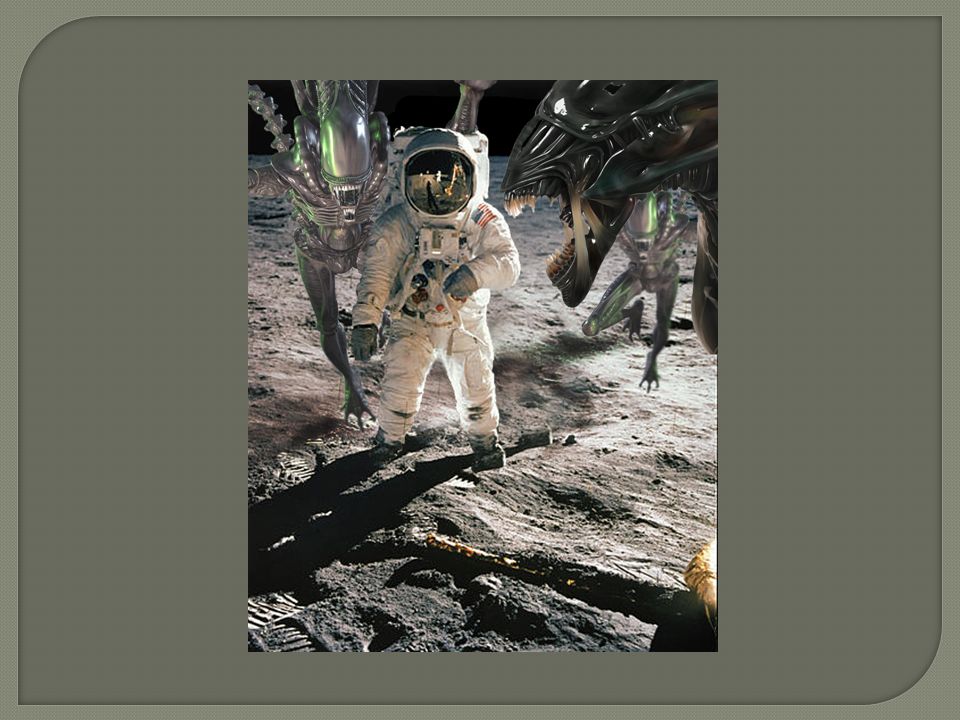
FOR EXAMPLE! PHOTO: ASTRONAUT -1

18
EDIT THE PHOTO…..

19
Put it all together…make sure it looks realistic!

21
Now create 9 more ! Remember practice, practice, practice!

Similar presentations


>")


