Download presentation
Presentation is loading. Please wait.

1
Command Center Terminal Board RTU-MP Controller (Opt)
New Control Box (Cleaner) Design Command Center Terminal Board RTU-MP Controller (Opt) Gas Controller
 Design. Command Center Terminal Board. RTU-MP Controller (Opt) Gas Controller.")
2
Controls: Cooling High Pressure Switch Low Pressure Switch
Indoor Fan Motor Overloads: Linebreak Thermik (pilot-circuit) External circuit-breaker
 External circuit-breaker.")
3
Controls: Cooling Control Transformer 75 va
3.2-A circuit breaker on transformer housing CLO -- Accy or FIOP

4
CLO Connections

5
Controls: Heating Integrated Gas Controller (IGC)
IGC Inputs Flame Sensor Hall Effect W1 Demand Speed Sensor Rollout Switch 24-v Limit Switch IGC Outputs Diagnostic LED Inducer Motor (CM) Indoor Blower (BM) IFO signal Gas Valve Sparker
 Indoor Blower (BM) IFO signal. Gas Valve. Sparker.")
6
Hall Effect Ref: Honeywell

7
Hall Effect Sensor Includes: Current field Integrated circuit
Transistor Amplifier circuit

8
Hall Effect: Pulse Output Signal
Speed Sensor Logic Criteria Speed > 2400 RPM: Inducer Motor OK Speed < 2000 RPM: Combustion Terminated

9
IGC Alarms

10
IGC Troubleshooting

11
IGC Error Codes: From NSMM 2003 (SPP PPT) in HVACPartners
Fault 2 – Limit Switch Open If limit opens: Gas valve and ignitor will be disable Indoor blower will immediately energized. Inducer shall remain energized The indoor blower will turn off after the fan off delay if “W” goes away. If limit closes again the fault will clear. If you still have “W”, the gas valve still open and re-igniton will occur.

12
IGC Service Reference Material
NSMM 2003 SPP PPT IGC Alarms Technical Base / Hall Effect Service Training GT54-01

13
Heat Pump Defrost Board
New PN: HK32EA005 Thermostat demands for 1 or 2 stage Cooling 2 stage Heating Emergency Heating Defrost Control in Heating Mode Based on RES HK32EA003

14
Controls: Heat Pump HPS High Pressure Switch
Opens 660PSI. Close 505PSI LPS Low Pressure Switch (A/C’s) Opens 54PSI. Close 117PSI Liquid Line Loss-of-Charge (HP’s) Opens 27PSI. Close 44PSI Freeze Protection Thermostat (FPS) Opens 30F. Close 45F Connects to new defrost board
 Opens 54PSI. Close 117PSI. Liquid Line Loss-of-Charge (HP’s) Opens 27PSI. Close 44PSI. Freeze Protection Thermostat (FPS) Opens 30F. Close 45F. Connects to new defrost board.")
15
Reversing Valve Operation
No O or B signal required Energized in Cooling Reversing Valve does not shift mode in Off cycle (No Dump)
")
16
Heat Pump Compressor Seq
Cooling Stage 1: Reversing Valve 1 + Compressor Cooling Stage 2: (2-comp models only) Rev Valves Compressors 1+2 Heating Stage 1: Compressor(s), No Reversing Valve
 Rev Valves Compressors 1+2. Heating Stage 1: Compressor(s), No Reversing Valve.")
17
Heat Pump Electric Heat
Heating Stage 2 Concurrent with compressor(s) Emergency Heat Electric Heat WITHOUT compressors Defrost Tempering
 Emergency Heat. Electric Heat WITHOUT compressors. Defrost Tempering.")
18
Heat Pump Defrost Time-Temperature Sequence
1. Heat Run Time (30,60,90 or 120 mins) Factory 60 mins 2. Initiate if tube temperature (DFT) low 3. Terminate when tube temperature (DFT) rises or defrost run period reaches 10 min HH18SA261DFT Settings: Open: 30F Close: 80F
 Factory 60 mins. 2. Initiate if tube temperature (DFT) low. 3. Terminate when tube temperature (DFT) rises or defrost run period reaches 10 min. HH18SA261DFT Settings: Open: 30F. Close: 80F.")
19
Defrost Speed-Up JMP17-JMP18 (flat/slot screwdriver)
1-5 secs: Speed-Up (0.1 sec/min) 5-20 secs: Forced Defrost Run to normal termination or 30 secs minimum
 5-20 secs: Forced Defrost. Run to normal. termination or. 30 secs minimum.")
20
Controls: Electric Heat
Accessory installation 1 or 2 stages Fan housing limit switch (pilot, manual) Element line-break (or secondary contactor) Heater control contactor(s)
 Element line-break. (or secondary contactor) Heater control contactor(s)")
21
Electric Heat: Single-Point Box
Required with all electric heater installations Splice box with cover Power terminal block Tap conductors If FLA > 48-A: Fuse blocks and 60-A fuses

22
CONTROLS TERMINAL BOARD
SERVICE MANUAL CONTROLS TERMINAL BOARD CONVENIENCE OUTLETS SMOKE DETECTORS

23
Installation Instructions and Service Manuals (SM)
The complete unit installation procedure (rig and position through start-up) will require reference to two (or more) technical manuals. Mechanical Installation: SI (II) Configure/Start-up/Troubleshoot: SM
 will require reference to two (or more) technical manuals. Mechanical Installation: SI (II) Configure/Start-up/Troubleshoot: SM.")
26
Service Manual: LP Gas Conversion

27
Service Manual: Heat Pump Piping

28
Service Manual: Appendix

29
Specific Topic Tech Support
Smoke Detectors: Application Tip Cat# HKRNKA-1XA (integration with building alarm systems) PremierLink: Form 33CS-58SI (configuration, t-s) RTU-MP: Form 48-50H-T-2T (configuration, t-s) RTU-MP 3rd Party Integration Guide
 PremierLink: Form 33CS-58SI (configuration, t-s) RTU-MP: Form 48-50H-T-2T (configuration, t-s) RTU-MP 3rd Party Integration Guide.")
30
Controls Terminal Board
aka Light Commercial Terminal Board (LCTB) Command Center Terminal Board Carrier PN HK50AA049 UTEC PN CEPL Array of terminal strips, housings and QCs Contains NO LOGIC, no software
 Command Center Terminal Board. Carrier PN HK50AA049. UTEC PN CEPL Array of terminal strips, housings and QCs. Contains NO LOGIC, no software.")
31
Controls Terminal Board
Gas Controller Provides: - Clean connection points - Insures positive connections - Visual aid Phase Monitor OR Fire / Remote Shutdown OR Smoke Alarm LPS HPS

32
Controls Terminal Board
11 terminal strips: J1-J2: Screw terminals (thermostat wires) 0.046-in square pin 18 quick-connect terminals
 in square pin. 18 quick-connect terminals.")
33
CTB: Jumpers JMP1 Phase Monitor JMP2 Occupancy Control
JMP3 Smoke Detector Shutdown JMP4 Remote Shutdown JMP5, 6, 7 Heat Pump / Reheat JMP1 JMP4 JMP3 JMP2

34
CTB: Actual vs Schematic View

35
2010 FIOPs Convenience Outlets Smoke Detectors CO2 Sensor (new)
")
36
Convenience Outlets Non-Powered Unit-Powered
Neither is connected as delivered Hinged cover shipped loose (in control box)
")
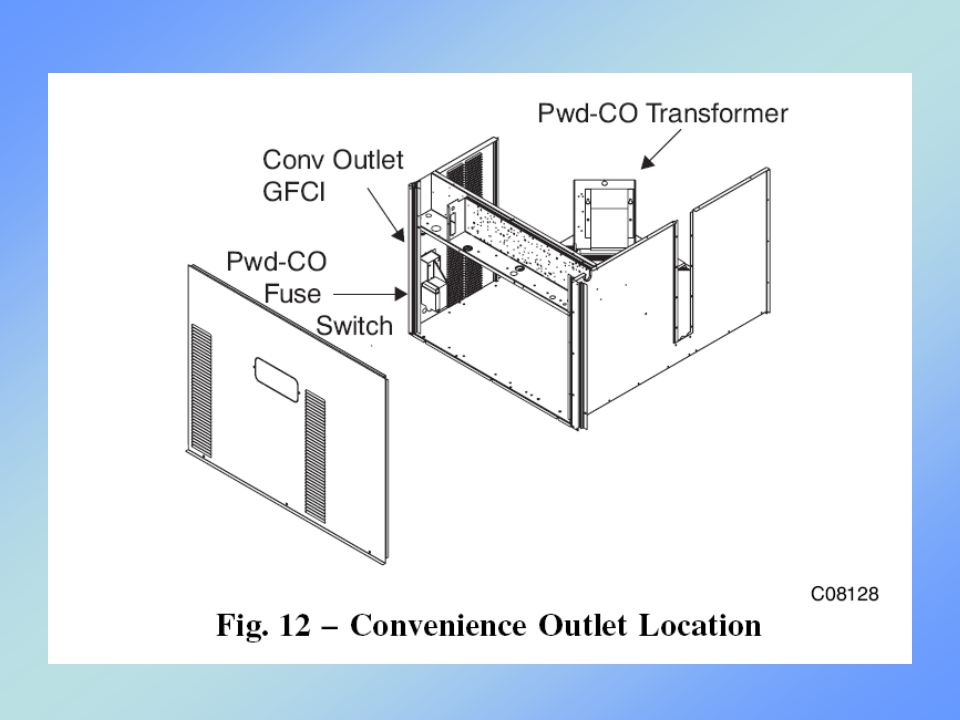
37
Convenience Outlets Non-Powered: Duplex GFCI Weatherproof box
Hinged cover Powered: Duplex GFCI Weatherproof box Transformer 15-A fuse/switch Hinged cover

39
Non-Powered CO Provide a separate 115-v 15-A power supply and circuit disconnect from the building Connect to the duplex outlet in the unit’s splice box Install the weatherproof hinged cover

40
Powered CO Check local codes to determine if connecting the convenience outlet transformer to the LINE side of the unit disconnect is acceptable. If acceptable: Connect primary leads at the power transformer together as required for unit line voltage and connect to unit disconnect’s line side terminals. If not acceptable: Connect primary leads at the power transformer together as required for unit line voltage and connect to unit disconnect’s load side terminals. Install the weatherproof hinged cover.

41
Powered CO: Label

42
Powered CO: Transformer Primary Connections

43
Weatherproof Hinged Cover

44
Powered Convenience Outlet: Duty Cycle Limit

45
Smoke Detector FIOPs Supply Air (on supply fan housing)
Return Air w/o Economizer Return Air with Economizer Combine S/A and R/A R/A Smoke Detector is for VERTICAL only “Some assembly required”

46
Smoke Detector Hardware
Controller Module (one per unit) Sensor Module (one or two required) R/A application: Sensor tube
 Sensor Module (one or two required) R/A application: Sensor tube.")
47
Smoke Detectors

48
R/A Sensor: Site Installation

50
Smoke Detector: LED

51
Smoke Detector: Alarm Integration
Application Tip Cat# HKRNKA-1XA

52
NEW FIOP: Unit-Mounted CO2 Sensor
Same control logic as on accessory CO2 No LCD display on sensor Requires PC access to configure Software and cable available thru RCD Details to follow in full training program

53
2010 SRT FIOPs Economizers (15th digit) CO2 sensors (9th digit)
Smoke Detectors (9th digit) Louvered Hail Guard (11th digit) 2-position Damper (15th digit) Convenience Outlet (16th digit) Thru-The-Base Connections (17th digit) PremierLink (14th digit) RTU-MP/Open (14th digit)
 Louvered Hail Guard (11th digit) 2-position Damper (15th digit) Convenience Outlet (16th digit) Thru-The-Base Connections (17th digit) PremierLink (14th digit) RTU-MP/Open (14th digit)")
54
2010 SRT Accessories Economizers & Roofcurbs CO2 & Enthalpy sensors
Power Exhaust Motormasters (low ambient) and winter start LP Conversions High Altitude Kits 2-pos damper / Man damper Thru-The-Base Louvered Hail Guards Electric Heat / Single Point Phase Monitor, Status switch, time guard PremierLink
 and winter start. LP Conversions. High Altitude Kits. 2-pos damper / Man damper. Thru-The-Base. Louvered Hail Guards. Electric Heat / Single Point. Phase Monitor, Status switch, time guard. PremierLink.")
55
Economizer Plugs Command Center aka Low Voltage Terminal Board (LVTB)
ECON 10pin Plug Used for all Economizers SAT/OAT 4pin Plug Used for Econ 2 only OCCUPANCY Terminals Used for Econ IV and 2-pos Damper 12-Pin Plug (male) – Unit Side plug in Econ Section Same plug and arrangement as old units 12-Pin Plug (female) – Econ Side Comes with specific FIOP or Accessory Small change on the Econ IV plug
 – Unit Side plug in Econ Section. Same plug and arrangement as old units. 12-Pin Plug (female) – Econ Side. Comes with specific FIOP or Accessory. Small change on the Econ IV plug.")
56
Economizer Plugs Table to help Troubleshoot Economizer wiring at the LVTB and the 12-pin plug

57
Economizer IV Electro-mechanical Unit Economizer
Stand alone operation with Honeywell W7212 controller. Compressor control runs through the W7212 If no econ then jumpers must be in 12-pin plug for cooling to operate Actuator is 2-10 vdc pre-programmed ready for W7212 output SAT in 12-pin plug (PL6) Same economizer as the R-22 machines.
 Same economizer as the R-22 machines.")
58
Economizer IV Added occupancy control Low Ambient Lockout
The “N” terminal tells the controller when occupied R-22 units had W7212 main power fed from the IFC and jumper to the N terminal 410a units have main power fed from transformer, and IFC feeds the N terminal trough the Occupancy terminals So W7212 is powered up when the unit is, instead of only when the fan is on Low Ambient Lockout The “LA” switch is installed on the Y2 input to the controller Part number HH18HA286, Contacts Open: 42°F ±5°F, and Contacts Close: 57°F. ±5°F. Below 42°F the second compressor will not run, econ will be stage one and 1st comp is stage 2 Power exhaust wire Tan wire that is connected to 24Vac HOT, move to EF1 Add jumper from 24Vac HOT to EF Connect other end of the tan wire to the tan wire in the PE Kit harness Connect the Grey wire in the PE kit harness to the 24Vac COM terminal

59
Economizer IV CO2 Sensor Enthalpy Power Exhaust (PE)
IAQ install, uses 24Vac (TR & TR1), and 0-10Vdc signal (AQ & AQ1), TR1 & AQ1 are common Demand Control Ventilation (DCV) is the only CO2 control available for Econ IV. DCV SET (POT) tells the controller at what input vdc from the IAQ sensor do we want to start opening the damper DCV MAX (POT) tells the controller at what damper position do you want us to stop opening for DCV The damper will modulate between the MIN POS (POT) and DCV MAX (POT) settings proportional to the IAQ vdc input from DCV SET (POT) to 10Vdc Enthalpy The Single Enthalpy sensor uses the same terminals as dry bulb (SO+ & SO). For Differential Enthalpy, 2 enthalpy sensors required. One installed per above and the other on terminals SR+ & SR (after removing the resistor). Set the cross over POT to “D” Whichever is lower is the air used for cooling Remember O for outdoor and R for Return Enthalpy sensors are HH57AC078 and Dry bulb are HH57AC074 Power Exhaust (PE) Terminals EF and EF1 are dry contacts and switch when the damper pos (in Vdc) gets above the EXH SET (POT) setting (in vdc) DCV – have to work with air balancer to determine the position of the damper and convert to input volts to the actuator. That Vdc is what MIN POS and DCV MAX need to be based on. For IAQ convert the Vdc output to PPM 0-10vdc to PPM, each vdc is 200 ppm.
, and 0-10Vdc signal (AQ & AQ1), TR1 & AQ1 are common. Demand Control Ventilation (DCV) is the only CO2 control available for Econ IV. DCV SET (POT) tells the controller at what input vdc from the IAQ sensor do we want to start opening the damper. DCV MAX (POT) tells the controller at what damper position do you want us to stop opening for DCV. The damper will modulate between the MIN POS (POT) and DCV MAX (POT) settings proportional to the IAQ vdc input from DCV SET (POT) to 10Vdc. Enthalpy. The Single Enthalpy sensor uses the same terminals as dry bulb (SO+ & SO). For Differential Enthalpy, 2 enthalpy sensors required. One installed per above and the other on terminals SR+ & SR (after removing the resistor). Set the cross over POT to D Whichever is lower is the air used for cooling. Remember O for outdoor and R for Return. Enthalpy sensors are HH57AC078 and Dry bulb are HH57AC074. Power Exhaust (PE) Terminals EF and EF1 are dry contacts and switch when the damper pos (in Vdc) gets above the EXH SET (POT) setting (in vdc) DCV – have to work with air balancer to determine the position of the damper and convert to input volts to the actuator. That Vdc is what MIN POS and DCV MAX need to be based on. For IAQ convert the Vdc output to PPM 0-10vdc to PPM, each vdc is 200 ppm.")
60
Economizer IV

61
Economizer 2 Econ2 No controller, requires Plink or RTU-MP/open
Jumper wires in 12-pin plug for cooling operation Actuator is 2-10vdc pre-programmed 500 ohm resistor (pre-installed) required for 4-20 controller output OAT in 12-pin plug (PL6)
 required for 4-20 controller output. OAT in 12-pin plug (PL6)")
62
Economizer 2 CO2 Sensor Enthalpy (only field installed) PE
IAQ is installed on the specific controller via PL18 for FIOP and direct to controller when field installed DCV is set in the specific controller with a user interface. Enthalpy (only field installed) Single or Differential control from the DDC controller Uses the 2 loose Grey wires near unit’s 12 pin plug Sensor wires run to the LVTB and then to DDC PE Wires provided with the PE accessory have to be run to the control box specifically to which ever DDC is installed Switch one stage on and off based on damper position
 Single or Differential control from the DDC controller. Uses the 2 loose Grey wires near unit’s 12 pin plug. Sensor wires run to the LVTB and then to DDC. PE. Wires provided with the PE accessory have to be run to the control box specifically to which ever DDC is installed. Switch one stage on and off based on damper position.")
63
Economizer 2 Cooling jumpers must be in harness for cooling to work
Resistor must be between the White signal wire and Black actuator common Actuator is 2-10v and controllers output 4-20mA Enthalpy sensor power from Actuator power Switch signal using 2 grey wires When troubleshooting Read vdc across resistor Determine if it’s the actuator or the controller Shorting the actuator signal to 24VAC will drive it 100%, but disconnect the actual signal first Spring return Closed Direction switch set to same direction as the spring return

64
2-Position Damper Opens to set position whenever the fan is running
To set position, set the screw on the actuator face near the shaft opening

65
Low Ambient Winter start Kit (CRWINSTR001A00) Motormaster I (32LT)
3 minute timer relay to bypass low pressure switch Field supply wires to tie into the LVTB, contact across LPS and coil between HPS and compressor contactor Current Literature – IIK-CRWNTRAN01-01 Motormaster I (32LT) Wave Chopper, varies voltage to vary fan speed, single phase approved motors, clip on sensor May need to replace motor and capacitor. Usage chart in literature. Copper Coil Controller with sensor – 32LT (230v), and 32LT (460v) MCHX coil controller with sensor – 32LT (230v), and 32LT (460v) Tries to maintain 100 deg SCT, unit operation down to -20 deg Current Literature – IIK-32LT903-01
 Wave Chopper, varies voltage to vary fan speed, single phase approved motors, clip on sensor. May need to replace motor and capacitor. Usage chart in literature. Copper Coil Controller with sensor – 32LT (230v), and 32LT (460v) MCHX coil controller with sensor – 32LT (230v), and 32LT (460v) Tries to maintain 100 deg SCT, unit operation down to -20 deg. Current Literature – IIK-32LT")
66
Low Ambient Motormaster II (CPLOWAMB001A00) Motormaster V
Fan cycle switch, on/off only, single phase motors, clip on sensor Tries to maintain high and low SCT, unit operation down to -20 deg Motormaster V Kits CRLOWAMB030A00, 031A00, and 032A00 for specific voltage For use on three phase motors (48/50TC 14 and 50TCQ 12) VFD, varies frequency (HZ) to vary fan speed, 3 phase approved motors Pressure sensor on liquid line, unit operation down to -20 deg
 VFD, varies frequency (HZ) to vary fan speed, 3 phase approved motors. Pressure sensor on liquid line, unit operation down to -20 deg.")
67
Gas Conversion Kits High Altitude Conversion
Four kits for use with LP and/or high altitude applications. Each contain 25 spuds, 5 of 5 different sizes. Manifold Pressure Natural Gas still 3.5-in.wc. LP now 10.5-in.wc. High Altitude Conversion Pick kit based on orifices needed Use only spuds and High-Alt label in kit Some spuds may have to be purchased separately Literature contains conversion tables

68
Gas Conversion Kits LP Conversion
New, low pressure switch on supply side Closes at 10.2-in.wc. and opens at 7.2-in.wc. Gas piping included in kits Kits include springs for gas valve to operate at higher pressure Labels for LP and high alt (if needed) Chose Kit based on orifices needed, some orifices may have to be purchased separately LPS
 Chose Kit based on orifices needed, some orifices may have to be purchased separately. LPS.")
69
Controls PremierLink RTU-MP RTU-Open
FIOP or Accessory. If field installed make sure the CRPREMLK001A01 kit was also purchased. It has the harness for LVTB and the TB to install other accessories to. RTU-MP FIOP only and only available through mid-2009 Overview training PES on partners Controller training PES on Partners Other information and tools on HVACpartners (CCN Support – Multi-Protocol Controls) RTU-Open Only FIOP until 3 Qtr 2009, then the retrofit should be available Replaces the RTU-MP, direct replacement Improved control and improved networking Fixes battery memory with flash memory, otherwise hardware is the same
 RTU-Open. Only FIOP until 3 Qtr 2009, then the retrofit should be available. Replaces the RTU-MP, direct replacement. Improved control and improved networking. Fixes battery memory with flash memory, otherwise hardware is the same.")
70
RTU-Open Support Contact Equipment Product support for:
Open release – FIOP around June 2009 – Accy around July 2009 Contact Equipment Product support for: Specific base unit operation or problems Questions/problems with the Controller or how it controls the unit, if it was Factory installed (FIOP) Questions/problems with how the FIOP was installed Controller operation, start-up, configuration, and troubleshooting questions Contact CCN support for: Network Integration and Communication questions or problems Questions/problems with the controller if it was field installed (accessory) Questions/problems with the accessory installation
 Questions/problems with how the FIOP was installed. Controller operation, start-up, configuration, and troubleshooting questions. Contact CCN support for: Network Integration and Communication questions or problems. Questions/problems with the controller if it was field installed (accessory) Questions/problems with the accessory installation.")
71
What’s Next Bynum Training program 4th Qtr

72
Questions???

Similar presentations


>")


/40GXC(Q) Service Training Sizes 18 and 24K.>")


