Download presentation
Presentation is loading. Please wait.

2
How to write a scientific paper
B. Einollahi Professor of Nephrology Baqiyatallah University of Medical Sciences

3
Writing a Scientific Manuscript

4
Enjoy the presentation
Sit back and relax Enjoy the presentation

5
Twelve Steps to Developing an Effective First Draft of your Manuscript
1. Consolidate all the information. Ensure you have everything you need to write efficiently, i.e., all data, references, drafts of tables and figures, etc.

6
Twelve Steps to Developing an Effective First Draft of your Manuscript
2. Target a journal. Determine the journal to which you plan to submit your manuscript and write your manuscript according to the focus of the targeted journal. The focus may be clearly stated within the journal or may be determined by examining several recent issues of the targeted journal.

7
Twelve Steps to Developing an Effective First Draft of your Manuscript
3. Start writing. When writing the first draft, the goal is to put something down on paper, so it does not matter if sentences are incomplete and the grammar incorrect, provided that the main points and ideas have been captured. Write when your energy is high, not when you are tired. Try to find a time and place where you can think and write without distractions.

8
Twelve Steps to Developing an Effective First Draft of your Manuscript
4. Write quickly. Don't worry about words, spelling or punctuation at all at this stage, just ideas. Keep going. Leave gaps if necessary. Try to write quickly, to keep the flow going. Use abbreviations and leave space for words that do not come to mind immediately.

9
Twelve Steps to Developing an Effective First Draft of your Manuscript
5. Write in your own voice. Expressing yourself in your own way will help you to say what you mean more precisely. It will be easier for your reader if they can “hear” your voice.

10
Twelve Steps to Developing an Effective First Draft of your Manuscript
6. Write without editing. Don't try to get it right the first time. Resist the temptation to edit as you go. Otherwise, you will tend to get stuck and waste time. If you try to write and edit at the same time, you will do neither well.

11
Twelve Steps to Developing an Effective First Draft of your Manuscript
7. Keep to the plan of your outline. Use the headings from your outline to focus what you want to say. If you find yourself wandering from the point, stop and move on to the next topic in the outline.

12
Twelve Steps to Developing an Effective First Draft of your Manuscript
8. Write the paper in parts. Don't attempt to write the whole manuscript at once, instead, treat each section as a mini essay. Look at your notes, think about the goal of that particular section and what you want to accomplish and say.

13
Twelve Steps to Developing an Effective First Draft of your Manuscript
9. Put the first draft aside. Put aside your first draft for at least one day. The idea of waiting a day or more is to allow you to "be" another person. It is difficult to proofread and edit your own work; a day or more between creation and critique helps.

14
Twelve Steps to Developing an Effective First Draft of your Manuscript
10. Revise it. Revise it and be prepared to do this several times until you feel it is not possible to improve it further. The objective is to look at your work not as its author, but as a respectful but stern critic. Does each sentence make sense?

15
Twelve Steps to Developing an Effective First Draft of your Manuscript
10. Revise it… In your longer sentences, can you keep track of the subject at hand? Do your longer paragraphs follow a single idea, or can they be broken into smaller paragraphs?

16
Twelve Steps to Developing an Effective First Draft of your Manuscript
11. Revise for clarity and brevity. Revise sentences and paragraphs with special attention to clearness. For maximum readability, most sentences should be about words. For a scientific article, paragraphs of about 150 words in length are considered optimal. Avoid using unnecessary words.

17
Twelve Steps to Developing an Effective First Draft of your Manuscript
12. Be consistent. Often a Ms has more than one author and therefore the writing may be shared. However, the style needs to be consistent throughout. The first author must go through the entire Ms and make any necessary editorial changes before submitting the Ms to the journal.

19
Am J Transplant

21
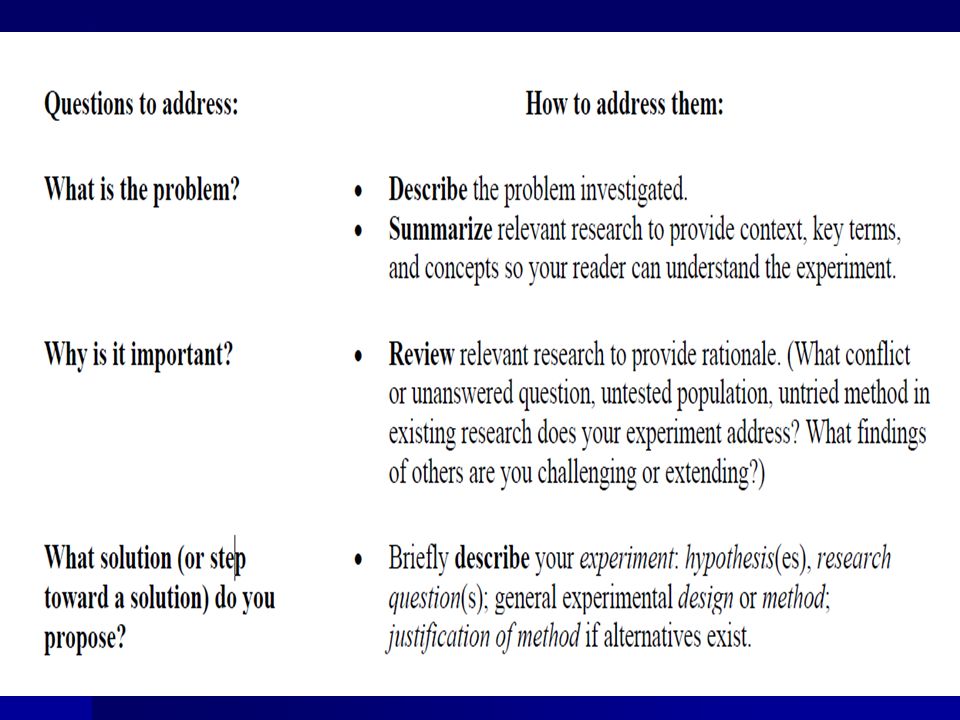
Eight Steps to Developing an Effective Outline
Preparing an outline is the most important step in the process of producing a manuscript for publication in a journal. The outline bears roughly the same relation to the final manuscript as an architectural blueprint does to a finished house. Its purpose of an outline is to divide the writing of the entire paper into a number of smaller tasks.

22
Eight Steps to Developing an Effective Outline
A good outline will organize the various topics and arguments in logical form. There is no single best way to prepare a scientific manuscript, except as determined by the individual writer and the circumstances. You should know your own style of writing best. Whatever you decide to do, you should follow at least these steps before beginning to write your manuscript.

23
Eight Steps to Developing an Effective Outline
Remember, at this stage, you are only constructing an outline. You are not writing; you just need to put down some notes to guide your thinking.

24
Eight Steps to Developing an Effective Outline
1. Develop a central message of the Ms Prepare a central message sentence (20-25 words). If you were asked to summarize your paper in one sentence, what would you say? Everything in the Ms will be written to support this central message.
. If you were asked to summarize your paper in one sentence, what would you say Everything in the Ms will be written to support this central message.")
25
Eight Steps to Developing an Effective Outline
2. Define the materials and methods Briefly state the population in which you worked, the sampling method you employed, the materials you used, and most importantly, the methods you used to carry out the study.

26
Eight Steps to Developing an Effective Outline
3. Summarize the question(s) and problem(s) What was known before you started the study? What answers were needed to address the problem(s)? List the key points pertaining to the question(s) and problem(s). What did you do to answer the question(s)?
 and problem(s) What was known before you started the study What answers were needed to address the problem(s) List the key points pertaining to the question(s) and problem(s). What did you do to answer the question(s)")
27
Eight Steps to Developing an Effective Outline
4. Define the principal findings and results Your central message sentence probably encapsulates the most important findings. There may be others that you feel ought to be included. List these in note form. Don't worry about the order or about how many you put down.

28
Eight Steps to Developing an Effective Outline
5. Describe the conclusions and implications Make brief notes on each of the implications that arise from your study. What are the principal conclusions of your findings? What is new in your work and why does it matter? What are the limitations and the implications of your results? Are there any changes in practice, approaches or techniques that you would recommend?

29
Eight Steps to Developing an Effective Outline
6. Organize and group related ideas together List each key point separately. Key points can be arranged chronologically, by order of importance or by some other pattern. The organizing scheme should be clear and well structured. You can use a cluster map, an issue tree, numbering, or some other organizational structure. Identify the important details, describe the principal findings, and provide your analysis and conclusions that contribute to each key point.

30
Eight Steps to Developing an Effective Outline
7. Identify the references that pertain to each key point

31
Eight Steps to Developing an Effective Outline
8. Develop the introduction Before beginning on the introduction, read through the notes you have made so far in your outline. Read them through and see whether there is a coherent and cohesive story and a unifying theme that runs through the outline. Your introduction outline should start with the main message, describe what the purpose or objective of your study was, how you went about doing the study, what you found and what are the implications of what you found.

32
Before Sending To The Journal
Have the paper read by several people. Listen to what they say, especially if same criticism comes up several times. Check and recheck spelling, figures, references, legends etc. Reviewers can be really annoyed by careless editing and mistakes reflect badly on your science. Make sure you have followed all the requirements of the journal about electronic submission etc. Some have a specific Checklist and Front Page format (key words; contact Information; address etc)
")
34
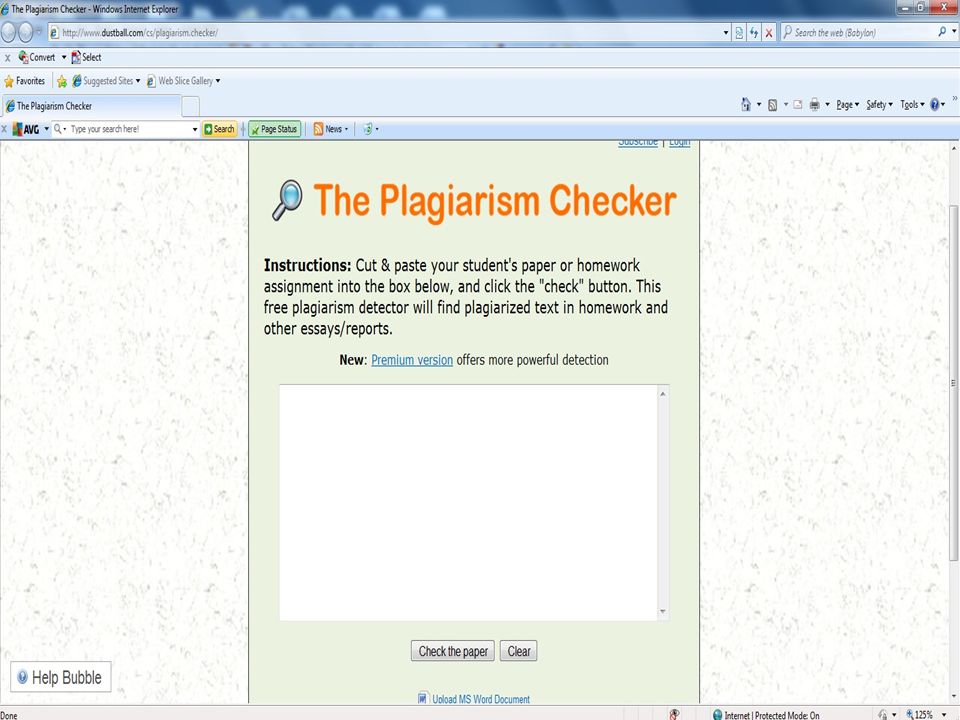
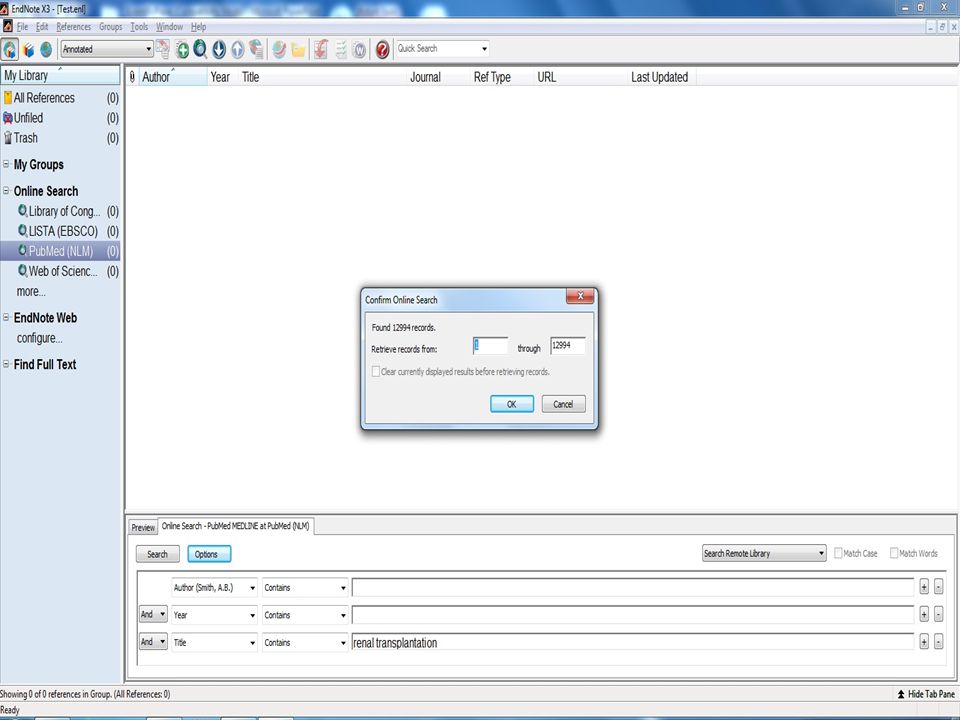
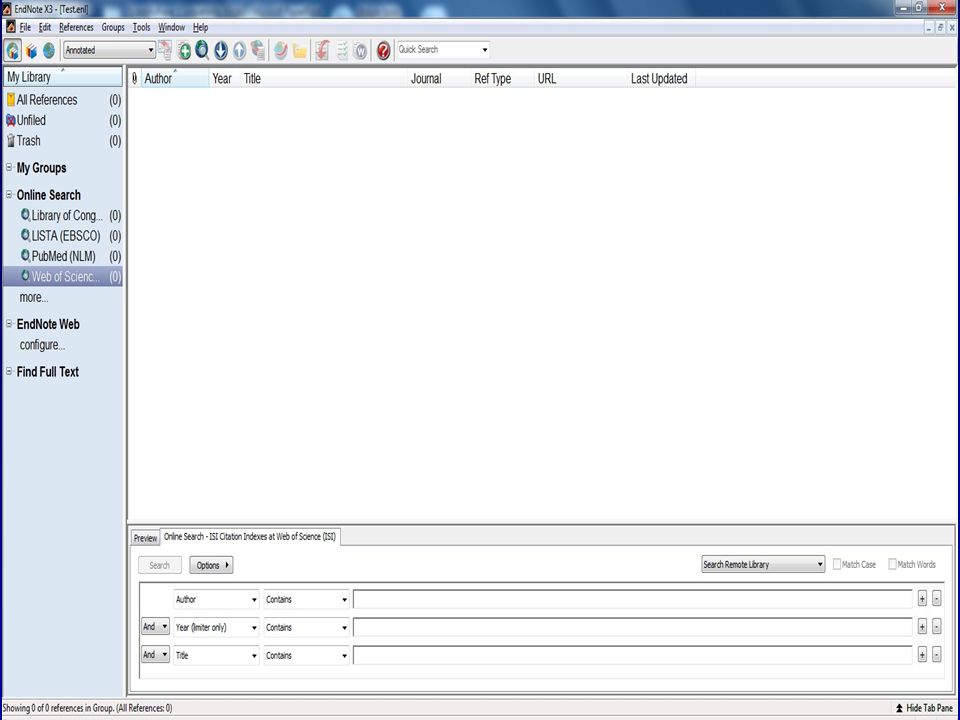
Writing Tools Plagirism Checker tools EndNote software knowledge

47
(And why you should care!)
What is plagiarism? (And why you should care!)
")
48
Definition: Plagiarism is the act of presenting the words, ideas, images, sounds, or the creative expression of others as your own.

49
Do I have to cite everything?

50
No need to document when:
You are discussing your own experiences, observations, or reactions Compiling the results of original research, from science experiments, etc. You are using common knowledge

51
What’s the big deal? If I change a Wrong! Paraphrasing
few words, I’m okay, right? Wrong! Paraphrasing original ideas without documenting your source, is plagiarism too!

53
Anatomy of a research manuscript
What’s known? Introduction What’s unknown? How do we show it? Methods Results What are we showing now? What did we show? Discussion What’s known?

54
Some people recommend that you begin with the Introduction and continue in order through each section of the paper to help ensure flow. Others suggest that you begin with the easiest sections, which are usually the Methods and Results, followed by the Discussion, Conclusion, Introduction, References and Title, leaving the Abstract until the end.

55
Beginning to Write: Start by choosing the tables and figures
write the methods write the results write the Conclusions - This forces you to think about what you want to say. writing the limitations of your work write the first paragraph of Discussion (Major findings) write the other part of Discussion write the Introduction section write the Abstract section Chose the final Title
 write the other part of Discussion. write the Introduction section. write the Abstract section. Chose the final Title.")
56
Tenses Text can be written in either the past or present tense, and the preference is to some extent personal. Past tense is OK for describing results of an experiment but use present tense for a general conclusion. “We observed that the expression of Bmp4 WAS increased. This suggests that the gene IS regulated by Shh.” Present tense is more immediate and indicates that a process is ongoing.

57
Whatever tense is used, be consistent &
don’t switch back and forth in the same paragraph !!!

58
At all costs, avoid the passive voice.
“Oocytes are signaled by MSP such that a cell cycle transition (M-phase entry) occurs” (not good) versus “ MSP signaling induces oocytes to enter M-phase of the cell cycle”. (good) “The genes were seen to be expressed…. (not good) “The genes were expressed….” (good)
 occurs (not good) versus. MSP signaling induces oocytes to enter M-phase of the cell cycle . (good) The genes were seen to be expressed…. (not good) The genes were expressed…. (good)")
60
Types of Medical Writing
Editorial Original Article Review Articles Short Papers Case Reports Letter to Editor Personal Views Special Communication

61
Manuscript Structure Cover letter Title and Title page Abstract
Introduction Methods Results Discussion and Conclusions Acknowledgements References Figures and Tables

62
Include a cover letter outlining the originality and important findings of the paper and why it will be of interest to the typical audience of the journal you have selected. Sometimes it is helpful to suggest possible referees, especially if the topic is unusual. It can save time to send a “presubmission enquiry” to the editor. This should outline in the most persuasive way the importance of your paper. Then the editor can reply with either encouragement to send the complete paper for review or a polite suggestion that you send it to another journal.

64
Conflict of Interest Notification Page a separate page
Title Page 1. Title of the article 2. Author/s name (with the academic degree/s)& affiliation 3. Short running head of no more than 40 characters 4. Corresponding author/s with the address for reprints 5. Source of support or grants 6. Word count Conflict of Interest Notification Page a separate page
& affiliation. 3. Short running head of no more than 40 characters. 4. Corresponding author/s with the address for reprints. 5. Source of support or grants. 6. Word count. Conflict of Interest Notification Page a separate page.")
65
Title It should not be underlined or italicized.
It should be short and yet sufficiently descriptive.

66
Title If the title does not indicate the contents come within the reader's range of interests when they do, the reader may miss a useful paper. If the title suggests that the contents do come within his range of interests but they do not, the reader will be annoyed. So, information must be packed carefully into the title.

67
Title Abbreviation should never be used.
Do not write paradoxical or obscure title. +This is dangerous as it indicates that your study has not resolved anything; it is thus a waste of time to read the paper. Do not write a long title. +A title should not exceed 20 words. Long title is at risk of distraction.

68
Title Try to make a "new" thing.
+ This can attract readers' attention. Do not make a statement in title.

69
Title Max info in least words <12-20 words <100 characters
The title is a label Should almost never contain abbreviations Question: easier to understand, more impact State results

71
What is an Abstract An abstract is a very concise statement of the major elements of your research project. It states the purpose, methods, and findings of your research project. An abstract is a condensed version of a full scientific paper.

72
Abstract: What is the Purpose?
Scientific abstracts introduce journal articles inform readers about article’s content help readers decide whether or not to read article The scientific abstract is a short ( word) overview of the article that should forecast all the major elements of the report/article.
 overview of the article that should forecast all the major elements of the report/article.")
73
Four C's of Abstract Writing
Complete — it covers the major parts of the project/case. Concise — it contains no excess wordiness or unnecessary information. Clear — it is readable, well organized, and not too jargon-laden. Cohesive — it flows smoothly between the parts.

74
Abstract There are two kinds of abstracts: Unstructured Structured

75
Abstract Summary of Manuscript (200-300 Words) Problem investigated
Purpose of Research Methods Results Conclusion

76
Abstract Background Aims Methods Outcome Measurements Results
Conclusions Keywords

77
Writing the Parts of Abstract
Write 1-2 introduction sentences that explain topic, purpose, and research question(s). Write 1-2 sentences describing your research methods (this may also include the type of data analysis you used). Write 1-2 sentences describing the results / findings. The major findings including key numerical results. Report those results which answer the questions you were asking; identify trends, relative change or differences, etc. Write 1-2 sentences containing your interpretations, conclusions and recommendations. Select 3-6 keywords relevant to the manuscript.
. Write 1-2 sentences describing your research methods (this may also include the type of data analysis you used). Write 1-2 sentences describing the results / findings. The major findings including key numerical results. Report those results which answer the questions you were asking; identify trends, relative change or differences, etc. Write 1-2 sentences containing your interpretations, conclusions and recommendations. Select 3-6 keywords relevant to the manuscript.")
78
Revising the Abstract Read your abstract all the way through:
add transition words to tie ideas together, eliminate unnecessary content and add in things that are missing, correct errors in mechanics, and proofread. Your abstract should be short and concise, but the section should also flow smoothly. Since your credibility is influenced by the style and precision with which you write, effective style and accurate grammar and mechanics are important elements of a successful abstract. The Purdue OWL maintains a number of resources on style, grammar and mechanics, as well as proof reading.

79
Abstract Common Mistakes Too much background or methods information
Figures or images References to other literature, figures or images Abbreviations or acronyms

80
Why Abstracts Not Accepted
Most common deficiencies: Poor presentation Weak discussion Lack of originality Poor methods Inappropriate statistical analysis Inadequate results

82
Anatomy of a research manuscript
What’s known? Introduction What’s unknown? How do we show it? Methods Results What are we showing now? What did we show? Discussion What’s known?

83
What was the problem that you investigated?
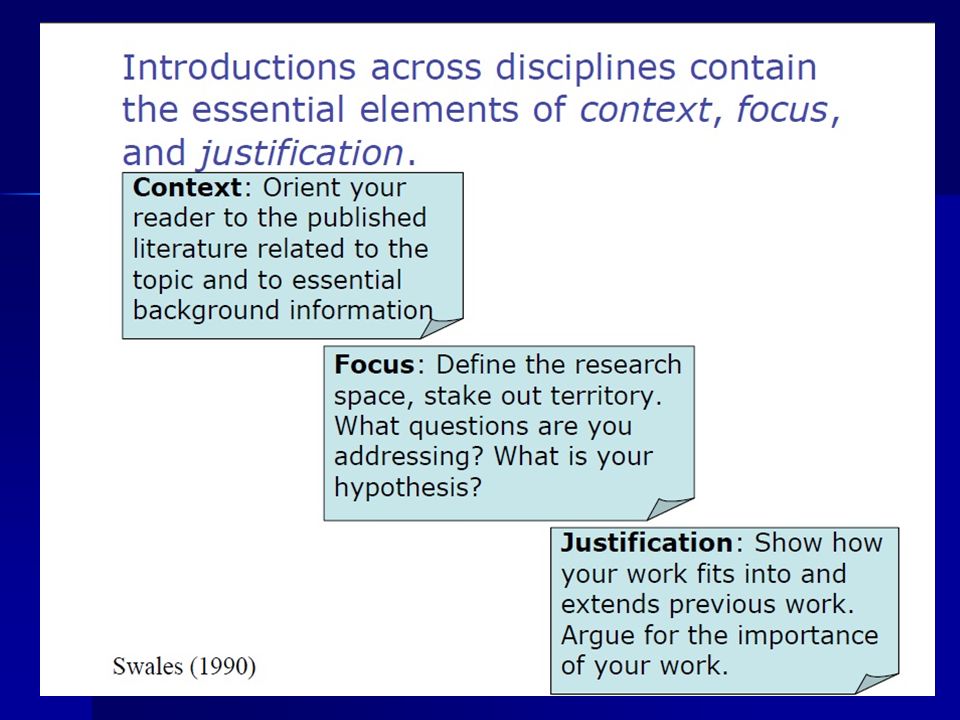
INTRODUCTION GUIDELINE ONE Describe the nature and scope of the problem What was the problem that you investigated? The amount of detail presented should be sufficient to allow the reader to understand the problem.

84
Introduction The first paragraph is crucial for catching the attention of the audience and for conveying to them the importance of the questions that you have addressed in the paper. If you don’t’ catch the attention of the audience in the first few sentences the chances are high that they won’t continue reading. So, make the first sentence both snappy and profound.

85
The Introduction should not contain an exhaustive historical review.
Assume that the reader has knowledge in the field for which you are writing, and it does not require a complete digest. Do not forget that citing appropriate and specific credit to relevant earlier works is part of your scholarly responsibility.

86
INTRODUCTION GUIDELINE TWO Explain why the work was important
Why was it important or necessary to do this work? What problems does it solve? What questions does it answer? What processes does it improve? What conclusions does it contradict? What conclusions does it support?

87
INTRODUCTION GUIDELINE THREE Review the relevant literature
Summarizing the relevant research permits the reader to understand the context of your work together with any specialized terminology or methodology. Reviewing the literature also helps to establish a rationale for your work by relating it to existing unsolved problems, difficulties and questions. Thus a review of the literature helps satisfy both guidelines one and two.

88
INTRODUCTION GUIDELINE FOUR Briefly describe the experimental methods you employed and, if necessary, justify your choice of methods This guideline expands upon the mention of methods that was made in your abstract. It is not necessary to provide a step-by-step description of your methods in the introduction as more detail will be provided in the methods section that follows. Nonetheless, your introduction should describe at least the type of methods you employed while doing your work.

89
The last paragraph of the Introduction should be a short summary of what you set out to do and what you have achieved. e,g “In this paper, we have studied the …… by using a novel technique in which ……. This approach has allowed us to directly compare A and B, and to distinguish between alternative possibilities for their functions.

93
What are Some Common Pitfalls of an Introduction Section?
Including unnecessary background or being repetitive. Exaggerating (or understating) the importance of your work. Using lackluster openers and weak follow-through in the body of your introduction. Not grounding the work in a context that will be important to your reader. Not focusing on a clear and compelling research question or hypothesis.
 the importance of your work. Using lackluster openers and weak follow-through in the body of your introduction. Not grounding the work in a context that will be important to your reader. Not focusing on a clear and compelling research question or hypothesis.")
94
Introduction Common Mistakes
Too much or not enough information Unclear purpose Lists Confusing structure Plagiarism Copyright 2005, Journal of Young Investigators, Inc.

95
The Introduction should not be long
Try to limit it within two double-spaced pages. Overall words

96
Write the Introduction in past tense when referring to your experiment
but when relating the background information, you can use both past and present tenses when referring to another investigator's published work.

98
Anatomy of a research manuscript
What’s known? Introduction What’s unknown? How do we show it? Methods Results What are we showing now? What did we show? Discussion What’s known?

99
Methods Section When appropriately written, the methods section can provide an extremely useful resource for the scientific community. The purpose of the section is to make it possible for interested readers to repeat the author’s experiment and reproduce his/her results.

100
Methods Section In this section, you should answer the question "What did you do?“ Many readers and reviewers read the Methods section first to see if they can understand what the authors did. If there is not, readers can not judge whether the results are of any value and there is no point in reading it further.

101
Methods Section Enough information for an experienced investigator to repeat your work Avoid tiresome detail Cut-and-paste from previous work of the author(s) It is the first section of the paper in which subheadings should be used (the participants or patients, the apparatus or materials and the procedure)
 It is the first section of the paper in which subheadings should be used (the participants or patients, the apparatus or materials and the procedure)")
102
Say how you did the work and what you used to do it.
Methods Guideline One Say how you did the work and what you used to do it.

103
Methods Guideline Two Use the past tense Because the methods section is describing things that you have already done, it is written in the past tense.

104
Methods Guideline Three
Don’t describe your results Remember that the methods section is intended to tell people how you did your work. Avoid the temptation to intersperse this with a discussion of your results or their significance.

105
Methods Guideline Four
Show your method section to colleagues. Ask them if they could use it to reproduce your results. This simple guideline can often be a very fast and effective way of identifying inadequacies in your writing. Things that you might consider second nature may be foreign to others.

106
Methods Guideline Five
Be precise when describing quantities

107
Participants What Subjects /patients /animals /specimens were used?
Reason for selecting the experimental design of the study When particular demographic characteristics are experimental variables or are important for the interpretation of the results, describe the group specifically, for example, in terms of racial and ethnic designation, national origin, level of education, health status, or language use.

108
Participants Should be checked The number of patients
How they are grouped (cases /controls) Origins of samples Inclusion criteria Exclusion criteria
 Origins of samples. Inclusion criteria. Exclusion criteria.")
109
Participants Whether informed consent was obtained
Whether the experiment or trial had been approved by an ethics committee and conforms to the ethical standards of the Declaration of Helsinki. Similar checks will be made if animals were used. Failure to fullfill the ethical requirements = reject the paper, without asking any question.

110
Setting Where and when your study was conducted?
Where and when the data were collected?

111
Procedures How did you proceed?
Briefly explain the general type of scientific procedure you used Explain the steps you took in your specific experimental manipulations and Interventions Describe method of randomization, counterbalancing, blinding techniques, and other control features in the design

112
Techniques Give enough details for readers to assess the validity of the results, and repeat the study If standard techniques is used, give appropriate reference, any modifications should be clearly explained If drug trial- clear description of trial

113
Procedures Why you chose the variables to measure and the reliability of measurement. Do not forget to mention the equipment that you used (manufacturer and model number, if unusual). If there is a simple well-known procedure, it is acceptable to name the technique. If it is new or you did something different, you should spend time describing the protocol used.
. If there is a simple well-known procedure, it is acceptable to name the technique. If it is new or you did something different, you should spend time describing the protocol used.")
114
Measurements of Endpoints
Clearly define primary and secondary outcomes of your study. The primary outcome is the pre-specified outcome of greatest importance and is usually the one used in the sample size calculation. It is also the outcome, to which the result of your study is assessed upon. Secondary outcomes include measures that were of interest, which may include unplanned or unintended effects of the treatment or intervention.

115
Sample Size You should provide a statement about the sample size.
Clearly state how the sample size was determined.

116
Randomization If the study was a randomized clinical trial, you need to describe the method of randomization, or details of any restriction (e.g., simple, stratification, blocking) of randomization were use.
 of randomization were use.")
117
Blinding If your study (a clinical trial) included this procedure, then it should be described in the paper.
 included this procedure, then it should be described in the paper.")
118
Data Analysis It is vital to include a sub-section of Data Analysis or Statistical Methods. In this sub-section, you should tell the readers what are your endpoints (or outcome variables), how did you analyze the data, whether data transformation was used and what was the rationale for the transformation. The author must report the threshold used to determine statistical significance.
, how did you analyze the data, whether data transformation was used and what was the rationale for the transformation. The author must report the threshold used to determine statistical significance.")
119
Consult a statistician before starting the study
Statistics Consult a statistician before starting the study

120
The author should use the third person, passive construction throughout, and always use the past tense. For example: “The sample was heated to 90 degrees C for 30 seconds.” - NOT: “I heat the sample to 90 degrees C for 30 seconds.”

121
When reading your M&M section, ask yourself at each place: “Would I need to know this to reproduce this experiment?” If the detail is not needed, remove it.

122
Common Mistakes in a Methods & Materials Section
Not Enough Information. Oddly, few people include too much information - nearly every author includes too little. Background/Introduction Material Included. Sometimes an author will include background material or explanations of concepts in the Methods & Materials section. That material belongs in the Introduction. In this section, the author should make no references to outside work, unless referencing a method or material.

123
Common Mistakes in a Methods & Materials Section
3. Verbose Descriptions. In the case of experimental setups, a diagram is worth a thousand words. 4. Results Reported. Sometimes, authors get so carried away describing their experiments that they report results in this section.

125
the heart of the publication
Results Section the heart of the publication This section must answer the question "What did you find?"

126
The Results Section The purpose of a Results section is to present the key results of the experiment without interpreting their meaning. The author should not include the raw data, but should summarize it with text and tables. The author should avoid writing out long lists of numbers - numbers and measurements should all be tabulated.

127
Results Communication of facts, measurements,
and observations, not interpretation of data or speculation, gathered by the author Start with the results that are easier to interpret Results should be set out in tables and figures Do not duplicate illustrations

128
It is sometimes a good idea to divide the Results section into sub-sections which your have described in the Methods section earlier. This helps keeping the manuscript coherent.

129
RESULTS GUIDELINE ONE Present your findings clearly
The data should be presented in a clear, readable form. Often this will involve the use of one or more tables. Depending upon the audience for your article, it may be more appropriate to present only a summary of your data in the results section. In this case, the full data set can be relegated to one or more appendices.

130
RESULTS GUIDELINE TWO Use the past tense
Because the results section is describing findings that you have already made, it is written in the past tense.

131
RESULTS GUIDELINE THREE Don’t interpret your results
Remember that the results section is intended to present your findings. Avoid the temptation to intersperse this with a discussion of their significance.

132
The Results section should be presented to support what you state to do in the Introduction.
Be sure you have looked at your data and that you are clear about what each result means ... if you're not clear about it, you're reader can't hope to be.

133
If a result is simple, recording it in the text is sufficient.
Set out the important results in a series of tables and graphs that you want to include in the paper. If a result is simple, recording it in the text is sufficient. However, for complex results, tables and figures will be needed (A lot of numbers, make Table). Refer to data (Fig. X, Table Y) Don’t repeat numbers in Tables Can state numbers from Figures if precision is required
. Refer to data (Fig. X, Table Y) Don’t repeat numbers in Tables. Can state numbers from Figures if precision is required.")
134
Do not include unimportant or disturbing information
If it is important present it in a table or a figure; if it is not, no matter how much work went into getting that data ... throw it out!

135
Avoid a long list of results with no interpretation
Develop each idea within the text: describe the effect; how did the levels of the independent variable differ.

136
Do not use qualitative words in the Results section
Do not write "This difference was highly significant (p = 0.001)," but simply state "This difference was significant (p = 0.001)."
, but simply state This difference was significant (p = 0.001).")
137
Do not interpret the data in the Results section
Comments such as "the data suggest that ...." are not really meaningful, a sort of "putting words into the readers' mouth." Save these indirect interpretations for the Discussion section.

138
It is very unwise to make statements such as "The ANOVA showed that
It is very unwise to make statements such as "The ANOVA showed that.…“ Statistical tests do not show anything; they just crunch numbers. It is up to you to use the right test and consider its results.

139
You should report negative results
In either case, your results may be of importance to others even though they did not support your hypothesis.

140
Criteria for Revascularization
When renal insufficiency is present and the objective is recovery of renal function together with prevention of further renal function impairment, the prerequisites for revascularization are as follows: The serum creatinine level is lower than 4 mg/dL. The serum creatinine level is higher than 4 mg/dL but with a possible recent renal artery thrombosis. When these conditions are satisfied, revascularization can be done if the following apply: The degree of stenosis is more than 80%. The serum creatinine level is increased after administration of ACE inhibitors. The degree of stenosis is 50-80%, and the scintigraphy findings are positive.

141
Writing the discussion and conclusion

144
Eight common components of a discussion section

145
Elements to Include in the Discussion
State the Major Findings of the Study The discussion should begin with a statement of the major findings of the study. This should be the very first paragraph in the discussion.

146
Elements to Include in the Discussion
State the Major Findings of the Study It should be a direct, declarative, and succinct proclamation of the study results. However, it should not include data or reference to the study design.

147
Elements to Include in the Discussion
State the Major Findings of the Study “Our results confirm that these nasal and full-face masks are similarly efficient over 15 min of NPPV with COPD patients recovering from acute hypercapnic respiratory failure.” This clearly states the most important finding of that study.

148
Elements to Include in the Discussion
State the Major Findings of the Study “Our findings suggest that ambient light has no statistically significant effect on SpO2 readings and that ambient light’s effect on SpO2 is clinically unimportant.” That is a good example of a direct, declarative, and succinct proclamation of the study results.

149
Elements to Include in the Discussion
Explain the Meaning of the Findings and Why the Findings Are Important As the person who conceived, designed, and conducted the study, the meaning of the results and their importance seem obvious to you. However, they might not be so clear for the person reading your paper for the first time.

150
Elements to Include in the Discussion
Explain the Meaning of the Findings and Why the Findings Are Important One of the purposes of the discussion is to explain the meaning of the findings and why they are important. After reading the discussion section, you want the reader to think, “That makes perfect sense. Why hadn’t I thought of that?”

151
Elements to Include in the Discussion
Explain the Meaning of the Findings and Why the Findings Are Important Even if your study findings are provocative, you do not want to force the reader to go through the paper multiple times to figure out what it means; most readers will not go to that effort and your findings will be overlooked, disregarded, and forgotten.

152
Elements to Include in the Discussion
Relate the Findings to Those of Similar Studies The findings of other studies may support your findings, which strengthens the importance of your study results.

153
Elements to Include in the Discussion
Relate the Findings to Those of Similar Studies It is also important to point out how your study differs from other similar studies.

154
Elements to Include in the Discussion
Consider Alternative Explanations of the Findings It is important to remember that the purpose of research is to discover and not to prove.

155
Elements to Include in the Discussion
Consider Alternative Explanations of the Findings When writing the discussion section, it is important to carefully consider all possible explanations for the study results, rather than just those that fit your biases.

156
Elements to Include in the Discussion
State the Clinical Relevance of the Findings The reason we conduct studies is usually to improve the care of our patients. Thus it is important to cast the findings of your study in the context of clinical practice.

157
Elements to Include in the Discussion
State the Clinical Relevance of the Findings Experimental studies conducted in the laboratory usually do not involve human subjects, but the results may have clinical implications, which should be stated.

158
Elements to Include in the Discussion
Acknowledge the Study’s Limitations All studies have limitations. Unfortunately, the limitations of some studies are fatal flaws that preclude publication. However, even the best studies in the most prestigious journals have limitations.

159
Elements to Include in the Discussion
Acknowledge the Study’s Limitations It is far better for you to identify and acknowledge your study’s limitations than to have them pointed out by a peer-reviewer or a reader (in a letter to the editor after publication).
.")
160
Elements to Include in the Discussion
Make Suggestions for Further Research Although a study may answer important questions, other questions related to the subject may remain unanswered. Moreover, some unanswered questions may become more focused because of your study.

161
Elements to Include in the Discussion
Make Suggestions for Further Research You should make suggestions for further study in the discussion section. Laboratory experimental studies typically lead to suggestions for follow-up clinical studies with human subjects.

162
Elements to Include in the Discussion
Give the “Take-Home Message” in the Form of a Conclusion What is the “take-home message”? What do you want the reader to remember from your study? The take-home message should be the first sentence of your conclusions section.

163
Elements to Include in the Discussion
Give the “Take-Home Message” in the Form of a Conclusion In some journals the conclusions section is a paragraph or subsection at the end of the discussion, whereas other journals require a separate conclusions section.

164
Elements to Include in the Discussion
Give the “Take-Home Message” in the Form of a Conclusion The conclusions section may also provide suggestions for practice change, if appropriate.

166
Things to Avoid When Writing the Discussion
Overinterpretation of the Results It is easy to inflate the interpretation of the results. Be careful that your interpretation of the results does not go beyond what is supported by the data. The data are the data: nothing more, nothing less.

167
Things to Avoid When Writing the Discussion
Unwarranted Speculation There is little room for speculation in the discussion. The discussion should remain focused on the your data and the patients and/or devices in your study.

168
Things to Avoid When Writing the Discussion
Unwarranted Speculation If the subjects in your study had asthma, it is usually not appropriate to speculate about how your findings might apply to other patient populations. If you feel compelled to speculate, be certain that you clearly identify your comments as speculation: “We speculate that ”

169
Things to Avoid When Writing the Discussion
Inflating the Importance of the Findings After all of the hard work that goes into a study, it is easy to attribute unwarranted importance to study findings. We all want our study to make an important contribution that will be cited for generations to come.

170
Things to Avoid When Writing the Discussion
Inflating the Importance of the Findings However, unwarranted inflation of the importance of the study results will disgust reviewers and readers.

171
Things to Avoid When Writing the Discussion
The “Bully Pulpit” Do not use the discussion section to criticize other studies. Although you should contrast your findings to other published studies, this should be done professionally. Do not use the discussion to attack other investigators. Moreover, never preach to the reader.

172
Things to Avoid When Writing the Discussion
Conclusions That Are Not Supported by the Data The hypothesis study data conclusions should be a tight package. Avoid the temptation to allow your biases to enter into the conclusions.

173
Summary The discussion section gives you an opportunity to explain the meaning of your results. When writing the discussion, remember that the focus should be to help the reader understand the study and that the highlight should be on the study data.

176
Acknowledgement Those who do not justify to be Authors should be Acknowledged Those who have provided technical help Financial and material support Funding sources should be listed in this section.

177
Acknowledgements (Silent partners)
“We wish to thank” - all those who deserve recognition for their contribution but who have not made a significant intellectual contribution and are therefore not included as authors (Colleagues, Institutions, Organizations providing financial help, laboratory and secretarial staff).
.")
179
Conflict of interest A financial interest that may affect, or appear to affect, the presentation or content of a publication thus calling into question its credibility or importance. Financial interests may include, but are not limited to: 1. Research Funds: Funds received for operations, supplies, salaries, travel etc… from organizations that may gain or lose financially as a result of the publication.

180
Conflict of interest 2. Employment Funds: Funds received for employment during the time that the research is conducted or promise of future employment from organizations that may gain or lose financially as a result of the publication. 3. Personal Financial Interests: Owning stocks or shares in organizations that may gain or lose financially as a result of the publication. Having patents or patent applications in progress whose value you may increase as a result of the publication.

182
Please check them in PubMed.
References Please check them in PubMed.

183
References The Vancouver Style
In the text, number references in order of appearance using Arabic numerals (e.g. 1, 2, 3) in parentheses for citations. Include the names of up to six authors before resorting to the use of "et al." Use only abbreviations approved for use in the latest edition of Index Medicus and conform to style and punctuation in the examples below. Journal article: Matas AJ, Ramcharan T, Paraskevas S, Gillingham KJ, Dunn DL, Gruessner RWG et al. Rapid discontinuation of steroids in living donor kidney transplantation: A pilot study. Am J Transplant 2001; 1(3):
 in parentheses for citations. Include the names of up to six authors before resorting to the use of et al. Use only abbreviations approved for use in the latest edition of Index Medicus and conform to style and punctuation in the examples below. Journal article: Matas AJ, Ramcharan T, Paraskevas S, Gillingham KJ, Dunn DL, Gruessner RWG et al. Rapid discontinuation of steroids in living donor kidney transplantation: A pilot study. Am J Transplant 2001; 1(3):")
184
References Book chapter:
Cecka JM. The UNOS scientific renal transplant registry. In: Cecka JM, Terasaki PI (eds). Clinical Transplants. Los Angeles, CA: UCLA Tissue Typing Laboratory, 2000: 1-18. Abstract: Halloran PF, Urmson J, Zhu L-F. High MHC class I expression protects rejecting kidney al-lografts: decreased class I and increased necrosis in kidney grafts lacking TAP transporters [abstract]. Am J Transplant 2[S3], 2002, 240.
. Clinical Transplants. Los Angeles, CA: UCLA Tissue Typing Laboratory, 2000: Abstract: Halloran PF, Urmson J, Zhu L-F. High MHC class I expression protects rejecting kidney al-lografts: decreased class I and increased necrosis in kidney grafts lacking TAP transporters [abstract]. Am J Transplant 2[S3], 2002, 240.")
185
References 3. Disertation
Kaplan SJ. Post-hospital home health care: the elderly's access and untilizaiion (dissertation]. St. Louis (MO): Washington Univ: 1995. 4. Unpublished material Leshner AL. Molecular mechanisms of cocaine. N Engl J Med. In press 1996. 5. Electronic material Morse SS. Factors in the emergence of infectious disease. Emerg Inftect Dis [serial online] 1995 Jan-Mar (cited 1996 Jun 5]; 1(1): [24 screens]. Available from URL:
: Washington Univ: Unpublished material. Leshner AL. Molecular mechanisms of cocaine. N Engl J Med. In press Electronic material. Morse SS. Factors in the emergence of infectious disease. Emerg Inftect Dis [serial online] 1995 Jan-Mar (cited 1996 Jun 5]; 1(1): [24 screens]. Available from URL:")
186
Sending Manuscript to the Journal
Covering letter signed by all co-authors Has not been submitted else where Approved by all authors Do not fear to submit in high IF journals

187
Some Guidelines Choose an appropriate Journals
Go through the “uniform requirements for Biomedical publications” Write simple grammatically correct sentences Brevity is the best practice Avoid irrelevant details Show the draft to colleagues Read final draft carefully Typographical and grammatical mistakes give bad impression Check tables and figures (Captions, size, clarity)
")
188
Some Writing Tips Active voice is preferable to passive voice
“We studied 15 patients with ARDS.” is much better than “Fifteen patients with ARDS were studied.” Always use the full term before you refer to it by acronym [for example, Orthotopic Liver Transplantation (OLT)] Write only one thought per sentence. Eliminate unnecessary words Ensure that verb tenses are consistent and correct
] Write only one thought per sentence. Eliminate unnecessary words. Ensure that verb tenses are consistent and correct.")
189
Prior to Submission Check Yourself did you :
Follow the instructions!!!! Include headings exactly as stated in the instructions/template? Use short, clear sentences; one idea per sentence? Limit your abstract to the word count/character count requirement? Edit, edit, edit Check grammar, syntax and punctuation

190
Writing: Abbreviations and Acronyms
Liked by authors, hated by readers Reading should not require a glossary Unwieldy word occurring > 10 times

191
Writing: Sentences Only one idea in a sentence
Keep short: <20 words Vary length Long sentences: greater risk of grammatical error

193
Some Practical Advice on Data Presentation
Numbers beginning a sentence must be fully spelled. For example, “Ninety-nine patients were recruited.” Put a space between numbers and units: for example, “75 kg.” Exception: 75%. Use a zero before decimal numbers that are less than 1. For example, write “0.32,” not ”.32.”

194
Some Practical Advice on Data Presentation
When you quote numbers, make sure you use the minimum number of significant digits or decimal places. For example, 23 ± 7 years is easier to read than 23.4 ± 6.6 years, and the loss of accuracy is not important in most situations. Use the appropriate number of digits: two significant digits for standard deviations (one digit if the standard deviation is for a descriptive statistic like height or weight, or if precision is not important); two decimal places for correlations, two significant digits for percentages. Examples: 73 ± 5; r = 0.45; r = 0.08; 16%; 1.3%; 0.013%.
; two decimal places for correlations, two significant digits for percentages. Examples: 73 ± 5; r = 0.45; r = 0.08; 16%; 1.3%; 0.013%.")
195
Some Practical Advice on Data Presentation
If it is more convenient to show p values than confidence limits, show the exact p value to one significant digit (for p < 0.1) or two decimal places (for p > 0.10). Do not use p < 0.05 or p > Examples: p = 0.03; p = 0.007; p = 0.09; p = (The exact p value is important for anyone using your data to calculate confidence limits or using your data in a meta-analysis.)
 or two decimal places (for p > 0.10). Do not use p < 0.05 or p > Examples: p = 0.03; p = 0.007; p = 0.09; p = (The exact p value is important for anyone using your data to calculate confidence limits or using your data in a meta-analysis.)")
196
Some Practical Advice on Data Presentation
Use the standard deviation as a measure of spread. Do not use the standard error of the mean. Avoid test statistics like t, F and χ2, but if the journal insists on them, show only two significant digits. Show 95% confidence intervals for effect statistics like a correlation coefficient or the difference between means.

197
Some Practical Advice on Data Presentation
Do not use scanned images of graphs or diagrams, because the lines and symbols become too "pixelly." Draw the figures directly in a computer, using preferably PowerPoint, Excel, or the drawing window of Microsoft Word. Make sure the fonts and any symbols are big enough.

198
Some Practical Advice on Data Presentation
Use italics for emphasis and bold for strong emphasis. Use italics in expressions such as the term whatever, and for listing descriptors of a scale. For example, items on the 5-point scale ranged from not at all to always. Do not use italics for foreign words and abbreviations common in scientific English, such as ad lib, per se, et al., via, ad hoc, post hoc, a priori, a posteriori.

199
Some Practical Advice on Data Presentation
An abbreviation or acronym (short name) is justified only if the full expression is excessively long or if the abbreviation is well known to all researchers in the field. Even so, an easily understood short form of the expression that avoids abbreviations or acronyms is preferable.
 is justified only if the full expression is excessively long or if the abbreviation is well known to all researchers in the field. Even so, an easily understood short form of the expression that avoids abbreviations or acronyms is preferable.")
200
Some Practical Advice on Data Presentation
If you must use an abbreviation, define it in parentheses the first time you use it: for example, body mass index (BMI), maximum oxygen uptake (VO2max), the fatigue dimension of the Profile of Mood States (POMS-fatigue).
, maximum oxygen uptake (VO2max), the fatigue dimension of the Profile of Mood States (POMS-fatigue).")
201
Some Practical Advice on Data Presentation
Use the following well-known Latin abbreviations only within parentheses: that is (i.e.), for example (e.g.), and so on (etc.). Do not use the abbreviations for namely (viz.) or compare (cf.), which few people understand. Use vs (versus) and et al. (and others) inside or outside parentheses without defining them.
, for example (e.g.), and so on (etc.). Do not use the abbreviations for namely (viz.) or compare (cf.), which few people understand. Use vs (versus) and et al. (and others) inside or outside parentheses without defining them.")
202
Some Practical Advice on Data Presentation
Use abbreviations without explanation for the following terms in the Summary, but define them in the Methods: standard deviation (SD), 95% confidence interval (95%CI), 95% confidence limits (95%CL).
, 95% confidence interval (95%CI), 95% confidence limits (95%CL).")
203
Some Practical Advice on Data Presentation
Use no periods or spaces in abbreviations of countries: USA, UK, NZ. Use a period only if the last letter of the abbreviation is not the last letter of the word, as in these examples: Prof., Dr, Mr, Ms, Vol. 1, p. 3, p , 2nd ed., et al., vs, etc., and so on.

204
Some Practical Advice on Data Presentation
Scientific names consisting of genus and species, should be underlined or italicized, with only the genus capitalized: Homo sapiens or Ilex opaca.

205
Some Practical Advice on Data Presentation
Use the following Systeme Internationale (SI) abbreviations for units of measurement, and never add an "s" to the following abbreviations. meter, m; gram, g; kilogram kg; mole mol; liter L; mililiter ml; degree oC; millisecond ms; second s; hour h; minute min; day d; week wk; year y.
 abbreviations for units of measurement, and never add an s to the following abbreviations. meter, m; gram, g; kilogram kg; mole mol; liter L; mililiter ml; degree oC; millisecond ms; second s; hour h; minute min; day d; week wk; year y.")
206
Thank you all for your attention

Similar presentations


 Obtaining a clear specification II) Research & preparation III) Report writing.>")


 Prepared By: Prepared By: Syed Abrar Hussain Shah.>")
>")


