Download presentation
Presentation is loading. Please wait.

1
Check in Check out Graphing with the Excel Program Michael Kraus

2
Behavioral Interventions are successful ONLY if… Implemented with Integrity/Fidelity Monitored!!! Implemented with Consistency As important as teaching academic skills NOT a quick fix! Data are reviewed & graphed!!!

3
Check-In Check-Out (CICO) 1) Morning “Check-In” - Discuss behavior /point goals - Point card given 2) Point card to each teacher - Beginning or end of period (school specific) 3) Teacher Feedback - End of period 4) End-of-Day “Check-Out” - review performance /problem solving - Was goal met? 5) Point card to Parent - send copy of card home with student - parent initials and card is returned following day
 Point card to Parent - send copy of card home with student - parent initials and card is returned following day.")
4
The Objectives… You will learn to graph a CICO intervention using the CICO Excel Program You will demonstrate this by completing a sample case. An observer will complete a fidelity checklist for you to demonstrate that you can use the CICO Excel Program.

5
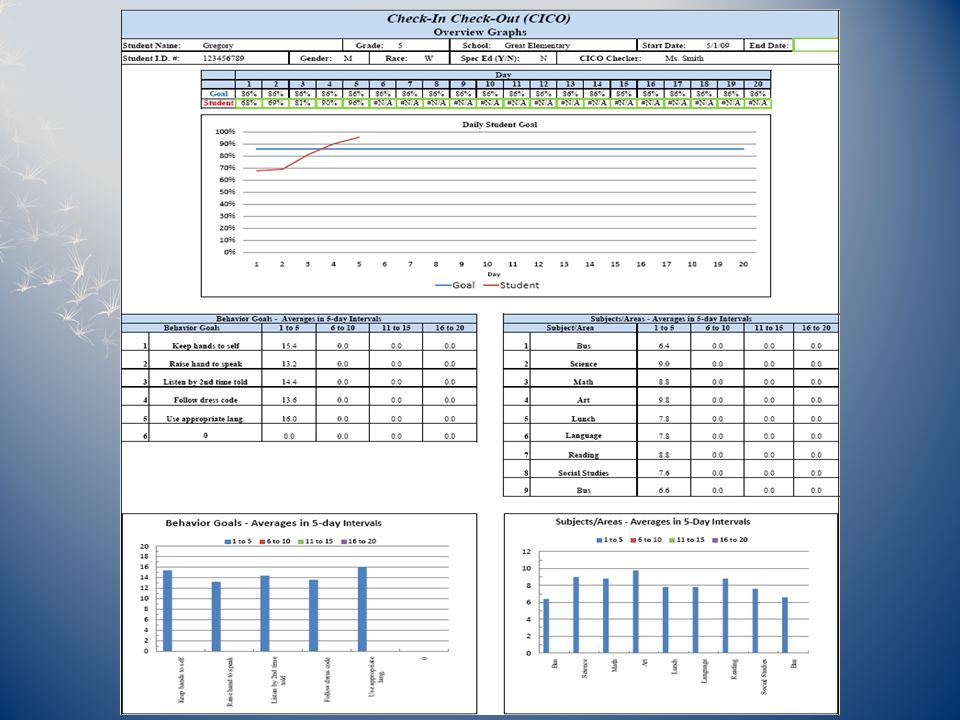
Gregory the Great

6
Locating and Saving the File Find the file on your computer named: “CICO Program 08-09” Double click the file to open it. Select “Save As” from the menu bar. Name the File “Gregory CICO 5-09” and click Save Gregory will have an electronic file that can store up to 20 days worth of CICO data

7
The Steps… 1. Descriptive Information 2. Subject/Area 3. Behavioral Goals 4. The Scores 5. The Point Goal 6. Rewards 7. Comments 8. Day 2 9. Graphs 10. Overview Tab

8
Step by Step: Stay Together The Coach Card is divided into 10 Steps. Avoid the temptation to “click ahead”.

9
Day 1…

10
The Steps… 1. Descriptive Information 2. Subject/Area 3. Behavioral Goals 4. The Scores 5. The Point Goal 6. Rewards 7. Comments 8. Day 2 9. Graphs 10. Overview Tab

11
Step 1: Descriptive Information Begin by filling in the student’s name, grade, school, student I.D., number, race, gender, and indicate if he/she is in Special Education. The name of the CICO Checker should also be entered. (Most importantly, in the field for date, the date of the daily check-in should be entered.)
.")
12
The Steps… 1. Descriptive Information 2. Subject/Area 3. Behavioral Goals 4. The Scores 5. The Point Goal 6. Rewards 7. Comments 8. Day 2 9. Graphs 10. Overview Tab

13
Steps 2 & 3: Subjects/ Areas & Goals Next, in the boxes under the Subject/Area row, enter the subjects or areas that will be monitored and scored by the teachers. Next, enter the Behavior Goals for the student in the BEHAVIOR GOALS column.

14
As easy as 1, 2, 3…

15
The Steps… 1. Descriptive Information 2. Subject/Area 3. Behavioral Goals 4. The Scores 5. The Point Goal 6. Rewards 7. Comments 8. Day 2 9. Graphs 10. Overview Tab

16
Step 4: Student Scores The scores given to the student by his/her teachers will be put into the boxes next to each of the BEHAVIOR GOALS and underneath each corresponding Subject/Area.

17
The Steps… 1. Descriptive Information 2. Subject/Area 3. Behavioral Goals 4. The Scores 5. The Point Goal 6. Rewards 7. Comments 8. Day 2 9. Graphs 10. Overview Tab

18
Step 5: The Point Goal Directly underneath the gray scoring area on the row labeled TOTAL POINTS, is a box labeled, Today’s Point Goal, where you will enter the point goal for the student.

19
The Steps… 1. Descriptive Information 2. Subject/Area 3. Behavioral Goals 4. The Scores 5. The Point Goal 6. Rewards 7. Comments 8. Day 2 9. Graphs 10. Overview Tab

20
Steps 6 & 7: Rewards and Comments Indicate whether the student received the reward in the box next to the one labeled “Reward Given?” and what type of reward/incentive was given. Comments about the student’s performance can be entered in the box marked “Comments.”

21
Steps 1 through 7…

22
The Steps… 1. Descriptive Information 2. Subject/Area 3. Behavioral Goals 4. The Scores 5. The Point Goal 6. Rewards 7. Comments 8. Day 2 9. Graphs 10. Overview Tab

23
Step 8: Day 2 and so on… For DAY 2 and beyond, you will only need to input the Date, the daily scores given by each teacher, information about student reward/incentive (if applicable), and any comments. All other information should auto-calculate from day one entries.

24
Gregory’s Data: Days 2 through 5 At this time, input the scores for Gregory from days 2 through 5. Remember that the only sections that should type in are bordered in GREEN.

25
The Steps… 1. Descriptive Information 2. Subject/Area 3. Behavioral Goals 4. The Scores 5. The Point Goal 6. Rewards 7. Comments 8. Day 2 9. Graphs 10. Overview Tab

26
Steps 9 and 10: Graphs and Overview For each day that the student’s points are entered, the spreadsheet will provide two graphs.

28
Fidelity Checklist

29
Final Thoughts… Middle Schools Block Scheduling Changing Behaviors or Subjects/Areas Work in Progress

Similar presentations


 to setup weightages 1. Student Assessment To view and capture assessment submission dates from.>")


