Download presentation
Presentation is loading. Please wait.

1
Basic Excel Information Summer 2006

3
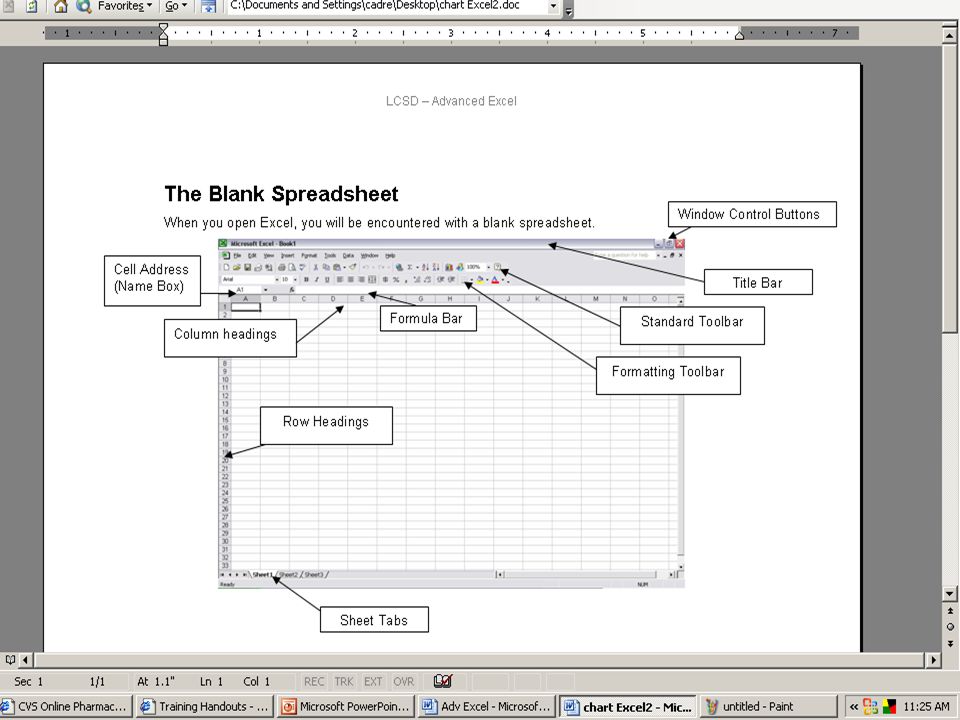
Spreadsheet Basics When you open Excel, the file you have opened is a workbook. Each workbook contains three worksheets. However, you can add worksheets to the workbook. Each worksheet has 256 columns and 65,536 rows each box is a cell. Each cell can contain a separate piece of data.

4
Entering Data To select a cell you can simply click on the cell that you wish. The selected cell will have a bold black border (box) around it. You can then enter text or numbers or both. Whenever you enter text into a cell, the alignment will be LEFT by default. When you enter numbers, the alignment will be RIGHT by default. If you enter alphanumeric data, it will align to the LEFT because it will be considered text despite the presence of numbers.
 around it. You can then enter text or numbers or both. Whenever you enter text into a cell, the alignment will be LEFT by default. When you enter numbers, the alignment will be RIGHT by default. If you enter alphanumeric data, it will align to the LEFT because it will be considered text despite the presence of numbers..")
5
Correcting Data If you are still in the process of typing inside of a cell, you can quickly erase the contents by pressing the [Esc] key on the keyboard. If you have already moved off of the cell, then you must select that cell and press the [Del] key on the keyboard to erase the contents of the selected cell(s). If you wish to simply replace the contents of a cell with alternative data/text then you can simply select that cell and begin typing. Whatever you type will replace the data that occupied that cell.
![Correcting Data If you are still in the process of typing inside of a cell, you can quickly erase the contents by pressing the [Esc] key on the keyboard.](http://images.slideplayer.com/13/3935153/slides/slide_5.jpg "If you have already moved off of the cell, then you must select that cell and press the [Del] key on the keyboard to erase the contents of the selected cell(s). If you wish to simply replace the contents of a cell with alternative data/text then you can simply select that cell and begin typing. Whatever you type will replace the data that occupied that cell..")
6
Graphs called Charts in Excel Charts are a graphical representation of data. They come in all shapes and sizes and can be used to represent all types of data. The key to charts lies in the proper selection of data and then in the proper selection of the correct type of chart. There are many options.

7
Quick Chart Key – F11 The first step is to select your data. The selection of data (the right amount, the right kind) directly affects the outcome of your chart. The selection of data here DID NOT include the larger totals. The larger numbers can throw a chart “off balance”. However, you may need those totals in the chart or wish to reflect those in a separate chart altogether.
 directly affects the outcome of your chart. The selection of data here DID NOT include the larger totals. The larger numbers can throw a chart off balance . However, you may need those totals in the chart or wish to reflect those in a separate chart altogether..")
8
Quick Chart Key – F11 cont’d Press the F11 key. This will create a chart on a separate worksheet. The type of chart it creates is a COLUMN chart. This is one of the most common types of charts. A column chart created with the F11 key

9
The Chart Wizard If you would like more options than the F11 key gives you, then the chart wizard is for you. Select the data on your spreadsheet that you wish to reflect in the form of a chart.

10
Go to the INSERT menu and select CHART. This will bring you into the Chart Wizard. Easier is to click on the chart icon. You will notice that the Chart Wizard dialog box states that you are on Step 1 of 4. So, keep in mind, you have to spend a few minutes making some decisions about your chart.

11
Step 1 of 4 Is the selection of the chart type. There are many kinds of charts for many purposes. Which chart is best for you? Well, that takes practice and testing. The four most common types of charts are the first four listed: Column, Bar, Line and Pie.

12
Step 1 of 4 Is the selection of the chart type. There are many kinds of charts for many purposes. Which chart is best for you? Well, that takes practice and testing. You can see a preview of what your data will look like in that particular chart type by using the “Press and Hold to Preview” button. You may find that your results are not to your liking, so be prepared to do some hunting. Once you have selected the type of chart you wish to create, press NEXT.

13
Step 2 of 4 is basically unnecessary if you have already “pre- selected’ your data. So just simply click NEXT to continue.

14
Step 3 of 4 Is where you can add, delete, or edit some “chart options”. These include titles, a legend and data labels. All can be useful and necessary at times. Data labels are especially helpful when using pie charts. Click Next.

15
Step 4 of 4 Is simply letting Excel know where you wish to place this chart. Your options include adding it as separate, new worksheet to your workbook or as an object in your current spreadsheet (or any other within the workbook for that matter).. Placing a chart as an “object in” is also called embedding a chart. Make your choice and select FINISH to complete the chart wizard.
.. Placing a chart as an object in is also called embedding a chart. Make your choice and select FINISH to complete the chart wizard..")
16
An example of an embedded chart

17
An example of a new sheet

18
For more detailed information on Excel: There are classes offered through Staff Development in face to face classrooms or in BlackBoard, an online version. A class to manipulate data in the classroom using Excel will be offered this Fall.

Similar presentations


 OR Click on Start All Programs Microsoft Office Microsoft Office Excel 2003.>")


>")
