Download presentation
Presentation is loading. Please wait.

3
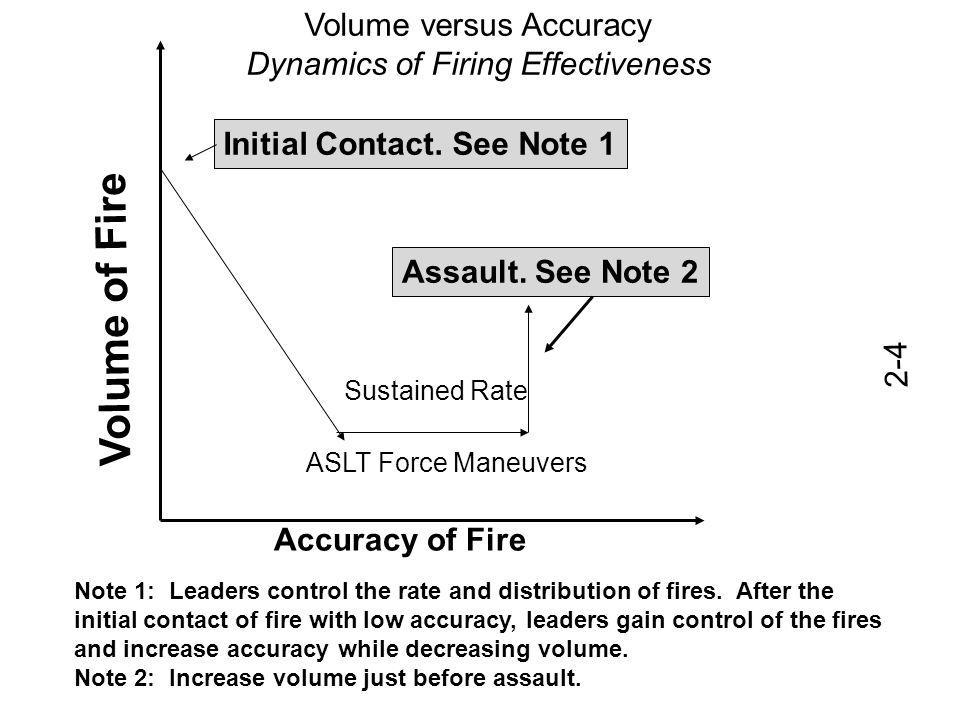
Initial Contact. See Note 1 Assault. See Note 2 Volume of Fire Volume versus Accuracy Dynamics of Firing Effectiveness Accuracy of Fire Note 1: Leaders control the rate and distribution of fires. After the initial contact of fire with low accuracy, leaders gain control of the fires and increase accuracy while decreasing volume. Note 2: Increase volume just before assault. Sustained Rate ASLT Force Maneuvers 2-4

4
Speed versus Firing Effectiveness Speed of Advance Fire Team (See Decision Matrix) Buddy Team (See Decision Matrix) Individual (See Decision Matrix) Enemy Firing Effectiveness (Volume and Accuracy ) *Leaders must make decisions based on the situation *Winners of the fire-fight are the units that make sound judgements and initiate appropriate actions faster than opposing units *The most critical point in the fire-fight is the initial reaction *We must gain fire superiority as fast as possible
 Buddy Team (See Decision Matrix) Individual (See Decision Matrix) Enemy Firing Effectiveness (Volume and Accuracy ) *Leaders must make decisions based on the situation *Winners of the fire-fight are the units that make sound judgements and initiate appropriate actions faster than opposing units *The most critical point in the fire-fight is the initial reaction *We must gain fire superiority as fast as possible")
5
Fire and Movement Situation Response/Decision TL Command Effective Fire MAX Fire MIN Movement Individual Movement R GR TL AR 4 2 1 33 UP, 3 DOWN 1 UP, 1 DOWN 2 UP, 2 DOWN 4 UP, 4 DOWN Slowest Movement and Best Firing Effectiveness VOICE COMMANDS USED ONLY DURING THE INTIAL STAGES OF TRAINING

6
Fire and Movement Situation Response/Decision TL Command Moderate Fire Balanced Fire and Movement Buddy Team Movement R GR TL AR 2 1 3 1 UP, 1 DOWN 2 UP, 2 DOWN Moderate Movement and Moderate Firing Effectiveness 4

7
Fire and Movement SituationResponse/DecisionTL Command Minimum OPFOR FireMinimum Fire/MAX Movement Fire Team Movement Fast Movement and Minimal Firing Effectiveness 2 4 3 1 2 4 3 1 “A” UP, “A” DOWN “B” UP, “B” DOWN

8
Figure 1A-4 (Movement Techniques) The individual Movement Technique is used when enemy fire is effective. Fire is effective when the incoming rounds have both great volume and accuracy; thereby effectively suppressing your ability to conduct fire and movement. The order for movement for IMT is: 1 man, 3 man, 2 man, 4 man 1 32 4 1 2 4 3 1 UP!1 DOWN! 1 23 4 3 UP! 1 3 2 4 1 2 4 3 1 2 4 3 1 2 4 3 2 UP!2 DOWN!4 UP!4 DOWN! 1 2 4 3 The buddy team movement technique is used when enemy fire is moderate. Fire is moderate when incoming fires have either low accuracy and high volume or moderate accuracy and low volume. 1 2 43 1 2 4 3 1 2 4 3 1 2 4 3 1 UP! 1 DOWN!2 UP! 3 DOWN! 2 DOWN!

9
Isolate: Deny the enemy the ability to reinforce or withdraw from a portion of the objective by focusing fires on elements that can influence the assault. Isolating the objective allows us to “eat one small piece of the pie” at a time when we are ready. Suppress: Focused fires on the objective that we want to assault. Reduce: Reduction is the actual assault to take a specific objective. -Apply to any situation. Break the big objective into very small pieces and defeat one piece at a time. This allows you to gain favorable combat power ratios. a. Breaching Obstacles:Suppress Obscure Secure Reduce b. AggressivenessSet the proper conditions Initiativebut (Isolate, Suppress, Reduce) Act Faster than the Enemy c. Basic Fire and Maneuver:
 Act Faster than the Enemy c. Basic Fire and Maneuver:.")
10
1 3 2 4 SL 1 3 2 4 Figure 1A-1 (Initial Contact) AR TL G R 3 1 2 4 1 3 2 SL 4 Figure 1A-2 (Determine COA) AR TL G R R AR TLG AR TL G R
 AR TL G R SL 4 Figure 1A-2 (Determine COA) AR TL G R R AR TLG AR TL G R")
11
SL 3 1 2 4 Figure 1A-3 (Squad Assault) 4 3 1 2 Shift Fires O/O or when Base of Fire Ldr. ID danger to assault element 2 1 34 SL 3 1 2 4 2 4 3 1 2 1 34 ASSLT POS Squad Assault Step 1: GAIN FIRE SUPERIORITY AND ASSLT

12
SL 3 1 2 4 Step 1a: GAIN FIRE SUPERIORITY AND ASSLT 2 4 3 1 ASSLT POS

13
3 1 2 4 Step 2: SHIFT FIRES AND KNOCK OUT BUNKER 3 1 SL 2 4 4 2 1 3 Shift Fires O/O or when Base of Fire Ldr. ID danger to assault element SL ? Step 2a: SHIFT FIRES AND KNOCK OUT BUNKER 3 1 2 4 4 2 1 3 Shift Fires O/O or when Base of Fire Ldr. ID danger to assault element SL 1 3 ? FRICTION Leader Decisions: Terrain Enemy COA Rates of Fire; When? How long? Distribution of Fire; Where? Which systems? Security? Always – Flanks/Rear Have we achieved conditions required? Isolation? Suppression” Reduction? If not –do what? Reposition? Platoon Assault? PL Decision

14
Battle Drill 6: Enter/Clear Building/Room Figure 1 - Preparing to Enter S4312 FRAG OUT! 3-22

15
Battle Drill 6: Enter/Clear Building/Room Figure 2 - Lead TM Clears 1 st RM, 2 nd TM Stacked, SL Enters RM When Clear 4312 COMING IN LEFT S4 31 2 NEXT TEAM ENTER LEFT DOOR ON LEFT WALL Note: #2 man stopped short of corner, because of exit, and then reported 3-23

16
Battle Drill 6: Enter/Clear Building/Room Figure 3 - 2 nd TM Clears 2 nd RM, PL Enters When 2 nd RM is Clear Note: #1 man stopped short of corner, because of exit, then reported 2 nd Squad, Lead TM2 nd Squad,Trail TM S43124312 FRAG OUT! S 4 31 2 S4312 S4312 P DOOR RIGHT 3-24

17
Battle Drill 6: Enter/Clear Building/Room Figure 4 - 2 nd SQD, Lead TM COMING IN LEFT S43124312 S 4 31 2 4312P P NEXT SQD ENTER LEFT, CLEAR 3 rd RM Lead TM S4312 Trail TM 4312 S4 3 1 2 FRAG OUT! 3-25

18
Battle Drill 6: Enter/Clear Building/Room Figure 5 - Clear Hall From a RM (Rolling T) S4 31 2 S 4 31 2 4 3 1 2 2 4 S 1 3 1 2 3 4 1 23 4 3 S4312 P FRAG OUT! FRAG OUT! 3-26

19
Turn/Corner Rolling T FIG 7A-6 1 2 1 3 3 FRAG OUT! 2 1 3 2 1 3 4 4 4

20
Battle Drill 6/7: Enter/Clear Building/Room or Trench Figure 6- Clearing T-Shaped Hallway/Trench Intersection 4321 1 1 2 3 4 12 2 1= Lowman 2=Highman Intended Direction of Travel = Grenade

21
Battle Drill 7A: Enter/Clear A Trench (Squad) SECTION CORNER TURN INTERSECTION FIGURE 7A-1
 SECTION CORNER TURN INTERSECTION FIGURE 7A-1")
22
Battle Drill 7A: Enter/Clear A Trench (Squad) DIRECTION OF CLEARING NEAR WALL FIGURE 7A-2
 DIRECTION OF CLEARING NEAR WALL FIGURE 7A-2")
23
Battle Drill 7A: Enter/Clear A Trench (Squad) SECURING ENTRY POINT Figure 7A-5 1 SL 3 2 4
 SECURING ENTRY POINT Figure 7A-5 1 SL 3 2 4")
24
1 3 1 1 2 TEAM THAT CLEARED CORNER (IF REPLACED) Figure 7A-7 Figure 7A-8 Battle Drill 7A: Enter/Clear A Trench (Squad) CLEARING A CORNER APPROACHING AN INTERSECTION 2 4 INTERSECTION
 Figure 7A-7 Figure 7A-8 Battle Drill 7A: Enter/Clear A Trench (Squad) CLEARING A CORNER APPROACHING AN INTERSECTION 2 4 INTERSECTION")
25
SL21 3 4 4 3 1 2 Figure 7A-10 Figure 7A-9 Battle Drill 7A: Enter/Clear A Trench (Squad) TRENCH ENTRY CLEARING AN INTERSECTION
 TRENCH ENTRY CLEARING AN INTERSECTION")
26
SL 1 2 3 4 Battle Drill 7A: Enter/Clear A Trench (Squad) Figure 7A-11 CLEARING AN INTERSECTION 3-40
 Figure 7A-11 CLEARING AN INTERSECTION 3-40")
27
Turn/Corner Serpentine FIG 7B-6 2 1 3 2 1 1 2 1 4 3 3 FRAG OUT! 4 4 3

28
Battle Drill 7A: Enter/Clear A Trench (Squad) Trench Entry Figure 7A-3 1 3 4 2 SL FRAG OUT!
 Trench Entry Figure 7A SL FRAG OUT!")
29
Battle Drill 7A: Enter/Clear A Trench (Squad) Trench Entry Figure 7A-4 1 3 4 2 SL 1342
 Trench Entry Figure 7A SL 1342")
Similar presentations


 This is an UNCLASSIFIED brief SGT Addington INFANTRY MOUT OPERATIONS.>")

 that develops into a>")

 How to move in a Team (patrol/contact) Ambush.>")


