Download presentation
Presentation is loading. Please wait.

1
Chapter 3 Tools and Fasteners

2
Objectives (1 of 2) List some of the common hand tools used in heavy-duty truck repair. Describe how to use common pneumatic, electrical, and hydraulic power tools used in heavy-duty truck repair. Identify the mechanical and electronic measuring tools used in the heavy-duty truck shop.

3
Objectives (2 of 2) Describe the proper procedure for measuring with a micrometer. Identify the types of manufacturer service literature used in truck repair facilities and describe the type of information each provides. Explain the principles and precautions of working with various heavy-duty truck fasteners.

4
Hand Tools (1 of 2) Hammer safety
Always wear eye protection when striking tempered tools and hardened metal surfaces. Whenever possible, use soft-faced hammers when striking hardened surfaces. Never strike one hammer against another. Check the fit and condition of the handle.

5
Hand Tools (2 of 2) Replace cracked or splintered handles and do not use the handle for prying or bumping. Select the right size for the job. Grip the handle close to the end. Prevent injuries to others. Swing in a direction that will not let your hammer strike someone if it slips from your hand. Keep the handle dry and free of grease and oil. Keep the hammer face parallel with your work.

6
Saw and Knife Safety (1 of 2)
Keep knife blades sharp. Cut away from the body. Never pry with a knife or saw blade. Store knives safely.

7
Saw and Knife Safety (2 of 2)
Before completing a saw cut, slow down to avoid injury as the saw finishes the cut. Never use a damaged blade. Always wear safety glasses when using a hacksaw. Do not use the thumb as a guide in starting a hacksaw. Use full travel, even strokes to maximize the life of the blade.

8
Chisel and Punch Safety
Wear eye protection when cutting with a chisel or using a punch. Avoid using a punch or chisel on hardened metal. Grind off mushroom heads before using a chisel or punch. Do not drive a punch too deep into a bore or it may become wedged due to its taper.

9
Screwdrivers Standard tip screwdrivers Phillips screwdrivers
Specialty screwdrivers Safety Use screwdrivers only for turning screws. A slotted screwdriver tip can easily be dressed to its original shape. If the screwdriver blade fits the screw slot properly, you will produce maximum torque with minimum effort.

10
Screwdriver Safety It is a good rule to keep your other hand clear when applying force to any type of screwdriver. Always have the screwdriver and the screw correctly lined up. Screwdrivers designed for use with wrenches have either a square shank or a hex bolster at the handle. Do not hold components in your hand while turning fasteners with a screwdriver. When working around anything electrical, use a screwdriver with an insulated handle and shank to avoid shock and short circuits.

11
Wrenches Open-end wrenches Box-end wrenches Combination wrenches
Adjustable wrenches Allen wrenches Socket wrenches

12
Wrench Safety (1 of 2) Use wrenches that fit.
Wrenches that slip damage bolt heads and nuts, skin knuckles, and cause the user to fall. Use the proper wrench to get the job done—the one that gives you the surest grip and a straight clean pull. Do not extend the length of a wrench. Do not use a hammer on wrenches unless they are designed for that type of use.

13
Wrench Safety (2 of 2) Pull on the wrench.
Use an open palm to push on a wrench when you cannot pull it toward you. Replace damaged wrenches. The adjustable wrench is a multi-purpose tool, but it should never be used if a properly fitting combination wrench is at hand.

14
Pliers Combination pliers Adjustable pliers Locking pliers
Diagonal cutting pliers

15
Plier and Cutter Safety
Do not use pliers as a wrench. Guard against eye injuries when cutting with pliers or cutters. Observe the following side-cutter precautions: Select a cutter big enough for the job. Keep the blades at right angles to the stock. Do not rock the cutter to get a faster cut. Adjust the cutters to maintain a small clearance between the blades. Pliers are made for holding, pinching, squeezing, and cutting—not usually for turning.

16
File Safety Wear eye protection when filing.
Never strike a file with a hammer. Always cut away from the body. Never use a file without a securely attached handle. Do not use worn (dull) files; replace them.
 files; replace them.")
17
Special Tools Taps and dies Gear and bearing pullers

18
Power Tools Safety (1 of 7)
Return all equipment to its proper place when finished. Wear eye protection. Noise may be a hazard with some portable power tools, especially pneumatic tools. Wear hearing protection whenever noise is excessive. Wear gloves when operating air chisels or air hammers. All electrical equipment should be grounded, unless it is the double insulated type.

19
Power Tools Safety (2 of 7)
Never make adjustments, lubricate, or clean a machine while it is running. Do not clean yourself or anyone else with compressed air. Report any suspect or malfunctioning machinery to the instructor or service manager. Know your power tool.

20
Power Tools Safety (3 of 7)
Do not abuse the electric power cord. Never yank it to disconnect it from a receptacle. No machine should be started unless guards are in place and in good condition. Check and make all adjustments before applying power. Give the machine your undivided attention while you are using it.

21
Power Tools Safety (4 of 7)
Inspect all equipment for safety and for apparent defects before using. Whenever safeguards or devices are removed to make repairs or adjustments, equipment should be turned off and the main switch locked and tagged. Start and stop your own machine and remain with it until it has come to a complete stop. Always allow any machine to reach operating speed before loading it. No attempt should be made to retard rotation of the tool or work.

22
Power Tools Safety (5 of 7)
Do not try to strip broken belts or other debris from a pulley in motion or reach between belts and pulleys. Do not use loose rags around operating machinery. Use the right tool. Maintain tools with care.

23
Power Tools Safety (6 of 7)
Remove adjusting keys and wrenches. Do not overreach. Maintain a balanced stance to avoid slipping. Disconnect tools when not in use, before servicing, or when changing attachments, blades, bits, cutters, and so on. Before plugging in any electric tool or machine, make sure the switch is off. Remove all sharp edges and burrs before completing any job.

24
Power Tools Safety (7 of 7)
Impact wrenches Air ratchet wrenches Air drills Air chisels and hammers Blowgun

25
Other Power Tools Bench grinders Lifts and hoists Presses

26
Lift and Hoist Safety (1 of 2)
Do not let anyone remain in a vehicle when it is being raised. Make certain you know how to operate the equipment and know its limitations. Never overload a lift, hoist, or jack. Chain hoists and cranes must be properly attached to the parts being lifted. Always use bolts and shackles of sufficient strength rating to attach the hoist to the object being lifted.

27
Lift and Hoist Safety (2 of 2)
Mechanical locks or stands must be engaged after lifting a truck on any kind of hoist. Do not use any lift, hoist, or jack that you believe to be defective or not operating properly. Make sure all persons and obstructions are clear before raising or lowering an engine or vehicle. Avoid working, walking, or standing under suspended objects that are not mechanically supported.

28
Measuring Tools Machinist’s rule Dial calipers Micrometers
Inside micrometer Outside micrometer Depth micrometer

29
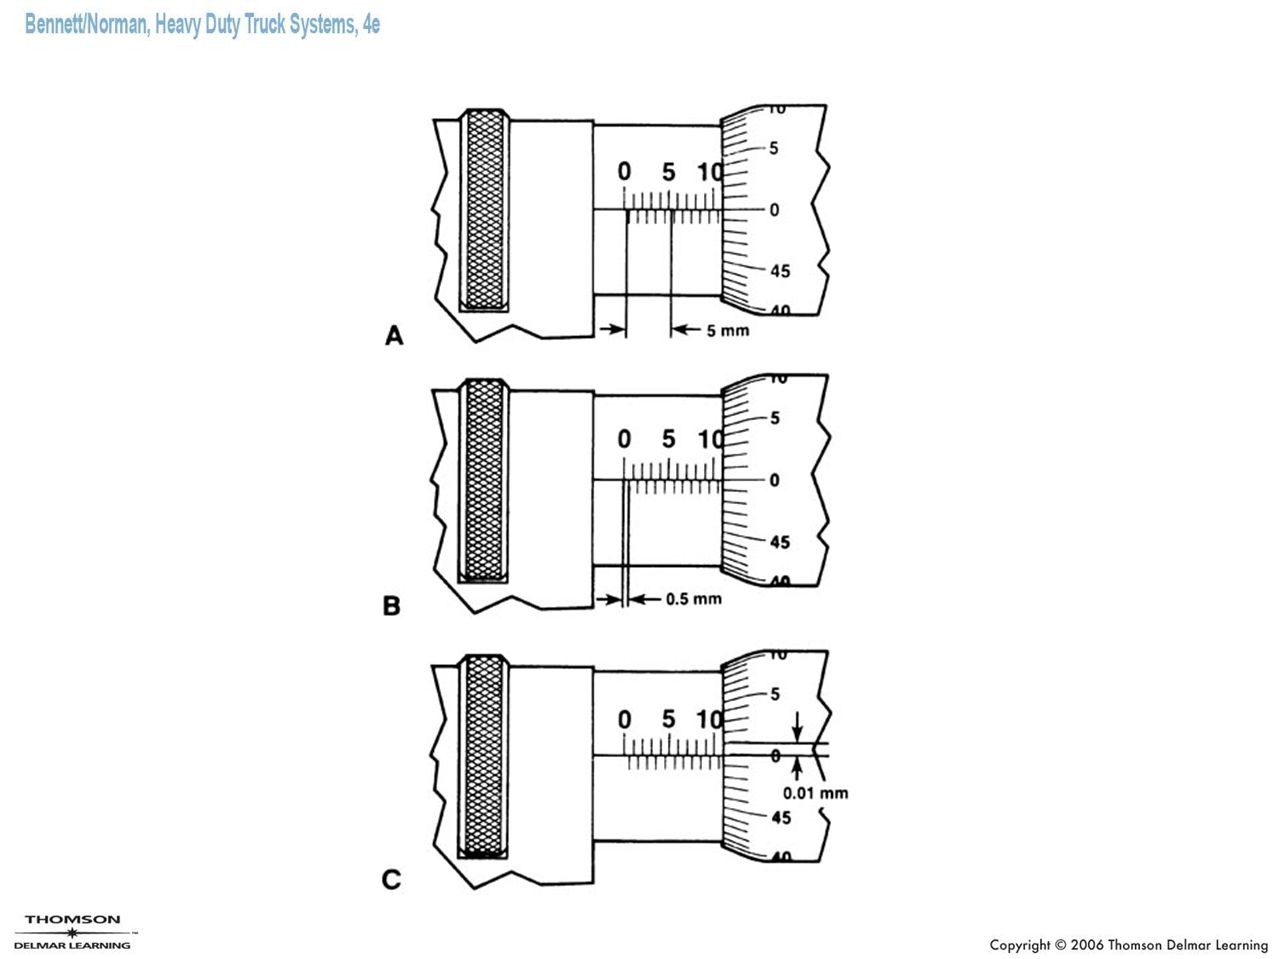
Reading an Inch-Graduated Outside Micrometer
To read a micrometer, first read the last whole sleeve number visible on the sleeve index line. Next, count the number of full sleeve graduations past the number. Finally, count the number of thimble graduations past the sleeve graduations. Add these together for the measurement. These three readings indicate tenths, hundredths, and thousandths of an inch, respectively.

34
Using an Outside Micrometer

35
Reading an Inside Micrometer

36
Other Measuring Gauges
Thickness gauges Screw pitch gauges Torque-indicating wrenches

37
Manufacturers’ Service Publications
Service manuals Parts books Service bulletins Recall bulletins Field service modifications Time guides Driver’s manuals

38
Other Service Publications
Supplier manufacturers’ guides and catalogs General repair literature

39
Fasteners Fastener grades and classes Frame fasteners
Tightening fasteners Fastener replacement Thread repair Screw/stud removers and extractors Thread locking compound application

40
Fastener Tightening (1 of 3)
Clean all fasteners, threads, and all surfaces before installing them. Ensure they are torqued accurately. When locking compound or anti-seize compound is recommended for a fastener, the compound acts as a lubricant, and oil is not needed. Hand turn fasteners so they contact before using a torque wrench to tighten them to their final torque values. Tighten the nut, not the bolt head, when possible. This gives a truer torque reading by eliminating bolt body friction.

41
Fastener Tightening (2 of 3)
Always use a torque wrench to tighten fasteners, and use a slow, smooth, even pull on the wrench. When reading a bar type torque wrench, look straight down at the scale. Viewing from an angle can give a false reading. Only pull on the handle of the torque wrench. Do not allow the beam of the wrench to touch anything. Tighten bolts and nuts incrementally. Typically, this should be to one-half specified torque, to three-fourth torque, to full torque, and then to full torque a second time.

42
Fastener Tightening (3 of 3)
Do not over-torque fasteners. Overtightening causes permanent stretching of fasteners, which can result in breakage of parts or fasteners. If specific torque values are not given for countersunk bolts, use the torque value for the corresponding size and grade of regular bolt. Follow the torque sequence when provided to ensure that clamping forces are even and mating parts and fasteners are not distorted.

43
Shop Talk If a torque-to-yield bolt is replaced with a new bolt of identical grade but torqued to a value found in a standard torque chart, the clamping force produced will be at least 25 percent less.

44
Adhesives and Chemical Sealing Materials
Chemical adhesives and sealants may provide added holding force and sealing ability when two components are joined. Sealants are applied to threads where fluid contact is frequent. Chemical thread retainers are either: Aerobic (cures in the presence of air) Anaerobic (cures in the absence of air) When using a chemical adhesive or sealant, follow the manufacturer’s instructions. Note that some adhesives molecularly bond to the surface of metals, destroying the material on removal.
 Anaerobic (cures in the absence of air) When using a chemical adhesive or sealant, follow the manufacturer’s instructions. Note that some adhesives molecularly bond to the surface of metals, destroying the material on removal.")
45
Shop Talk To disassemble fasteners that have been held together with a thread locking compound, it may be necessary to heat the bond line to 400°F before removing the nut. Every time the fasteners are disassembled, replace them. If mating components are damaged by overheating, replace them.

46
Summary (1 of 4) Hand tools are used in many repair tasks.
Proper selection and use of hand tools by the technician are important requirements for performing quality heavy-duty truck service. Power tools make a technician’s job easier. Pneumatic (air) tools have four advantages over electrically powered equipment: flexibility, light weight, safety, and low cost operation and maintenance. The disadvantage is the noise produced. Power tool safety rules must be followed and that includes wearing hearing protection.
 tools have four advantages over electrically powered equipment: flexibility, light weight, safety, and low cost operation and maintenance. The disadvantage is the noise produced. Power tool safety rules must be followed and that includes wearing hearing protection.")
47
Summary (2 of 4) The power tools used in heavy-duty truck repair include impact wrenches, air ratchet wrenches, air drills, air chisels and hammers, blowguns, bench grinders, grinding wheels, wire wheel brushes, buffing wheels, presses, and lifts and hoists. Using jacks, lifts, frame machines, and hoists to raise trucks, trailers, or heavy parts on a truck chassis requires careful adherence to safety rules. The machinist’s rule looks like an ordinary ruler, but it is precisely divided into small increments, either in metric or decimal graduations.

48
Summary (3 of 4) Dial or digital calipers are used for taking inside, outside, depth, and step measurements, and are calibrated to read in either metric or standard scales. A micrometer is used for measuring the inside or outside diameter of a shaft or the bore of a hole, either in metric or standard units. Gauges are used to measure thickness and screw pitch. A torque wrench is used to measure the amount of twisting force applied in tightening a fastener. The main source of repair and specification information for heavy-duty trucks is the OEM service literature available in manuals, on CDs, or on-line from manufacturer data hubs.

49
Summary (4 of 4) Troubleshooting charts are provided in manuals or on-line to provide a way to systematically track problem sources and identify the repair required. Fasteners used on heavy-duty trucks come in a range of grades and classes. Proper use of torque wrenches is necessary when installing threaded fasteners. The correct fastener is important. In some cases, threads must be repaired with thread inserts or by thread chasing. Rivets are used to fasten overlapping skin panels on a truck cab and some trailer skins. A rivet gun and bucking bar are used to drive and buck rivets.

Similar presentations