Download presentation
Presentation is loading. Please wait.

1
Student Manager 101 Series Part 1/5 Names

2
A general intro to Student Manager Inputting a name Editing names A few useful tips

3
It can help you do your job Faster Easier With more accuracy

4
Student Manager is an instrument……. NOT a CD Player (or MP3 Player.. For you “young ‘uns”) Your involvement and participation Is required!
 Your involvement and participation Is required!.")
5
So … the amount of benefit you get from Student Manager is directly proportional To the investment you make in learning How to use it… in your environment! You are NOT alone… You have help….

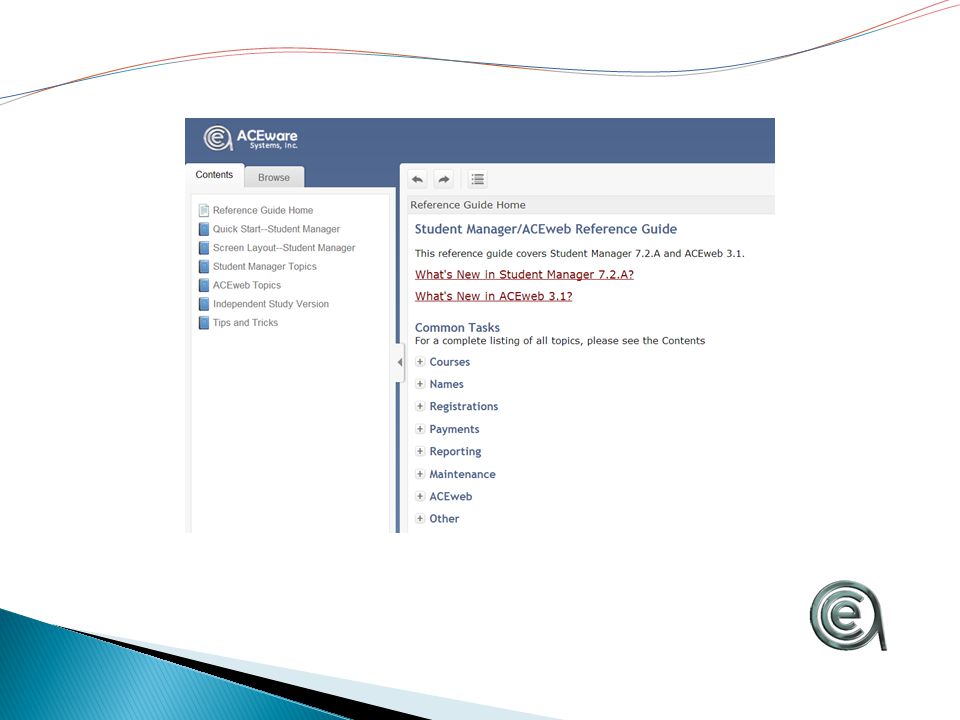
6
www.aceware.com Remember, there’s always online help at ……

7
Or from the Student Manager Tool bar……

10
Student Manager data is managed through three major areas….. Names - your students, your potential students Courses – Your programs, classes, workshops, conferences, online programs, etc. Registrations – and the payments related to them

11
Other icons on the toolbar include: Lookup Faculty Add/Edit Codes Edit Preferences Open the Online Help Guide Log on a Different User

12
Click on the icon, or use the drop-down menus to access each area.

13
To Leave Student Manager... Go to File and choose Exit When you leave your office, ALWAYS Close (EXIT) Student Manager
 Student Manager.")
14
Clicking on Edit provides the opportunity to Undo, Copy, Edit, Paste, Clone and Paste Name record, set Preferences and establish or edit your User Profile.

15
Module Is where you can get to your data… To add/edit or Delete records in your system….

16
Reports ….. 290 + reports in 84 different areas… (all reports can be modfied…)
")
17
Tools… for maintenance & cleanup

18
A quick place to get a “Big Picture” of the total size of your system is under “Help” - About Student Manager

20
Click the + sign to add a name 3 ways to begin! 1 2 3 On the keyboard – Alt + A From Modules, select Names, Add New Name

21
Since only checked fields display, you can remove fields, improving accuracy. NOTE: Many fields can be re- labeled and/or validated. Customize the name screen with Preferences We’ll cover this in more Detail in the Last Series # 5 - Codes

22
Pink brackets are also validated data fields, but link to a table. Data Validation fields with dropdown arrows) Remember.. What you “See” depends On what fields you’ve enabled in The Name Preferences Area.. The + sign means you can add codes On-the-fly
 Remember.. What you See depends On what fields you’ve enabled in The Name Preferences Area.. The + sign means you can add codes On-the-fly.")
23
Student ID # The ID # is the unique identifier for the Names table. Organizations have the option of entering a unique 9 digit ID, or allowing the system to generate an ID number for the Name record (if you do not enter a #, the system will generate a unique ID number when you save the record). System generated ID numbers begin with your site code (e.g. if 'X' is your site code the numbers would begin at X00000001; select Edit / Preferences / Organization Defaults to set the site code.
. System generated ID numbers begin with your site code (e.g. if X is your site code the numbers would begin at X ; select Edit / Preferences / Organization Defaults to set the site code..")
24
A few fields deserve extra mention... Badge Name: for those people who don’t like the name their mother gave them, or prefer to go by the name “Bubba” When a husband and wife enroll for ballroom dance, you don’t need to send the household two brochures. “Don’t mail” lets you hide one of the names when running mailing lists. NOTE: in 7.2.A you can “Re-Purpose” this field

25
A few fields deserve extra mention... A complimentary field to “Don’t Mail” is Excl which excludes the name from mass emails (This allows you to comply with “Can Spam” regulations )
.")
26
A few fields deserve extra mention... Source identifies how the customer arrived at your doorstep the first time. Add Interest identifies those classes in which the customer expressed an interest. As they register for courses, the subject code from the course is added to this field. No limit is placed on the amount of Interest codes a student may have.

27
Interest Codes are a POWERFUL tool for Marketing and Program Management!.. Can add as many as you want Can “Scope” by program area Can auto-fill from Course “Subject” Can be edited or deleted

28
A few fields deserve extra mention... Occupation and Organization Record the student’s career choice in occupation, and the industry in which they work in organization. For example, on campus you have nurses and law enforcement officers (occupation) who work in education (organization). Recording both is more accurate when generating mailing lists. NOTE: again… in 7.2.A you can “Re-Purpose” these fields
 who work in education (organization). Recording both is more accurate when generating mailing lists. NOTE: again… in 7.2.A you can Re-Purpose these fields.")
29
Membership(s) A powerful tool to manage, track, and control access to classes. There is a special webinar devoted to handling memberships in the webinar archive.

30
Student Manager Automatically adds…. Add Date, Updated Time, Updated, Created by, and Updated by. This creates a historical record of activity on the record.

31
Saving your work…. Any Button EXCEPT Undo Abandon Esc Will SAVE your edits Saves.. Screen Remains Open Saves (Closes Screen) If you have NOT saved changes, will UnDo any Edits (Screen Remains Open) You do NOT have to hit SAVE Before an OK/Close If you have NOT saved changes, will UnDo any Edits (Closes Screen) Looks up (finds) a new name (also SAVES)
 If you have NOT saved changes, will UnDo any Edits (Screen Remains Open) You do NOT have to hit SAVE Before an OK/Close If you have NOT saved changes, will UnDo any Edits (Closes Screen) Looks up (finds) a new name (also SAVES).")
32
Once you’ve built a list of names, use the Find tool to locate a name in the list. Find

33
Navigating the FIND window No extra click – just type! For name lookup, type last name, first name Tab to search by next column When you find the name, ENTER or Dbl Click to open edit screen To EXIT the Find Window.. Press ESC (the X close box does NOT do it) What you type appears here….
 What you type appears here…..")
34
Getting your Timing down You may set the # of seconds the FIND window “waits” for you to enter the next keystroke(s) in Preferences (The Default is 3.5 seconds)
 in Preferences (The Default is 3.5 seconds)")
35
Lets you search using about a variety of options First Name Partial Address Key word in Firm Notes in Comments Part of email address Or custom conditions

36
Here’s a few good tips! Credential Tab

37
A whole new tab on the name screen that helps you record test scores (think Work Keys), transcript info from other schools, job placement, etc. You can even track multiple scores for the same test, filter results, and keep notes.

38
Here’s a few good tips!

39
1.Locate name 2.Edit / Clone name 3.Add a blank name record (or locate an existing record) 4.Edit / Paste Address When adding names, the Last name added/edited is By default.. The address that would be Cloned Clone Name (copy address from an existing record)
.")
40
Deleting an email from the name screen will bring up a dialog box For the special case when you REALLY, REALLY don’t want to ever email this person… Blacklisting prevents the email address from being inadvertently added later. NOTE: this is a System Wide Preference.. That is by default OFF.

42
You can make the change permanent under name preferences

43
Additional Reports provides the ability to print a #10 envelope, generate a fax cover sheet, or print a transcript.

44
Reports / Demographic / Mailing Labels Print Marked Labels Remember HELP is available Super tool for tracking Catalog/ Brochure requests

45
When the user logs in on the Call Back date, the Call Back window will open showing the Call Back information: Who calls On what date This Call Back Feature also Available for Faculty and Courses

47
Just Double Click on the Email Address

48
Separate the addresses with a comma and a space

49
Type the “good” Student ID# over the “evil” Student ID# and follow the onscreen prompts

51
Student Manager 101 Courses Courses From our cabin to yours, Wednesday, October 10 Same time, same link!

Similar presentations


 follow the hyperlinks to navigate to the specified Topic.>")


 501-5269 POSSESS Central Region Member October 31, 2007.>")


 Recording Attendance Custom Records.>")


 follow the hyperlinks to navigate to the specified Topic or Figure.>")