Download presentation
Presentation is loading. Please wait.

1
Portland Centricity® User Group Meeting
January 29, 2015

2
And you thought EHR was tough to learn…..

4
Financial Opportunity
Is your billing process inefficient Do you have high staff turnover Are you a new provider What priorities do you want to focus on?

5
Portland Centricity® User Group Meeting
January 29th, 2015

6
Who We Are IT/computer consulting firm Established in 1997
12 network consultants (18 staff) 66 of 175 clients are small/mid-sized clinics Vast majority use Centricity® via HealthCo HealthCo’s preferred IT partner in Oregon Lot’s of mutual clients with HePS (she’s a client of ours too )
 66 of 175 clients are small/mid-sized clinics. Vast majority use Centricity® via HealthCo. HealthCo’s preferred IT partner in Oregon. Lot’s of mutual clients with HePS. (she’s a client of ours too )")
7
Why We’re Different No Long-term Contracts Hourly Billing or Fixed-fee
No Mileage/Travel Charges Featuring: 24/7 Help Desk/End-user Support HIPAA & Compliance Assistance EHR / PM Selection & Support Hardware & Software Sales Vendor Relations Management 24/7 Server Monitoring & Alerts Medical Practice Interfacing: Hospital, Lab, Radiology, EKG Ultrasound, Spirometry, etc.

8
Some of Our Clients The Children’s Clinic Longview Orthopedic
Pediatric Associates of the Northwest Cascade Eye Center Longview Urology Hillsboro Pediatrics Columbia Pain & Spine Institute Westside Pediatric Clinic Sunset Pediatrics Portland Plastic Surgery Group Comprehensive Neurosurgical Consultants Portland Pain & Spine Maple Street Clinic Mountain View Medical Center Oregon Reproductive Medicine Vivid Eye Care Waldorf Center for Plastic Surgery …and many more

9
CPS Version 12 What’s New?

10
Agenda PM Enhancements Account Summary Desktop/Chart View
New EMR Forms New and Updated MEL/Data Symbols

11
PM Enhancements

12
“Guarantor Based” New Options
Here we have some new settings for Guarantor based collections. You do have to check the Guarantor based collection letter option in order for these other options to work. There is now a new “Default collection status” for visits newly changed to a visit status of collections. In current versions, the default for a visit that just changed to a Visit Status of Collections is New. The new default looks for the most recent visit for the guarantor in collections based on DOS and sees what Collection status it has, then the system will change all newly turned visits to that same Collection status. You can still set it to New as the default if you want, but this way – if you have a guarantor with visits in Collections, you can have all their visits automatically be the same collection status instead of having some in 120 day delinquent and some in 45 courtesy reminder. We also have a new pop up alert warning for guarantors in collections.

13
Billing Notes GE has enhanced the Billing notes. They are now user name and date/time stamped like the Correspondence notes. Notes that are repeatedly used can be created and saved in Administration. The user can select the note from a drop down list within registration. They have added security to this where you can set whether a user can delete, edit or inactivate/reactivate the notes Type any notes pertaining to the billing. Add notes 1 Click (New). The New Billing Notes window appears. 2 Type the Note subject and text. 3 Click Done. The new note appears in all Billing Notes windows for this patient throughout the application (reg, Charges tab of the visit and pymt entry). Edit notes 1 Select the note from the list in the Billing Notes window. 2 Click (Edit). The Edit Billing Notes window appears. 3 Complete your edits and click Done. The updates appear in all Billing Notes windows for this patient throughout the application. Delete notes use when... You want to completely remove the note from the database. Once deleted, the note cannot be retrieved. 2 Click (Delete). The Delete Billing Notes query appears. 3 Click Yes to delete. The note no longer appears in all Billing Notes windows for this patient throughout the application. Inactivate/reactivate notes use when... You want to be able to retrieve the note at a later date. Inactivate a note 1 Select the note from the list in the Billing Notes window.2Click (Inactivate). The note no longer appears in all Billing Notes windows for this patient throughout the application. Reactivate a note 1 Click Display inactive billing notes in the Billing Notes window. Inactive notes display in the list. 2 Select the note from the list in the Billing Notes window. 3 Click (Reactivate). The note appears in all Billing Note windows for this patient throughout the application.
. The New Billing Notes window appears. 2 Type the Note subject and text. 3 Click Done. The new note appears in all Billing Notes windows for this patient throughout the application (reg, Charges tab of the visit and pymt entry). Edit notes. 1 Select the note from the list in the Billing Notes window. 2 Click (Edit). The Edit Billing Notes window appears. 3 Complete your edits and click Done. The updates appear in all Billing Notes windows for this patient throughout the application. Delete notes use when... You want to completely remove the note from the database. Once deleted, the note cannot be retrieved. 2 Click (Delete). The Delete Billing Notes query appears. 3 Click Yes to delete. The note no longer appears in all Billing Notes windows for this patient throughout the application. Inactivate/reactivate notes use when... You want to be able to retrieve the note at a later date. Inactivate a note. 1 Select the note from the list in the Billing Notes window.2Click (Inactivate). The note no longer appears in all Billing Notes windows for this patient throughout the application. Reactivate a note. 1 Click Display inactive billing notes in the Billing Notes window. Inactive notes display in the list. 2 Select the note from the list in the Billing Notes window. 3 Click (Reactivate). The note appears in all Billing Note windows for this patient throughout the application.")
14
Open a patient’s chart summary from registration
Also, when you are looking at a patient’s record in Registration, You can go directly from registration into the patient’s chart summary. In previous versions, the chart component would open in registration at the desktop level and then the user would need to search for the patient. It will now open directly into the chart for the patient that is being viewed in Centricity.

15
Configure default Quantity and Type of Unit of
Measure for Drugs You can now configure default Quantity and Type of Unit of Measure for Drugs, from the Information screen on a CPT code (this was actually fixed in CPS version ) Setting this at the CPT code level will fill in the information appropriately when billing with the CPT code in the visit.
 Setting this at the CPT code level will fill in the information appropriately when billing with the CPT code in the visit.")
16
Chart Contributor has been changed to Chart Access
In Administration in the in the User table: Chart contributor has been changed to Chart Access. The function remains the same.

17
Security (if upgrading from CPS95)
There are new security settings to reflect the changes to the product: Account Summary- a new component for which security will need to be set. We will talk about this feature later in the presentation. Transaction Management – now can set security so that users can see the information, but can be restricted from moving and/or deleting transactions in the batch. Billing Notes now have security for adding new notes, editing, deleting, inactivating and reactivating. To se this go to Administration – Notes – Patient Billing Notes Account Summary Administration – Notes – Patient Billing Notes

18
Security – Increased Granularity
If you are upgrading from Centricity Practice Solution 9.5 or later, Change patient contacts, Change patient home location of care, and Change patient photo permissions are automatically set for all users already granted Change Registration permission. If you are upgrading from a pre-9.5 version these permissions must be set manually after the application is updated.

19
Account Summary The Account Summary component is another new feature in CPS v11. It is so exciting that we’ve created an entire section of this presentation on it! Good morning everyone!

20
Account Summary is a new component in CPSv11 or later versions
This component was created as a centralized place to review account information and troubleshoot patient account status. The module provides financial summary information for a guarantor account (total balances and aging) and transaction history with detailed ledger information for each visit within a guarantor’s responsibility. What is Account Summary? It creates a centralized place to review account information and troubleshoot patient account status. This module provides financial summary information for a guarantor account (total balances and aging) and transaction history with detailed ledger information for each visit within a guarantor’s responsibility. The account summary basically takes the AR window and the Registration component Patient, Insurance and Financial tabs and displays it in in View only, but much more user friendly format. This makes it much easier for viewing the AR to discuss it with a patient/guarantor.
 and transaction history with detailed ledger information for each visit within a guarantor’s responsibility. What is Account Summary It creates a centralized place to review account information and troubleshoot patient account status. This module provides financial summary information for a guarantor account (total balances and aging) and transaction history with detailed ledger information for each visit within a guarantor’s responsibility. The account summary basically takes the AR window and the Registration component Patient, Insurance and Financial tabs and displays it in in View only, but much more user friendly format. This makes it much easier for viewing the AR to discuss it with a patient/guarantor.")
21
Set Up: Users must first be given access to Account Summary in Security before being able to view the component. In Administration > User and Resource Management > Users > Security > Account Summary. Either you have access to it or not.

22
So here is a screen shot of the Account Summary component
So here is a screen shot of the Account Summary component. Notice the left side navigation area, a blue “banner” or demographics information across the top and then the information in the panes. There are also 2 action icons Comparison View and Find patient which are your action buttons.

23
Here is the Account Summary view side by side with the EMR chart
Here is the Account Summary view side by side with the EMR chart. Notice the similarities in the left navigation panes and the layout is similar to EMR

24
Demographics Area: The Find Patient button allows users to search for a patient or guarantor. In the demographics area, any patients linked to the guarantor will display. By highlighting each patient, you would see their individual insurance information. Here is a closer view of the Guarantor’s demographics banner. Notice the guarantor information on the left, in the middle we see alerts regarding any patients that are linked to that guarantor and to the right of that – a display of any patients that are linked to the guarantor. Note that by highlighting each patient, users can see their individual insurance information = also, users can quickly go directly into the registration record of whichever patient is highlighted by clicking the Go to Registration link.

25
If you wanted to view the same information displayed in the Demographics section now, you would have to open up multiple registration windows and go back and forth between the Patient and Insurance tabs.

26
Don’t forget your Patient Alert Notes messages…
For those patients with Alerts messages like the patient has Visit in Collections, you have to close the pop up warning window that everyone always takes the time to stop and read and evaluate that information… right?

27
Account Summary Demographics Area – is a helping hand!
Having it all right there in one place without having to navigate through multiple windows or tabs is a great thing! Having the majority of the information right in one window is definitely a great thing!

28
Financial Summary: Both the Financial Summary and Transaction History sections display data regarding all visits of all patients associated with the Guarantor. The Financial summary gives a quick snapshot of the balance aging and last patient payment received Our next section is the Financial Summary. The Financial summary gives a quick snapshot of the balance aging and last patient payment received, much like the information displayed under the Get Financial Information button in the Registration component

29
If you wanted to view this same information now, you would need to:
Open the Guarantor’s record in the Registration component Click on the Get Financial History button

30
Then view the information regarding each patient under the Guarantor
Granted, this isn’t so bad – but you still don’t have access to all of the information needed to discuss an account with the patient/guarantor. The Account Summary puts access to everything you need in one place!

31
Transaction History: The Transaction Summary shows an individual summary for all visits for the patients associated with the guarantor. If needed, users can drill down into a visit to examine it by clicking on the ticket # and it will open the visit in the Billing component. The next section is the Transaction History. Like the Financial Summary, the Transaction History displays data regarding all visits of all patients associated with the Guarantor. Like in the Account Receivable component, clicking on the + next to the ticket number will display detailed information regarding the visit.

32
If you wanted to view this same information now, you would need to:
Open the Patient’s record in the Registration component Click on the Get Patient History button

33
Repeat for each patient linked to the Guarantor

34
Go to the Billing Component to view the Visits related to the Guarantor to see the Visit Statues for each visit. And THEN to get the visit status information either go to the Billing or AR Component – as you can see, Account Summary makes this so much easier by having access to all of the information right there.

35
Account Summary Financial Summary and Transaction History helps you see a Patient’s Account from Head to Toe! Another nice feature of the Transaction history is if the expanded view of the ticket isn’t enough information and the user needed to open up the visit in the Billing component, they simply need to click on the ticket number to open it up.

36
Comparison Views: The Comparison Views button allows users to look at 2 account summaries side by side Users can also have several Account Summaries open for different patients at a time if needed, and you can also have a side by side view of 2 account summaries (for example if you wanted to view a husband and wife’s accounts as they are each their own guarantor).
.")
37
Dock/UnDock/Close: There are 3 icons located in the upper right portion of the Patient’s Account Summary window. The icon that looks like a partially unbent paperclip is the undock icon so you can undock this account summary and move it around your window. The open square is the dock icon. The X icon closes the account summary for the patient you are looking at, not the Account summary component. Additional icons in the upper right section of a guarantor’s summary – undock, dock, close. To Sum it up, this is a great tool to help your staff to answer patient questions about their account! Now let’s go into the product and check it out – let’s look for William Duff = see all patients. Comparison view: Joyce and Scott Davenport

38
Desktop/Chart View

39
New Look and Feel to the Desktop

40
New Ribbon View

42
Ability to add custom HTML links to your left
navigation pane that open within Centricity Add custom links and commands With Administration > Custom Module Extensibility permissions you can create custom HTML links in the left navigation pane and custom commands in the ribbon menu that execute batch or system commands.

43
Ability to add a URL using Set Up a Command function to open a new Web Page outside of Centricity

45
Example: adding Centricity EDI dashboard, ESM Console, HealthCo Client Login to your links
Need screen shot for link to ESM and Portal

46
Security settings to add Custom Links and Commands

47
New Look and Feel to the Chart

48
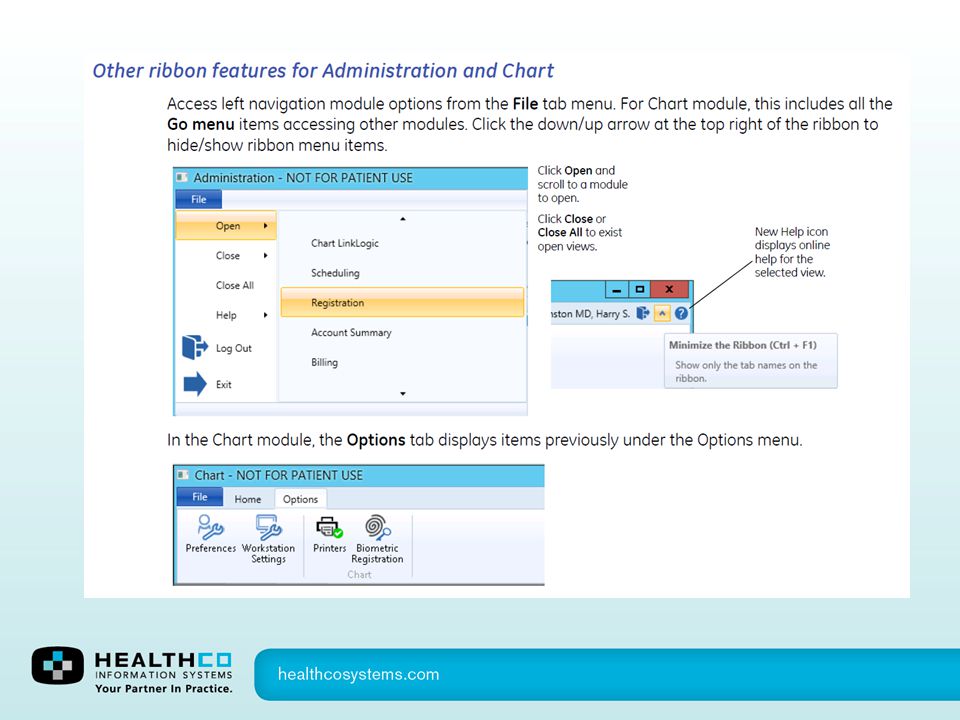
Ability to minimize the ribbon
Administration Edit items and frequently used features moved to Ribbon. Like Microsoft Outlook®, the ribbon Home menu offers easy to use visual groupings of commonly used features for Administration and Chart.

49
New EMR Forms

53
MU Core Checklist

54
Family History – CCC Basic

55
Family History - HealthCo

56
Urgent Care Management

57
New PPD Form

58
New Immunization Management Form
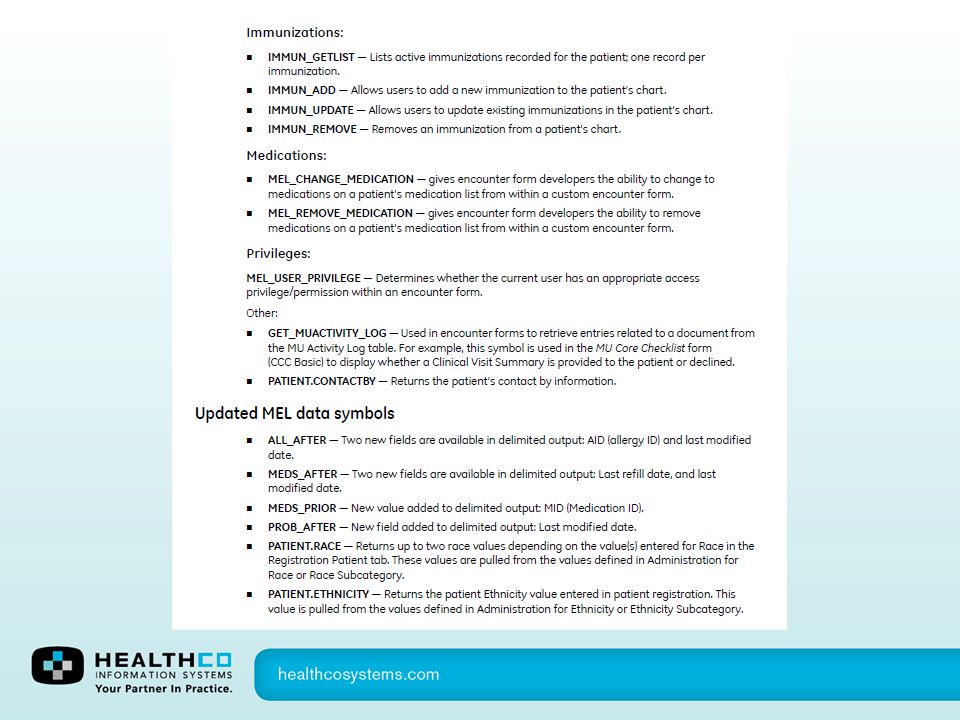
With this new HTML form you are able to set series and icons will display as a guide to determine if needed. Once you click on the icon you will now be able to administer the immunization. Dropdown fields can be predefined from Administration.

59
New Immunization Management Form
With this new HTML form you are able to set series and icons will display as a guide to determine if needed. Once you click on the icon you will now be able to administer the immunization. Dropdown fields can be predefined from Administration.

60
New Immunization Management Form
With this new HTML form you are able to set series and icons will display as a guide to determine if needed. Once you click on the icon you will now be able to administer the immunization. Dropdown fields can be predefined from Administration.

61
New Immunization Management Form
With this new HTML form you are able to set series and icons will display as a guide to determine if needed. Once you click on the icon you will now be able to administer the immunization. Dropdown fields can be predefined from Administration.

62
New Medication Administration Form

63
New Medication Administration Form

64
New Care Plan Management Form

65
Updated Risk Factors-CCC Form

66
Updated Risk Factors-HealthCo Form

67
Updated Problems-CCC Form

68
Updated Patient Instructions-CCC Form

69
Updated CPOE A&P-CCC Form

72
Meaningful Use Updates in CPS12

73
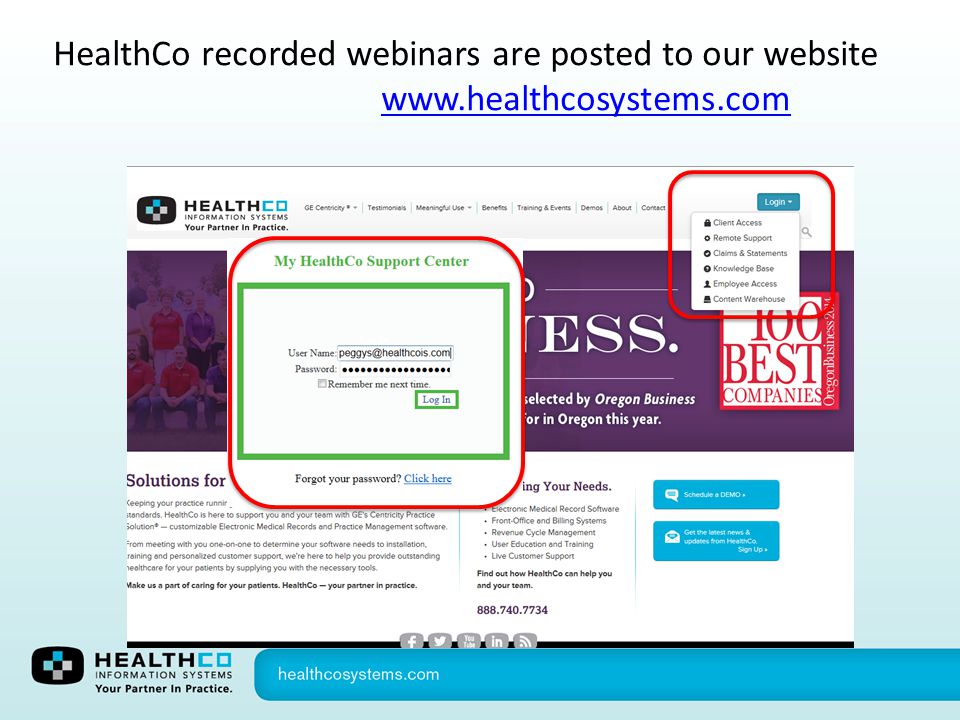
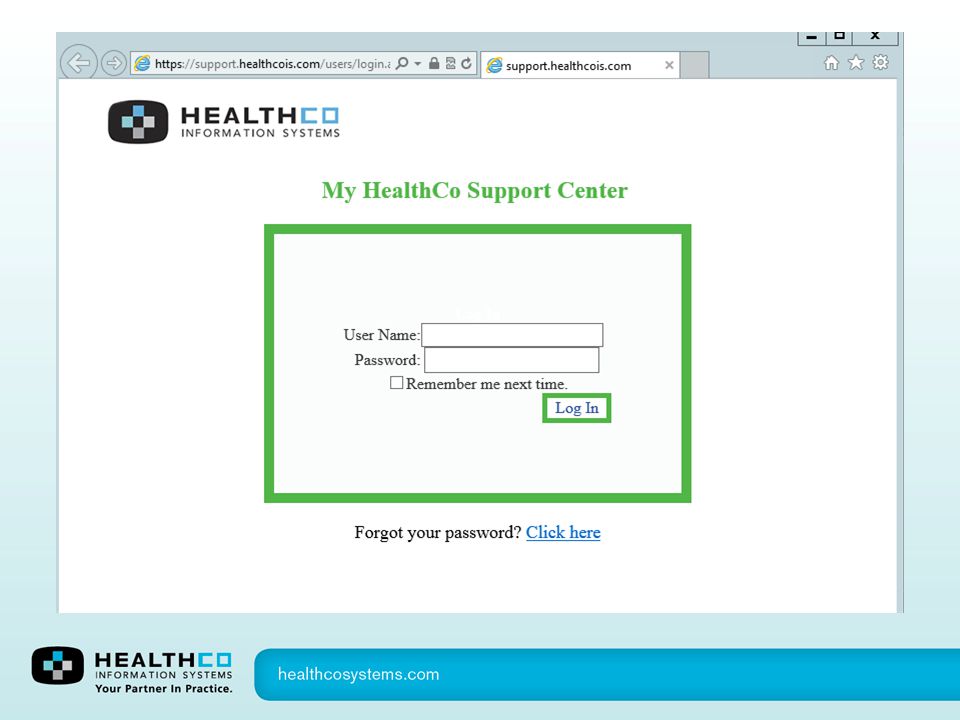
HealthCo recorded webinars are posted to our website
77
HealthCo provides consulting services to assist
in upgrade training as well as Meaningful Use Consulting. Please Contact: Andrea Cunningham Director, Professional Services

78
Managing Reimbursements Easy Money
Managing Reimbursements Easy Money? Women’s Healthcare Associates Lana Giacomelli Business Office Manager & Jennifer Santos Reimbursement Supervisor

79
Payment Options for Patient Balances (hint- make it easy for your patients to pay you!)
Use of your portal for one time payments and/or setting up payment plans Ability for a guarantor to make a one time payment from your website CCOF (credit card on file) (we don’t use this – YET, but are considering it!) A CCOF program facilitates the collection of a credit or debit card from each patient and requires that this card be used for copayments, coinsurance and deductibles. You may collect an estimate of what is due at time of service and/or charge the credit card when the payer pays the claim. Overview of patient balances - Discussion about the increase in patient balances, and the trend is still ticking upward– are we paying attention to this, and how can we raise the issue to stakeholders to make informed decisions around policies and procedures we utilize to collect from our patients. Centricity vendor Kryptiq (in our area) provides portal access for patients, and provides options for you to set up your payment criteria to make it as easy as possible for patients to pay their balances. Options: Discount for paying in full within a certain timeframe. Make a one time payment. Set up a payment plan for specified period of time (you can set up a perimeter for a patient to set up their own plan) or provide a number for them to call in to set up an automatic plan with a representative from your organization. CCOF (credit card on file) programs - describe this program – ask if anyone is currently utilizing it, and their experience good or bad…
 (we don’t use this – YET, but are considering it!) A CCOF program facilitates the collection of a credit or debit card from each patient and requires that this card be used for copayments, coinsurance and deductibles. You may collect an estimate of what is due at time of service and/or charge the credit card when the payer pays the claim. Overview of patient balances - Discussion about the increase in patient balances, and the trend is still ticking upward– are we paying attention to this, and how can we raise the issue to stakeholders to make informed decisions around policies and procedures we utilize to collect from our patients. Centricity vendor Kryptiq (in our area) provides portal access for patients, and provides options for you to set up your payment criteria to make it as easy as possible for patients to pay their balances. Options: Discount for paying in full within a certain timeframe. Make a one time payment. Set up a payment plan for specified period of time (you can set up a perimeter for a patient to set up their own plan) or provide a number for them to call in to set up an automatic plan with a representative from your organization. CCOF (credit card on file) programs - describe this program – ask if anyone is currently utilizing it, and their experience good or bad…")
80
Utilizing GE Centricity Technology to Streamline Workflows
EDI services and website – offers good visibility of the claims process EFT – the key to eliminating the use of ‘virtual credit cards’ ERA – automatically posting your insurance payments Establish a team to manage the project Be prepared for frustrations in setting up each carrier transaction column set (lessons learned - questions to ask to save time) ERA can be ‘turned on’ by carrier. We started with smaller payers to get used to the workflow change. Now at 85% of all carriers on ERA. Lana will start the discussion and outline what WHA is currently utilizing in Centricity to streamline workflows. Utilizing GE EDI services, we have access to the EDI website. The website offers a dashboard (default to last 7 days) that has robust reporting capabilities (available in claim number or claim $ options) and drill down capabilities that allows users to figure out the cause of a claim rejection quickly. WHA recently combined the reimbursement and collection teams into one department (a direct effect of utilizing Centricity EDI, EFT and ERA services to streamline the manual posting process) The focus of our learning opportunity today will be to dig into Task Management (available with our current version 12) Lana will introduce Jenn Santos, the Reimbursement Supervisor at WHA to take the group through the process of utilizing Task Management for assignment and monitoring of the A/R balances and team.
 ERA can be ‘turned on’ by carrier. We started with smaller payers to get used to the workflow change. Now at 85% of all carriers on ERA. Lana will start the discussion and outline what WHA is currently utilizing in Centricity to streamline workflows. Utilizing GE EDI services, we have access to the EDI website. The website offers a dashboard (default to last 7 days) that has robust reporting capabilities (available in claim number or claim $ options) and drill down capabilities that allows users to figure out the cause of a claim rejection quickly. WHA recently combined the reimbursement and collection teams into one department (a direct effect of utilizing Centricity EDI, EFT and ERA services to streamline the manual posting process) The focus of our learning opportunity today will be to dig into Task Management (available with our current version 12) Lana will introduce Jenn Santos, the Reimbursement Supervisor at WHA to take the group through the process of utilizing Task Management for assignment and monitoring of the A/R balances and team.")
81
Managing your team with Centricity Task Management
Assigning Security A/R Distribution Building Queues Adding Criteria Assigning Tasks Follow Up and Monitoring Questions Shifting our focus now to the tools available in Centricity for management of A/R - Jenn Santos will take you through the steps to utilize Task Management effectively by showing you the step by step building blocks in Centricity. Jenn will review this outline, the take us through the individual steps…

82
Assigning Security Task Management: Assign all users that will be using this module Everything else should be the person building and assigning tasks. Review that you have to assign users in security to view and use task manager. What should be assigned to users vs. Admin

83
AR Distribution Describe how our AR Department is divided out by insurance company then by alpha.

84
Building Queues How to build a queue Go over the buttons at the top
Review that it lists how many tasks meet the criteria next to the queue name

85
Name your Queue Assign Users
Name must be unique and not include any previous queue names Assign Users Include anyone who will be working the queue along with the user who will be assigning tasks and anyone else you want to be able to view it. Explain the importance of removing the task once it no longer meets the criteria Assigning users

86
Adding Criteria Company Current Insurance Carrier
Current Insurance Group Days Since Last Filed Days Since Procedure Department Facility Patient Last Name Procedure Balance Provider Resource Visit Deposit Balance Visit Insurance Balance Visit Owner Visit Patient Balance Visit Status Criteria options Company – if you do billing for more than one company Current Insurance Carrier – One specific insurance carrier Current Insurance Group – A whole group of many individual insurance carriers Days Since Last Filed – Days since the claim went out the door Days since procedure – Days since the service was performed Department – Breakdown by department; office visit, mammogram, surgery etc. Facility – If you want to look at a specific site Patient last name – if you work your AR by alpha Procedure balance – if you want to work tasks over a certain dollar amount Provider – Breakdown by provider Resource – Breakdown by resources you have setup in the system Visit Deposit Balance – If there is a deposit sitting on a ticket (you can put in a dollar amount range) Visit Insurance Balance – Work claims with a certain insurance balance Visit owner – claims in a certain visit owner or excluded from a certain visit owner Visit Patient Balance – working patient balances Visit Status – If the claim is on hold, in progress, filed succeeded; we use it to exclude filed rejected claims
 Visit Insurance Balance – Work claims with a certain insurance balance. Visit owner – claims in a certain visit owner or excluded from a certain visit owner. Visit Patient Balance – working patient balances. Visit Status – If the claim is on hold, in progress, filed succeeded; we use it to exclude filed rejected claims.")
87
How you run your department will determine the way you setup your queues. **Make sure to Save your queue! This is how I have our queues setup for my department. Depending on what data you want to look at will depend on how you setup the queue. Make sure that you save the queue!

88
Queues Each queue updates every night How to manually run a queue
Open Task Management Build Queues Select the Queue you want to run Run Queue Show how to manually run queues.

89
Assigning Tasks Select multiple lines at once Right click option
Assign Task Button **User must have access to queue to view assigned claims** How I assign tasks. Assign them weekly By alpha by insurance One at a time or a large amount at once.

90
Follow up and Monitoring
Once claim has been worked the AR Specialist puts the claim in their visit owner along with a visit description. They also complete the task. **<date> <brief description> **1/20/15 Corrected Claim Once it is in the visit owner it will no longer meet the queue criteria and drop off the list the next day. Explain the follow up procedures.

91
Questions?

92
Future Decisions & Challenges Discussion
Electronic Eligibility through GE? Phreesia or similar product compatible with Centricity? Patient balances – how to manage payment plans that make sense for your practice, and how to get meaningful reports on payment plan performance. Getting what you need for reporting and managing purposes from your vendors. Lana will thank Jenn for her presentation, then if time permits have more open discussion about future decisions and challenges…

93
Thank you! We appreciate the opportunity to share ideas about the ever changing and challenging processes for managing the Revenue Cycle puzzle! Thank Jill Arena for the invitation to present to the group.

Similar presentations


-384-1608>")


