Download presentation
Presentation is loading. Please wait.

1
Importing Titles in Destiny

2
1. Click My Computer or My Documents or your G drive. Save it to whichever drive you wish. 2. Click your G drive if you want to keep the file. The G drive starts with your username.

3
1.Click File. 2.Click New. 3.Click Folder. 4.Name the folder.

4
You will usually get MARC records from email or from a vendor website. The next 6 slides show the various ways to import records in these formats.

5
If you have a vendor disc or CD You may ask the vendor to start delivering the MARC records via email or Internet. If you have inserted a CD, open your CD drive (D). Choose the file with the.001 (or.mrc) extension. Save the file.
. Choose the file with the.001 (or.mrc) extension. Save the file..")
6
If you have MARC records emailed to you as an attachment An email attachment looks like this:

7
Steps for Emailed MARC Records 1.Click Download. 2.Then choose Save. 3.This will send the file to My Documents on your computer. This is on the C drive of your computer. 4.When you browse to find your MARC records in Catalog (Destiny), you will find My Documents and click the correct file. May end in.001 or.mrc 5.Click that file. 6.Click Open. See slide on next page.
, you will find My Documents and click the correct file. May end in.001 or.mrc 5.Click that file. 6.Click Open. See slide on next page..")
9
Downloading MARC Records from Titlewave Log in to www.titlewave.comwww.titlewave.com Click My Profile. Click the MARC Download button under MARC Records on the bottom right side. A new screen appears. On the right side, you will see a Download button. Click that button. Save the file.

10
1. Click My Profile. 2. Click MARC Download.

11
Files that have not been downloaded will just say Download. If you should ever need to download them again, they will be here.

12
From this point on, all steps are the same. Just follow the step-by-step instructions on the screen shots.

13
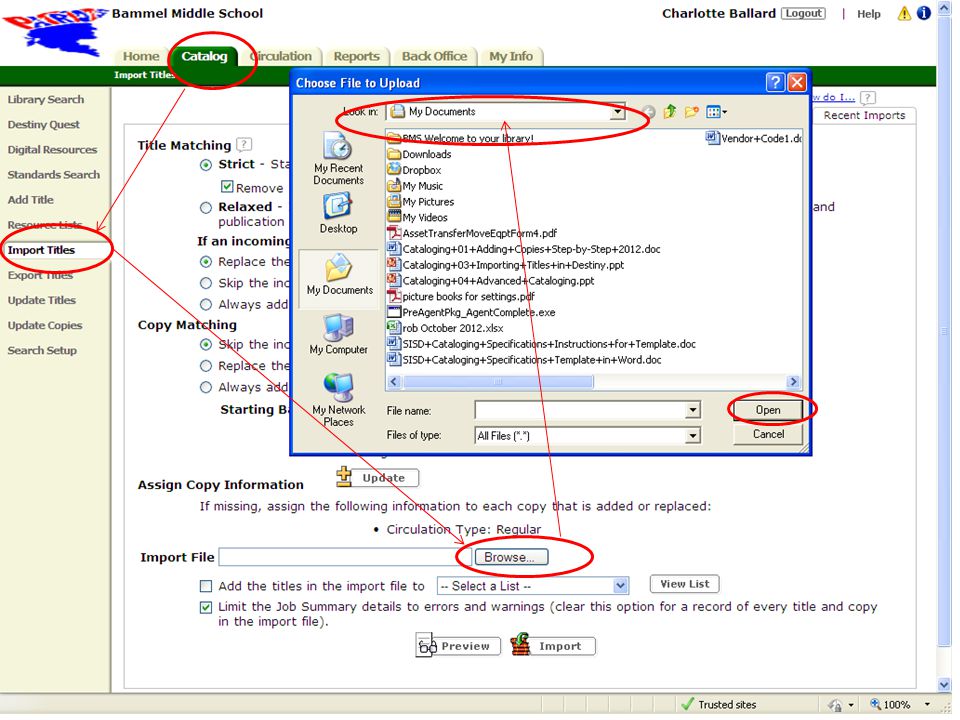
1. In Destiny, click the Catalog tab. 2. Click Import Titles. 3.Check the first box in these first three areas. 4. Select Circulation Type (Regular for most books). You may select other types from the menu. Example: Reference.
. You may select other types from the menu. Example: Reference..")
14
6. Optional: You may add titles to a Resource List if you want to. You have to create a Resource List before you try to upload your file. 5. Insert Vendor name and Funding Source. 7. Click Browse. Find your file. See next slide.

15
7. Click the file you just saved. Then click Open.

16
1. Do not uncheck this box. 2. The file name appears in the Import File box. 3. Then click Preview.

17
This screen will appear. You see the top job is Import Preview. Click Refresh List.

18
Now the job is completed. Click View.

19
You will see this screen next. It tells you how many titles are added, how many copies are added, how many titles are replaced, how many duplicates are skipped, and how many errors were made. (In this example, 42 records were read, 4 new titles were added that SISD did not have before, 43 copies were added, 2 titles were replaced because they were better than the title record that SISD already had in Destiny, and 36 duplicate titles were skipped because the record that was already in Destiny was better than the one being imported.) The most important thing here is to notice errors. Most of the time, you will see “0 Errors.” If there are errors, you will see them explained below the line.
 The most important thing here is to notice errors. Most of the time, you will see 0 Errors. If there are errors, you will see them explained below the line..")
20
The next step is to click the Import button. Then you are pretty much finished. You may look at your new Job Summary, print it out if you wish, or move on to your next exciting librarian task.

Similar presentations


>")


