Download presentation
Presentation is loading. Please wait.

1
Microsoft Office 2007-Illustrated Introductory, Windows Vista Edition Windows XP Unit B

2
Microsoft Office 2007-Illustrated Introductory, Windows Vista Edition Objectives Create and save a WordPad documentCreate and save a WordPad document Open, edit and save an existing Paint fileOpen, edit and save an existing Paint file Work with multiple programsWork with multiple programs Define file managementDefine file management Work with a USB driveWork with a USB drive

3
Objectives View files and create folders with My ComputerView files and create folders with My Computer Move and copy files with My ComputerMove and copy files with My Computer Manage files with Windows ExplorerManage files with Windows Explorer Search for filesSearch for files Delete and restore filesDelete and restore files Microsoft Office 2007-Illustrated Introductory, Windows Vista Edition

4
Unit Introduction In the first part of the unit, students will use WordPad and Paint (two programs that come with Windows XP) to learn how to create, edit and save files and to work with more than one program at a time.In the first part of the unit, students will use WordPad and Paint (two programs that come with Windows XP) to learn how to create, edit and save files and to work with more than one program at a time. In the last part of the unit, they’ll use My Computer and Windows Explorer to learn about file management.In the last part of the unit, they’ll use My Computer and Windows Explorer to learn about file management.

5
Microsoft Office 2007-Illustrated Introductory, Windows Vista Edition Creating and Saving a WordPad Document To create a WordPad document, you open the program and begin typing.To create a WordPad document, you open the program and begin typing. When you save your work, you store it permanently on a disk.When you save your work, you store it permanently on a disk. If you do not save your work you will lose it!If you do not save your work you will lose it! You can save a file using the Save As command on the File menu.You can save a file using the Save As command on the File menu.

6
Microsoft Office 2007-Illustrated Introductory, Windows Vista Edition

7
Creating and Saving a WordPad Document When you save a file, you must give it a name and indicate to which disk you want to save the file.When you save a file, you must give it a name and indicate to which disk you want to save the file. Enter this information in the Save As dialog box the first time you save the file.Enter this information in the Save As dialog box the first time you save the file. Microsoft Office 2007-Illustrated Introductory, Windows Vista Edition

8
Creating and Saving a WordPad Document Make sure you understand the distinction between the hard disk, a floppy disk and a USB flash drive.Make sure you understand the distinction between the hard disk, a floppy disk and a USB flash drive. The hard disk is your computer’s internal disk, usually drive C on a computer.The hard disk is your computer’s internal disk, usually drive C on a computer. A floppy disk is a removable disk.A floppy disk is a removable disk. A USB flash drive is removable and can be plugged into a USB port on your computer.A USB flash drive is removable and can be plugged into a USB port on your computer.

9
Microsoft Office 2007-Illustrated Introductory, Windows Vista Edition Creating and Saving a WordPad Document After you save a file for the first time, you can use the Save command on the File menu to save your changes to the file again and again without having to rename the file.After you save a file for the first time, you can use the Save command on the File menu to save your changes to the file again and again without having to rename the file. It is very important to save your work often!It is very important to save your work often!

10
Microsoft Office 2007-Illustrated Introductory, Windows Vista Edition Opening, Editing, and Saving an Existing Paint File You can use the Open command on the File menu to reopen files that are stored on a disk.You can use the Open command on the File menu to reopen files that are stored on a disk. When you open a file, you display it in the program window.When you open a file, you display it in the program window.

11
Microsoft Office 2007-Illustrated Introductory, Windows Vista Edition Opening, Editing, and Saving an Existing Paint File Know how to use the Look in list arrow in the Open dialog box to locate files on your USB flash drive and your hard disk.Know how to use the Look in list arrow in the Open dialog box to locate files on your USB flash drive and your hard disk. You can open a file from the Open dialog box by double-clicking the filename, or by selecting the filename, then clicking Open.You can open a file from the Open dialog box by double-clicking the filename, or by selecting the filename, then clicking Open.

12
Microsoft Office 2007-Illustrated Introductory, Windows Vista Edition

13
Opening, Editing, and Saving an Existing Paint File Once you have opened a file, you can edit it.Once you have opened a file, you can edit it. In Paint, you can modify a graphic using the buttons on the Paint Tool Box.In Paint, you can modify a graphic using the buttons on the Paint Tool Box. Microsoft Office 2007-Illustrated Introductory, Windows Vista Edition

15
Opening, Editing, and Saving an Existing Paint File To save the changes you make to a file, use either the Save or the Save As command.To save the changes you make to a file, use either the Save or the Save As command. Saving a file using the Save command overwrites the original copy of the file.Saving a file using the Save command overwrites the original copy of the file. The Save As command allows you to save changes as a new file, the original file remains intact.The Save As command allows you to save changes as a new file, the original file remains intact. Create a new file by typing a new filename in the Save As dialog box.Create a new file by typing a new filename in the Save As dialog box. Microsoft Office 2007-Illustrated Introductory, Windows Vista Edition

16
Working with Multiple Programs Use the title bar to move windows on the desktop so that all open programs can be viewed simultaneously when moving information from one program to another.Use the title bar to move windows on the desktop so that all open programs can be viewed simultaneously when moving information from one program to another. A powerful aspect of Windows is the ability to run several programs at the same time.A powerful aspect of Windows is the ability to run several programs at the same time. This is useful if you want to copy information between programs or work on several projects at once.This is useful if you want to copy information between programs or work on several projects at once. Microsoft Office 2007-Illustrated Introductory, Windows Vista Edition

17
Working with Multiple Programs Each time a file is opened, a button representing that file is placed on the taskbar.Each time a file is opened, a button representing that file is placed on the taskbar. One of the easiest ways to switch from one file to another is by clicking the button of the file to which you want to switch.One of the easiest ways to switch from one file to another is by clicking the button of the file to which you want to switch. Each taskbar button appears with the name of the program used to create the file as well as a title of the file.Each taskbar button appears with the name of the program used to create the file as well as a title of the file. Microsoft Office 2007-Illustrated Introductory, Windows Vista Edition

18
Working with Multiple Programs If you open several programs and files at one time, Windows XP will automatically group files that were created with the same program, reducing clutter in the taskbar.If you open several programs and files at one time, Windows XP will automatically group files that were created with the same program, reducing clutter in the taskbar. To switch to a file that is grouped, click the program’s button on the taskbar, which opens a short list of the files open in that program.To switch to a file that is grouped, click the program’s button on the taskbar, which opens a short list of the files open in that program. Microsoft Office 2007-Illustrated Introductory, Windows Vista Edition

19
Working with Multiple Programs Understand the Windows Clipboard and the difference between using the Copy, Cut, and Paste commands.Understand the Windows Clipboard and the difference between using the Copy, Cut, and Paste commands. The Clipboard is a storage area that is used to temporarily store the data you copy or move from one location to another.The Clipboard is a storage area that is used to temporarily store the data you copy or move from one location to another. You can use the Clipboard to copy or move data within the same file, between files in the same program, or between files in different Windows programs.You can use the Clipboard to copy or move data within the same file, between files in the same program, or between files in different Windows programs. Microsoft Office 2007-Illustrated Introductory, Windows Vista Edition

20
Working with Multiple Programs When you copy or move data from one file to another, use the Copy or Cut to place the data on the Clipboard.When you copy or move data from one file to another, use the Copy or Cut to place the data on the Clipboard. When you copy data, the original data remains intact and a copy is placed on the Clipboard.When you copy data, the original data remains intact and a copy is placed on the Clipboard. When you cut data, you remove the data from its original location and place it on the Clipboard.When you cut data, you remove the data from its original location and place it on the Clipboard. To insert the data in a new location, you use the Paste command to insert the contents in a new location.To insert the data in a new location, you use the Paste command to insert the contents in a new location. Data is inserted at the location of the insertion point.Data is inserted at the location of the insertion point. Microsoft Office 2007-Illustrated Introductory, Windows Vista Edition

23
Defining File ManagementDefining File Management Understand the difference between a file and a folder.Understand the difference between a file and a folder. A file is an electronic collection of data that is stored on a disk.A file is an electronic collection of data that is stored on a disk. A Windows folder is similar to a paper folder: it is an area of the disk that is used to store and organize files.A Windows folder is similar to a paper folder: it is an area of the disk that is used to store and organize files. Microsoft Office 2007-Illustrated Introductory, Windows Vista Edition

24
Defining File ManagementDefining File Management Windows allows you to:Windows allows you to: create folders within folderscreate folders within folders organize and keep track of your files.organize and keep track of your files. You can use My Computer and Windows Explorer to create and manage the files and folders on your disks.You can use My Computer and Windows Explorer to create and manage the files and folders on your disks. The structure of files and folders you create is called a folder hierarchy.The structure of files and folders you create is called a folder hierarchy. Microsoft Office 2007-Illustrated Introductory, Windows Vista Edition

25
Defining File ManagementDefining File Management My Computer and Windows Explorer are powerful file management programs.My Computer and Windows Explorer are powerful file management programs. Use them to create, copy, rename, move, and delete files and folders on your computer.Use them to create, copy, rename, move, and delete files and folders on your computer. The main differences between them are how you open each program and how the various file management tasks are performedThe main differences between them are how you open each program and how the various file management tasks are performed Microsoft Office 2007-Illustrated Introductory, Windows Vista Edition

27
Working with a USB DriveWorking with a USB Drive Working with a USB drive from within Windows is no different than working with the hard drive of your PCWorking with a USB drive from within Windows is no different than working with the hard drive of your PC A USB flash drive needs to be plugged into a USB port.A USB flash drive needs to be plugged into a USB port. USB ports are usually located on the front or on the back of the CPU. On laptop computers, USB ports are frequently located on the side of the machine.USB ports are usually located on the front or on the back of the CPU. On laptop computers, USB ports are frequently located on the side of the machine. Microsoft Office 2007-Illustrated Introductory, Windows Vista Edition

28
Working with a USB DriveWorking with a USB Drive You can plug a USB drive into any available USB port, but keep in mind that the USB port you select determines the drive’s letter designation.You can plug a USB drive into any available USB port, but keep in mind that the USB port you select determines the drive’s letter designation. To use a flash drive, you do not have to install software or otherwise prepare the drive: you remove the cap on the flash drive, if necessary, insert the flash drive into a USB port, and wait a few seconds until Windows recognizes the drive.To use a flash drive, you do not have to install software or otherwise prepare the drive: you remove the cap on the flash drive, if necessary, insert the flash drive into a USB port, and wait a few seconds until Windows recognizes the drive. While you do not have to format flash drives, you can use the Format command to quickly erase its contents.While you do not have to format flash drives, you can use the Format command to quickly erase its contents. Microsoft Office 2007-Illustrated Introductory, Windows Vista Edition

30
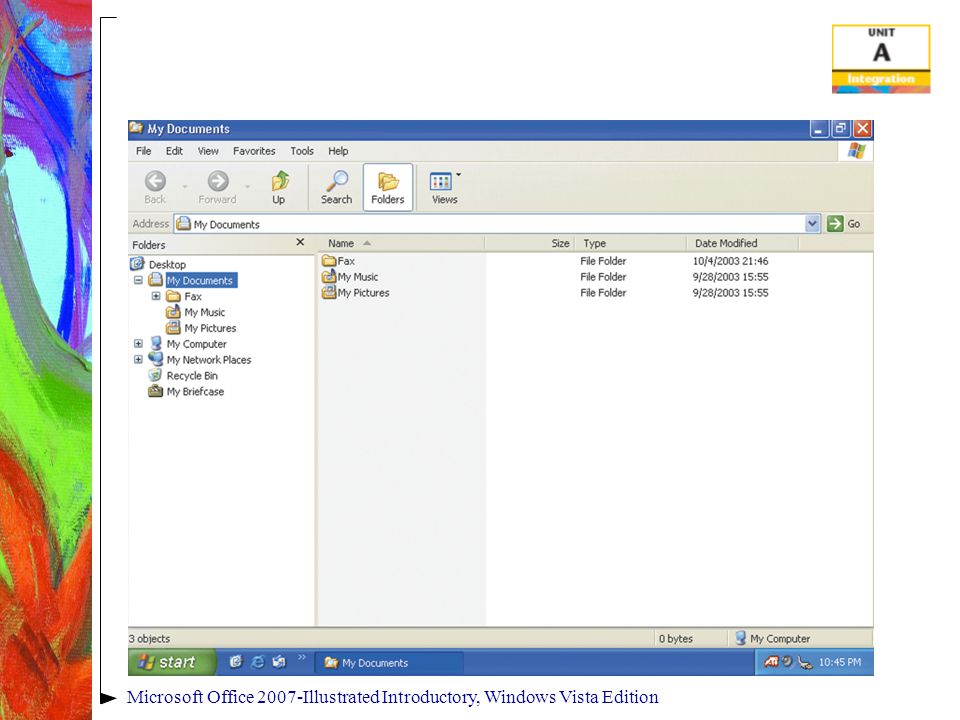
Viewing Files and Creating Folders with My Computer My Computer displays the disk drives, folders, and files on your computer.My Computer displays the disk drives, folders, and files on your computer. To view the contents of a drive or folder, double-click the item in the My Computer window.To view the contents of a drive or folder, double-click the item in the My Computer window. You can also use the Back, Forward, and Up buttons on the toolbar to navigate between folders.You can also use the Back, Forward, and Up buttons on the toolbar to navigate between folders. The Address Bar displays the name of the current folder selected.The Address Bar displays the name of the current folder selected. Microsoft Office 2007-Illustrated Introductory, Windows Vista Edition

32
Viewing Files and Creating Folders with My Computer To create the folder point to New on the File menu, then click Folder. The folder you create is added to the current folder as a subfolder.To create the folder point to New on the File menu, then click Folder. The folder you create is added to the current folder as a subfolder. You can use the View button on the toolbar to change the way information is displayed in the My Computer window.You can use the View button on the toolbar to change the way information is displayed in the My Computer window. Microsoft Office 2007-Illustrated Introductory, Windows Vista Edition

33
Moving and Copying Files with My Computer One method of copying a file is to “send” a file to a removable disk.One method of copying a file is to “send” a file to a removable disk. This is known as backing up a file.This is known as backing up a file. This method maintains the original location of the file to protect you from losing your files in the event of computer trouble.This method maintains the original location of the file to protect you from losing your files in the event of computer trouble. Microsoft Office 2007-Illustrated Introductory, Windows Vista Edition

34
Moving and Copying Files with My Computer Sometimes you may want to move an item from one folder to another.Sometimes you may want to move an item from one folder to another. To do this, you can drag the item.To do this, you can drag the item. If you need to copy the item to another folder, press [Shift] while you drag.If you need to copy the item to another folder, press [Shift] while you drag. Remember, the location you want to copy or move the item to must be displayed for you to be able to drag the item.Remember, the location you want to copy or move the item to must be displayed for you to be able to drag the item. Microsoft Office 2007-Illustrated Introductory, Windows Vista Edition

35
Moving and Copying Files with My Computer The Common Tasks pane conveniently includes the most common commands you use in My Computer.The Common Tasks pane conveniently includes the most common commands you use in My Computer. When you select any item in My Computer, typical commands performed with that item appear in the task pane.When you select any item in My Computer, typical commands performed with that item appear in the task pane. Using the task pane can increase your efficiency when working in My ComputerUsing the task pane can increase your efficiency when working in My Computer Microsoft Office 2007-Illustrated Introductory, Windows Vista Edition

36
Moving and Copying Files with My Computer You can select a file and click the Move the selected items command in the File and Folder Tasks pane.You can select a file and click the Move the selected items command in the File and Folder Tasks pane. The Move Items dialog box opens for you to select the folder to move a file. Figure B-15 shows the Move Items dialog box.The Move Items dialog box opens for you to select the folder to move a file. Figure B-15 shows the Move Items dialog box. Microsoft Office 2007-Illustrated Introductory, Windows Vista Edition

38
Moving and Copying Files with My Computer You can use the “Copy this file” and “Move this file” commands on the File and Folders task pane to copy and move files and folders to a new location.You can use the “Copy this file” and “Move this file” commands on the File and Folders task pane to copy and move files and folders to a new location. You also can use the Cut, Copy, and Paste buttons on the Edit menu to copy and move files and folders.You also can use the Cut, Copy, and Paste buttons on the Edit menu to copy and move files and folders. Microsoft Office 2007-Illustrated Introductory, Windows Vista Edition

39
Moving and Copying Files with My Computer To navigate the windows, you can click the Up button on the My Computer toolbar to show the next level up in the folder hierarchy.To navigate the windows, you can click the Up button on the My Computer toolbar to show the next level up in the folder hierarchy. You can also click the Back button to return to a previously visited location. You can click the plus sign next to a folder to open its files.You can also click the Back button to return to a previously visited location. You can click the plus sign next to a folder to open its files. Keep in mind that you must open the folder into which you want to copy or move the item before you paste itKeep in mind that you must open the folder into which you want to copy or move the item before you paste it Microsoft Office 2007-Illustrated Introductory, Windows Vista Edition

40
Moving and Copying Files with My Computer Finally, it is also possible to select multiple files and folders.Finally, it is also possible to select multiple files and folders. If the files are not grouped together, click the first object, then press and hold down [Ctrl] as you click each additional object to add to the selection.If the files are not grouped together, click the first object, then press and hold down [Ctrl] as you click each additional object to add to the selection. If the files are grouped together, click the first object then press and hold down [Shift] as you click the last object you want to select.If the files are grouped together, click the first object then press and hold down [Shift] as you click the last object you want to select. Microsoft Office 2007-Illustrated Introductory, Windows Vista Edition

41
Managing Files with Windows Explore Understand the function of the two panes in the Windows Explorer window.Understand the function of the two panes in the Windows Explorer window. The left pane, the Explorer Bar, displays the drives and folder hierarchy of your entire computer. Only folders display in the left pane.The left pane, the Explorer Bar, displays the drives and folder hierarchy of your entire computer. Only folders display in the left pane. The right pane displays the contents of the folder selected in the left pane, including folders and files.The right pane displays the contents of the folder selected in the left pane, including folders and files. Microsoft Office 2007-Illustrated Introductory, Windows Vista Edition

43
Managing Files with Windows Explore Click the plus sign next to a folder to expand it (reveal its subfolders).Click the plus sign next to a folder to expand it (reveal its subfolders). Click the minus sign next to a folder to collapse it (hide its subfolders).Click the minus sign next to a folder to collapse it (hide its subfolders). Microsoft Office 2007-Illustrated Introductory, Windows Vista Edition
.Click the minus sign next to a folder to collapse it (hide its subfolders). Microsoft Office 2007-Illustrated Introductory, Windows Vista Edition.")
44
Managing Files with Windows Explore You can drag items to move and copy them from one folder to another.You can drag items to move and copy them from one folder to another. To move a file, drag it to a different folder (in either pane). When you release the mouse button, the file is moved to that folder.To move a file, drag it to a different folder (in either pane). When you release the mouse button, the file is moved to that folder. To copy an item, press [Shift] while you drag.To copy an item, press [Shift] while you drag. Microsoft Office 2007-Illustrated Introductory, Windows Vista Edition
. When you release the mouse button, the file is moved to that folder.To move a file, drag it to a different folder (in either pane). When you release the mouse button, the file is moved to that folder. To copy an item, press [Shift] while you drag.To copy an item, press [Shift] while you drag. Microsoft Office 2007-Illustrated Introductory, Windows Vista Edition.")
45
Managing Files with Windows Explore Make sure you are able to rename a file or folder by right-clicking it, clicking Rename in the shortcut menu, then typing a new name.Make sure you are able to rename a file or folder by right-clicking it, clicking Rename in the shortcut menu, then typing a new name. Microsoft Office 2007-Illustrated Introductory, Windows Vista Edition

46
Searching for Files You can use the Windows XP Search feature to quickly find any kind of object, from a Word document or a movie file to a computer on your network or a person in your address book.You can use the Windows XP Search feature to quickly find any kind of object, from a Word document or a movie file to a computer on your network or a person in your address book. If you are connected to the Internet, you can use Search to locate Web pages and people on the Internet.If you are connected to the Internet, you can use Search to locate Web pages and people on the Internet. Microsoft Office 2007-Illustrated Introductory, Windows Vista Edition

48
Searching for Files Click the Search button on the Standard Buttons toolbar and specify your search options.Click the Search button on the Standard Buttons toolbar and specify your search options. You can search for all files of a certain type and/or use advanced search options, and then click the Search button at the bottom of the Search Companion pane.You can search for all files of a certain type and/or use advanced search options, and then click the Search button at the bottom of the Search Companion pane. The search results are displayed in the right pane and options for further searching are displayed in the Search Companion pane.The search results are displayed in the right pane and options for further searching are displayed in the Search Companion pane. Microsoft Office 2007-Illustrated Introductory, Windows Vista Edition

49
Searching for Files How to create a shortcut and pin a program to the Start menuHow to create a shortcut and pin a program to the Start menu if you use files, folders, programs, and drives often, you can create a shortcut, an icon that represents an object, and place it on the desktop.if you use files, folders, programs, and drives often, you can create a shortcut, an icon that represents an object, and place it on the desktop. Shortcuts save you time by eliminating the steps required to open an item.Shortcuts save you time by eliminating the steps required to open an item. When you double-click a shortcut icon, the item it represents opens.When you double-click a shortcut icon, the item it represents opens. Microsoft Office 2007-Illustrated Introductory, Windows Vista Edition

50
Searching for Files It is important to understand that when you delete a shortcut, you delete the link between the shortcut icon and the item. You do not delete the item itself. Help your students determine when it is appropriate to create a shortcut to a file, folder, or program by suggesting these guidelines:It is important to understand that when you delete a shortcut, you delete the link between the shortcut icon and the item. You do not delete the item itself. Help your students determine when it is appropriate to create a shortcut to a file, folder, or program by suggesting these guidelines: Microsoft Office 2007-Illustrated Introductory, Windows Vista Edition

51
Searching for Files It is important to understand that when you delete a shortcut, you delete the link between the shortcut icon and the item. You do not delete the item itself.It is important to understand that when you delete a shortcut, you delete the link between the shortcut icon and the item. You do not delete the item itself. Microsoft Office 2007-Illustrated Introductory, Windows Vista Edition

52
Searching for Files Determine when it is appropriate to create a shortcut to a file, folder, or program. Use these guidelines:Determine when it is appropriate to create a shortcut to a file, folder, or program. Use these guidelines: Create shortcuts to those files, folders, or programs you use most frequently.Create shortcuts to those files, folders, or programs you use most frequently. Do not create so many shortcuts that your desktop becomes cluttered.Do not create so many shortcuts that your desktop becomes cluttered. Will it save you time, and increase the convenience.Will it save you time, and increase the convenience. Microsoft Office 2007-Illustrated Introductory, Windows Vista Edition

53
Deleting and Restoring Files One way to delete a file is to drag it from Windows Explorer to the Recycle Bin on the desktop.One way to delete a file is to drag it from Windows Explorer to the Recycle Bin on the desktop. Other ways to delete a file include:Other ways to delete a file include: Select the file in the right pane of Windows Explorer and then click the Delete button on the toolbar.Select the file in the right pane of Windows Explorer and then click the Delete button on the toolbar. Select the file and then press [Delete].Select the file and then press [Delete]. Right-click a file and then click Delete on the shortcut menu.Right-click a file and then click Delete on the shortcut menu. Microsoft Office 2007-Illustrated Introductory, Windows Vista Edition

55
Deleting and Restoring Files When you delete a file it is moved to the Recycle Bin.When you delete a file it is moved to the Recycle Bin. Understand that the files you delete are not permanently removed from your hard drive until you empty the Recycle Bin.Understand that the files you delete are not permanently removed from your hard drive until you empty the Recycle Bin. Microsoft Office 2007-Illustrated Introductory, Windows Vista Edition

56
Deleting and Restoring Files The Recycle Bin is an area of the hard disk that is used for storing deleted files.The Recycle Bin is an area of the hard disk that is used for storing deleted files. You can permanently delete the files stored in the Recycle Bin by right- clicking the Recycle Bin icon on the desktop and clicking Empty Recycle Bin, or by clicking the Empty the Recycle Bin command on the Recycle Bin Tasks pane.You can permanently delete the files stored in the Recycle Bin by right- clicking the Recycle Bin icon on the desktop and clicking Empty Recycle Bin, or by clicking the Empty the Recycle Bin command on the Recycle Bin Tasks pane. Microsoft Office 2007-Illustrated Introductory, Windows Vista Edition

57
Deleting and Restoring Files You can restore deleted files and folders from the Recycle Bin to their original location.You can restore deleted files and folders from the Recycle Bin to their original location. This is useful if you later decide you want to keep a file you deleted.This is useful if you later decide you want to keep a file you deleted. To restore a deleted item, open the Recycle Bin, select the item, then click Restore.To restore a deleted item, open the Recycle Bin, select the item, then click Restore. Microsoft Office 2007-Illustrated Introductory, Windows Vista Edition

Similar presentations