Download presentation
Presentation is loading. Please wait.

1
PRU Census 2011 Application Version 1.2 1

2
PRU Census 2011 Open the Application 2

3
3

4
4

5
Click to open the PRU Census application 5

6
6

7
PRU Census 2011 Select Folder 7

8
Click to select a folder to hold the Census Return and Report files. 8

9
9

10
It is very important to select a folder that is available to all users who will be involved with the Return, … but that folder must be secure as it will hold children’s details. 10

11
IMPORTANT NOTE: Due to the sensitive nature of some of the data stored in SIMS.net, careful consideration should be given when specifying the location of any folder into which you save sensitive data, e.g. census returns, imported and exported CTFs, etc. You should be mindful of your school's responsibilities with respect to information security. Consider which users have access to the chosen folder, especially if the folder is shared on a Server. The DfE recommends ISO27001 as the standard for information security, a copy of which can be found at http://www.itgovernance.co.uk/bs7799.aspx. If you are in any doubt, you should consult with your IT Security Officer before proceeding. 11

12
12

13
This is the default message, but this can be added to or edited 13

14
14

15
This indicates that changes to the security message have been saved 15

16
PRU Census 2011 Add a Return 16

17
Click to add a New PRU Census Return. 17

18
The Census Date is the reference date for all snapshot information and you would need permission from your LA/DfE to change it. 18

19
This is the first dry run so you can change the description to indicate this 19

20
It is a good idea to save the file with this revised description. 20

21
The date span for the collection of attendance information is shown, but only the From date can be edited. The only reason to change the From date is where the school term starts before the 1 st September 21

22
The date span for the collection of exclusion information is shown, but cannot be edited 22

23
Click to move to the School Information panel 23

24
Click if any of the school details need to be edited 24

25
25

26
Don’t forget to save any changes you make. 26

27
Click OK to close the window 27

28
Calculate All Details will add the necessary information to the subsequent panel. You should only have to calculate all details once as panels can then be calculated on an individual basis. The calculation of the Attendance panel is a little more complicated as it checks to see if manual entry is required. 28

29
29 There is a lot of Attendance information to interrogate so only proceed if you have sufficient time.

30
Helpful messages also appear at the bottom left of the screen

31
31 If the PRU has any 2, 3 or 4 year old pupils an Hours at Setting panel will also be included. This would operate in exactly the same was as it does for School Census.

32
The Time in Unit panel is read only, but a button is provided to jump to the editing screens. 32

33
Click to jump to the editing screen 33

34
This operates in exactly the same why as when called from the menu. 34

35
35 Right mouse click

36
Click to tick highlight all the pupils in the list

37
Click to enter a time for all highlighted rows

38
Enter the time in the unit for the Census week

40
Don’t forget to save any changes. 40

41
Click OK to close the window 41

42
Click to move to the Provider Status panel 42

45
Don’t forget to save any changes.

46
Click OK to close the window

47
Clarissa’s Enrolment Status will be reported as “F”. If Other Provider had been ticked the Enrolment Status would have been reported as “O”. As we understand it, pupils with Enrolment Status reported as “F” or “O” will be treated in line with pupils with an Enrolment Status of “C” or “M” for funding purposes. So it is important to fill this in accurately

48
Click to move to the Teachers panel

49
Where schools don’t use P7 for contracts they should expect the table to display zeros. Where P7 is in used for contracts schools should expect the totals to be filled in from what they have entered in P7. However, we have made this information editable in all cases as we know that schools may choose to keep incomplete personnel information. 49

50
If the relevant information is changed in P7 this can be brought through to the panel but clicking Recalculate, but this will remove any manual edits for this panel. 50

51
Click to move to the Support Staff panel 51

52
If support staff information is missing, it can either be added in P7 and recalculate, or added manually in the panel as necessary. 52

53
Click to move to the Attendance panel 53

54
54 It is OK to ignore the missing marks for a dry run, but it is important that these a dealt with before a Return is authorised

55
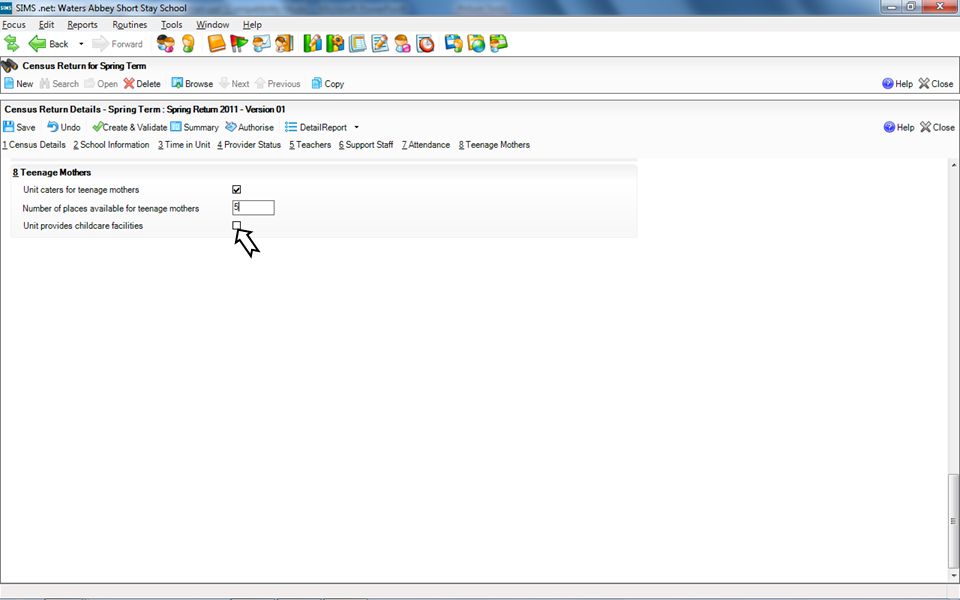
Click to move to the Teenage Mothers panel 55

59
Don’t forget to save your changes. 59

61
PRU Census 2011 Create & Validate 61

62
Click to create the XML Return file and to run DfE validation across the file. The legality of attendance codes will be checked again at this point, just in case an illegal code has been used since the check made for Calculate All 62

63
This indicates that creation and validation of the Return file is taking place. 63

64
The creation of the Return file takes place first … 64

65
Again it is OK to ignore the missing marks for a dry run, but it is important that these are dealt with before a Return is authorised

67
Once the Return file is created it is validated via the DfE XSL file. 67

68
Click to create an HTML report 68

69
It may look as though nothing has happened, but in fact the output has been sent to the Internet browser. 69

70
The HTML file is now available after the application has closed and the output can be printed via the browser. 70

71
The content can also be copied to other office applications, e.g. a spreadsheet. However, you should be careful where you save such information as it should be kept secure. We suggest you save them in the same folder as the Return file. 71

72
72

73
Click here to get a list of the errors/warnings that have been generated and to select a particular error/warning to use as a filter. 73

74
74

75
75

76
You can also copy the filtered report to your browser 76

77
77

78
If you use the screen functionality you can drag the divider upwards to show more of the problems. 78

79
If it is getting in the way you can drag it to the bottom of the screen 79

80
80 If you jump to a place to deal with an issue, don’t forget to save the change. If you make a change in SIMS that is part of a calculation, don’t forget to recalculate the panel and save those changes. If you make a change in a panel don’t forget to save the change. If you want changes reflected in the Return don’t forget to Create & Validate.

81
You can also close the validation panel 81

83
PRU Census 2011 Summary Report 83

84
The DfE Summary Report can be run as soon as Create & Validate has taken place. There is no need to correct all problems before running this report as the report may help in identifying the problem. 84

85
Please note that the PRU’s Phase is set to “PR” rather than “SC” as an Establishment Number of 1149 is in the range of deemed to be PRU. 85

86
86

87
87

88
88

89
89

90
90

91
91

92
92

93
93

94
94

95
95

96
96

97
97

98
98

104
PRU Census 2011 Detail Reports 104

105
Detail Reports indicate the content of the XML Return file. Click for a choice of Detail Reports. 105

106
We can choose individual reports but we will click on Multiple Reports for a multiple selection of the reports 106

107
We can untick all the reports we don’t want output, but in this case we want them all so we leave them all ticked. Click to create the reports 107

108
108

109
109

110
110

111
111

112
112

113
113 113

114
114

115
115 This should be empty in all cases as contact details are no longer required

116
116

117
117

118
118

119
119

120
PRU Census 2011 Authorise 120

121
Click to authorise the return ready for sending to the DfE. 121

122
This is a dry run so you should click No. 122

123
PRU Census 2011 Copy 123

124
Click to see a list of the returns. 124

125
The Copy functionality has been provided, but it will only be helpful if you have entered information in the panels. You will still have to click on Create & Validate to produce the Return file itself. 125

126
Thank you for your time 126

Similar presentations


 Hainan c agGY Ia-1 (2) Anhui agGY Ia-2 (3) agGY Ia-1 2 2 WD-2 WD-8 WD-36 agGY Ia-2 3 3.>")


