Download presentation
Presentation is loading. Please wait.

1
PBv2.x Pen F/W Upgrade SOP
WWPM_Brian Hung 2011/12/21

2
A. Main FW Upgrade 1.Plug the power cord
2.Press and hold the MENU key on keypad until all LEDs glow. 3.Connect USB cable plug in PB/Mouse mini B connector. 4. Use DLP composer to update new firmware (Please refer the following page.) 5. Unplug and plug power cord. 6. Execute Factory reset in service mode. (Push power->left->left->menu sequentially on keypad or remote control to enter service mode)
 5. Unplug and plug power cord. 6. Execute Factory reset in service mode. (Push power->left->left->menu sequentially on keypad or remote control to enter service mode)")
3
How to install and use DLP composer

4
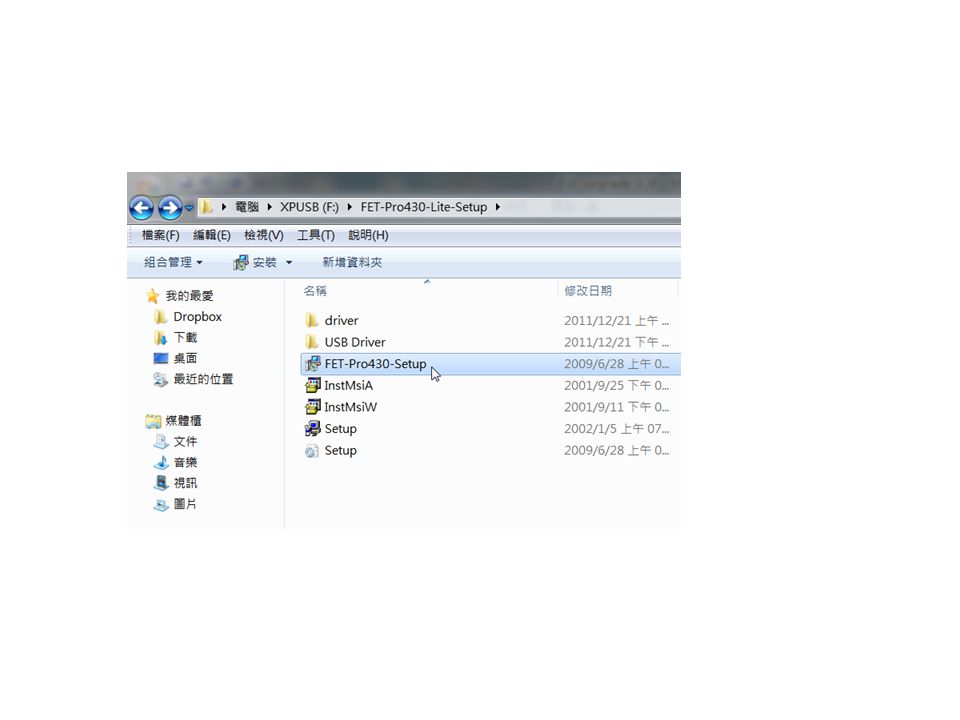
1. Execute the setup file. 2. Follow all default setting to finish the installation process.

5
1. Execute the “Install DLP Device Driver” from start->Programs->DLP Composer™ Lite 10.5.1.
2. Choose all items and click install. (Please remove all external USB devices before installation)
")
6
1. Execute the “DLP Composer™ Lite 10. 5
1. Execute the “DLP Composer™ Lite ” from start->Programs->DLP Composer™ Lite

7
1. Click “Edit”->“Preference”

8
1. Click “Browse” 2. Choose the folder of FW

9
1. Choose USB

10
1. Click “Flash Loader” 2. Click “Browse”

11
3. Choose the correct FW file.
(Please check the model name of projector before FW upgrade.)
")
12
1. Must follow the same setting as the picture.
2. Click “Start Download”

13
1. Click “Yes”

14
1. Wait for the upgrade process.

15
E. RF FW Upgrade (for UTi model)
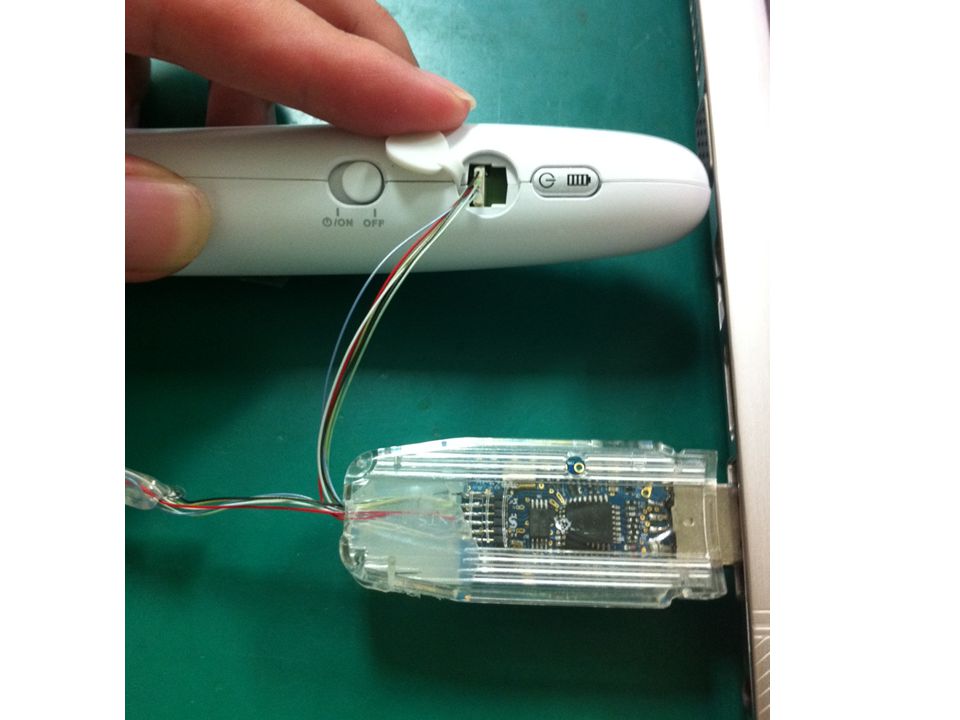
. Enter Service Mode (Push the button sequentially Power->left->left->Menu on keypad /remote control) or Power->Right->Right->Menu on keypad) . Switch the USB mode from “Mouse” to “Debug” and do not close the OSD. . Connect PC and projector via USB cable.
 or Power->Right->Right->Menu on keypad) . Switch the USB mode from Mouse to Debug and do not close the OSD. . Connect PC and projector via USB cable. ")
16
Unzip RF FW.RAR Execute DLP Pointblank Firmware Upgrade Tool.exe Check the message as below “USB Connection Opened”

17
1. Execute the “Install DLP Device Driver” from start->Programs->DLP Composer™ Lite 10.5.1.
2. Choose all items and click install. (Please remove all external USB devices before installation)
")
18
1. Click “Browse” 2. Choose the correct FW file

19
3. Click Download 4. Reboot the projector after upgrade process finish.

20
. Enter Service Mode (Push the button sequentially Power->left->left->Menu on keypad /remote control) or Power->Right->Right->Menu on key pad) . Execute “Factory Reset” . Reboot the projector
 . Execute Factory Reset . Reboot the projector. ")
21
Tips . Turn on the PB function of the projector and pen.
. Make sure the connection is workable. . Change the Channel setting from “Auto” to any other number.

Similar presentations


 Open the device with the browser interface.>")


 Connect Host PC directly to device by Ether cable, Find.>")

 47LX9500-UA : The Full model name.>")


. Refer to Appendix.>")


