Download presentation
Presentation is loading. Please wait.

1
3D Printers Hard to Build? Maybe Not! Session BL07 Jim Chronister Central Dauphin High School

2
http://www.cdschools.org/site/default.aspx?PageID=17142

3
3D Printing Process Design Your Part: SolidWorks, OnShape.com, AutoCAD, Blender, SketchUp, etc… anything that can export a.stl file format. Process the Part in a Slicing Program: Slic3r, Simplify3D, Cura, etc… processes your design to create a G-Code file for the printer. Print the Part: Use a program like Pronterface (Printrun) to run the printer from a computer or use an SD card interface to run the printer as a standalone device.
 to run the printer from a computer or use an SD card interface to run the printer as a standalone device..")
4
History 3D printing came on the scene in the mid 1980s, called Rapid Prototyping technologies, but were geared for industrial applications. In 2004, the open source movement called RepRap is developed to make 3D printing more affordable. In 2007, the first printer for under $10,000 was launched by 3D Systems. In 2009, the first kit forms of 3D printers were launched by BitsfromBytes and MakerBot for under $2,000.

5
First Kits BitsfromBytes (BfB)- The Rapman Printer Print area- ~7.5” x 7.5” x 7.5” (single extruder) Base price- ~$1,400 second extruder +$400 MakerBot Industries- The Cupcake CNC Print area- ~4” x 4” x 5” (x,y,z) Base price- ~$800
- The Rapman Printer Print area- ~7.5 x 7.5 x 7.5 (single extruder) Base price- ~$1,400 second extruder +$400 MakerBot Industries- The Cupcake CNC Print area- ~4 x 4 x 5 (x,y,z) Base price- ~$800")
6
Today’s 3D Printer Kits DaVinci 1.0 $499.99 OneUp @ Walmart $279.99 Prusa i3 @ Ebay $369.95 Kossel Mini@ Ebay $369.95

7
So You Want A 3D Printer? The 7 easy steps to building your own printer…

8
Step #1: Determine the type of printer you want. Stereolithography- Use of a liquid resin that cures when a laser beam hits it, building layers. Fused Deposition Modeling- Melted thermoplastic materials are extruded onto a table one layer at a time. Selective Laser Sintering- Similar to stereolithography, but uses a powered material instead of liquid resin. Can be nylon, ceramics, glass, or metal. Selective Laser Melting- Similar to above, but instead of bonding power together, it is melted. Electron Beam Melting- Similar to above, but uses electronic beams instead of UV rays. Laminated Object Manufacturing- Layers of material are cut and glued together. Website: http://www.tech3dprinting.com/what-are-the-different-types-of-3d- printers-available-in-the-markethttp://www.tech3dprinting.com/what-are-the-different-types-of-3d- printers-available-in-the-market

9
Stereolithography Machines FormLabs Peachy Printer Fused Deposition Modeling MakerBot MakerGear

10
Step #2: Determine Your Budget. Option #1: Money is no object. Leave this session now and go over to the Great American Hall to speak with a printer vendor. You don’t belong here. Option #2: You have a budget and a desire to learn something new. Find an inexpensive kit and do a little internet research. My hope is that this session will help answer a few questions.

11
Step #3: Find Your Printer. Determine the build size you want. Typical size: ~7” x 7” x 7” Do you want a standalone printer or one tied to a computer? Builds can take hours. What type of material do you want to use? (PLA, ABS, Nylon, Resin) Where does your district allow you to shop? Find your vendor(s) and make your purchase. …and You’re Off!
 Where does your district allow you to shop. Find your vendor(s) and make your purchase. …and You’re Off!.")
12
Plans & Kits www.reprap.org All things 3D printer open-source community

13
Plans & Kits Popular RepRap Models: Prusa i3: A four motor system (2 motors for Z-axis) that can support multiple extrudes. Mini Kossel: A three motor system using a tripod design

14
Vendors Many district approved vendors may be more expensive with fewer options. Amazon and Ebay can offer cheaper kits of equal quality. A possible vendor that I have had good experience with is Chowhe Electronics on Ebay and Amazon. http://stores.ebay.com/chowhe-electronics?_rdc=1

15
Step #4: Take a deep breath, start assembly. Find a good set of build instructions. If your machine didn’t come with them, look on RepRap.org or YouTube. Take careful measurements. Accuracy is key. Make sure all axes move freely before connecting motors. Follow wiring diagrams and programming instructions. There are a lot of wires to connect! Determine the firmware you wish to use. The firmware is the software that controls the printer and interprets the G-Code file. The vendor may provide you with the programming.

16
Typical Electronics: Stepper Motors: Motors driven by a digital pulse to rotate specific degree angles. Typically NEMA 17 motors- 1.8 degrees per step. Heatbed: A heated table surface that helps stabilize your prints. Typical sizes 8” x 8”. Most run on 12 or 24 volts and can heat to 100 degrees Celsius.

17
Typical Electronics: Typical Arduino open source electronics are used for most printers. Arduino Mega 2560: Processor for the printer. Ramps 1.4: 3D Printer interface board A4988 Stepper Driver: One for each stepper motor (X,Y,Z, and Extruders). 2004 LCD Controller: Display screen and SD Card reader for standalone use. Typically $30-$50
 LCD Controller: Display screen and SD Card reader for standalone use. Typically $30-$50.")
18
Typical Electronics: Rumba Atmega Controller board alternative. Combines the Mega 2560 and Ramps 1.4 boards together into one. Still need to add the A4988 motor controller boards

19
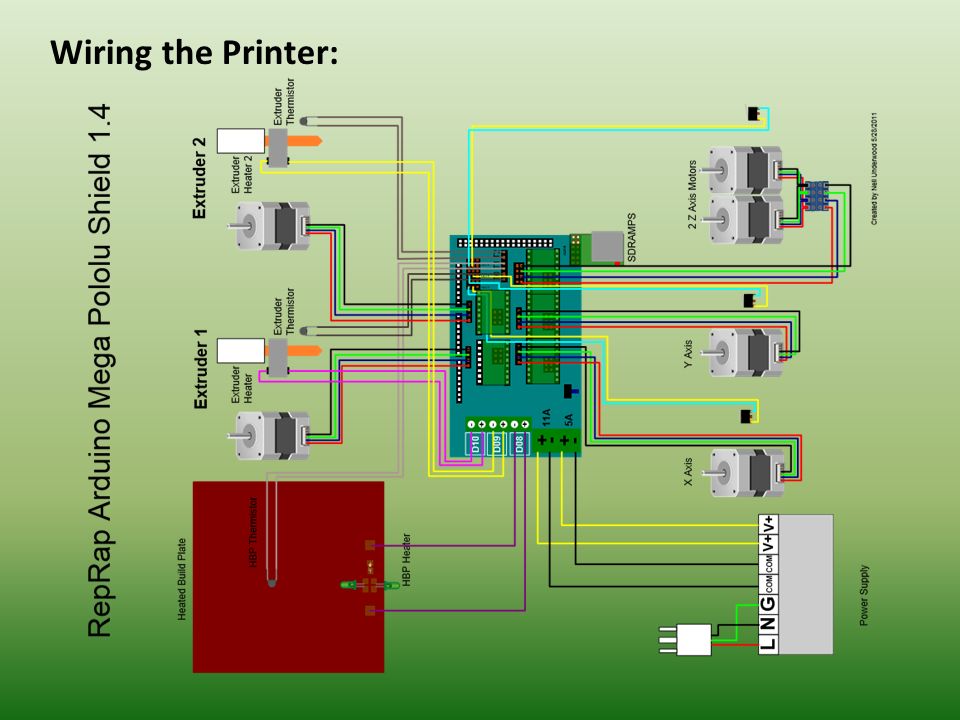
Wiring the Printer:

21
The Firmware: Marlin and Sprinter seem to be the most popular. They are written and downloaded through the Arduino programming software. Download the Arduino software from: https://www.arduino.cc/en/Main/Software https://www.arduino.cc/en/Main/Software Find a compiled copy of the Marlin or Sprinter software for your printer. Customize the firmware as needed for your machine. There are several website that will help you with adjustments. Download the firmware to your printer for testing and modifications through the USB port on the Mega 2560 board.

22
Step #5: Time to calibrate your machine. Your machine needs to be tested and checked before that first print. If you tell it to move 100 mm in the X, Y, or Z direction, it moves just that. The same goes for the extruder and is dependent on the nozzle diameter. (.4 or.5mm There are many websites and YouTube videos that will walk you through the process. Be Patient! You may need to adjust your firmware and re-download several times until you get it just right.

23
Step #6: Set up your slicing program. Size of the print bed Nozzle diameter (.4 mm ?) Filament diameter (1.75 mm ?) Filament temperature: ~200⁰ for PLA; ~250⁰ for ABS Your slicing program needs to be set up for your printer and filament. Most programs will have basic setting that will only need tweaking. Below are some basic things that will need to be set: Print bed temperature: ~60⁰ for PLA; ~95⁰ for ABS Set the number of extruders and offset distance. Set the infill percentage (~20%)
 Filament diameter (1.75 mm ) Filament temperature: ~200⁰ for PLA; ~250⁰ for ABS Your slicing program needs to be set up for your printer and filament. Most programs will have basic setting that will only need tweaking. Below are some basic things that will need to be set: Print bed temperature: ~60⁰ for PLA; ~95⁰ for ABS Set the number of extruders and offset distance. Set the infill percentage (~20%).")
24
Step #7: Time for that first print! (The thrill of victory, or the agony of defeat!) If you need a model to print that is already in a proper 3D printer format, check out www.thingiverse.com. This website is a community-based site where individuals share 3D models and ideas.www.thingiverse.com Process an stl file in your slicing program and take it to the printer. Pick something simple for a first print that can be measured and checked for accurate calibration.
 If you need a model to print that is already in a proper 3D printer format, check out This website is a community-based site where individuals share 3D models and ideas. Process an stl file in your slicing program and take it to the printer. Pick something simple for a first print that can be measured and checked for accurate calibration..")
25
The Good… The Bad… And The Ugly…

26
Resources http://reprap.org/wiki/Main_Page - RepRap Website http://reprap.org/wiki/Main_Page http://solidutopia.com/marlin-firmware-user-guide-basic/ Marlin user’s guide and setup http://solidutopia.com/marlin-firmware-user-guide-basic/ http://www.my-home-fab.de/Dokumentations/RepRap-Firmware/Installing- Marlin-Firmware-on-RAMPS-14/en Another Marlin installation guide http://www.my-home-fab.de/Dokumentations/RepRap-Firmware/Installing- Marlin-Firmware-on-RAMPS-14/en https://onedrive.live.com/view.aspx?resid=61D9A16368C58A74!113&ithint=fil e%2c.pdf&app=WordPdf&authkey=!AI2iTJjJC1ZxdG0 -Prusa i3 assembly guide https://onedrive.live.com/view.aspx?resid=61D9A16368C58A74!113&ithint=fil e%2c.pdf&app=WordPdf&authkey=!AI2iTJjJC1ZxdG0 http://www.thingiverse.com/ - 3D Printing community models http://www.thingiverse.com/ https://www.youtube.com/watch?v=-7ht0zYWhzY – video for calibration steps https://www.youtube.com/watch?v=-7ht0zYWhzY https://www.arduino.cc/en/Guide/Windows - Arduino website https://www.arduino.cc/en/Guide/Windows http://reprap.org/wiki/RAMPS_1.4Put_the_connectors_on_the_motor_wires RAMPS 1.4 connection tutorial http://reprap.org/wiki/RAMPS_1.4Put_the_connectors_on_the_motor_wires http://prusaprinters.org/calculator/ - Filament and motor calculators http://prusaprinters.org/calculator/ http://www.cdschools.org/site/default.aspx?PageID=17142 – My 3D Printer site. http://www.cdschools.org/site/default.aspx?PageID=17142 http://slic3r.org/ - the Slic3r website for slicing software. http://slic3r.org/

27
Thanks for Attending! If you have any questions, please email me: Jim Chronister jchronister@cdschools.org

Similar presentations


 Project goals and motivation RepRap Details >")


 drawing. With the use.>")


