Download presentation
Presentation is loading. Please wait.

1
Building LEGO Robots For FIRST LEGO League By Dean Hystad

2
1 Structures 1.1 Bricks, Plates, and Beams 1.1.1 Bricks
LEGO bricks are made out of ABS plastic. They are injection molded to very exacting tolerances (0.002mm)2. The top of the brick is covered with cylindrical plastic bumps called studs. The bottom of the brick has cylindrical holes or tubes. When you snap two bricks together, the tubes deform slightly around the studs, locking the two firmly together.
2. The top of the brick is covered with cylindrical plastic bumps called studs. The bottom of the brick has cylindrical holes or tubes. When you snap two bricks together, the tubes deform slightly around the studs, locking the two firmly together.")
3
Dimensions The common practice is to refer to bricks using their dimensions: width, length, and height (though height is often left off when referring to standard sized bricks). When doing this, the width and length dimensions are given in studs. The piece below is a 2 x 4 brick.
. When doing this, the width and length dimensions are given in studs. The piece below is a 2 x 4 brick.")
4
1.1.2 Plates Plates are essentially short bricks. They are 1/3 the height of standard bricks--3.2mm or 0.4 studs. Plates use the same naming convention as bricks. Some plates have through holes aligned with the backside tubes. They are referred to as Technic plates, or less obscurely, plates with holes. The holes accept axles and connector pins and make the Technic plates much more useful. Three Plates = One Brick high

5
1.1.3 Beams Technic beams are 1x bricks with holes in their sides. The holes are spaced at one-stud intervals and centered between the studs on the top of the beam. The beams can be stacked on top of each other just like bricks. In addition, connector pins can be placed in the side holes allowing the beams to be assembled side by side. The number of assembly techniques available using the new parts is staggering.

6
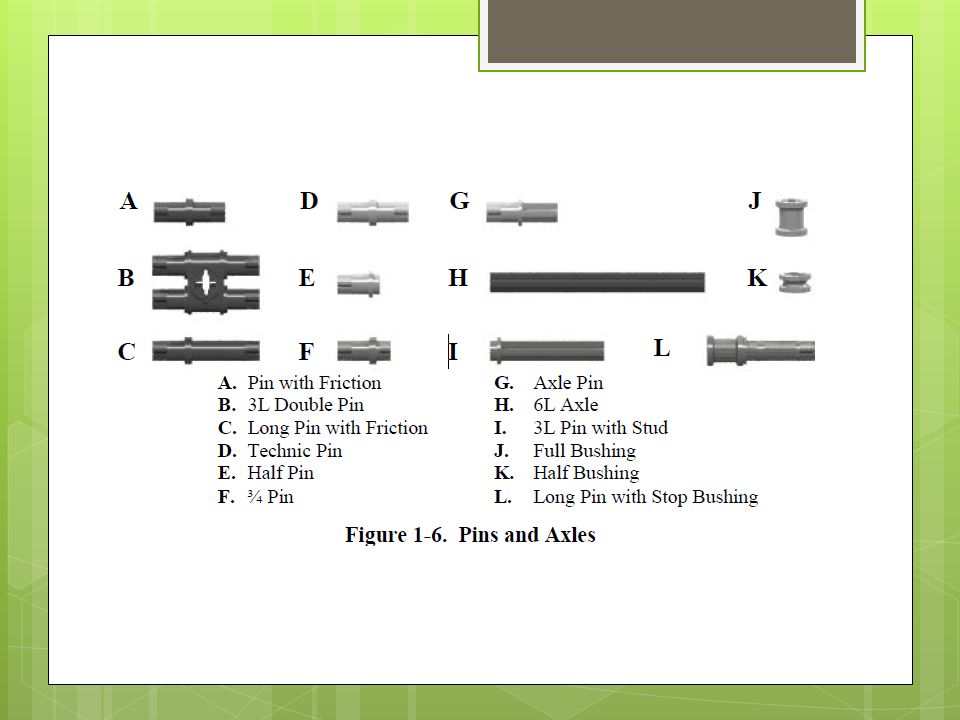
1.1.4 Axles and Pins The RIS kit comes supplied with a wide variety of pins and axles for connecting Technic beams together. The most commonly used of these is the black Technic pin with friction, or friction pin. The friction pin has small, raised ridges that make it lock tightly in the holes of a Technic beam providing a very strong connection. A long version of the friction pin can be used to pin three beams together. The double pin works well with the goofy transparent blue connector block that comes in the newer RIS sets and has an axle hole that can sometimes be useful

8
Axles Axles are long rods that have a “+” shaped cross section. They slide easily through the holes in Technic beams, but they fit tightly in the cross-holes found in wheels, gears, bushings, and other Technic elements. Axles are available in even stud lengths starting at 2 and going up to 12. There are also 3 and 5 stud long axles. It is common to use shorthand when referring to axles, describing the axle using its length followed by “L”. Thus a four stud long axle is a 4L axle

9
1.1.4 Axles and Pins The RIS kit comes supplied with a wide variety of pins and axles for connecting Technic beams together. The most commonly used of these is the black Technic pin with friction, or friction pin. The friction pin has small, raised ridges that make it lock tightly in the holes of a Technic beam providing a very strong connection. A long version of the friction pin can be used to pin three beams together. The double pin works well with the goofy transparent blue connector block that comes in the newer RIS sets and has an axle hole that can sometimes be useful

10
Other names To aid in communication and facilitate the exchange of ideas, the LEGO community has come up with names for each thingamajig and doohickey. Most of the names were provided by LEGO--extracted from marketing or packaging literature. But many part monikers originated in the user community. Figure 1-10 lists the names of some of the Technic parts included in the RIS kit.

11
You don’t have to memorize these

12
1.2 Building a Frame A robot needs some sort of frame. The frame gives the robot its shape. It provides mounting points for sensors and reacts the forces generated by motors and gears. It is like our skeleton, which gives us our shape, supports our organs, and reacts the forces generated by our muscles. A good frame is strong, lightweight, and holds together even after much use.

13
A simple frame made out of beams and 1x8 plates.
It’s strong, lightweight, and the dimensions are appropriate for the base of a robot platform. But it is not very rigid. A gentle push on opposing corners causes the frame to twist out of shape. Eventually the corner connections work loose, and the frame falls apart.

14
BUT…. The problem is that the plates do not lock the corners at right angles. There is a small amount of clearance between the ends of the 1 x 6 beams and the sides of the 1 x 12 beams. This allows the studs to act as hinges. Replacing one or more of the 1 x 8 plates with 2 x 8 plates makes the frame much more rigid. The improved frame is much stiffer. Pushing on the corners causes it to flex hardly at all. The 2 x 8 plate firmly locks the short and long beams together at right angles. This frame is adequate for many applications, but it can be made even stronger.

15
Even stronger

16
Looking at the previous slide
The frame in Figure 1-13 uses cross bracing to hold it together. The 1 x 3 lift arms prevent the frame from being pulled apart. Cross bracing is a useful technique for building very strong LEGO structures. The connections between LEGO bricks are very strong in compression (a force pushing the bricks together), and in shear (a sideways force trying to slide the bricks across each other), but they are relatively weak in tension (a force pulling the bricks apart). When cross bracing, we reinforce a connection which is weak in tension by adding components that will be in shear. In this case, the 1 x 3 lift arms and axle pins are in shear when trying to pull the beams apart
, and in shear (a sideways force trying to slide the bricks across each other), but they are relatively weak in tension (a force pulling the bricks apart). When cross bracing, we reinforce a connection which is weak in tension by adding components that will be in shear. In this case, the 1 x 3 lift arms and axle pins are in shear when trying to pull the beams apart.")
17
Bear in mind…..

Similar presentations


 was introduced in 2011. Parts do not.>")
 2013 Mechanical Kits Ltd.1.>")


: 1 X 24”; 1 X 21⅛”; 8 X 7½”; 4 X 7⅛”; 4 X 7”; 2 X.>")


