Download presentation
Presentation is loading. Please wait.

1
Starter: Microscopes Which image is from the light microsope? How do you know?

2
Starter – key terms

3
Cell structure 2.1.1 Microscopy

4
Objectives and Success Criteria Objectives Compare and contrast different types of microscopes Describe the preparation of specimens for observation using microscopes Success criteria Identify the differences between Optical, Electron and Laser scanning microscopes Prepare a specimen for observation and identify structures within.

5
Cell Theory All living things consist of cells New cells are formed only by the division of pre-existing cells The cell contains information that acts as the instructions for growth. This information can be passed to new cells

6
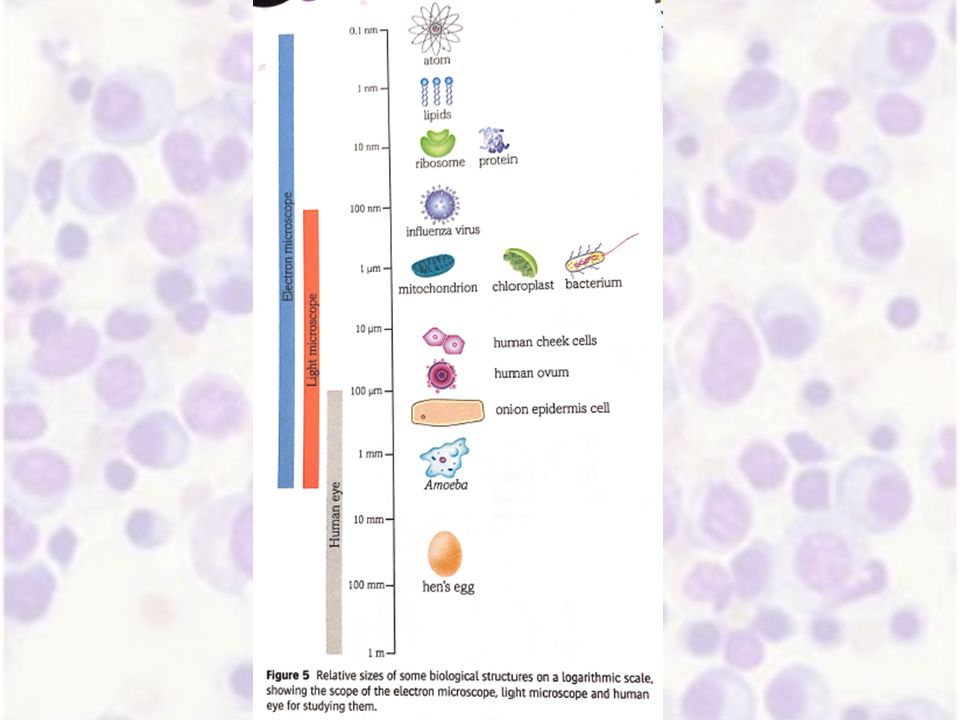
How small is a cell?

7
Key terms Magnification: How many times a structure is enlarged Resolution: The ability to see two distinct points separately. Objects that are close together can only be distinguished if light waves can pass through them.

8
Optical (Light) Microscope Relatively cheap Easy to use Portable Can study whole living specimens
 Microscope Relatively cheap Easy to use Portable Can study whole living specimens")
9
Optical (Light) Microscope Magnification available on light microscope – x40 – x100 – x400 – x1500 or x2000 Resolution - maximum of 200nm. (0.2 m) If structures are closer together than that they will be seen as one object) This is due to the wavelength of visible light (400-700nm) Ribosomes have a diameter of 20nm Can you see them using an optical microscope? Ribosomes have a diameter of 20nm Can you see them using an optical microscope? Hint: In optical microscopy objects that are closer than half the wavelength of light cannot be seen separately.
 If structures are closer together than that they will be seen as one object) This is due to the wavelength of visible light ( nm) Ribosomes have a diameter of 20nm Can you see them using an optical microscope. Ribosomes have a diameter of 20nm Can you see them using an optical microscope. Hint: In optical microscopy objects that are closer than half the wavelength of light cannot be seen separately..")
10
Laser scanning (confocal) microscopes Laser light used to scan the image point by point. Computer assembles information into one image. High resolution, high contrast, depth sensitivity Fluorescent dye can be used to allow more specific targeting of features to be studied. Can be used for whole cells and living organisms Use in diagnosis of disease (eg eye diseases) and in medical research
 and in medical research.")
11
Electron Microscope EM generates beam of electrons (0.004nm width) Wavelength is 125 000x shorter than visual light so increases resolution. Electron beam passes through very thin prepared sample. Resolution is 0.5nm Magnification can be up to 500 000x Expensive, can only be used in a controlled environment Vacuum needed for sample preparation large Preparing slides is complex Skill and training needed

12
Transmission Electron Microscope Electrons pass through denser part of sample less easily so create contrast. Sample dehydrated and stained with metal salts Electrons focused on photographic plate (or screen) Resulting 2D grey-scale image is an Electron micrograph Magnification up to 2 million times (future- 50 million x) What might be a disadvantage of Electron microscopy?
 Resulting 2D grey-scale image is an Electron micrograph Magnification up to 2 million times (future- 50 million x) What might be a disadvantage of Electron microscopy .")
13
Scanning Electron Microscope Electrons are reflected off a metal-salt-stained sample 3D, grayscale, but computer programmes can add false colour Magnification x 15-200 000

15
Task Construct a table/diagram/revision resource which compares and contrast Light and Electron microscopes. Include: resolution, magnification, sample preparation, types of samples viewed, level of detail seen.

16
EM Advantages of EMDisadvantages of EM Resolution is x2000 more than LM Samples have to be placed in a vacuum Produces detailed images Very expensive SEM produces 3D images Need to be highly skilled to create samples

17
Comparing LM and EM 1500 2000) x 200 000 x 2 000 000
 x x")
18
Types of Specimens – Optical microscopy Living organisms – Amoeba, Paramecium (unstained) Dry mount – eg solid specimen, a single hair Wet mount – specimen immersed in a liquid, eg living organisms Squash preparation – wet mount and squash the soft, solid tissue – eg root tips. Smear preparations – blood, cheek cells Thin sections (sliced) of animal, plant, fungal tissue.
 of animal, plant, fungal tissue..")
19
Staining specimens Staining makes the components of a cell easier to identify (differential staining) and provides contrast against the background to make the structures become more visible and be identified. (Cell structures and cytoplasm are often transparent) Staining can take many stages or can be as simple a allowing the specimen to dry and applying the stain.
 Staining can take many stages or can be as simple a allowing the specimen to dry and applying the stain..")
20
Specimen preparation Sections of tissue to be examined are thin (having been sliced or sectioned) to allow light to penetrate the specimen Some fragile tissues (eg brain) can be embedded in wax prior to sectioning to prevent distortion of the tissues during slicing Stains are coloured chemicals that allow certain components of a tissue to be seen more easily. Methylene blue is a general stain. Acetic orcein – Stains DNA red, Gentian violet stains bacterial cell walls Eosin stains cytoplasm Differential stains Challenge – Look up acid fast and gram staining. How are they differential stains?

21
Preparing Slide for EM Fix specimen in gluteraldehyde Dehydrate with ethanol Embed in resin Slice thinly Stain (salts of heavy metals – eg lead, uranium) Mount on copper grid Place in vacuum (allows electrons to travel towards specimen)
 Mount on copper grid Place in vacuum (allows electrons to travel towards specimen)")
22
Examining cells under the microscope Examine the prepared slides and draw accurately what you see! Do this in your lab book after you have checked your understanding on the next slide! Task - Demonstrate use of a light microscope (working towards PAG1)
.")
23
Just before you draw: Check your understanding. Shading present Label lines not touching correct place (cell wall) Label lines not parallel with top of page No magnification given
 Label lines not parallel with top of page No magnification given.")
24
Homework Review notes Recap conversions between mm, m and nm Q1,3,5,6 purple book p30

Similar presentations