Download presentation
Presentation is loading. Please wait.

1
UNDERSTANDING ADOBE FLASH

3
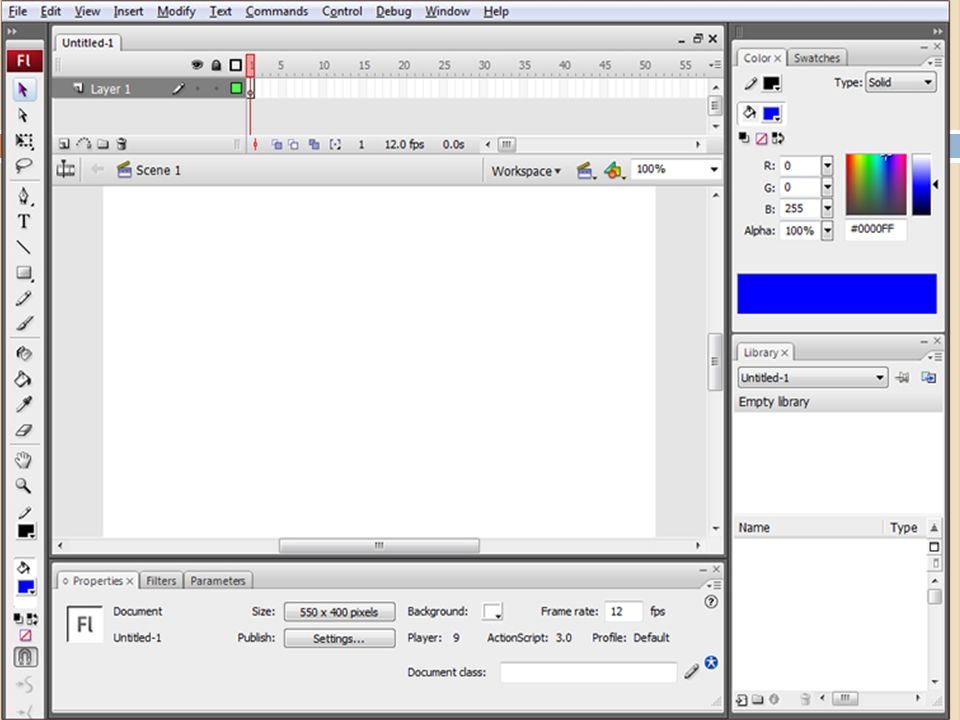
The Flash Interface The flash interface provides you with: A menu bar Panels A work area: stage

4
The Flash Interface Toolbar or tools panel is used for creating and modifying vector objects Properties panel allows you to modify most objects and tools Library is where all symbols and assets are imported to Colour panel allows you to choose colours, create gradients and save swatches Edit bar allows you to navigate from scene to scene and other functions including zooming the stage Practice file

5
The Timeline

6
Using the Timeline Layer Name Edit Layer Properties: Click to display the Properties Panel for this frame New Layer: creates a new layer New Folder: creates a folder so you can organise your layers Delete: delete a layer (there is no going back!) Onion Skin: All frames between the Start Onion Skin and End Onion Skin markers (in the Timeline header) are superimposed as one frame in the Document window. Onion Skin Outlines: Click to display onion skin frames

7
Using the Timeline Current frame: display the current frame number view Frame rate: displays current frame rate Elapsed time: shows how many frames have been executed on the timeline

8
Using the Timeline Add and Manipulate Keyframes, frames and Tweens for animation Keyframes are used to denote a change at a point in time, they provide a new start Insert blank keyframe example

9
Using the Timeline Add a Shape Tween A shape tween is the smooth transformation of a shape from one to another, may also include colour and location. Example of shape tween (face) Previewing the animation is done by using: Control->Test Movie or Ctrl Enter (windows) or cmd Enter (mac)
 Previewing the animation is done by using: Control->Test Movie or Ctrl Enter (windows) or cmd Enter (mac).")
10
Using the Timeline Modifying the animation Adding or removing frames from an animation can increase the speed (removing) or decrease the speed (adding) of the animation. To do this with a shape tween, select the first frame, shift, select the last frame then: Insert->Timeline->Frame or right click -> insert frame Frames can also be removed using the same procedure but choosing remove frame

11
Using the Timeline Export the SWF to Preview Creates an SWF file for testing to the same location as the FLA file

12
Motion Editor

13
Using the Motion Editor Allows you to edit all aspects of the animation’s properties Shows the value of each property of the selected span in a graph Viewable frames can be controlled

14
Understanding Flash File Types When you publish your flash animation, flash creates 2- 3 files: A SWF file (Small Web Format) [not Shockwave file this is different technology] An html file containing the SWF tags which allows you to embed the SWF file A javascript file which ensures the SWF file plays with no action required from the user For you flash animation to work correctly, you must upload all these files to your web server.
![Understanding Flash File Types When you publish your flash animation, flash creates 2- 3 files: A SWF file (Small Web Format) [not Shockwave file this is different technology] An html file containing the SWF tags which allows you to embed the SWF file A javascript file which ensures the SWF file plays with no action required from the user For you flash animation to work correctly, you must upload all these files to your web server.](http://images.slideplayer.com/24/7510330/slides/slide_14.jpg "Understanding Flash File Types When you publish your flash animation, flash creates 2- 3 files: A SWF file (Small Web Format) [not Shockwave file this is different technology] An html file containing the SWF tags which allows you to embed the SWF file A javascript file which ensures the SWF file plays with no action required from the user For you flash animation to work correctly, you must upload all these files to your web server.")
15
Best Practice for managing file sizes of a published Flash document Bitmaps Ensure that bitmaps have been edited in bitmap editing software such as Fireworks or Photoshop before you import Reduce the file size as much as possible and change the screen resolution to match your flash settings before importing

16
Best Practice for managing file sizes of a published Flash document Simplify the artwork in your movie by: Using solid lines rather than dashes, dotted lines, also avoid custom widths Use pencil tool rather than the brush tool Optimise curves by using Modify->Shape-> Optimise. Using this on curves reduces the number of lines.

17
Best Practice for managing file sizes of a published Flash document Use symbols for every object that appears more than once Group objects as much as possible, almost as efficient as a symbol Use vector graphics rather than bitmaps Avoid animating a bitmap, it will create a larger file For larger presentations, use a series of SWF files rather than a number of scenes

18
Best Practice for managing file sizes of a published Flash document Sound Use shortest loops possible for background sounds Video Ensure it is imported at the dimension you require, should be no larger than 320 x 240

19
Best Practice for managing file sizes of a published Flash document What increases files: Vector graphics: the complexity of the shape The more complex the shape, the more corners and curves will increase the file size and the CPU resources to generate it The number of gradients and blending modes will increase the file size also

Similar presentations


 and Vector Animation. Two Applications for Creating Animations 1.Photoshop – GIF Animation 2.Flash – Vector Animation.>")


. You can remove normal frames from a certain layer.>")

