Download presentation
Presentation is loading. Please wait.

1
Wound Care and Repair By Dr. Kawair

2
Wound Care Lecture Outline Proper sequence for routine wound repair
Options for choices of local anesthetics & types of sutures Basic suturing techniques Options for post-suturing wound care "Secondary" aspects of wound care

3
Objectives of Wound Care
Lessen pain Prevent infection Enhance healing Achieve best cosmesis

4
Classification Scheme for Wounds
Abrasion : tangential, superficial injury to epidermis only Simple laceration : linear, short length break in epidermis Deep laceration : penetrates to dermis +/- deeper structures Complex laceration : irregular edges (nonlinear), +/- deep Skin avulsion : complete removal of epidermal +/- dermal tissue Crush injury : vertical compression injury to epidermis & dermis Burns : thermal or chemical coagulation of epidermis / dermis Frostbite : freezing injury to epidermis / dermis Infected : established microbial invasion of tissue Wounds associated with other injuries : open fractures, etc.
, +/- deep. Skin avulsion : complete removal of epidermal +/- dermal tissue. Crush injury : vertical compression injury to epidermis & dermis. Burns : thermal or chemical coagulation of epidermis / dermis. Frostbite : freezing injury to epidermis / dermis. Infected : established microbial invasion of tissue. Wounds associated with other injuries : open fractures, etc.")
5
Surgical Wound Types Classification
Type I : "Clean" ; usual infection risk 1 to 5 % Type II : "Clean-contaminated" ; infection risk 5 to 10 % Type III : "Contaminated" ; infection risk 10 to 15 %* Type IV : "Dirty" ; infection risk 30 to 50 %* *Most wounds seen in the E.D. are Type III or IV (since they occur through unprepped skin)
")
6
Surgical Wound Types Classification (continued)
Type I ("Clean") Nontraumatic No inflammation present No break in technique Example : elective groin hernia repair Type II ("Clean-contaminated") Nonsterile body region entered (GI or GU tract, biliary tract, resp. tract, oropharynx, etc. ) Or minor break in technique
 Nontraumatic. No inflammation present. No break in technique. Example : elective groin hernia repair. Type II ( Clean-contaminated ) Nonsterile body region entered (GI or GU tract, biliary tract, resp. tract, oropharynx, etc. ) Or minor break in technique.")
7
Type III : Contaminated Wounds
Major break in technique Gross spillage from GI tract Infected GI, GU, or biliary tract entered Fresh traumatic wound ( through unprepped skin) Note that the overall infection rate in the Type III wounds seen in the E.D. should be only about 3 %
 Note that the overall infection rate in the Type III wounds seen in the E.D. should be only about 3 %")
8
Type IV : Dirty Wounds Wounds associated with perforated viscus
Traumatic wounds with : Imbedded foreign body Fecal contamination Delayed presentation > 12 to 24 hours for face or scalp > 6 hours elsewhere on body Crossing clean tissue to drain pus

9
Proper Sequence of Steps for Routine Wound Care & Repair
1. Adequately expose the wound area. need wide area exposed for adequate prep margins. 2. Remove superficial contaminants (gravel, etc.). leave deeply imbedded objects in place for removal in O.R. 3. Cleanse around the wound. most cleansing agents damage exposed deep tissues. 4. Consider local hair removal. usually do not need to remove hair (can just slick it down with betadine or K-Y jelly). shaving increases wound infection rates. local shaving causes temporary cosmetic problem. NEVER shave an eyebrow (it might not grow back).
. leave deeply imbedded objects in place for removal in O.R. 3. Cleanse around the wound. most cleansing agents damage exposed deep tissues. 4. Consider local hair removal. usually do not need to remove hair (can just slick it down with betadine or K-Y jelly). shaving increases wound infection rates. local shaving causes temporary cosmetic problem. NEVER shave an eyebrow (it might not grow back).")
10
Proper Sequence of Steps for Wound Care & Repair (cont.)
5. Irrigate the wound : the most important step for reducing bacterial counts in the wound. 18 or 19 gauge needle and 20 to 30 cc. syringe give best irrigation pressure (about 20 psi). 6. Reprep wound edges. need to prep area larger than the drape fenestration. 7. Drape the wound. 8. Locally anesthetize the wound. 9. Close (suture) the wound. 10. Dress and bandage the wound. 11. Instruct the patient in followup wound care.
. 6. Reprep wound edges. need to prep area larger than the drape fenestration. 7. Drape the wound. 8. Locally anesthetize the wound. 9. Close (suture) the wound. 10. Dress and bandage the wound. 11. Instruct the patient in followup wound care.")
11
Advantages of Locally Anesthetizing Wounds After the Irrigation & Prep
Can keep sterile syringe on tray for additional later local anesthesia if needed Uses only one pair of gloves & one anesthetic syringe (saves money) Less risk of introducing infection into tissue adjacent to wound ( by only injecting into wound surface after irrigation and cleansing of wound)
 Less risk of introducing infection into tissue adjacent to wound ( by only injecting into wound surface after irrigation and cleansing of wound)")
12
Wound Edge Prep Important to prep a wide area in case the drapes slip
For finger wounds, should at least prep the adjacent surfaces of the 2 adjacent fingers For very dirty hands, consider placing a sterile surgical glove on the patient's hand, & then tear off a portion of the glove to expose the wound area Should use an agent with a broad antimicrobial spectrum (e.g. Betadine or Hibiclens) Most agents need to dry on skin to achieve the best antimicrobial effect Try to avoid getting the prep agent on the exposed deeper tissue (try to keep it just on the skin surface)
 Most agents need to dry on skin to achieve the best antimicrobial effect. Try to avoid getting the prep agent on the exposed deeper tissue (try to keep it just on the skin surface)")
13
Choices for Wound Irrigation Fluids
Usual choice : normal saline Cheap, isotonic ; however, not bacteriacidal Normal saline with 3 ppm iodine (2 to 3 gtts iodine per liter) Perhaps best choice Bacteriacidal but not tissue toxic Normal saline with antibiotics ( 1 gram of 1st generation cephalosporin per liter) Bacteriacidal but expensive Mild risk of sensitization Poloxamer 188 ("Shur-clens") Surfactant agent ; not bacteriacidal Expensive compared to normal saline
 Perhaps best choice. Bacteriacidal but not tissue toxic. Normal saline with antibiotics ( 1 gram of 1st generation cephalosporin per liter) Bacteriacidal but expensive. Mild risk of sensitization. Poloxamer 188 ( Shur-clens ) Surfactant agent ; not bacteriacidal. Expensive compared to normal saline.")
14
Poor Choices for Wound Irrigation Fluids
Sterile water Hypotonic ; will damage exposed tissue Full strength (10 %) povidone iodine (Betadine) Damages tissue & WBC's Full strength clorhexidine gluconate (Hibiclens) Toxic also to cornea & middle ear Hydrogen peroxide 10 to 30 % Hexachlorophene 3 % (Phisohex) Only effective against gram positive bacteria
 povidone iodine (Betadine) Damages tissue & WBC s. Full strength clorhexidine gluconate (Hibiclens) Toxic also to cornea & middle ear. Hydrogen peroxide 10 to 30 % Hexachlorophene 3 % (Phisohex) Only effective against gram positive bacteria.")
15
Local Anesthetic Agents
Lidocaine (Xylocaine) 0.5 to 2.0 % concentrations Available with & without 1: 100,000 epinephrine (epi) Dose limits : 5 mg/kg without epi 7 mg/kg with epi Topically doesn't work well Buffering (1 cc of 1 meq/cc or 7.5 % Na HCO3 added to 9 to 10 cc of lidocaine solution) and warming decrease pain of infiltration Buffered lidocaine is stable at least one week
 0.5 to 2.0 % concentrations. Available with & without 1: 100,000 epinephrine (epi) Dose limits : 5 mg/kg without epi. 7 mg/kg with epi. Topically doesn t work well. Buffering (1 cc of 1 meq/cc or 7.5 % Na HCO3 added to 9 to 10 cc of lidocaine solution) and warming decrease pain of infiltration. Buffered lidocaine is stable at least one week.")
16
Local Anesthetic Agents
Bupivacaine (Marcaine) 0.25 to 0.75 % concentrations Available with & without 1 : 200,000 epi Same local anesthetic class (amide) as lidocaine Can yield up to 6 to 8 hours of local anesthesia Can be mixed as 1 : % Marcaine & 2 % lidocaine for digital or intercostal or wrist blocks Dose limit is variable Usually quoted as 2.0 to 2.5 mg/kg
 0.25 to 0.75 % concentrations. Available with & without 1 : 200,000 epi. Same local anesthetic class (amide) as lidocaine. Can yield up to 6 to 8 hours of local anesthesia. Can be mixed as 1 : % Marcaine & 2 % lidocaine for digital or intercostal or wrist blocks. Dose limit is variable. Usually quoted as 2.0 to 2.5 mg/kg.")
17
Allergy to Local Anesthetic Agents
Allergy to amide local anesthetics is rare Most reactions are actually due to intravascular injection and vasodilatation Can use cardiac lidocaine (has no preservative) if allergy to the preservative is suspected If allergy to amide local anesthetic is suspected, then options are : Use an ester class local anesthetic Procaine (Novocaine) or tetracaine Use 1 % diphenhydramine (Benadryl) injection Use slow injection of normal saline with benzyl alcohol preservative
 if allergy to the preservative is suspected. If allergy to amide local anesthetic is suspected, then options are : Use an ester class local anesthetic. Procaine (Novocaine) or tetracaine. Use 1 % diphenhydramine (Benadryl) injection. Use slow injection of normal saline with benzyl alcohol preservative.")
18
Local Anesthetic Injection Technique
Best to use 27 gauge or smaller needle Inject slowly Inject through wound surface (is more painful to inject through intact skin next to wound) If 1 & 1/2 inch (3 cm) needle is used, can gradually advance a bleb along the entire length of one side of a short wound with just one stick per side Do not usually need to pull back on syringe before injecting ; just look for raising of subcutaneous bleb (the area of the bleb should be well anesthetized) For digits, inject on proximal side first Should limit to 3 cc volume per digit
 If 1 & 1/2 inch (3 cm) needle is used, can gradually advance a bleb along the entire length of one side of a short wound with just one stick per side. Do not usually need to pull back on syringe before injecting ; just look for raising of subcutaneous bleb (the area of the bleb should be well anesthetized) For digits, inject on proximal side first. Should limit to 3 cc volume per digit.")
19
Use of TAC TAC = tetracaine (0.5 %), adrenalin (1:2000), & cocaine (11.8 %) Excellent topical anesthetic for open wounds Contraindicated for: Wounds on or near mucosal surfaces (due to rapid absorption of cocaine) Areas of body served by end arteries (digits, penis, ear lobes, tip of nose) Pregnancy History of high BP or CAD Allergy to components Most useful for scalp or face lacerations in children
 Areas of body served by end arteries (digits, penis, ear lobes, tip of nose) Pregnancy. History of high BP or CAD. Allergy to components. Most useful for scalp or face lacerations in children.")
20
Use of TAC (cont.) Dose limit : 2 cc for adults
Takes 10 to 15 minutes to work Blanching of wound margins confirms effect Blanched areas are anesthetic For small wounds soak cotton-tipped applicators in TAC & place directly in wound For larger wounds place soaked cotton ball or 2x2 inch gauze pad in wound Apply gentle continuous pressure also over wound to facilitate TAC entry into tissue

21
(Lidocaine-Epinephrine-Tetracaine)
Use of LET (Lidocaine-Epinephrine-Tetracaine) Composed of 4 % lidocaine, 1:2000 epi, 0.5 % tetracaine Has largely superseded the use of TAC because of its greater safety and lesser cost Unlike TAC, it is safe to use on or near mucous membranes Other contraindications same as for TAC Application technique same as for TAC
 Composed of 4 % lidocaine, 1:2000 epi, 0.5 % tetracaine. Has largely superseded the use of TAC because of its greater safety and lesser cost. Unlike TAC, it is safe to use on or near mucous membranes. Other contraindications same as for TAC. Application technique same as for TAC.")
22
Regional Anesthetic Technique "Minidose" Bier Block
Indications Multiple or extensive lacerations of hand, wrist, or foot Fracture or dislocations of hand, wrist, or foot, especially if multiple Safer than previously reported (higher dose) Bier block technique since total amount of lidocaine used in the "minidose" block is nontoxic
 Bier block technique since total amount of lidocaine used in the minidose block is nontoxic.")
23
Minidose Bier Block Procedural Sequence Place double BP cuffs on limb
Place IV catheter distally in limb Raise limb +/- Esmarch bandage wrap ( to exsanguinate the limb) Inflate proximal BP cuff (> systolic BP) Infuse 1.5 mg/kg lidocaine in IV Wait 15 minutes Inflate distal cuff & deflate proximal cuff Perform the wound repair or fracture reduction procedure Deflate distal cuff
 Inflate proximal BP cuff (> systolic BP) Infuse 1.5 mg/kg lidocaine in IV. Wait 15 minutes. Inflate distal cuff & deflate proximal cuff. Perform the wound repair or fracture reduction procedure. Deflate distal cuff.")
24
Choice of Suture Needle Type
Cutting needle triangular in cross section can punch through tough skin however can tear delicate tissues main use : epidermis repair (outer layer) Taper needle round or circular in cross section does not puncture epidermis well good for fascia & deep tissues
 Taper needle. round or circular in cross section. does not puncture epidermis well. good for fascia & deep tissues.")
25
Cutting and taper needles

26
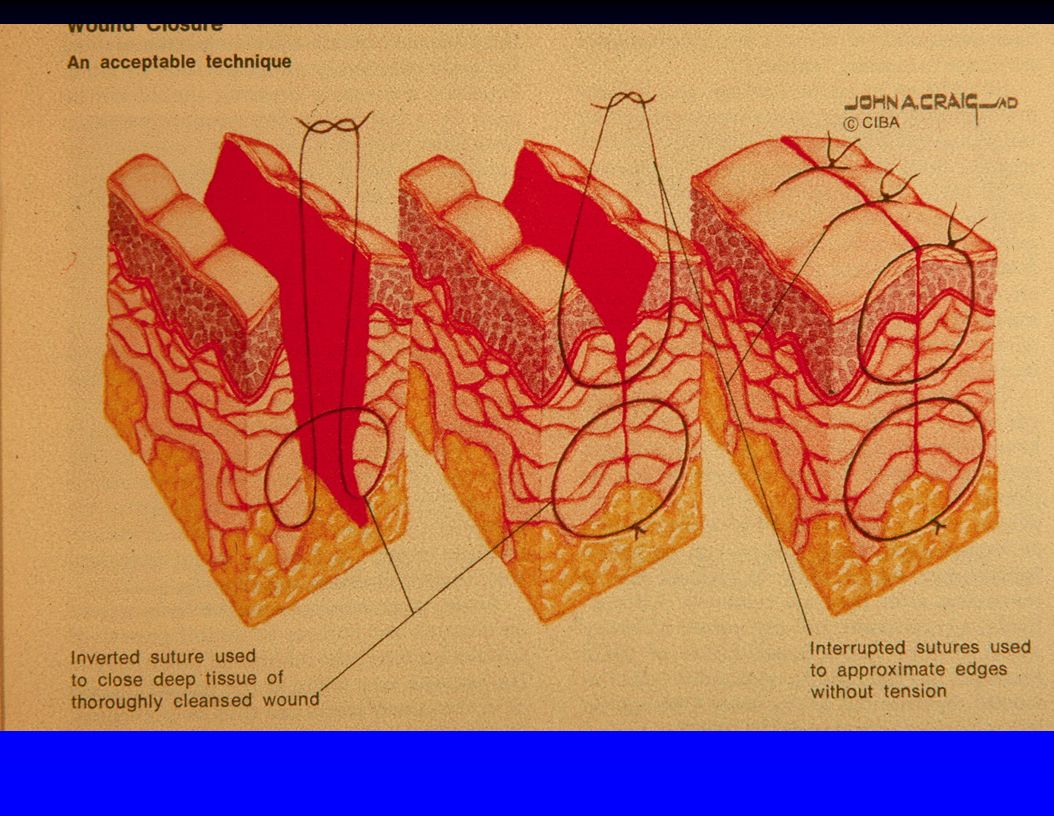
Choice of Suture Type Nonabsorbable Indications: Absorbable
skin repair fascia under tension vascular (blood vessel) repairs Absorbable subcutaneous layers intraoral mucosa (including tongue) fascia not under tension
 repairs. Absorbable. subcutaneous layers. intraoral mucosa (including tongue) fascia not under tension.")
27
Suture Type Comparison
Monofilament (single strand) Advantages : Less reactive Less likely to become infected Braided (multiple strands wound around each other) Greater tensile strength Easier to tie knots Knots hold better
 Advantages : Less reactive. Less likely to become infected. Braided (multiple strands wound around each other) Greater tensile strength. Easier to tie knots. Knots hold better.")
28
Comparison of Nonabsorbable Sutures
Nylon (Dermalon) : inexpensive, fine for most skin repairs. Polypropylene (Prolene) : smoother & stronger than nylon ; blue color makes it easier to see on dark-haired scalp ; requires 8 knot throws to secure ; is the best pull-out suture. Braided nylon (Surgilon) : combines strength of nylon with tying ease of silk ; very expensive. Silk : more reactive, more infection risk ; used by some dentists for intraoral suture ; it has no advantages over other better sutures. Wire (stainless steel) : least reactive & strongest type of suture ; difficult to tie & uncomfortable for patient ; requires wire cutters for removal. Cotton : obsolete (high tissue reactivity & infection potential).
 : inexpensive, fine for most skin repairs. Polypropylene (Prolene) : smoother & stronger than nylon ; blue color makes it easier to see on dark-haired scalp ; requires 8 knot throws to secure ; is the best pull-out suture. Braided nylon (Surgilon) : combines strength of nylon with tying ease of silk ; very expensive. Silk : more reactive, more infection risk ; used by some dentists for intraoral suture ; it has no advantages over other better sutures. Wire (stainless steel) : least reactive & strongest type of suture ; difficult to tie & uncomfortable for patient ; requires wire cutters for removal. Cotton : obsolete (high tissue reactivity & infection potential).")
29
Comparison of Absorbable Sutures
Plain gut : absorbs in 5 to 10 days (by inflammation). Chromic gut : absorbs in 10 to 14 days (by inflammation). Polyglycolic acid or polyglactin (Vicryl, Dexon) : absorb in 30 to 90 days (by hydrolysis) ; are braided ; are stronger, less reactive, and last longer than gut sutures. Polydioxanone (PDS) : absorbs in 100 to 210 days ; monofilament ; minimally reactive ; smooth to tie. Gut type of sutures shown in studies to cause more wound pain. Also can cause wound redness & swelling simulating wound infection.
. Chromic gut : absorbs in 10 to 14 days (by inflammation). Polyglycolic acid or polyglactin (Vicryl, Dexon) : absorb in 30 to 90 days (by hydrolysis) ; are braided ; are stronger, less reactive, and last longer than gut sutures. Polydioxanone (PDS) : absorbs in 100 to 210 days ; monofilament ; minimally reactive ; smooth to tie. Gut type of sutures shown in studies to cause more wound pain. Also can cause wound redness & swelling simulating wound infection.")
30
Suture Size Guidelines
Wound Location Recommended Suture Size Scalp 3-0 , 4-0 Face 6-0, 5-0 Chin 6-0, 5-0 (2 layer) Trunk 4-0 Arm 4-0 Hand 5-0 Leg 4-0 Foot 4-0, 3-0 General rule : 6-0 on face, 5-0 on hand, & 4-0 elsewhere on body
 Trunk Arm Hand Leg Foot. 4-0, 3-0. General rule : 6-0 on face, 5-0 on hand, & 4-0 elsewhere on body.")
31
Suture Removal Guidelines
Wound Location Suture Removal (Days) Scalp 7 Face 3 to 5 Chin 7 Trunk 7 to 10 Arm 7 to 10 Hand 10 to 14 Leg 10 to 14 Sole of foot 14 to 21
 Scalp. 7. Face. 3 to 5. Chin. 7. Trunk. 7 to 10. Arm. 7 to 10. Hand. 10 to 14. Leg. 10 to 14. Sole of foot. 14 to 21.")
32
Factors to Consider Leaving Sutures in Longer Than Listed on Previous Slide
Insulin - dependent diabetes Chronic steroid use Immunosuppressed Poor nutrition Age > 70 years

33
Cosmetic Wound Closure Alternative Techniques
Steri-strips Good if wound edges not under much tension Tinture of benzoin helps hold strips Okay if patient won't get wound wet for 3 days Start at center of wound & bisect outwards Running subcuticular polypropylene suture Probably best cosmetic suture Difficult to learn Can tie knots at both ends to anchor Helpful to buttress with steri-strips

34
Method of application of Steri-Strips (apply benzoin to skin first so tape strips adhere better)
")
35
Steri strip application technique

37
Lines of Least Skin Tension : "Lines of Langer"
Should perform debridements & elliptical biopsy incisions parallel to the lines of least skin tension to minimize scarring Lines of Langer generally run parallel to natural skin folds or perpendicular to the underlying muscle fibers ; for example : Horizontal on forehead Circumferencial on forearm or leg

38
Elective incisions best made parallel to the Lines of Langer

39
Use of Staples to Close Wounds
Advantage : speed Disadvantages : Uncomfortable for patient Requires staple remover to remove Poorer cosmetic result Main use in E.D. : Rapidly close an actively bleeding scalp laceration in the patient who must be rushed off for emergent other diagnostic tests or surgery

40
Holliman's 3 Rules of Plastic Surgery
If these are followed, the repair will be of "plastic surgery quality" 1. Plan what you're going to do (line up the corresponding skin points on opposite sides of the laceration) 2. Take your time 3. Use a very large number of little tiny stitches
 2. Take your time. 3. Use a very large number of little tiny stitches.")
41
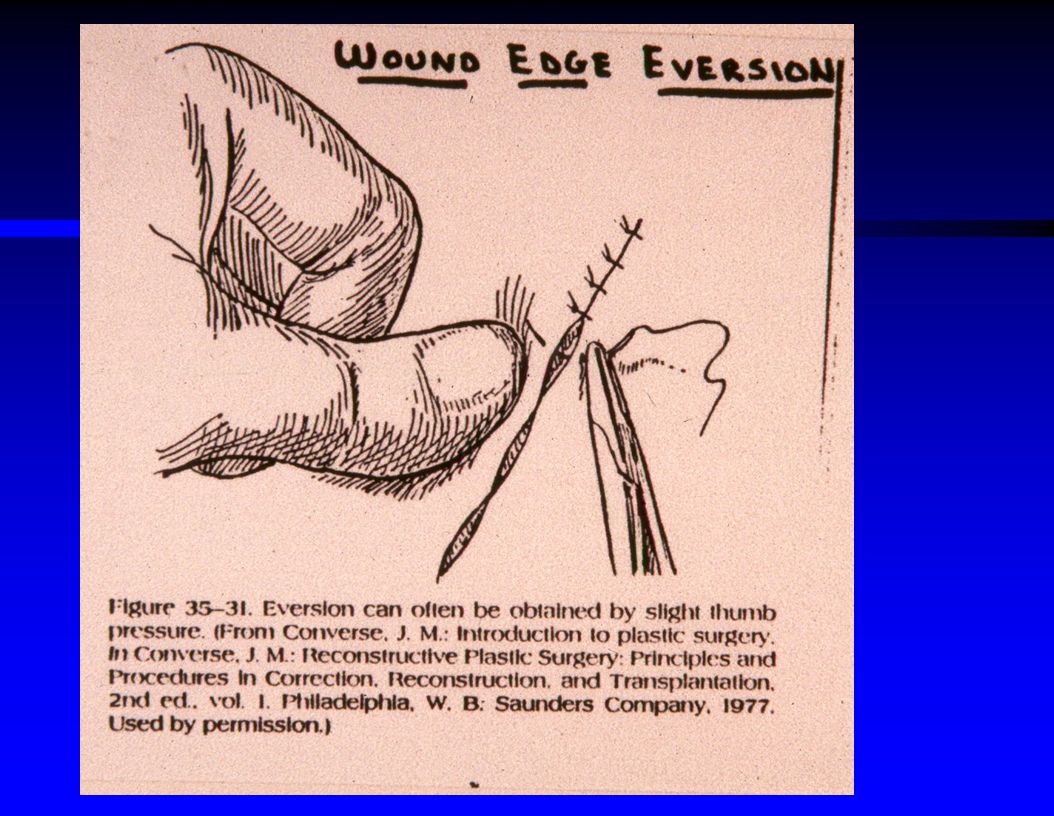
Basic Suturing Technique
Grasp needle with needle holder (instrument clamp) at 90 degree angle Grasp needle about 1/3 of the way up from the suture end of the needle Hold needle holder with thumb in one finger hole, 4th finger in the other finger hole, and second finger extended for stability Never grasp the sharp tip of the needle with the needle holder (will dull or break it)
 at 90 degree angle. Grasp needle about 1/3 of the way up from the suture end of the needle. Hold needle holder with thumb in one finger hole, 4th finger in the other finger hole, and second finger extended for stability. Never grasp the sharp tip of the needle with the needle holder (will dull or break it)")
42
Basic Suturing Technique (cont.)
Start to puncture the skin vertically with the needle If the needle is a small size & the wound is wide, transit the wound in 2 passes (pick the needle up with the needle holder and remount it after pushing it thru just one side first) Exit needle on other side same distance from wound edge Usually make the needle pass deeper than wide to achieve wound edge eversion
 Exit needle on other side same distance from wound edge. Usually make the needle pass deeper than wide to achieve wound edge eversion.")
43
Basic Suturing Technique How to Instrument Tie a Suture Knot
Grasp needle side of suture with left hand Pull suture partway through, leaving a 1 inch (2.5 cm) "tail" Point needle holder at tail of suture Use left hand to throw 2 loops of the suture strand around the end of the needle holder Grasp the "tail" suture end with the needle holder Pull the tail thru the 2 loops (this actually creates the knot)
 tail Point needle holder at tail of suture. Use left hand to throw 2 loops of the suture strand around the end of the needle holder. Grasp the tail suture end with the needle holder. Pull the tail thru the 2 loops (this actually creates the knot)")
44
Basic Suturing Technique How to Instrument Tie (cont.)
Cinch the double-throw knot down Make sure the knot sets down flat (may have to cross hands 90 degrees to do this) Use left hand to throw a single loop around the needle holder Then grasp tail of suture with needle holder & pull tail thru the loop Alternate subsequent throw loops above & below the needle holder (so that square, not granny, knots result, which are less likely to unravel)
 Use left hand to throw a single loop around the needle holder. Then grasp tail of suture with needle holder & pull tail thru the loop. Alternate subsequent throw loops above & below the needle holder (so that square, not granny, knots result, which are less likely to unravel)")
45
Basic Suturing Technique (cont.)
Space sutures same distance apart & same distance on either side of wound (should be like a "square box") ; examples : 1 mm apart & 1 mm from wound edges for delicate facial lacerations 1 cm apart & 1 cm from wound edge for "cruder" repairs not under tension Tie at least 5 to 6 knots (throws) for nylon Tie at least 7 to 8 knots (throws) for prolene Tie 3 knots for absorbable sutures
 ; examples : 1 mm apart & 1 mm from wound edges for delicate facial lacerations. 1 cm apart & 1 cm from wound edge for cruder repairs not under tension. Tie at least 5 to 6 knots (throws) for nylon. Tie at least 7 to 8 knots (throws) for prolene. Tie 3 knots for absorbable sutures.")
46
Basic Suturing Technique (cont.)
Always be conscious of good sterile technique Don't let your jacket sleeve brush the sterile drapes Don't let the end of the suture flop off the sterile area Bring sponges & scissors over to the drapes where you are working so they are available (so you don't have to keep reaching back to your suture tray for these) Dispose of all needles and sharps in proper receptacles
 Dispose of all needles and sharps in proper receptacles.")
47
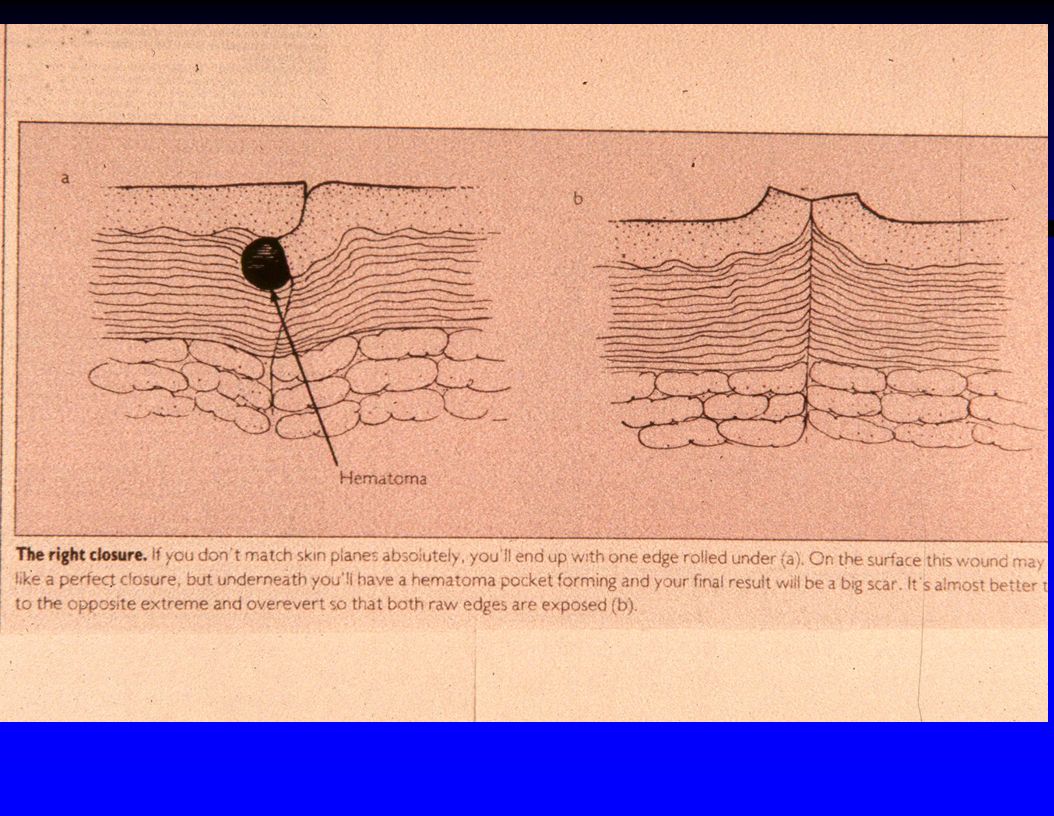
Best wound edge eversion is obtained when you place the sutures deeper than wide, as in the bottom diagram (note the middle diagram shows poor placement with resultant inversion of the wound edges)
")
48
To avoid gaps in the hair after healing, any debridement of tissue where the hair is coming out at an angle should be at the same angle as the hair (not just straight vertical), such as in the eyebrow
, such as in the eyebrow")
49
Remember the goal of cosmetic wound closure is to try to have the scar be flat with the surrounding skin (if the scar is raised or lowered it causes a noticeable shadow in oblique light)
")
52
Main Suturing Techniques
Simple interrupted OK for most wounds Quick to place Easiest to learn May cause wound edge eversion Continuous over & over Fastest to place However, if breaks at one point, the whole suture line will far apart Generally not recommended unless there is a huge time-consuming total laceration length to repair

53
Most common suture techniques
Subcuticular

55
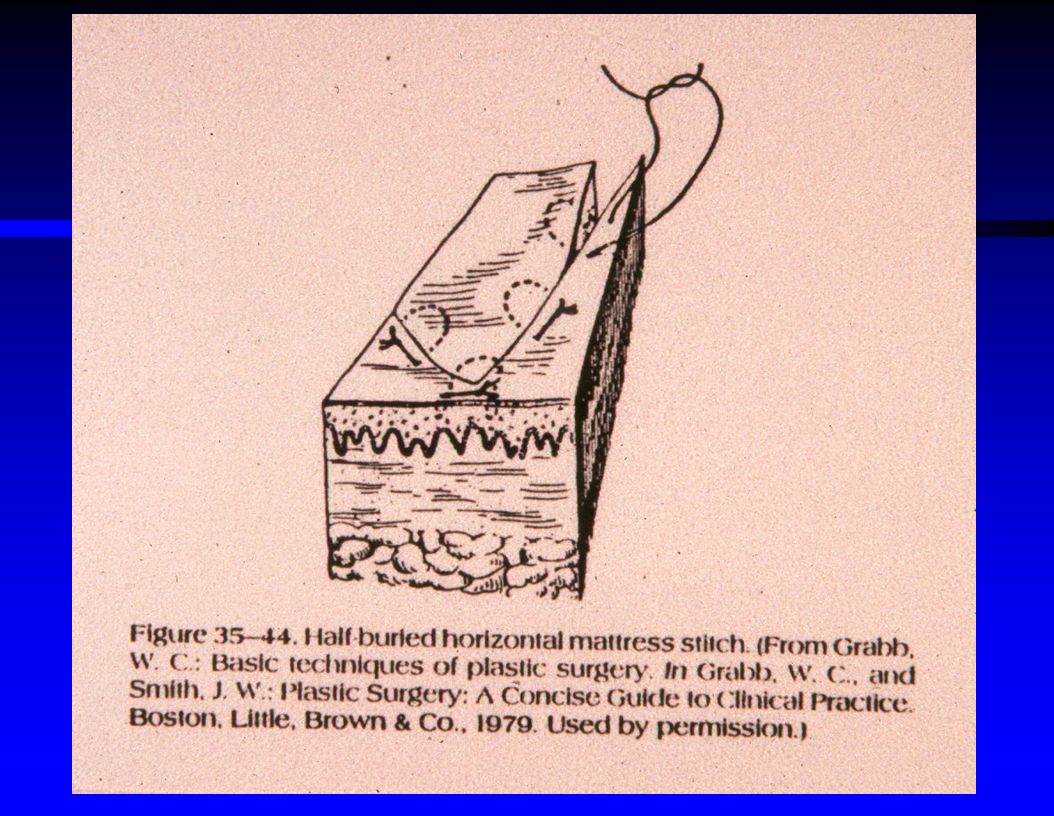
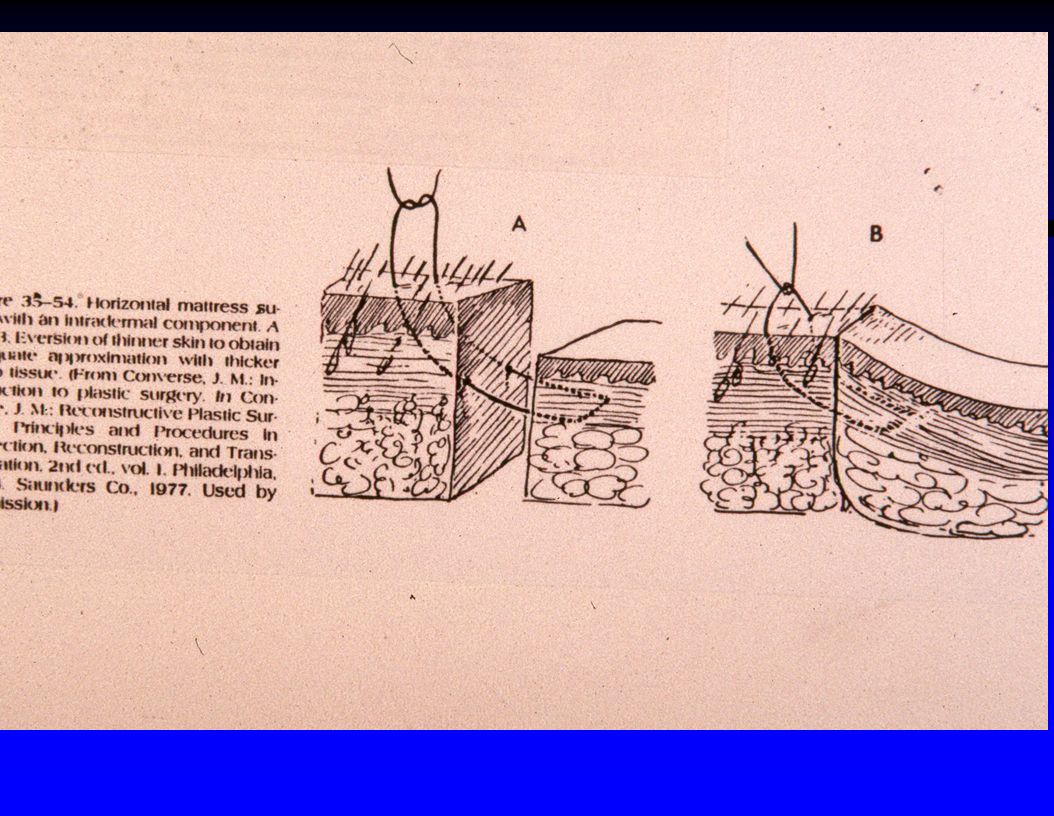
Main Suturing Techniques (cont.)
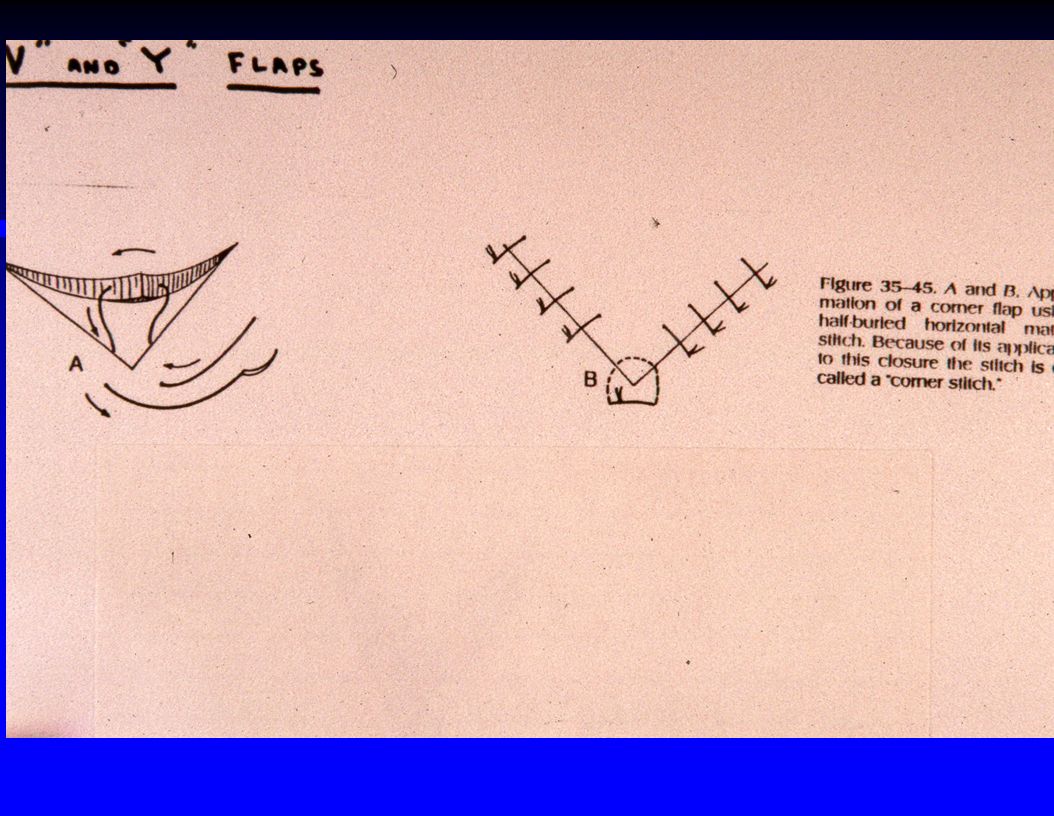
Interrupted vertical mattress Best suture to evert wound edges Takes longer to place Can start at center of wound, & once eversion is achieved, finish with simple interrupted Interrupted horizontal mattress Good where skin is thin (back of hand, etc.) Equivalent to having 2 sutures per knot (so is a quick technique) Interrupted half-buried horizontal mattress Good to elevate a flap or to repair the tip of a T or Z shaped laceration
 Equivalent to having 2 sutures per knot (so is a quick technique) Interrupted half-buried horizontal mattress. Good to elevate a flap or to repair the tip of a T or Z shaped laceration.")
62
Use of half-buried horizontal mattress stitch to close V and T shaped lacerations

63
Use of half-buried horizontal mattress suture to close a Z shaped laceration

64
Conversion of a V shaped laceration to a Y shaped laceration (V-Y advancement) ; note use of horizontal mattress suture to close the center of the Y
 ; note use of horizontal mattress suture to close the center of the Y")
65
Needle motion sequence for placing a buried (deep) suture with its knot inverted
 suture with its knot inverted")
67
At completion of suturing, pull all the knots over to one side

68
Undermining of Wound Edges
Important to reduce tension on wound edges Especially important for lacerations on the anterior calf (either horizontal or vertical) Best technique is to spread with curved mosquito clamp just below the subcuticular layer ; essentially loosens subcuticular layer from the underlying fatty dermal layer (you can use a knife for undermining but this can stir up more bleeding)
 Best technique is to spread with curved mosquito clamp just below the subcuticular layer ; essentially loosens subcuticular layer from the underlying fatty dermal layer (you can use a knife for undermining but this can stir up more bleeding)")
69
Using a clamp to spread at the junction of the subcuticular layer and the underlying fat rather than a knife can achieve undermining with less potential for bleeding

70
One technique for correction of a “dog ear” ; usually a better alternative is to remove the sutures already placed, realign the wound edges, and start suturing again from the center of the wound

71
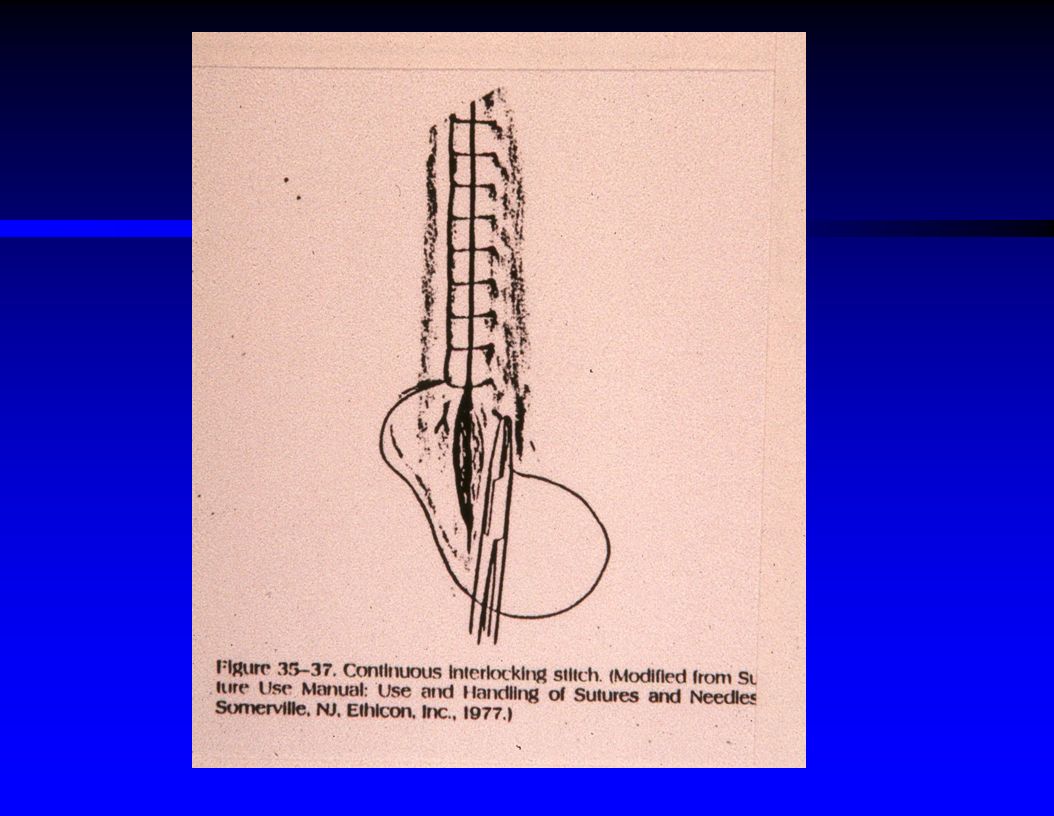
Continuous Interlocking Suture ("Baseball Stitch")
Each loop is partially locked onto next loop Can cause tissue necrosis Only useful occasionally in a patient with a coagulopathy who has continued bleeding from the initially placed interrupted suture sites

73
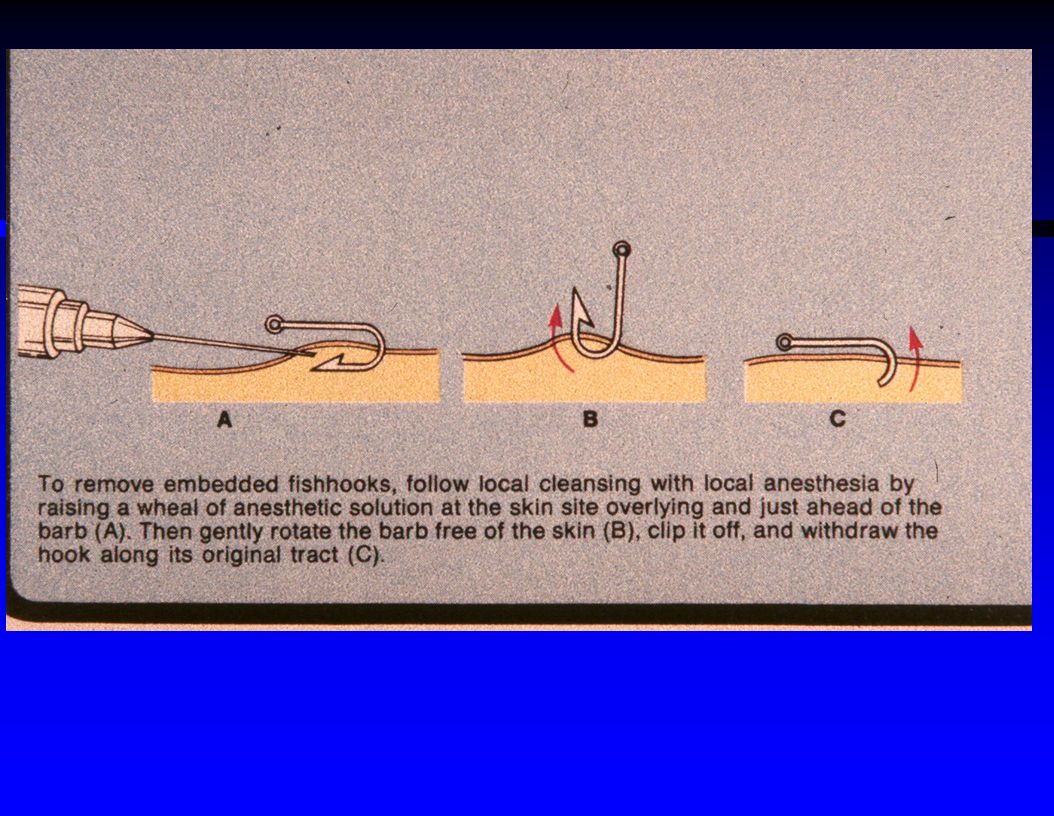
Imbedded Fishhook Removal : 3 Acceptable Techniques
Local anesthesia, then : Just rip the hook out (suitable only if small barb hook) Or, insert 18 gauge needle to cover the barb, and then back the needle & hook out together Or, punch the barb on through the skin, and then cut the barb off with wire cutters, and then back the shank out
 Or, insert 18 gauge needle to cover the barb, and then back the needle & hook out together. Or, punch the barb on through the skin, and then cut the barb off with wire cutters, and then back the shank out.")
75
Correct Definitions Dressing : the covering immediately next to the wound surface Bandage : the material holding the dressing in place

76
One method of bandaging a finger

77
Use of Tube-Gauze to bandage a finger

78
Use of Topical Antimicrobial Agents for Wounds
Use of topical agents may : Decrease scarring Decrease infection Lessen coagulum encasing the sutures Prevent dressing from sticking to wound and redamaging the wound when it is removed

79
Choices of Topical Agents for Wounds
Polymixin - Bacitracin (Polysporin) : best choice Neosporin (Polysporin + Neomycin) : OK but 10 % risk of sensitivity to neomycin Bacitracin : only kills gram positive bacteria Silver sulfadiazine (Silvadene) : bacteriostatic, expensive, good for burns Sulfamylon : bacteriostatic, stings on application, causes metabolic acidosis (carbonic anhydrase inhibitor) Povidone-iodine (Betadine) : toxic to exposed tissue, so DON'T use on wounds (OK for IV sites) Mupirocin (Bactroban) : good but more expensive than Polysporin
 : best choice. Neosporin (Polysporin + Neomycin) : OK but 10 % risk of sensitivity to neomycin. Bacitracin : only kills gram positive bacteria. Silver sulfadiazine (Silvadene) : bacteriostatic, expensive, good for burns. Sulfamylon : bacteriostatic, stings on application, causes metabolic acidosis (carbonic anhydrase inhibitor) Povidone-iodine (Betadine) : toxic to exposed tissue, so DON T use on wounds (OK for IV sites) Mupirocin (Bactroban) : good but more expensive than Polysporin.")
80
Choices for Wound Dressings
Dry gauze : suitable for most wounds or if steri-strips used Nonadherent dressings : preferred for abrasions, nailbed injuries, skin flaps, or thin skinned elderly Vaseline gauze Xeroform gauze Adaptic gauze : most expensive Telfa : not really nonadherent Can use clear dressings like Op-site for some wounds Duoderm commercial dressing also useful for covering some types of chronic open wounds

81
In general, active motion is better
Immobilization of the Injured Extremity Versus Encouraging Active Motion After Wound Repair In general, active motion is better Prevents need for physical therapy to regain ROM after immobilization No increase in wound separation problems if sutures left in for at least 14 days (as on the hand) Finger splints usually unnecessary for properly repaired finger lacerations
 Finger splints usually unnecessary for properly repaired finger lacerations.")
82
Hand immobilization and bandaging

83
Further Wound Care Don't forget to consider tetanus immunization for all wounds Consider antibiotics for : Bite wounds Contaminated wounds Hand or foot wounds If delayed presentation Wound already infected Risk factors for infection ( diabetes, chronic steroids, immunosuppressed, malnutrition, PVD, age > 70)
")
84
Lacerations to Refer to Plastic Surgery
Suspected facial nerve involvement Flap required for repair Major cartilage injury Parotid duct laceration (blood at Stensen's Duct) ? if skin graft needed ? if patient asks for plastic surgeon
 if skin graft needed. if patient asks for plastic surgeon.")
85
Lacerations to Refer to Ophthalmologist
Lid margin laceration Medial canthus laceration Thru & thru lid laceration Avulsion of lid or periorbital tissue Ptosis Suspected globe injury Proptosis Hyphema Lens or retinal detachment

86
Tetanus Immunization Guidelines
Every 5 year update for tetanus toxoid is good general rule on all cases Also use TIG (tetanus immune globulin) if : Patient never immunized Immunosuppressed Allergic or severe local reaction to toxoid ? if highly tetanus - prone wound & is > 10 years since last toxoid immunization
 if : Patient never immunized. Immunosuppressed. Allergic or severe local reaction to toxoid. if highly tetanus - prone wound & is > 10 years since last toxoid immunization.")
87
Beveled laceration best repaired in 2 layers

88
Wound appearance after placement of subcutaneous absorbable sutures

89
Wound appearance after outer layer skin repair with 6-0 nylon

90
Wound Care Lecture Summary Carefully plan any wound repair
Don't forget to inform the patient what you're doing Follow Holliman's 3 rules of plastic surgery Don't forget to consider tetanus immunization & antibiotics Ensure proper followup care

Similar presentations