Download presentation
Presentation is loading. Please wait.

1
Advanced Methods of Materials Characterization (Lecture 3) March 14 th, 2014
 March 14 th, 2014")
2
Last week we talked about…

3
Electromagnetic Spectrum Photons are the basic units of all the electromagnetic radiations.

4
Some Microscopic Terms Resolution Magnification Brightness Contrast Depth-of-field Homework: What are the definitions of these terms?

5
Chapter 1 Scanning Electron Microscopy (SEM)
")
6
Question #1: Why do we need electron microscopy?

7
Introduction and History Electron microscopes were developed due to the limitations of optical microscopes which are limited by the physics of visible light. In the early 1930's this theoretical limit had been reached and there was a scientific desire to see the fine details of the interior structures of organic cells (nucleus, mitochondria, etc.). This required 10,000x plus magnification which was not possible using current optical microscopes.
. This required 10,000x plus magnification which was not possible using current optical microscopes..")
8
Microstructural Features of our Interests Grain Size From sub-micrometer to the centimeter regime Grain Shapes Precipitate Size Volume Fractions and Distributions of Various Phases Defects Cracks and voids

9
What can we see with an SEM? Topography The surface features of an object or "how it looks", its texture; direct relation between these features and materials properties Morphology The shape and size of the particles making up the object; direct relation between these structures and materials properties Composition The elements and compounds that the object is composed of and the relative amounts of them; direct relationship between composition and materials properties Crystallographic Information How the atoms are arranged in the object; direct relation between these arrangements and material properties

10
Question #2: How does Scanning Electron Microscope work?

11
Scanning Electron Microscope Electron microscopes are scientific instruments that use a beam of energetic electrons to examine objects on a very fine scale.

12
How SEM works? - An electron beam is condensed, accelerated, and focused on a specimen by lens; - The electron beam hits the specimen, producing, among others, secondary and backscattered electrons; - These electrons are collected by a detector, converted to a voltage, and amplified.

13
Electromagnetic Lens

14
Electron-Solid Interactions

15
Examples of SEM Image Sources: http://tupian.hudong.com/3960/11.html

16
Examples of SEM Image Sources: http://bbs.labscn.com/showphoto.aspx?photoid=2074 http://bbs.1718china.com/thread-27547-1-1.html

17
Examples of SEM Image Source: http://www.le.ac.uk/bs/em/sem.htm

18
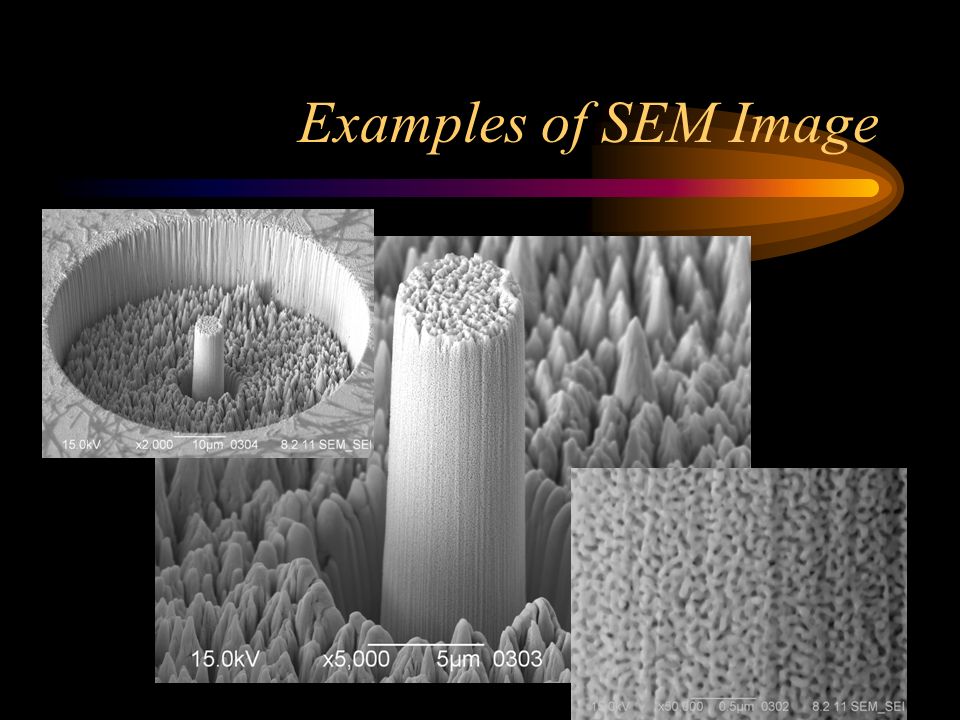
Examples of SEM Image

20
Today let’s look at…

21
Question #3: What is the resolution difference between an electron microscope and an optical/light microscope?

22
Optical Microscopy

23
Examples of OM Image Sources: http://www.emeraldinsight.com/journals.htm?articleid=1524385&show=html http://www.eatechnology.com/specialistbusinesses/analytical/materialstesting /opticalmicroscopy

24
OM vs. SEM: Resolution

25
Resolution Limits of OM and SEM

26
Optical Microscopy VS SEM Max. Magnification Depth of FieldResolution OM~ 4,000x0.5mm ~ 0.2 m SEM~ 500,000x30mm1.5nm Combination of higher magnification, larger depth of field, greater resolution, in addition to compositional and crystallographic information makes SEM one of the most heavily used instruments in academic/national lab research areas and industry.

27
Question #4: How do we prepare a sample for SEM observations? (Homework)
")
28
Question #5: What are the key components of an SEM?

29
Components of a SEM machine 1. Electron optical column consists of: – electron source to produce electrons – magnetic lenses to de-magnify the beam – magnetic coils to control and modify the beam – apertures to define the beam, prevent electron spray 2. Vacuum systems consists of: – chamber which “holds” vacuum, pumps to produce vacuum – valves to control vacuum, gauges to monitor vacuum 3. Signal Detection & Display consists of: – detectors which collect the signal – electronics which produce an image from the signal

30
Components of SEM Electric guns Thermonic electric guns Thermonic electric guns Field emission guns Field emission gunsLens Deflection coils Electro-magnetic lens

31
Vacuum system The electron guns should be kept at high vacuum state! Usually better than 10-7 Torr. The sample chamber work at medium vacuum status. Better than 10-3 Torr

32
Signal detecting and processing system SE detector// BSE detector

33
Key parameters for operations of SEM HV Accelerating voltages: 1 KeV-30 KeV The difference in potential between the filament and the anode. As the voltage is increased, the electrons travel with higher velocity and are more energetic. d=0.61 入 /NA Reduction in structural details of the specimen surface in SE mode.//Increased electron build up in insulating samples, causing charging artifacts //Increased heating and the possibility of specimen damagecharging

34
Key parameters for operations of SEM WD Working distance: Working distance is the distance from the bottom of the SEM column to the sample The shorter the working distance, the smaller the diameter of the beam is at the sample surface. So, when possible, the WD is kept at 10mm or smaller for high resolution imaging. resolution The disadvantage is that focal depth and depth of field is drastically reduced at small WD.

35
Key parameters for operations of SEM Spot size The size (cross sectional diameter) that the cone of the beam makes on the surface of the sample affects : 1) the resolution of the image. 2) the number of electrons generated (therefore the graininess of the image). At low magnifications we use a larger spot size than at higher magnifications.
 the number of electrons generated (therefore the graininess of the image). At low magnifications we use a larger spot size than at higher magnifications..")
36
Key parameters for operations of SEM Magnification-- Magnification is the enlargement of an image, or portion of an image By reducing the size of the area scanned by the scan coils, the SEM changes the magnification of the image!

37
SEM #1 SEM #2 SEM #3

38
Safety in an EM Lab Chemicals Common chemicals Handling Disposal, waste management Cleaning and exposure Equipment Radiation Electrical safety Servicing Physical and Mechanical Hazards

39
Primary HazardColor Code FlammablesRed Toxics/HealthBlue Reactives/OxidizersYellow Contact HazardsWhite GeneralGray, Green, Orange Many labs color code bottles to aid in segregated chemical storage. The assignments given above are standard for most labs and are based upon chemical manufacturer’s color code designations. Liquids should also be stored away from solids.

40
Chemicals found in an EM lab Aldehydes (glutaraldehyde, paraformaldehyde) Carcinogenic, allergies, sensitivity Minimize exposure to fumes Cacodylate salts ~50% arsenic Carcinogenic, toxic Readily absorbed through skin (garlic taste) Osmium tetroxide (osmic acid) Toxic, irritant, volatile Spills reduced to metallic osmium with corn oil or Na Ascorbate powder, then cat litter to pick up.
 Carcinogenic, allergies, sensitivity Minimize exposure to fumes Cacodylate salts ~50% arsenic Carcinogenic, toxic Readily absorbed through skin (garlic taste) Osmium tetroxide (osmic acid) Toxic, irritant, volatile Spills reduced to metallic osmium with corn oil or Na Ascorbate powder, then cat litter to pick up.")
41
Acetone and alcohols Used as solvents, dehydrants and cleaners Flammable- keep in flammables cabinet Toxic Chemicals dissolved can penetrate skin Propylene oxide Highly flammable Carcinogen Picric acid Dried salts explosive Resin Components Carcinogenic Allergic reactions when using antihistamines Heavy metal salts (lead and uranium) Toxic Carcinogenic
 Toxic Carcinogenic")
42
Handling Wear: Gloves Lab coat Dust mask Closed toe shoes Work deep in ventilation hood Measuring: New spatula for each chemical Minimize dust Have clean-up equipment available All spills are hazardous waste Clean after yourself !

43
Disposal Spent, expired, or surplus chemicals Minimize waste! Use less toxic alternatives if available. Use a minimal amount - avoid large amounts. Keep Waste in separate containers - avoid mixing Some can be recycled. Easier to keep track of amounts for manifests. Some chemicals are not compatible. Clean up after yourself!

44
Clean Up! Always clean up any spills, messes. Make a spill kit Mercury difficult to clean up Can’t wipe or pick up Use a vacuum with trap, not vacuum cleaner (volatilizes the mercury) Treat the cleaning materials as hazardous waste -Not into trash can or down sink
 Treat the cleaning materials as hazardous waste -Not into trash can or down sink.")
45
Pumps Oil filters to minimize inhaling Liquid N 2 and compressed gasses Explosion of tank SF6 gas – changes to toxic Fluorine if heated above 200 C X-ray exposure

46
Physical damage Cuts Razor Blades Glass knives Symptoms of mercury poisoning include tremors, tunnel vision, loss of balance, slurred speech, and unpredictable emotions. Inhalation Mercury bulbs can explode if old and overheated (usually after 200-300 hours of use).
..")
47
Fires:Extinguishers Emergency showers and eye washes

48
Chapter 2 Transmission Electron Microscopy (TEM)
")
49
Electron-solid interactions Secondary electrons (SEM)//Backscattered electrons (SEM ) //Auger electrons (AES)//X-rays (EDS) Transmitted electrons (TEM)
//Backscattered electrons (SEM ) //Auger electrons (AES)//X-rays (EDS) Transmitted electrons (TEM)")
50
What is TEM? Transmission electron microscopy (TEM) is a microscopy technique whereby a beam of electrons is transmitted through an ultra thin specimen, interacting with the specimen as it passes through.microscopyelectrons An image is formed from the interaction of the electrons transmitted through the specimen; the image is magnified and focused onto an imaging device, such as a fluorescent screen, on a layer of photographic film, or to be detected by a sensor such as a CCD camera. focusedfluorescentphotographic filmCCD camera
 is a microscopy technique whereby a beam of electrons is transmitted through an ultra thin specimen, interacting with the specimen as it passes through.microscopyelectrons An image is formed from the interaction of the electrons transmitted through the specimen; the image is magnified and focused onto an imaging device, such as a fluorescent screen, on a layer of photographic film, or to be detected by a sensor such as a CCD camera. focusedfluorescentphotographic filmCCD camera.")
51
What is TEM used for? Morphology –The size, shape and arrangement of the particles which make up the specimen as well as their relationship to each other on the scale of atomic diameters. Crystallographic Information –The arrangement of atoms in the specimen and their degree of order, detection of atomic-scale defects in areas a few nanometers in diameter Compositional Information (if so equipped) –The elements and compounds the sample is composed of and their relative ratios, in areas a few nanometers in diameter
 –The elements and compounds the sample is composed of and their relative ratios, in areas a few nanometers in diameter.")
52
DATENAMEEVENT 1897J. J. ThompsonDiscovers the electron 1924Louis deBroglieIdentifies a wavelength to moving electrons =h/mv where = wavelength h = Planck's constant m = mass v = velocity (For an electron at 60kV = 0.005 nm) 1926H. BuschMagnetic or electric fields act as lenses for electrons 1929E. RuskaPh.D thesis on magnetic lenses 1931Knoll & RuskaFirst electron microscope built 1931Davisson & CalbrickProperties of electrostatic lenses 1934Driest & MullerSurpass resolution of the LM 1938von Borries & RuskaFirst practical EM (Siemens) - 10 nm resolution 1940RCACommercial EM with 2.4 nm resolution 1945 1.0 nm resolution Brief History of TEM
 1926H. BuschMagnetic or electric fields act as lenses for electrons 1929E. RuskaPh.D thesis on magnetic lenses 1931Knoll & RuskaFirst electron microscope built 1931Davisson & CalbrickProperties of electrostatic lenses 1934Driest & MullerSurpass resolution of the LM 1938von Borries & RuskaFirst practical EM (Siemens) - 10 nm resolution 1940RCACommercial EM with 2.4 nm resolution nm resolution Brief History of TEM.")
53
Overview of a TEM Instrument Four Main Components: Illuminating System Specimen Manipulation System Imaging System Vacuum System

54
- A electron beam is focused by 2 condenser lenses, restricted by a condenser aperture; - The beam strikes a specimen and part of it is transmitted; - This transmitted portion is focused by objective lens into an image; - The image is passed down through enlarge lenses and a projector lens, being enlarged all the way; - The image strikes the phosphor image screen and light is generated, allowing user to see the image. How TEM works?

55
Components of TEM JOEL-2010 TEM

Similar presentations


>")


>")

 By Austin Avery.>")


 HITESH KUMAR GUPTA(09320) CHANDAN SINGH(09260) SCANNING ELECTRON MICROSCOPE MATERIAL SCIENCE ASSIGNMENT.>")
 But consider now different.>")

>")


