Download presentation
Presentation is loading. Please wait.

1
GARMENT FINISHING PRODUCTION TECHNIQUE PRESENTED BY: PRAGATI,RUCHITA,SHELJA AND POOJA

6
DEFINITIONS Sanforization is a process of treatment used for cotton fabrics. It is a method of stretching, shrinking and fixing the woven cloth in both length and width before cutting and producing, to reduce the shrinkage which would otherwise occur after washing.

7
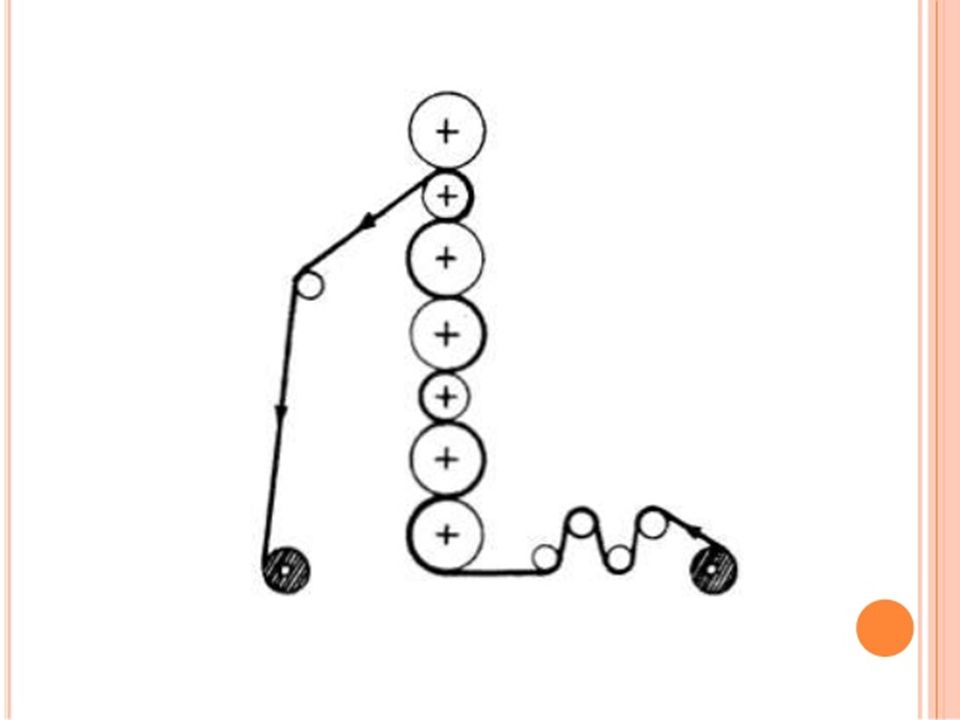
MERCERISATION

18
Process Flow Chart of Garment Finishing: Finishing input (style, color & size wise) ↓ Initial quality check ↓ Spot Removing ↓ Ironing/Pressing ↓ Inspection ↓ Hang tag ↓ Get up change ↓ Folding ↓ Poly ↓ Bar code (buyer wise sticker) ↓ Metal check ↓ Cartooning/Packaging ↓ Final inspection by buyer
 ↓ Initial quality check ↓ Spot Removing ↓ Ironing/Pressing ↓ Inspection ↓ Hang tag ↓ Get up change ↓ Folding ↓ Poly ↓ Bar code (buyer wise sticker) ↓ Metal check ↓ Cartooning/Packaging ↓ Final inspection by buyer")
20
T RIMMING AND THREADING Trimming and threading is the most important process in garment finishing after post production. We usually see that some extra thread in the garment after stitching which is meant to be trimmed and removed from the garment. This trimming and threading assures further finishing in the garment

22
G ARMENT I NSPECTION The inspections are done to control the quality is means by examining the products without the products any instruments. To examine the fabric, sewing, button, thread, zipper, garments measurements and so on according to specification or desired standard is called inspection. thread There are so many facilities for inspection in every section of garments industries. The aim of inspection is to reduce the time and cost by identifying the faults or defects in every step of garments making.

24
F LOW C HART OF G ARMENT I NSPECTION Confirmation of Quantity ↓ Confirmation of accessories ↓ Size spec inspection ↓ In side Inspection ↓ Out side Inspection ↓ Final Inspection ↓ Packing

25
1. Confirmation of Quantity: First step of garment inspection start with confirmation of Quantity with the vendors packing list by counting all Pecs. Of each box. If Qty is not matching to the packing list and written in the box then this discrepancy is informed to the vendor. 2. Confirmation of Accessories: Here we confirm brand tags, Price tags, or other tags, wash care labels, woven labels, or other labels and accessories as required by the buyer. 3. Size Spec inspection: After confirmation of accessories all pcs are checked as per size spec based on the instruction sheet which is given by the buyer side. If any measurement problem is noticed then we check the original sample and inform the buyer same time. 4. In Side Inspection: At this stage garment is checked from reverse side to ensure that there is no fabric defect, poor stitching, and stains etc in the garment.

26
5. Out Side Inspection: At this stage garment is checked from outside to ensure that there is no color variation, weaving defect, fabric defect, printing defect, holes, poor stitching, bad smell, dying defect and stains etc in the garment. 6. Final Inspection: Final Inspection stage is the most important part of inspection process, here garment is rechecked to confirm that inspection is done properly without missing any checking step if any defect is noticed we put it into rejection bin or send it for repay. 7. Packing: All “Grade-A” goods are put back into poly bags as per the original packaging and then they are send for needle inspection. So, depending on the quality of defect some garments are send for repair and some are rejected.

28
C LOTHING REPAIR Clothing repair and mending can cover a rather wide range of activities varying from those requiring very little skill to those demanding a great deal of sewing skill and expertise..

29
T YPES OF REPAIRS PREVENTIVE MENDING:-it includes a variety of things which will keep the garment looking good and delay major repairs or mending activities. Tying loose threads Reattaching buttons. Ripped seams Unsecured hem Raveling buttonhole DARNING:- Darning is the “reweaving” of fabric in a damaged area, and can be done by hand or sewing machine. Hand darning Machine darning

30
PATCHING:- Patching is often used when the damaged area is large or is not suited to darning. The repair can be almost invisible, or very decorative in nature. Replacement:- generally requires the removal of a section or part of the garment so that a new portion or part can be installed. Replacement can require a great deal of skill, or just a little time and creative thought.

31
FOLDING After completing pressing, the garments are folded with a predetermine area. Garments are folded according to the buyers direction, requirements in a standard area. Folds are made by applying pressure on fabric resulting in creases. Crease will become more pronounced when we applied pressure along the folds.

32
I MPROPER FOLDING Folds that will set produces creases. Garments are rubbing against each other, producing wrinkles (tiny folds) in the fabric, that will also set. Plastic dry cleaning bags or tissue papers helps in wrapping clothes that will reduces wrinkles, but does nothing about creases.
 in the fabric, that will also set. Plastic dry cleaning bags or tissue papers helps in wrapping clothes that will reduces wrinkles, but does nothing about creases..")
33
F OLDING CLASSIFICATION Folding classification depends on the fabric types. There are mainly four types of folding. They are – Stand up: Collar is folded and situated at 90* angle. Semi stand up: Collar is folded with body and situated at 45 degree angle. SEMI STAND UP

34
FOLDING CLASSIFICATION Flat pack: Collar is separated as a hole on the body of shirt. Hanger pack: shirt is packed and transported by hanging on the hanger. At the end of the folding, garments are placed into a polythene packet

35
P ACKING AND PACKAGING REQUIREMENTS Carton should be strong and secure enough to easily transport the products. Content should be packed in the carton according to the instruction. Labels should be marked on the carton according to the requirements. Any misleading information or unrelated printed matter should not be displayed on the carton. for example brands or product names unrelated to the cartons content.

36
I T IS IMPORTANT TO : Use the correct size carton for the goods you need to pack to minimize free space in carton. Ensure that cartons are adequately sealed to support the content. Do not use brown paper wrapping. Do not use any form of strapping. Do not use carton stapling.

37
THANK YOU

Similar presentations