Download presentation
Presentation is loading. Please wait.

1
Compound Light Microscope
The Microscope Compound Light Microscope

2
I. History of the Microscope
1400’s – simple microscopes (magnifying lenses) were used. 1590 – Hans and Zacharias Jansenn develop first compound light microscope – images were distorted. C. Robert Hooke –( ) - improved microscope design and coined the term “cell”. D. Anton Van Leeuwenhoek – ( ) developed compound light microscope with 100x to 200x magnification. E. Microscopes were essential for the discovery of the cell.
 were used – Hans and Zacharias Jansenn develop first compound light microscope – images were distorted. C. Robert Hooke –( ) - improved. microscope design and coined the term cell . D. Anton Van Leeuwenhoek – ( ) developed compound light microscope with. 100x to 200x magnification. E. Microscopes were essential for the discovery. of the cell.")
3
II. Types of Modern Microscopes
Compound Light Microscope – uses light and multiple lenses to magnify an image. 1. most common type of microscope 2. used to examine living tissue. B. Electron Microscope – uses a beam of electrons to examine a sample 1. SEM – Scanning electron microscope – scans surfaces 2. TEM – Transmission electron microscope - scans through a sample and magnifies on a florescent screen or film. C. Scanning Probe Microscope – traces the surface with a small tip called a probe. 1. developed in the 1980’s. 2. produces 3-dimensional images. 3. allows scientists to see extremely small objects (nanotechnology)
")
4
SPM image Electron Microscope SEM image TEM image
How Scanning Probe works SPM image

6
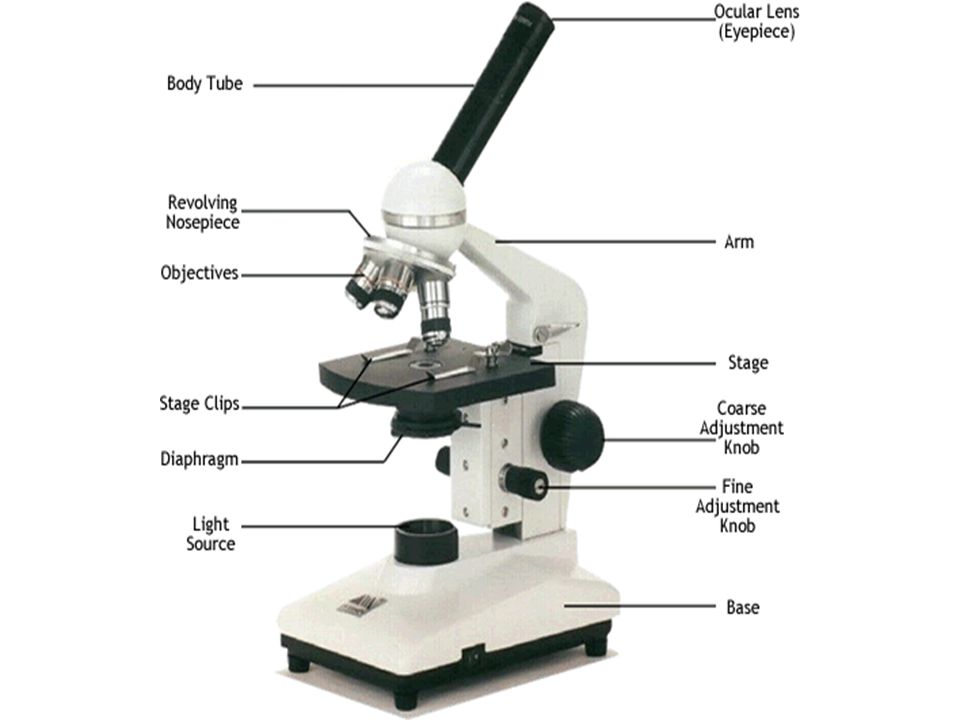
III. Compound Light Microscope
Eye piece – contains a lens that magnifies 10x Body tube – maintains a proper distance between the eyepiece and the objective lenses Nose piece – contains the objectives and can be rotated Objective lenses – provide magnification of 4x, 10x, and 40x Stage clips – holds the slide in position Diaphragm – regulates the amount of light Light source – produces or reflects light Base – supports the microscope Fine Adjustment knob – moves the stage slightly for fine focusing Coarse Adjustment knob – moves the stage up and down Stage – supports the slide being observed Arm – supports the body tube; grasped when carrying the microscope

7
IV. Microscope Use Caring for a microscope
1. Always carry the microscope using two hands; one holding the base and one holding the arm. 2. Don’t move the microscope base when in use. 3. Don’t touch the lenses with your fingers. 4. Only clean the lenses with lens paper. 5. The course adjustment knob is used only when looking through the low power objective lens. The fine adjustment knob is used when in medium or high power objective lenses are being used. 6. Leave the microscope in low power and cover the microscope when you store it.

8
B. Using a microscope 1. Place the microscope on a flat surface that is clear of objects. The arm should be towards you. 2. Look through the eyepiece. Adjust the diaphragm so light comes through the opening in the stage. 3. Place a slide on the stage so the specimen is in the field of view. Hold it firmly in place using stage clips. 4. Always focus with course adjustment and the lowest-power objective lens 4x. After the object is in focus in low power, turn the nosepiece until the high power objective is in place. Use ONLY the fine adjustment to focus with the high power objective lens.

9
C. Preparing slides 1. Wet Mount 2. Staining a Slide

10
D. Magnification – Total magnification = the product of the ocular lens magnification and the objective lens magnification. Power = 10 x 4 = Power = 10 x 10 = Power = 10 x 40 = 400

12
The End

Similar presentations