Download presentation
Presentation is loading. Please wait.

1
Android Application Development CSE 5520/4520 Wireless Networks

2
Outline Introduction to Android Applications Setting up the Android application development Environment Creating and Running Applications Anatomy of ANDROID Applications

3
INTRODUCTION TO ANDROID APPLICATIONS

4
Introduction to Android Applications Android is a mobile software platform (OS) from Google and the Open Handset Alliance. It is powered by the Linux Kernel The underlying OS is written in C or C++ But applications are built using Java Built-in Apps = Apps created in SDK Is an open source platform – Thus third party can add functionalities and does not have to rely on Google (ex: Multimedia Codecs, Sophisticated shell environment, etc.)
.")
5
Android Features Reuse and replacement of components Dalvik virtual machine Integrated browser Optimized graphics SQLite – DB owned by each application (can be shared) Media support GSM Telephony Bluetooth, EDGE, 3G, and WiFi Camera, GPS, compass, and accelerometer Rich development environment
 Media support GSM Telephony Bluetooth, EDGE, 3G, and WiFi Camera, GPS, compass, and accelerometer Rich development environment")
6
What is Dalvik VM (DVM)? Dalvik is the process virtual machine (VM) that runs the apps on Android devices. DVM is optimized to run on slow-cpu, low-ram, and low-power devices Every Android application runs in its own process, with its own instance of the DVM DVM is written so that a device can run multiple VMs efficiently Programs are commonly written in Java and compiled to bytecode. Then they are converted from Java Virtual Machine- compatible.class files to Dalvik-compatible.dex (Dalvik Executable) files before installation on a device.
 that runs the apps on Android devices. DVM is optimized to run on slow-cpu, low-ram, and low-power devices Every Android application runs in its own process, with its own instance of the DVM DVM is written so that a device can run multiple VMs efficiently Programs are commonly written in Java and compiled to bytecode. Then they are converted from Java Virtual Machine- compatible.class files to Dalvik-compatible.dex (Dalvik Executable) files before installation on a device..")
7
Android Architecture

8
Android API vs. Android SDK Application Programming Interface (API) is an interface (set of libraries) that allows you to communicate with the Android platform. Android Standard Development Kit (SDK) provides you the API libraries and the developer tools necessary to build, test and debug apps for Android.
 is an interface (set of libraries) that allows you to communicate with the Android platform. Android Standard Development Kit (SDK) provides you the API libraries and the developer tools necessary to build, test and debug apps for Android..")
9
What is an API Level? API Level is an integer value that uniquely identifies the framework API revision offered by a version of the Android platform. The framework API consists of: – A core set of packages and classes – A set of XML elements and attributes for declaring a manifest file – A set of XML elements and attributes for declaring and accessing resources – A set of Intents – A set of permissions that applications can request Each successive version of the Android platform can include updates to the Android application framework API that it delivers.

10
Platform VersionAPI LevelVERSION_CODE Android 4.1, 4.1.116JELLY_BEAN Android 4.0.3, 4.0.415ICE_CREAM_SANDWICH_MR1 Android 4.0, 4.0.1, 4.0.214ICE_CREAM_SANDWICH Android 3.213HONEYCOMB_MR2 Android 3.1.x12HONEYCOMB_MR1 Android 3.0.x11HONEYCOMB Android 2.3.4 Android 2.3.3 10GINGERBREAD_MR1 Android 2.3.2 Android 2.3.1 Android 2.3 9GINGERBREAD Android 2.2.x8FROYO Android 2.1.x7ECLAIR_MR1 Android 2.0.16ECLAIR_0_1 Android 2.05ECLAIR Android 1.64DONUT Android 1.53CUPCAKE Android 1.12BASE_1_1 Android 1.01BASE

11
SETTING UP THE ANDROID APPLICATION DEVELOPMENT ENVIRONMENT

12
Setting up the Android development environment 1.Download and install Java 6 (JDK 1.6)JDK 1.6 2.Download Eclipse (JEE, Classic or Java developers)Eclipse 3.Download and install Android SDK base – Download: http://developer.android.com/sdk/index.htmlhttp://developer.android.com/sdk/index.html – http://developer.android.com/sdk/installing.html http://developer.android.com/sdk/installing.html 4.Install Eclipse ADT Plugin (Android Development Tools in Eclipse)Eclipse ADT Plugin 5.Adding platforms and SDK components 6.AVD (Android Virtual Device)
JDK Download Eclipse (JEE, Classic or Java developers)Eclipse 3.Download and install Android SDK base – Download: – Install Eclipse ADT Plugin (Android Development Tools in Eclipse)Eclipse ADT Plugin 5.Adding platforms and SDK components 6.AVD (Android Virtual Device)")
13
Installing Android SDK First download and install Android SDK This is not the complete SDK environment. – It includes only the core SDK tools, which you can use to download the rest of the SDK packages (such as the latest system image). The installer will check for machine requirements and then saves the Android SDK Tools into a default location (or you can specify the location). Make a note of the name and location of the SDK directory – you will need to refer to this directory later, when setting up the ADT plugin and when using the SDK tools from the command line.
. The installer will check for machine requirements and then saves the Android SDK Tools into a default location (or you can specify the location). Make a note of the name and location of the SDK directory – you will need to refer to this directory later, when setting up the ADT plugin and when using the SDK tools from the command line..")
14
Install Eclipse ADT 1.Start Eclipse, then select Help > Install New Software. 2.Click Add, in the top-right corner. 3.In the Add Repository dialog that appears, enter "ADT Plugin" for the Name and the following URL for the Location:https://dl-ssl.google.com/android/eclipse/ 4.Click OK. 5.In the Available Software dialog, select the checkbox next to Developer Tools and click Next. 6.In the next window, you'll see a list of the tools to be downloaded. Click Next. 7.Read and accept the license agreements, then click Finish. 8.When the installation completes, restart Eclipse.

15
Using SDK components Run Android SDK manager – Window -> Android SDK Manager Probably prompted automatically after installing ADT plugin and restarting Eclipse – Select all entries, except that you can omit Android versions older than 2.2 Click “Install n packages” Runs for a long time Detailed instructions – http://developer.android.com/sdk/installing/adding- packages.html http://developer.android.com/sdk/installing/adding- packages.html

16
Create an Android Virtual Device (AVD) Defines the system image and device settings used by the Emulator To create an AVD through Eclipse: 1.Select Window > Android SDK and AVD Manager. The Android SDK and AVD Manager displays. 2.Make sure the entry for Virtual Devices is selected and click New. The Create new AVD window displays. 3.Enter a Name for the AVD. 4.Select Google APIs (API level 9) as the Target. 5.Click Create AVD. 6.Close the Android SDK and AVD Manager.
 as the Target. 5.Click Create AVD. 6.Close the Android SDK and AVD Manager..")
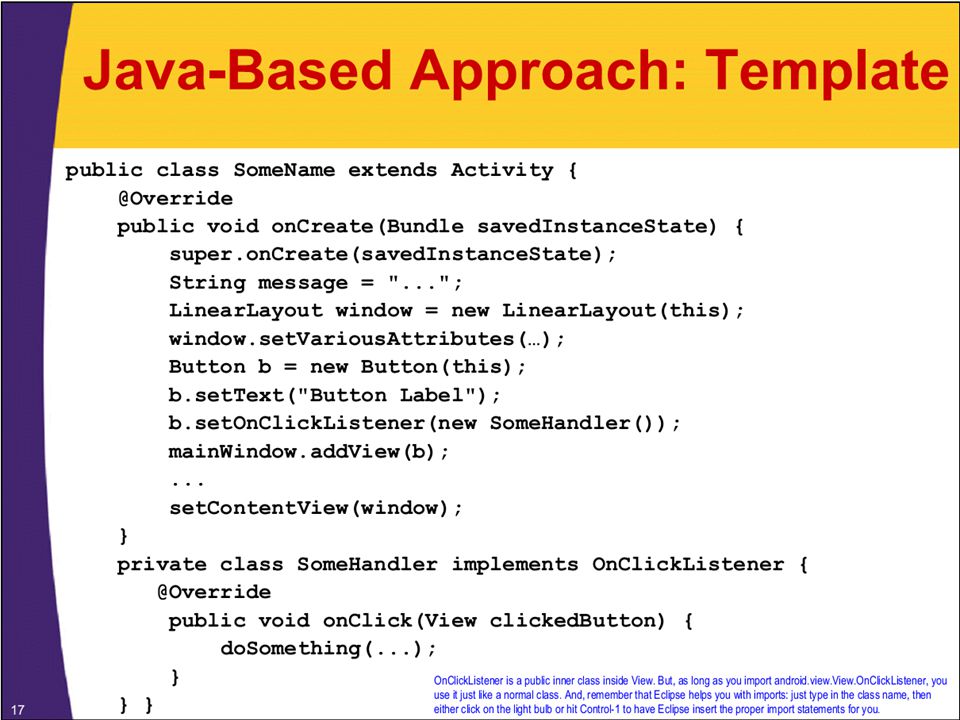
17
DEVELOPING AND RUNNING APPLICATIONS

18
Application Components Activity ◦ Present a visual user interface for one focused endeavor the user can undertake ◦ Example: a list of menu items users can choose from

19
Application Components Cont. Services ◦ Run in the background for an indefinite period of time ◦ Example: calculate and provide the result to activities that need it

20
Application Components Cont. Broadcast Receivers ◦ Receive and react to broadcast announcements ◦ Example: announcements that the battery is low

21
Application Components Cont. Content Providers ◦ Store and retrieve data and make it accessible to all applications ◦ Example: Android ships with a number of content providers for common data types (e.g., audio, video, images, personal contact information, etc.) Intents ◦ Activities, services, and broadcast receivers — are activated by asynchronous messages called intents. ◦ Hold the content of a message ◦ Example: convey a request for an activity to let the user edit some text
 Intents ◦ Activities, services, and broadcast receivers — are activated by asynchronous messages called intents. ◦ Hold the content of a message ◦ Example: convey a request for an activity to let the user edit some text.")
22
Usage of Intent to start an activity Allows communication between components – Message passing – Bundle Intent intent = new Intent(CurrentActivity.this, OtherActivity.class); startActivity(intent);
; startActivity(intent);")
23
Android “Hello World” File New Project Android Android Application Project – Next time you can do File New Android Application Project Fill in options as shown on next pages Run the project (will be explained later) – R-click Run As Android Application
 – R-click Run As Android Application")
24
“Hello World” - Setting Project Options Application Name – Shown in Play Store and Settings Manage Application List. Usually same as Project Name. Project Name – Eclipse project name. Follow naming convention you use for Eclipse. Not used elsewhere. Package name – Apps on a particular Android device must have unique packages, – so use com.yourCompany.project Build SDK – The Android version used to build/compile your project. This can be any version (e.g., the most recent), but the safest option is to make it match the minimum SDK below. Minimum Required SDK – The Android version that you want to run on. – For most phone apps, choose 2.3.3, since that is the most common version in use worldwide. For learning new features, use latest version.
, but the safest option is to make it match the minimum SDK below. Minimum Required SDK – The Android version that you want to run on. – For most phone apps, choose 2.3.3, since that is the most common version in use worldwide. For learning new features, use latest version..")
25
“Hello World” - Setting Project Options Cont. Configure Launcher Icon – To choose the picture displayed on the Android device, that, when clicked, launches the app. – Use defaults for development and testing. Just press “Next”. Create Activity – Choose “BlankActivity”

26
“Hello World” - Options for Blank Activity Activity Name – Name of “main” Java class. This is the class you will edit first. – Class name often corresponds to project name. Layout Name – Base name of XML file in res/layout folder. – Used to give layout to app. Often just called “main”. – Will be referred to in main Java class with R.layout.layout_name. Navigation Type – For now, leave this as “None” Hierarchical Parent – Parent Activity (for when user presses Up). Empty for now. Title – Text that will be shown on Android title bar.
. Empty for now. Title – Text that will be shown on Android title bar..")
27
Running New App on Emulator Same as with any project R-click Run As Android Application NOTE: do not close emulator after testing. Emulator takes a long time to start initially, but it is relatively fast to deploy a new or a changed project to the emulator.

28
Running App on Mobile Phone Deploying via USB Connection Prereq: install drivers for Android device – Plug phone (or other Android device) into computer. – Recent OS’s might find drivers automatically. If not, download from device manufacturer. – See list at http://developer.android.com/tools/extras/oem- usb.htmlhttp://developer.android.com/tools/extras/oem- usb.html – After installation, plug in phone, then go to android- dir/platform-tools/ and run “adb devices”. Your device should now be listed.

29
Running App on Mobile Phone Cont. In the Android device – Enable USB debugging – Allow unknown sources – Verify USB drivers are on computer http://developer.android.com/tools/extras/oem-usb.html – Plug into computer via USB In Eclipse – R-click app, Run As -> Android Application – If emulator is open, will be given a choice of which device to deploy to. – If emulator not open, will deploy to physical device automatically.

30
ANATOMY OF ANDROID APPLICATION

31
Anatomy of Android Application

32
Android Manifest Every application must have an AndroidManifest.xml file (with precisely that name) in its root directory.AndroidManifest.xml The manifest presents essential information about the application to the Android system, information the system must have before it can run any of the application's code. Among other things, the manifest does the following: – It names the Java package for the application. The package name serves as a unique identifier for the application. – It describes the components of the application — the activities, services, broadcast receivers, and content providers that the application is composed of.

33
Android Manifest – It determines which processes will host application components. – It declares which permissions the application must have in order to access protected parts of the API and interact with other applications. – It also declares the permissions that others are required to have in order to interact with the application's components. – It declares the minimum level of the Android API that the application requires. – It lists the libraries that the application must be linked against.

34
Structure of the Manifest File

35
Structure of the Manifest File Cont.

38
The lifecycle of and Android Activity

43
Example Create a network monitor using Android’s TrafficStats class http://www.techrepublic.com/blog/app- builder/create-a-network-monitor-using- androids-trafficstats-class/774

44
More Android Samples In Eclipse – File -> New -> Project… – Select Android -> Android Sample Project – Select the API Level – Select the desired sample and click finish (Ex: Snake)
")
45
Project 3 - Objectives 1.Logging smart phone activities or resource usage while an application is running 2.What are the resources available to monitor – Monitoring the resources requested and test it with one single application. 3.Download and test with a certain category of applications 4.What are the plots and graphs to produce the resources used across all the applications.

46
References Android Developers - http://developer.android.com/index.htmlhttp://developer.android.com/index.html Android Tutorial - http://www.coreservlets.com/android-tutorial/http://www.coreservlets.com/android-tutorial/ Dr. Lotzi Bölöni - http://www.cs.ucf.edu/~lboloni/Teaching/EEL6788_2010/http://www.cs.ucf.edu/~lboloni/Teaching/EEL6788_2010/ Dr. Lotzi Bölöni (slides)- http://www.cs.ucf.edu/~lboloni/Teaching/EEL6788_2010/slides/T8a- AndroidTutorial.ppt http://www.cs.ucf.edu/~lboloni/Teaching/EEL6788_2010/slides/T8a- AndroidTutorial.ppt Dr. Natasa Przulj - http://www.doc.ic.ac.uk/~natasha/course2012/docs/android-tutorial.pdf http://www.doc.ic.ac.uk/~natasha/course2012/docs/android-tutorial.pdf
- AndroidTutorial.ppt AndroidTutorial.ppt Dr. Natasa Przulj")
Similar presentations


 Copyright 2015 by Janson Industries.>")

Dept of CS & E.>")
 Eclipse plug-in ▫Android SDK and.>")


