Download presentation
Presentation is loading. Please wait.

1
Grove City High School 2010-2011 Ms. Bruce

2
Week 1 This week Basic Commands Basic Saving Basic Printing

3
What is AutoCAD? AutoCAD is a CAD (Computer Aided Design or Computer Aided Drafting) software application for 2D and 3D design and drafting.
 software application for 2D and 3D design and drafting..")
4
Commands Tool Bar Pull Down KEY COMMANDS From the Key board

5
Key Sequences Always look at the command line At the bottom of the page Always be as specific as possible

6
Layers In Auto CAD, we make individual layers… For things like ○ Hidden lines ○ Center lines ○ Section lines ○ Break lines

7
Layers Layers are a way of managing, tidying and also controlling the visual layout of a drawing.

8
Layers A whole section of a drawing can be turned on or off, or simply one aspect can be controlled - text for example.

9
Layers This is all done by using layers within Autocad.

10
What is a Layer A layer can be thought of as a large piece of clear plastic, as infinitely large as the drawing area in Autocad.

11
What is a Layer When drawing in Autocad, everything is drawn on the default layer which is set current. Only the objects you are drawing are visible on the layer, the layer itself can never be seen - it is invisible.

12
What is a Layer Each new layer is created by you, the user. Normally, it is acceptable to have a layer for each different part of a drawing. Layers are controlled by the layer properties manager button which is located on the object properties toolbar:

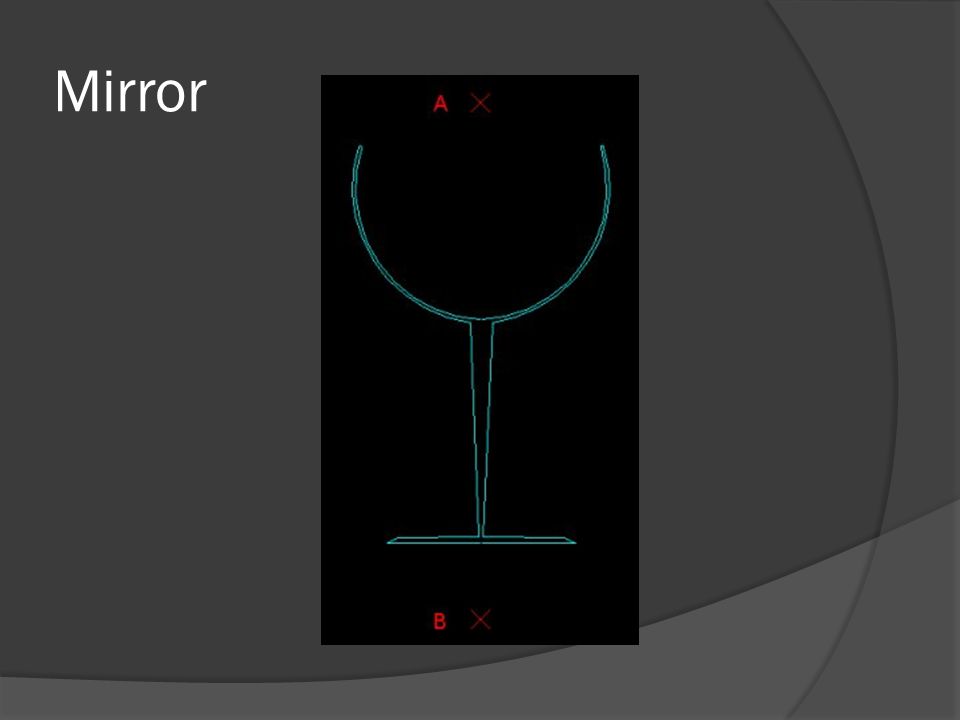
13
Layer property manger

14
In Layer Property manger Add a New Layer - Press the New button to create a new layer. Delete a Layer - Press the delete button to delete the selected layer. Set Current layer - Press the current button to set the selected layer current. All objects drawn will then be drawn on this current layer. Show Details - Press the show details button to see more detailed information about the selected layer. Each layer also has the following options against it:

15
Layer property Manger Name - Displays the layer name. On - Controls if the layer is on or off. Select the light bulb to turn the layer off on the drawing. Freeze in all VP - Pressing this will freeze the layer in all viewports as well as the current model view (see lesson 10 to learn about viewports) Lock - This handy feature locks a layer preventing any content of the layer from being modified. Colour - Change this to whichever colour you like. All objects drawn on the layer will display the chosen colour provided that the objects colour setting in the object properties toolbar (shown above) is set to 'By Layer'. Linetype - Set the default linetype for all objects drawn on the layer. i.e continuous, dashed, dotted etc. Lineweight - Set the thickness a line appears.Default is no thickness. This option can be toggled on/off on the display by the LWT button above the command console. Plot - Select if the layer will be shown when the drawing is plotted (printed). The current layer, layer colour, linetype and lineweight can all be controlled outside of the layer properties manager via the object properties toolbar.
 Lock - This handy feature locks a layer preventing any content of the layer from being modified. Colour - Change this to whichever colour you like. All objects drawn on the layer will display the chosen colour provided that the objects colour setting in the object properties toolbar (shown above) is set to By Layer . Linetype - Set the default linetype for all objects drawn on the layer. i.e continuous, dashed, dotted etc. Lineweight - Set the thickness a line appears.Default is no thickness. This option can be toggled on/off on the display by the LWT button above the command console. Plot - Select if the layer will be shown when the drawing is plotted (printed). The current layer, layer colour, linetype and lineweight can all be controlled outside of the layer properties manager via the object properties toolbar..")
16
Drafting Settings Command DS Changes Grid Object Snaps Polar Tracking

17
Object Snaps Midpoint End point Intersection Extension Center Quadrant Tangent Perpendicular Parallel Insert Node

18
Object Snaps The Object Snaps (Osnaps for short) are drawing aids which are used in conjunction with other commands to help you draw accurately.
 are drawing aids which are used in conjunction with other commands to help you draw accurately.")
19
Object Snaps Osnaps allow you to snap onto a specific object location when you are picking a point

20
When you are drawing, take a few moments to consider how you will construct each part of the drawing and which Osnaps you will use before starting work. There is always more than one way to draw anything in AutoCAD but the quickest, most accurate and the most efficient way always requires the use of one or more of the Osnap tools

21
Dock the Object Snap toolbar to your drawing window for quick access to the Osnaps. You will be using them all the time, one-click access is essential. See Object Snaps to find out how to display the Object Snap toolbar. To dock the toolbar, click on the toolbar title and drag it to the edge of the drawing window. Object Snaps

22
You will begin to work on Handed out exercises

23
Day 2

24
Modify Commands The modify tools (from left to right): Erase, Copy, Mirror, Offset, Array, Move, Rotate, Scale, Stretch, Lengthen, Trim, Extend, Break at point, Break, Chamfer, Fillet, Explode
: Erase, Copy, Mirror, Offset, Array, Move, Rotate, Scale, Stretch, Lengthen, Trim, Extend, Break at point, Break, Chamfer, Fillet, Explode")
25
Erase Select this button then a drawing element to erase it permanently from the drawing.

26
Copy Copy - The copy command will copy any selected drawing elements and reposition where specified by the user, without affecting the original elements.

27
Mirror Mirror - The mirror command will create a mirror image of any selected drawing elements along any line of symmetry specified by the user.

28
Mirror

30
Offset Offset will make a copy of a line or series of selected lines by a specified distance in the direction specified.

31
Offset

32
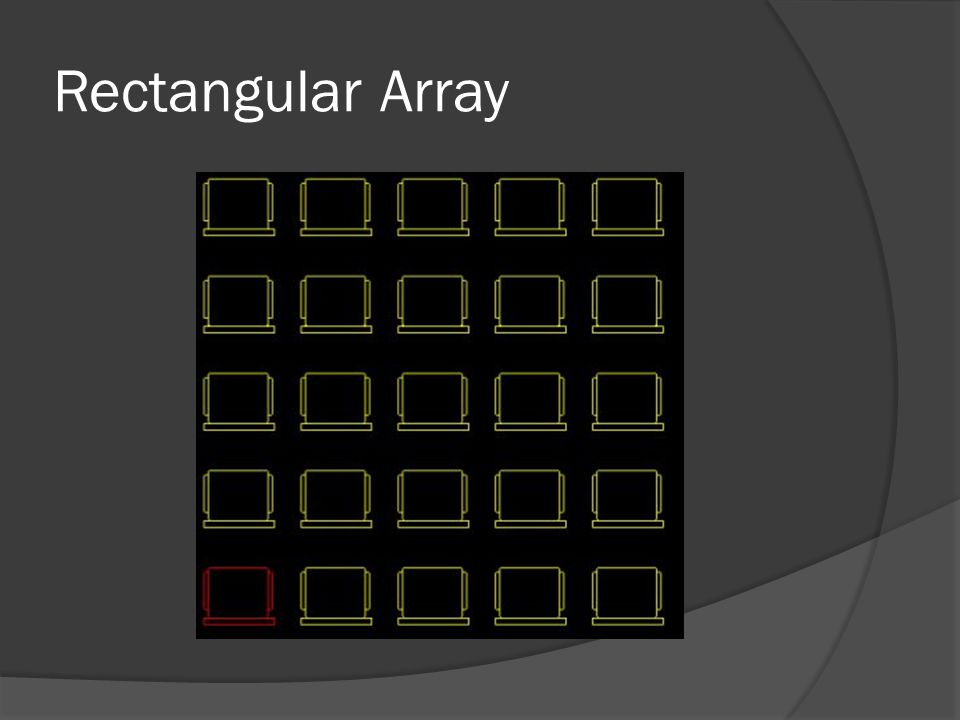
Array The array command quickly creates copies of a selected object(s) to a specified spacing..
 to a specified spacing..")
33
Rectangular Array

35
Polar Array

37
Move The move command works exactly the same as the copy command described above, except instead of creating a copy of the selected objects, the second objects are moved.

38
Rotate The rotate command rotates any selected objects about a defined point by the angle specified. By default Autocad will rotate objects anticlockwise when an angle is entered.

39
Scale The scale command scales the size of a selected object(s) by a defined scale factor from a selected base point. The selected objects can be scaled up to increase size or down to reduce the size.

40
Lengthen The lengthen command will lengthen a selected line.

41
Lengthen DE - Delta: Autocad asks for a distance to lengthen the line by, when the line is selected it will then be lengthened by the specified distance ONLY to the side of the line where the line was selected. i.e If when you selected the line, you selected it just to the left of centre, then the left side of the line would be lengthened.

42
Lengthen P - Percent: Autocad asks for a percent to lengthen by, then asks you to select the line. Specifying 50% would reduce the size of the line by half (The same effect as scaling by a factor of 0.5). Specifying 100% would result in no change in length. 200% would double the length of the line. When specifying the percentage to Autocad only the numerical figure has to be entered and not the percent (%) symbol.
. Specifying 100% would result in no change in length. 200% would double the length of the line. When specifying the percentage to Autocad only the numerical figure has to be entered and not the percent (%) symbol..")
43
Lengthen T - Total: Autocad asks for the distance you want the entire line to be, when you select the line it will adjust the lines length to the distance specified.

44
Lengthen DY - Dynamic: Autocad adjusts the length of the line as the mouse is moved in the direction the line is to be lengthened. This is not an accurate technique, although is useful for quickly lengthening construction lines for example.

45
Day 3

46
Trim The trim command is an extremely useful tool which will erase all parts of an object beyond or within its intersection with another object.

47
Trim

48
Extend The extend command is similar to the trim command in how it functions, except it extends a selected line to a point of intersection of another selected object.

49
Break at Point The break at point command enables the user to break an object at a specific point, creating two separate objects.

50
Break The break command is identical to the break at point command, except the break line isn't as neat as break at point.

51
Break

52
Chamfer The chamfer command will chamfer the intersection of two lines to a specified distance.

53
Chamfer

54
Fillet The fillet command is very similar to the chamfer command above, except instead of creating a straight line chamfer, Autocad creates a radius between the two points.

55
Fillet

56
Explode The explode command is very straight forward. It simply breaks down an object down to its basic line entities.

57
ZOOM AutoCAD's zoom command toolbar:

58
Zoom real time and Pan Pan Button

59
Zoom real time and Pan While holding the left mouse button, pull the mouse to the left, right, up or down. Notice how the pan tool reflects these mouse movements on screen so we can move around the screen effortlessly.

60
Auto CAD

61
Making Layout/Layers….

Similar presentations