Download presentation
Presentation is loading. Please wait.

1
A MEMS Design Project Debby Chang, Randall Evans, Caleb Knoernschild under Jungsang Kim, Ph.D. December 10, 2005 Duke University

2
Overview Design overview First Test: manual movement of the gear –Design of gears –Test setup for gears –Test requirements for gears –Test results for gears Second Test: manual actuation of the mirror –Design of the mirror –Test setup for mirror –Test requirements for mirror –Test results for mirror Final Test: actuation of comb drives –Design of comb drive –Test setup for comb drive –Test requirements for comb drive –Test results for comb drive

3
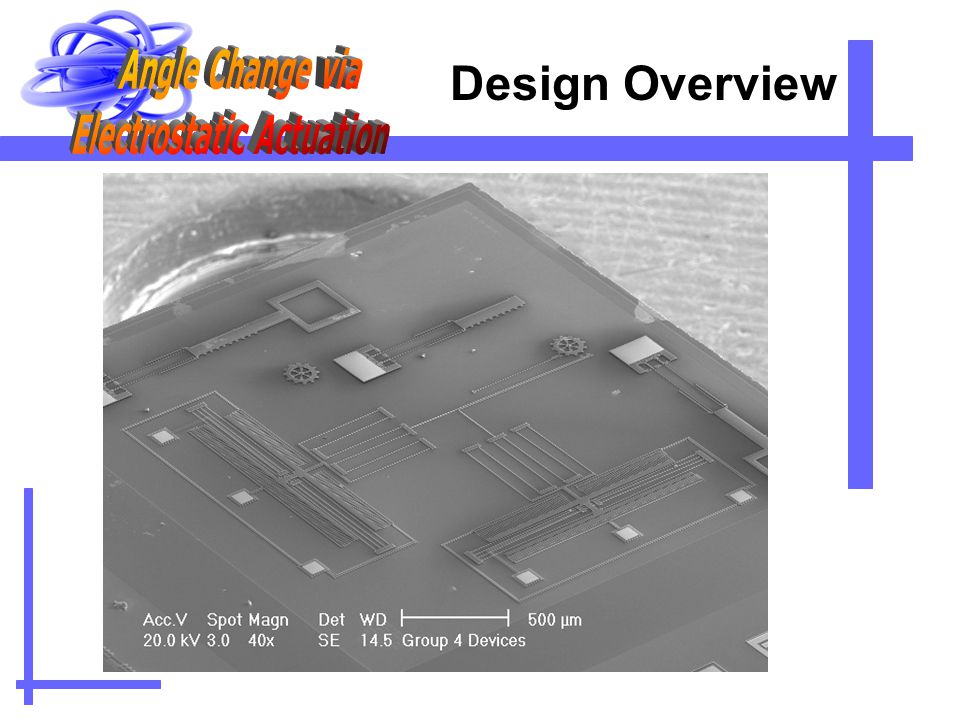
Design Overview

5
Backside View

6
y x Design Overview

7
3 Subsystems –Linear Actuator –Gears and Ratchet –Mirror and Mirror Arm Systems

8
Overview Design overview First Test: manual movement of the gear –Design of gears –Test setup for gears –Test requirements for gears –Test results for gears Second Test: manual actuation of the mirror –Design of the mirror –Test setup for mirror –Test requirements for mirror –Test results for mirror Final Test: actuation of comb drives –Design of comb drive –Test setup for comb drive –Test requirements for comb drive –Test results for comb drive

9
Error 1 Missing Anchor The large gear is not anchored! “Where are the big gears??”

10
Gear Test Does the gear perform its function when manually stimulated. –Procedure: stimulate the gear by placing a probe against one of the teeth, then pushing tangentially

11
Testing- Materials Micromanipulator with a glass pipette probe mounted vertically 100x+ camera capable of recording video light source mounted vertically

12
Gear Test Result

13
Overview Design overview First Test: manual movement of the gear –Design of gears –Test setup for gears –Test requirements for gears –Test results for gears Second Test: manual actuation of the mirror –Design of the mirror –Test setup for mirror –Test requirements for mirror –Test results for mirror Final Test: actuation of comb drives –Design of comb drive –Test setup for comb drive –Test requirements for comb drive –Test results for comb drive

14
Mirror and Mirror Arm ComponentsSimulated Values Theoretical Values Mirror Arm Mass2.54118e-10 kg- Mirror Arms Spring Constant 0.00269 N/m0.00254 N/m Length of Mirror75.5 um Length of Arms467 um Length of Mirror Arm 543 um y x

15
Mirror Design SEM Image + Coventor Design

16
Test Procedure First test: Measure angle change based upon translation

17
Error? Mirror flaw in the connection of the mirror arm to mirror. The top stopper has a.5um gap. Still Connected! (most of the time).5 um gap Top “stop” Bottom “stop”
.5 um gap Top stop Bottom stop .")
18
Error 2 No release holes were designed into a large planar mirror, so the first three chips, released in HF for 4 minutes, may not have fully released the mirrors To overcome this, we released 2 extra devices for a total of 15mins in HF to ensure complete release –One device that was released flipped over onto the gel (see backside picture)
")
19
First Release Results

20
Second Release Results

21
Mirror Fracture Strength Fracture Strength of Polysilicon =1.55 GPa (LaVan et. al ) Cross sectional area of one mirror arm A = WxD= 3um * 1.5 um = 4.5 e-12 m^2 Force required to break the mirror arms F=Fracture Strength/2*Area F= 0.014N Mirror Weight = 1.1 e-9 kg = 1.1e-8N A =Cross Sectional Area “Size and Frequency of Defects in ” LaVan et. Al.
 Cross sectional area of one mirror arm A = WxD= 3um * 1.5 um = 4.5 e-12 m^2 Force required to break the mirror arms F=Fracture Strength/2*Area F= 0.014N Mirror Weight = 1.1 e-9 kg = 1.1e-8N A =Cross Sectional Area Size and Frequency of Defects in LaVan et. Al..")
22
Broken Arms

23
Mobile mirror release problems

24
Overview Design overview First Test: manual movement of the gear –Design of gears –Test setup for gears –Test requirements for gears –Test results for gears Second Test: manual actuation of the mirror –Design of the mirror –Test setup for mirror –Test requirements for mirror –Test results for mirror Final Test: actuation of comb drives –Design of comb drive –Test setup for comb drive –Test requirements for comb drive –Test results for comb drive

25
Design of Comb Drive y x

26
Expectations –Designed to move 20 um at 40 Volts, BUT … –Flaw only allows ~ 14 um movement –Hope to see 14 um movement Design of Comb Drive ~14um

27
Test setup for Comb Drive DC Characteristics –Apply a DC voltage and observe movement under microscope or camera –Use feature sizes of components on device to estimate the comb drive movement AC Characteristic –Test varying voltages and frequencies –view under microscope or camera to observe motion –Look for movement of drive – resonance frequency occurs at largest drive displacement response

28
Comb Movement and Elasticity

29
Test Requirements for Comb Drive Microprobe tip For DC Characterization –120 Volt, 2.5 Amps Power supply –Microscope –CCD viewing equipment For AC Characterization –5 Vpp max function generator –10x amplifier –Microscope –CCD viewing equipment

30
Test Results for Comb Drive Tests were not successful due to several design errors –Contact Pad Flaw –Comb Tooth Motion due to Poly 0 ?

31
Error 3 Ground Electrode electronically isolated from poly 0 wire Poly 1 pattern placed inside Anchor 1 Probe

32
Contact Pad Substrate Poly 0 Substrate Poly 0

33
Oxide 1 Contact Pad Substrate Poly 0 Substrate Poly 0 Oxide 1

34
Contact Pad Substrate Poly 0 Substrate Poly 0 Oxide 1

35
Poly 1 Contact Pad Substrate Poly 0 Substrate Poly 0 Oxide 1 Poly 1

36
Contact Pad Substrate Poly 0 Substrate Poly 0 Oxide 1 Poly 1

37
Contact Pad Substrate Poly 0 Oxide 2 Substrate Poly 0 Oxide 1 Poly 1 Oxide 2

38
Poly 1 Contact Pad Substrate Poly 0 Substrate Poly 0 Oxide 1 Poly 1 Oxide 2

39
Poly 2 Poly 1 Contact Pad Substrate Poly 0 Substrate Poly 0 Oxide 1 Poly 1 Oxide 2 Poly 2

40
Poly 1 Contact Pad Substrate Poly 0 Substrate Poly 0 Oxide 1 Poly 1 Oxide 2 Poly 2

41
Poly 1 Contact Pad Substrate Poly 0 Substrate Poly 0 Oxide 1 Poly 1 Oxide 2 Poly 2 Top View

42
Error 4 Free comb seems to be driven to substrate instead of driven to engage more with corresponding teeth. Movable inner comb does not move horizontally very much

43
Comb Teeth Design Flaw Comb drive does not move as designed because of Poly 0 Poly 0 layer leaks charge to nitride layer which forces movable teeth into the substrate C1 C2 ++++++++++++++++++++++++++++++++++++++++++++++++ C2 C1 But there are twice as many C2 capacitances

44
Comb Teeth Design Flaw Ground h w1 w2 dodo L is intersecting teeth length L

45
Comb Teeth Design Flaw Ground h-Δ w1 w2 do-Δdo-Δ L is intersecting teeth length

46
Comb Teeth Design Flaw Possible temporary solution – reduce built up charge by grounding substrate through package and silicon paste

Similar presentations


 BUCKETS (PIXELS) VERTICAL CONVEYOR BELTS (CCD COLUMNS) HORIZONTAL CONVEYOR BELT ( SERIAL REGISTER ) MEASURING CYLINDER (OUTPUT AMPLIFIER)>")


