Download presentation
Presentation is loading. Please wait.

1
Collecting Data with Well-Designed Forms
Chapter 4 Collecting Data with Well-Designed Forms Use the quote as a jumping off point for discussion, if desired.

2
Forms can show only one record at time
Chapter Introduction Automate process of acquiring data needed for day-to-day operation of business Forms can show only one record at time Provide many advantages to database users Flexibility for users and designers Consist of one or many pages Design all forms in a database to create consistent look and feel Include buttons that facilitate navigation

3
Level 1 Objectives: Developing Simple Forms to Facilitate Data Entry
Design forms for efficient data entry Create simple forms for data entry and editing Develop a consistent user interface

4
A Poorly-Designed Form

5
A Well-Designed Form

6
Examining and Entering Data
Enter data into records using: Table’s Datasheet view Form that includes fields from one or more tables Most Access database applications use forms for data entry After database released for regular business use

7
Creating Simple Forms for Data Entry and Editing
Access provides many ways to create forms Options for creating simple forms Form tools Form wizard

8
Creating a Form Using the Form Tool
Click the CREATE tab, then click the Form tool in the Forms group Access creates form by: Arranging all fields in table in columnar format Displays first record in form window Converts subdatasheet into subform

9
Creating a Form Using the Form Tool (cont’d.)
Move from one field to next Switch to Form view and press the Tab key Move from one record to another Click buttons on record navigation bar at bottom of main form Data in subform changes

10
Using the Form Wizard Specify field order Specify particular layout and style for form Click the Forms Wizard button in the Forms group on the CREATE tab

11
Figure 4.6: Starting the Form Wizard

12
Figure 4.7: Select the fields you want to show on the form

13
Figure 4.8: Form for the tblDoctor table

14
Using the Form Wizard (cont’d.)
Record source Underlying object Provides fields and data in form Bound form Displays data from fields in its record source Unbound form Do not have record source Usually used to help users navigate

15
Types of Controls Bound forms or controls have an associated record source which is the underlying object that provides the fields and data for the control. Unbound forms and controls do not have a record source - they aren't directly related to any data. They might be navigation tools, etc.

16
Form Views Form View (Default) Layout View Design View
Shows a form with data from underlying table Data can be edited but layout can't Layout View Allows some modification to the layout while seeing the data displayed in the form Can't change data Design View Full control of layout

17
Using design elements called controls
Form Controls Using design elements called controls Small objects such as text boxes, buttons, and labels

18
Form Controls Select: Selects objects including ink, shapes and text areas; especially useful for objects behind text. Text Box: Displays a label attached to a text box that is bound to a field in an underlying table or query or contains a calculated value Label: Displays text, such as titles or instructions; an unbound control.

19
Form Controls Button: Creates a control that users can click to take an action, such as record navigation or form and record operations Tab Control: Creates a series of tab pages on a form. Each tab page can contain a number of other controls that display information from another table or query.

20
Form Controls Hyperlink: Creates a link to a Webpage, program, or address. Web Browser Control: Allows you to use Web pages to a form. Navigation Control: Allows you to add an additional navigation tab in a navigation.

21
Form Controls Option Group: Groups toggle buttons, option buttons, or check boxes so the user can only select one item per group. Insert Page Break: Add or removes a page break between the pages of a multipage form.

22
Form Controls Combo Box: Creates a combo box control that contains a list of potential values form the control and lets you type text or select a table or query as the source of values in the list. You can also use the combo box to find a record. List Box: Creates a list of values for the control either by typing values or specifying a table or query for the source.

23
Form Controls Combo Box: Creates a combo box control that contains a list of potential values form the control and lets you type text or select a table or query as the source of values in the list. You can also use the combo box to find a record. Chart: Inserts a chart into a form to display data graphically. Line: Draws a line to enhance the appearance of the form.

24
Form Controls Toggle Button: Displays a toggle button control bound to a yes/no field. Similar to a check box. List Box: Creates a list of values for the control either by typing values or specifying a table or query for the source. Rectangle: Draws a rectangle to enhance the form's appearance. Check box: creates a control that holds on/off, yes/no, or true/false data.

25
Form Controls Unbound Object Frame: Adds an object from antoher application such as Excel. The object becomes part of the form, not part of the underlying data. Use this for adding pictures, sounds, charts, or slides to the form. Attachment: Inserts and attachment control in the form design grid which allows you to attach and view multiple files stored in the underlying field. Option Button: Display an option button bound to a yes/no field.

26
Form Controls Subform/Subreport: Embeds another form in the current form. If the forms have a related field, Access maintains the link between them. Bound Object Frame: Creates a bound OLE object stored in an Access database table such as a picture stored in an OLE Object data type field. Image: Displays a static graphic image on the form which becomes part of the form, not part of the underlying data.

27
Figure 4.10: Form for the tblCustomer in Design view

28
Using the Form Wizard (cont’d.)
Form header Displays information that always appears on form even when records change Top of screen Form footer Displays information that always appears on form Bottom of screen Often contains Instructions for using form Buttons to perform actions

29
Using the Form Wizard (cont’d.)
Page headers and footers Display information at top or bottom of every page Appear only when printing form by default Headers Useful for column headings dates, and page numbers Footers Display summaries and page numbers Grid Form background

30
Examining a Form in Design view
Design view Detail section Fields have two parts Label Text box Move and sizing handles Adjust to where data fits

31
Developing a Consistent User Interface
Forms in database share same design Present consistent user interface Users learn how to use forms once Apply what they learn to all forms in database Access Themes are simple way to make forms and reports appear more professional Borders, background colors, shading and graphic effects applied to entire form

32
Developing a Consistent User Interface (cont’d.)
Click Design Tab on the Ribbon and click Themes button in Themes group Scroll down gallery and select theme Click in Form header, click Format tab, Shape Fill Change colors using the Shape Fill menu of colors

33
Changing Label Properties in a Form
Select label box to change Right click label and click Form Properties Property sheet opens Select property to modify the appearance and behavior of the label

34
Adding an Unbound Graphic
Resize form header in Design view so image will fit To add a logo Click the FORM DESIGN TOOLS DESIGN tab Click Logo button in Header/Footer group Insert desired graphic Use size mode property Clip option for best fill of image

35
Introduction to Reports
Reflect the information in the database Summarize business activities Provide details about your data Use reports to format data in an attractive and informative layout for printing Often based on data in multiple tables

36
Understanding Reports
Presents information from one or more database tables Printed format Provides most options and advantages for printing database content Organize and format information to create professional presentation Include numeric and textual data Maintain flexibility when displaying summary information

37
Understanding Reports (cont'd.)
Accomplish goals with reports Create printed copy of information used regularly Distribute information to others Customize organization and appearance of printed information Group or summarize information for Reporting to others Calculating running totals Group totals Grand totals Percentages of totals

38
Table 5.1: Comparing forms and reports

39
Choosing the Appropriate Type of Report
Determine report purpose and audience Before developing Report types Detailed Grouped Summary Mailing labels Multiple-column Types of reports can contain other reports Called subreports

40
Creating and Modifying Basic Reports
Report button Create report that displays all fields and records in single table or query Report Wizard Guides you through steps of creating report Based on one or more tables or queries Asks questions about Record sources Fields Layout Format

41
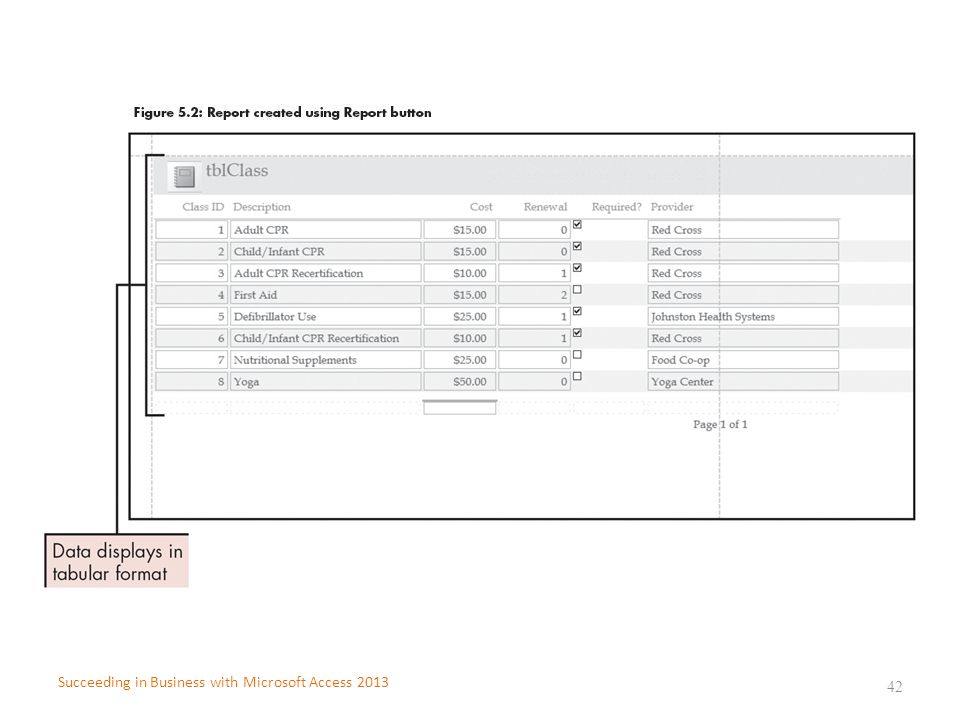
Creating a Report Using the Report Button
In the Navigation Pane, click the table on which you want to base the report Click the CREATE tab, click the Report button in the Reports group. Access creates a report that includes all the fields from the record source Save the report Naming reports Use rpt prefix Choose meaningful name

43
Creating a Report Using the Report Wizard
Provides quick way to select only fields you want to display in report Based on one or more tables or queries Select one of several layouts and styles for report Create report with Report Wizard Customize report in Design view Provides options for selecting fields

44
Creating a Report Using the Report Wizard (cont'd.)
Pages Fields Grouping Sorting Layout and orientation

45
Modifying a Report in Design View
Can create reports from scratch in Design view Control Small object such as text box Displays data or line to separate records Modify report in Layout and Design view Switch to Print Preview to see effects of changes

46
Forms provide easy to use interface
Level 1 Summary Forms provide easy to use interface Normally used in production databases to access/edit data Reports reflect and summarize the data in the underlying tables/queries. Does not allow data to be edited. Create using Form or Report Tool Form or Report Wizard

47
Level 2 Objectives: Creating Forms that Use Fields From More than One Table
Create multitable forms Improve navigation on forms Add controls to forms

48
Adding a Subform to an Existing Form
Form embedded in another form Primary form Called main form Underlying table usually has one-to-many relationship with table underlying subform Main form and subform linked Subform displays only records that related to current record in main form

49
Adding a Subform to an Existing Form (cont’d.)
Use Wizard to create subform Access automatically synchronizes main form with subform Only if tables containing fields for form related Subform must also have field with same name or compatible data type and field size as primary key in table underlying main form Main form can have more than one subform Subform can also contain another subform

50
Modifying the Form Layout
Can move and resize controls, including subform Click right edge of form to get two headed arrow Drag to make form wider To widen the subform Click border Sizing handles appear Point to the middle-right handle Pointer changes to a double-sided arrow Then drag the subform border

51
Modifying the Form Layout (cont’d.)
Select other controls to move text box and attached label together Labels Move with text field or independently Edit text Resize

52
Creating a Form from a Query
User view Custom form that shows only fields particular user wants Might or might not be used for data entry In some cases fields may be locked so all user can only view them and not edit them Use Form Wizard to create form based on query Access asks which table to view results by

53
Creating a Form from a Query (cont’d.)
Prevent editing Set form properties to No Allow edits Allow deletions Allow additions Data entry

54
Adding Command Buttons to a Form
Users click to perform common tasks Access provides collection of command buttons Associated with actions Can contain Text Standard icons available from Access Graphics

55
Adding Command Buttons to a Form (cont’d.)
Create in Design view Using Command Button Wizard By adding button to form then setting properties Be consistent when creating command buttons Location on form Order

56
Table 4.5: Command button options

57
Exploring Other Form Properties
Open property sheet for form Right-click the item you wish to modify the properties for Click Properties on shortcut menu Common reason to use form properties Decide to base form on different record source from one used to create form

60
Controlling Form Printing
Control form’s vertical spacing on printed page Include date and page number Using Access-provided functions

61
Printing a Selected Record in Form view
Print Preview button Preview form See how it will print

62
Add subform to existing form Modify form layout Create form from query
Level 2 Summary Add subform to existing form Modify form layout Create form from query Create command buttons Modify form properties Print form Use print preview

63
Level 3 Objectives: Creating Forms for Completing Daily Business Tasks
Improve usability of forms Place calculations on forms Develop advanced forms

64
Improving the Usability of Forms
Use form controls Speed up process of locating particular record Include calculated control in form Create multiple-page forms Create forms with multiple subforms Learn about tab order Control focus in form to skip unbound controls

65
Locating a Record Quickly
Find tool Open Find and Replace dialog box Click field to search for particular value Enter value to match Access searches for records that contain same value in selected field Combo box Displays list of values Users select one from list

66
Table 4.9: Ways to locate a record

67
Locating a Record Quickly (cont’d.)
Use Control Wizard to add combo box to form Combo Box Wizard Provides three options for listing values in combo box Look up values in table or query Let users type value Let users select value that Access matches to find record

68
Adding a Calculation to a Form
Include calculated field on form Create field in query Use query as record source for form Or add an unbound control that contains calculation directly to form Create unbound control Text box button Enter calculation

69
Streamlining the Main Pharmacy Processes in a Complex Form
Process analysis List steps and substeps employees perform Indicate which database objects used to complete each task

70
Step 1: Registering New Customers or Confirming Customer Identity
Usually completed by technician Uses Command Button Wizard to add two command buttons to open associated forms

71
Step 2: Filling and Refilling Prescriptions
Started by technicians Pharmacist must check for Drug interactions Confirm instructions and dosages

72
Creating Forms with Many Subforms
Arrange fields in logical groups According to how employees most often use them Click Subform/Subreport button Start Subform Wizard Prevent data errors Change properties of subform so it does not allow edits, deletions, or additions

73
Figure 4.41: Completed frmPrimaryActivity form with three subforms

74
Creating Multipage Forms Using Page Break
Too many fields to fit on one screen Continue a form onto an additional page (or pages) by placing a page break Page Up or Page Down key moves you from page to page
 by placing a page break. Page Up or Page Down key moves you from page to page.")
75
Creating Forms Using Tab Controls for Multiple Subforms
Add multiple subforms to form in compact way Each subform has tab at top Layered one on top of other Add first tab by clicking Tab Control button Add additional tabs by Right-clicking blank spot in tab control Clicking insert page

76
Figure 4.42: Form with tab controls

77
Changing Tab Order and Tab Stop
Form created with form tool or Form Wizard Places fields in order they appear in table design After fields rearranged for more logical data entry Form needs modification to arrange order of movement through fields Called tab order Test each form by Opening form Pressing Tab key to see if cursor stops in each field in appropriate order

78
Add calculations to forms Create forms with multiple subforms
Level 3 Summary Locate records using Find tool Combo box Add calculations to forms Create forms with multiple subforms Set tab order After modifying field order on form

79
Forms provide easy to use interface Create using Wizards
Chapter Summary Forms provide easy to use interface Create using Wizards Use subforms to display related data Create form from query Create command buttons Create forms that display large amount of data Multiple subforms Multiple pages

Similar presentations