Download presentation
Presentation is loading. Please wait.

1
Controls in Biosafety II: Work Practices and Personal Protective Equipment EMD 545b Lecture #6

2
Biosafety Work Practices 4 Foundation matrix 4 Routes of Exposure on Y axis 4 7 Basic biosafety work practices on X axis 4 Which practices block each route of exposure? 4 Majority of biosafety work practices stem from the core 7 practices

3
Routes of Exposure 4 Ingestion 4 Inhalation 4 Mucous membranes (eyes, nose, mouth) 4 Percutaneous
 4 Percutaneous")
4
Biosafety Work Practices 4 No mouth pipetting 4 No eating, drinking, smoking, food storage 4 Wear personal protective equipment 4 Work carefully to avoid creation of aerosols 4 Eliminate/avoid the use of sharps 4 Decontaminate work surfaces/spills 4 Wash hands after removing PPE, skin contact (keep hands away from face)
")
5
Biosafety Work Practices 4 Administrative –establish safety policies (written SOP) –restrict access to lab to those involved in work –post entry requirements (immunizations, PPE) –labels on equipment storing biohazards, door sign with agent and contact information –ensure training for all who work with hazards –advise all workers of any special hazards –workers must demonstrate proficiency
 –restrict access to lab to those involved in work –post entry requirements (immunizations, PPE) –labels on equipment storing biohazards, door sign with agent and contact information –ensure training for all who work with hazards –advise all workers of any special hazards –workers must demonstrate proficiency")
6
Biosafety Work Practices 4 Transport/Shipping –use two leak proof labeled containers for on- campus shipment (include contact info) –avoid the use of glass primary or secondary containers whenever feasible –Use UN-Approved infectious substance shippers for public roadways, air, other methods of conveyance –All shippers/transporters trained biennially
 –avoid the use of glass primary or secondary containers whenever feasible –Use UN-Approved infectious substance shippers for public roadways, air, other methods of conveyance –All shippers/transporters trained biennially")
7
Biosafety Work Practices 4 Contain other aerosol generating procedures –any procedure that imparts energy to a microbial culture, includes: homogenizing, blending, shaking, grinding vortexing, mixing, pipetting, spills opening tubes which are under pressure (vacutainer) removing syringe from vial, expelling air animal bedding, cage dust, animal hair, necropsy droplets from pipets to bench, liquid to liquid (from height), forcibly expelling liquid from pipette
 removing syringe from vial, expelling air animal bedding, cage dust, animal hair, necropsy droplets from pipets to bench, liquid to liquid (from height), forcibly expelling liquid from pipette")
8
Bioafety Work Practices 4 Personnel –ensure reporting of all near misses or incidents –report immunosuppression/compromised skin –evaluate new procedures before initiation –never initiate work without authorization –address all medical requirements before starting – know signs/symptoms of disease, report them –always work carefully, avoid short cuts, follow written SOP’s –keep pets, other unrelated items out of lab

9
Foundational Biosafety Practices 4 Hand washing 4 No mouth pipetting 4 No eating or drinking in lab 4 Minimize aerosol generation 4 Decontaminate work surfaces 4 Safe sharps handling 4 Wear applicable PPE

10
Foundational Biosafety Practice #1 Confine Aerosols

11
Aerosols –Procedures that impart energy into a microbial suspension are a potential source of aerosol (Chatigny, 1974) –Many common lab procedures and accidents have capability of releasing aerosols –homogenization, sonication, blending, mixing, grinding, shaking, vortexing, spills, opening vials, pipetting, animals excreting agent, opening vials under pressure, etc.
 –Many common lab procedures and accidents have capability of releasing aerosols –homogenization, sonication, blending, mixing, grinding, shaking, vortexing, spills, opening vials, pipetting, animals excreting agent, opening vials under pressure, etc.")
13
Confine Aerosols! Promote Awareness of: –Aerosol containment –Work Practices & PPE –Emergency Response Procedures 4 Minimize/prevent lab- acquired infections

14
Aerosols are generated in many procedures

15
Viable Particles Recovered from Air (Chatigny, 1974) 4 Procedure –sonic oscillator –mixing w/ pipette –overflow from mixer –opening lyophilized vial –top removed after blending –dropping flask of culture –dropping lyophilized culture 4 # Particles/ft3 of air –6 –7 –9 –135 –1500 –1551 –4839
 4 Procedure –sonic oscillator –mixing w/ pipette –overflow from mixer –opening lyophilized vial –top removed after blending –dropping flask of culture –dropping lyophilized culture 4 # Particles/ft3 of air –6 –7 –9 –135 –1500 –1551 –4839")
16
Aerosol spread from open flame

17
Correct Use of Biosafety Cabinets 4 Purge air before and after use 4 Load supplies prior to work 4 Wipe items with disinfectant before loading (or removing) 4 Clean up spills promptly
 4 Clean up spills promptly")
18
Biosafety Work Practices 4 Effective Use of the Biosafety Cabinet –use to contain aerosols (pipetting, other work) –decontaminate interior before/after use –work at least 4” inside front grille –minimize movement of hands out of cabinet –keep traffic behind operator to a minimum –avoid the use of an open flame inside cabinet
 –decontaminate interior before/after use –work at least 4 inside front grille –minimize movement of hands out of cabinet –keep traffic behind operator to a minimum –avoid the use of an open flame inside cabinet")
19
Centrifuge Containment 4 Load/unload sealed buckets in a biosafety cabinet 4 Wait 2 to 5 minutes after run to allow aerosols to settle 4 Decontaminate centrifuge and buckets after each use

20
Biosafety Work Practices 4 Centrifugation Precautions –use secondary containment (decon after use) –check tubes for cracks or deformities before use –always use sealed primary tubes –don’t overfill primary containers –balance loads to avoid damage to centrifuge –unit should have solid lid and interlock
 –check tubes for cracks or deformities before use –always use sealed primary tubes –don’t overfill primary containers –balance loads to avoid damage to centrifuge –unit should have solid lid and interlock")
21
Confinement at Source

22
Incident Response: Exposures and Spills

23
Emergency Response 4 Aerosol exposure –BL2 leave lab upon release Wash wounds, flush face/eyes if exposed, wash hands post sign, keep area vacated for 20 - 30 minutes to allow aerosols to settle decontaminate personnel clothing, skin notify lab supervisor, biosafety, and Health Services if necessary

24
Foundational Biosafety Practice #2 Hand Washing

25
4 Hands must be washed after removing: –gloves –other PPE –and whenever gloves are damaged or torn

26
Foundational Biosafety Practice #3 No Mouth Pipetting

27
Careful Pipetting Techniques 4 Never blow out last drop in pipette 4 Use pipette aids with filters 4 Horizontal pipette collection tubs 4 Never mix by suction + expulsion

28
Minimize Aerosols 4 Careful pipetting practices 4 Avoid drops onto hard surfaces 4 Wipe up spills promptly with appropriate disinfectant

29
Careful Pipetting Techniques 4 Discharge liquid down side of container 4 Deliver as close as possible to contents 4 Work over plastic-backed absorbent matting

30
Avoid Splatter 1 Incorrect 3 Correct 2 Incorrect

31
Minimize Aerosols 4 Use capped tubes when mixing, blending, or vortexing 4 Pour liquids carefully 4 Avoid bubbles

32
Foundational Biosafety Practice #4 Eliminate or Work Safely with Sharps

33
Use Extreme Care with Sharps 4 Percutaneous exposure risk –Employ safe work practices –Utilize safe sharp devices 4 Aerosol risk –Use biosafety cabinet for removal of air from needle 4 Sharps also includes scalpels, blades and wires.

34
Safe Sharps Devices 4 Only use sharps if absolutely required as part of a process. 4 Ongoing evaluation of new safety devices

35
Safe Use of Sharps 4 Keep hands away from needles. 4 Use mechanical methods for needle removal. 4 Never bend, recap or manipulate sharps by hand.

36
Safe Use of Sharps Disposal/Reprocessing 4 Dispose of entire unit into sharps container. 4 Collect reusable sharps in labeled, leak proof container.

37
Infectious Waste Disposal 4 All cultures and stocks are decontaminated before disposal. 4 Wastes must be in closed containers for transport out of lab. 4 Infectious waste containers must be labeled.

38
Infectious Waste Disposal 4 Written SOP’s for: –Waste management –Regulated sharps –Other sharps (tips, pipettes, glass items, etc.) –Liquid waste
 –Liquid waste")
39
Foundational Biosafety Practice #5 No Eating, Drinking or Smoking (Avoid touching your eyes, nose, mouth)
")
40
Foundational Biosafety Practice #6 Personal Protective Equipment (PPE)
")
41
Purpose of PPE: Barrier against skin, mucous membrane or respiratory exposure to infectious agents To prevent spread of contamination.

42
Laboratory Clothing 4 Protects the worker from splash and splatter during procedures. 4 Protects worker’s clothing from contamination. 4 Can be used to protect product from contamination.

43
Laboratory Clothing: Important Considerations 4 Choice of fabric: must be appropriate for use –Fire retardant and resistant to chemicals –Water repellant if risk of splash and splatter. Can add plastic apron 4 Type and use must be prescribed in SOP or manual and staff trained

44
Laboratory Clothing: Important Considerations 4 Staff must be trained in aseptic removal procedures-gloves last! 4 Reusable clothing must withstand autoclaving 4 Laundry facilities must be provided. Lab clothing not to be taken home.

45
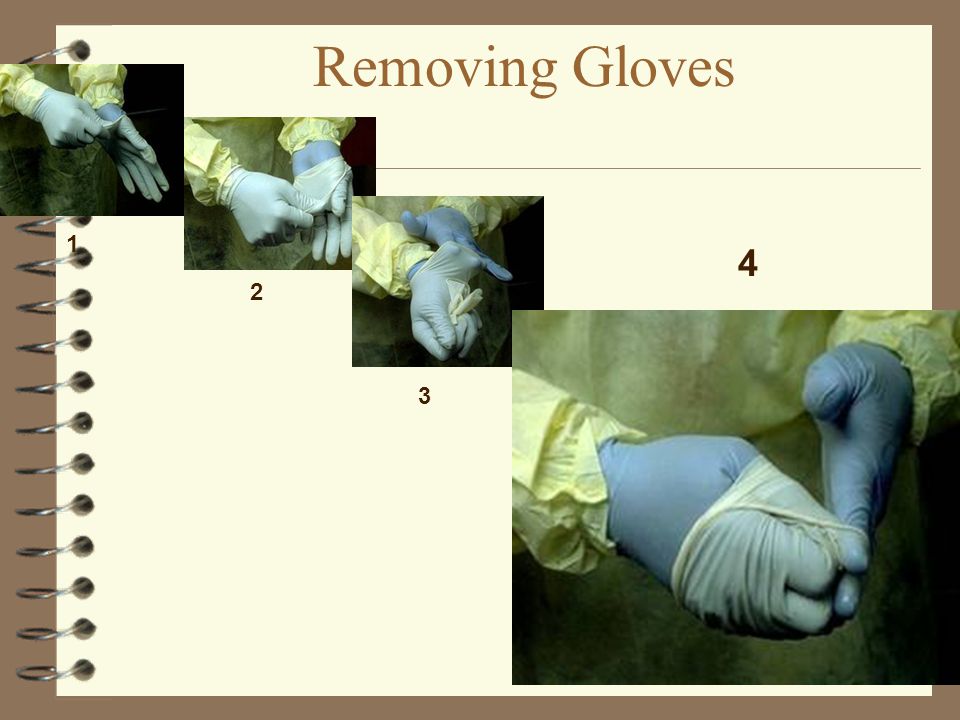
Removing Gloves 1

46
2 1

47
1 2 3

48
1 2 3 4
49
Gloves: Important Considerations 4 Avoid wetting gloves (disinfectants enhance permeation) 4 Change gloves as soon as feasible after contamination 4 Use utility gloves or double glove for spills 4 Examine utility gloves after washing for integrity
 4 Change gloves as soon as feasible after contamination 4 Use utility gloves or double glove for spills 4 Examine utility gloves after washing for integrity")
50
Personal Protective Equipment (PPE) Limitations of PPE: Does not eliminate the hazard. Integrity wanes with use (change gloves frequently) Not all gloves created equal - select best glove for the task.
 Not all gloves created equal - select best glove for the task..")
51
Gloves: Important Considerations 4 Latex allergies: Alternatives must be provided 4 Leather, mesh and kevlar used with animal handling (cut, scratch or slice protection) 4 Consider chemical hazards 4 All gloves not created equal
 4 Consider chemical hazards 4 All gloves not created equal")
52
Eye and Face Protection Eye and face protection appropriate for the task: Safety glasses - must have side protectors Goggles Face shield and goggles if risk of splash and splatter

53
Respirators 4 Air Purifying Respirator (APR) 4 Uses a filter medium to remove contaminant –Reduces aerosols –Non-powered - masks –Powered - PAPR 4 Assigned Protection Factor –APF = 10 - 50 (NIOSH) for Air Purifying or Powered Air Purifying
 4 Uses a filter medium to remove contaminant –Reduces aerosols –Non-powered - masks –Powered - PAPR 4 Assigned Protection Factor –APF = (NIOSH) for Air Purifying or Powered Air Purifying")
54
Respirators 4 Air supplying – Air supplied from safe area –Supplied Air Respirator (SAR) –Air line and + pressure –Self Contained Breathing Apparatus (SCBA) 4 Protection Factor! –APF 10,000 (pressure demand SCBA)
.")
55
Other Considerations 4 Cover exposed skin, dress sensibly 4 Avoid shorts, sandals in the lab 4 Use shoes with non-slip soles 4 Shoe covers for spills or contamination control 4 Rubber boots may be needed in wet areas

56
Foundational Biosafety Practice #7 Decontamination/Disinfection

57
Disinfecting & Cleaning

58
Biosafety Work Practices 4 Disinfection –select appropriate combination of chemical, concentration, and contact time –keep working solutions of disinfectant at bench –use work surface covers (replace frequently) –promptly clean/decontaminate work surfaces & equipment, biohazard waste (and spills) – spot treat reusable protective clothing or launder (never bring home for cleaning)
 –promptly clean/decontaminate work surfaces & equipment, biohazard waste (and spills) – spot treat reusable protective clothing or launder (never bring home for cleaning)")
59
3 C’s of Disinfection 4 Chemical –Select disinfectant effective against target organism 4 Concentration –Prepare the “referenced” solution 4 Contact time –Disinfectants don’t work instantaneously –EPA uses a 10 minute contact time for testing

60
Disinfectants Disinfectants will destroy or inactivate specific viruses, bacteria, and pathogenic fungi, but not necessarily their spores. 4 Chlorine (household) bleach –1% dilution for work surfaces –10% for spills or porous surfaces
 bleach –1% dilution for work surfaces –10% for spills or porous surfaces.")
61
Disinfectants 4 Alcohol –ethyl alcohol or isopropyl alcohol diluted to 70-85% in water for surface decontamination 4 Other –classified by EPA as tuberculocidal and virucidal –follow manufacturer’s written instructions for use

62
Decontamination 4 Encompasses: –antisepsis, disinfection, decontamination, and sterilization –Antisepsis chemical applied to living tissue that will control or arrest the growth of a microorganism –Decontamination disinfection or sterilization of contaminated materials

63
Decontamination 4 Disinfection –To free from infection, reduction of contaminant load to a safe level, does not imply total destruction of all microorganisms. Will not always destroy spores. 4 Sterilization –The destruction of all forms of microbial life. Difficult to achieve (usually referred to a very low chance that a microbe survived).
..")
64
Spill Clean-Up Kit 4 disinfectant 4 paper towels 4 gloves 4 face protection 4 biohazard bags 4 forceps 4 dust pan & brush

65
Personal Protective Equipment Biohazards

66
Personal Protective Equipment (PPE) 4 Protection of: 4 Skin 4 Clothing 4 Mucous membranes 4 Respiratory system 4 Use: 4 Gloves (double, kevlar) 4 lab coats, solid-front gowns, sleeve covers 4 Full-face protection 4 Respirator
 4 Protection of: 4 Skin 4 Clothing 4 Mucous membranes 4 Respiratory system 4 Use: 4 Gloves (double, kevlar) 4 lab coats, solid-front gowns, sleeve covers 4 Full-face protection 4 Respirator")
67
OSHA Standard 1910.1032 4 General requirements for PPE, employers must: –conduct hazard assessment, select equipment –inform employees of hazards and equipment selected for protection –provide proper sizes are available –train employees what PPE, when to wear, how to put on, wear and take off, limitations, care, maintenance, disposal

68
Gloves 4 Latex (allergy) 4 Nitrile 4 vinyl, PVC 4 Polyvinyl Alcohol 4 Neoprene 4 Silver Shield 4 Kevlar 4 Gauntlet 4 Temperature resistant –autoclaves, cryogens
 4 Nitrile 4 vinyl, PVC 4 Polyvinyl Alcohol 4 Neoprene 4 Silver Shield 4 Kevlar 4 Gauntlet 4 Temperature resistant –autoclaves, cryogens")
69
Gloves 4 Donning –check before use –size, fit, taping wrists 4 Doffing –remove aseptically –change frequently 4 Double gloving –remove outer pair in contaminated field 4 Dedicate to work area

70
Lab Coats/Gowns 4 Lab coat 4 Back-fastening gown, scrubs 4 Aprons, jump suits (w/ hood, booties) 4 Level A, B, C, D suits 4 Knit grip cuff vs. open cuff, sleeve covers 4 Disposable/Reusable –Treat onsite, use laundry service, no home use –Hook in lab, remove prior to leaving

71
For work in a Biosafety Cabinet 4 solid-front or wrap-around gown 4 gloves (double gloving) 4 face protection (face shield or mask and safety glasses )
 4 face protection (face shield or mask and safety glasses )")
72
Face Protection 4 Safety glasses 4 Goggles 4 Face shield 4 Surgical mask/shield 4 Surgical mask/goggles 4 Impact resistant face shield

73
Use of a HEPA-filtered PAPR for additional protection during high-risk research procedures

74
For work outside a Biosafety cabinet 4 solid-front or wrap- around gown or jump suit 4 gloves (double gloving) 4 face protection (face shield or mask and safety glasses) 4 Respiratory protection if aerosols are generated
 4 face protection (face shield or mask and safety glasses) 4 Respiratory protection if aerosols are generated")
75
Respiratory Protection 4 Disposable N-95 mask and N- 99/N-100 respirator 4 Powered-Air-Purifying respirator 4 Annual training, medical exam, fit testing

76
Respiratory Protection 4 Disposable Respirators (95%, 99%, 100% efficiencies) –N - not resistant to oil –P - partially resistant to oil –R - resistant to oil 4 Medical questionnaire 4 Annual training 4 Qualitative & quantitative fit testing
 –N - not resistant to oil –P - partially resistant to oil –R - resistant to oil 4 Medical questionnaire 4 Annual training 4 Qualitative & quantitative fit testing")
Similar presentations


>")


>")


 IACUC Approval Authorized access to facilities Animal.>")
 HAZARDOUS MATERIAL SPILLS For Tulane Laboratory and Facilities Employees May 2012.>")


