Download presentation
Presentation is loading. Please wait.

1
Renovating 103 Mowat Street or “When to call in the experts!”

2
The proud owners.

4
The (nosey) neighbours are in no doubt about my origins!
 neighbours are in no doubt about my origins!")
5
This was what sold us on the house … the hardwood floors, pocket doors and fireplace. NOT the wallpaper!

6
The kitchen was renovated for us. Unfortunately there are no before shots! (it was just too ugly to photograph!)
.")
7
In case you were wondering these were the old kitchen cupboards! Now in the basement as laundry cupboards – where they belong! Get a load of the nice pink wardrobe left behind for us!!! Stylin’!

8
We had to do the painting of the kitchen. Stylin’! Juan Valdez – our trusty Mexican labourer was a great help!

9
Finished product

10
The Master Bedroom Note: this wallpaper wasn’t so bad!

11
In the vain hope of not having to drywall (plasterboard) this room we removed the wallpaper – all 10 layers of it! Despite all the cracks - and there were many – we still thought we could live with it! Timeline – Mogilny coughs up the puck in overtime of game 7 of the Eastern Conference final of 2002!

12
And then this large patch of plaster fell on Stacey’s head (and her bum)! So we drywalled the whole thing!

13
Sarah helped us paint – note the still yellow trim!

14
Half-finished product! Juan with raccoon eyes!

15
Cali likes the finished product.

16
Yes – we bought it even after seeing this! This is the upstairs foyer – to the left is the master bedroom to the right the spare room and bathroom.

17
Once more into the breach – or at least onto the walls to remove that paper! This is above the staircase - very hard to get to! One of several instances of old drywall (the brown stuff)– could come down any minute!
– could come down any minute!.")
18
After the great wallpaper removal of 2002!

19
Front hall and stairs. Two things – the stairs were carpeted (left photo gives a glimpse) and the carpet in the front hall was also the carpet in one of the sheds – very classy!
 and the carpet in the front hall was also the carpet in one of the sheds – very classy!.")
20
The office – or place to surf the net when bored in winter and it’s 10 billion degrees below zero outside! Dig the stylin’ baggy pants on Juan! From lathe and plaster to drywall.

21
Never, ever let an engineer do an electrician’s job!!! Every room in the house had ceiling fans – we discovered why in our first summer. But when replacing them it became obvious that the wiring in our house was far from simple. Knob and tube half converted to more modern wiring. Better to have Brad playing with it than me!

22
The finished product – lots of work will be done here! The halogen lamps were meant to provide bright lights to work by – they turned out to be more romantic than the lighting in the master bedroom! This is where we make our vids to send home – when we think of it!

23
The back room – an erstwhile den! The new floor was put in for us before we moved in. Behind the white fake wood paneling was some real wood paneling!

24
Had the real wood paneling been in a little better shape we might have been tempted to keep it.

25
Bad photo but this is a lesson in the value of the hammer – Luke you can go and get another beer, you don’t need this lesson. I am modeling a huge gas heater (another thing we discovered the value of after removing it!) embedded in the back wall. It had to go. Not only was it ugly, it took up too much room. A day later, after many expletives had been uttered and the tool of choice, the hammer, had been brought to the very brink of breaking, the stupid f**king thing was out! Forever!
 embedded in the back wall. It had to go. Not only was it ugly, it took up too much room. A day later, after many expletives had been uttered and the tool of choice, the hammer, had been brought to the very brink of breaking, the stupid f**king thing was out. Forever!.")
26
This room and the bathroom were the biggest changes! Old door! Hole for new door!

27
Juan and Stacey model the new double doors!

28
Jim attacked the work with great vigour. Or did I piss him off?

29
Another hole was made for a new window. Time for some open air kissing!

30
Above – a new window. much larger than the little one that was there previously. Below – the little window was moved to the opposite wall so we now had two small windows on this wall. This was the window that cost me 12 stitches in my left hand!

31
Ta da!! While I was in Oxford Stacey put the finishing touches on (made the trim herself!) – clever young lass isn’t she!!
 – clever young lass isn’t she!!.")
32
Next on the list were the lounge and dining rooms. So we piled all our ground floor belongings into the back room and the hallway to do the job – really this was only to do the floors of the two rooms. I can hear mum’s evil laugh now – her baby boy who hated renovations actually willingly subjected himself to this!!!

33
And off comes the wallpaper - all 10 f**king layers of it!!! This time we were able to salvage most of the plaster.

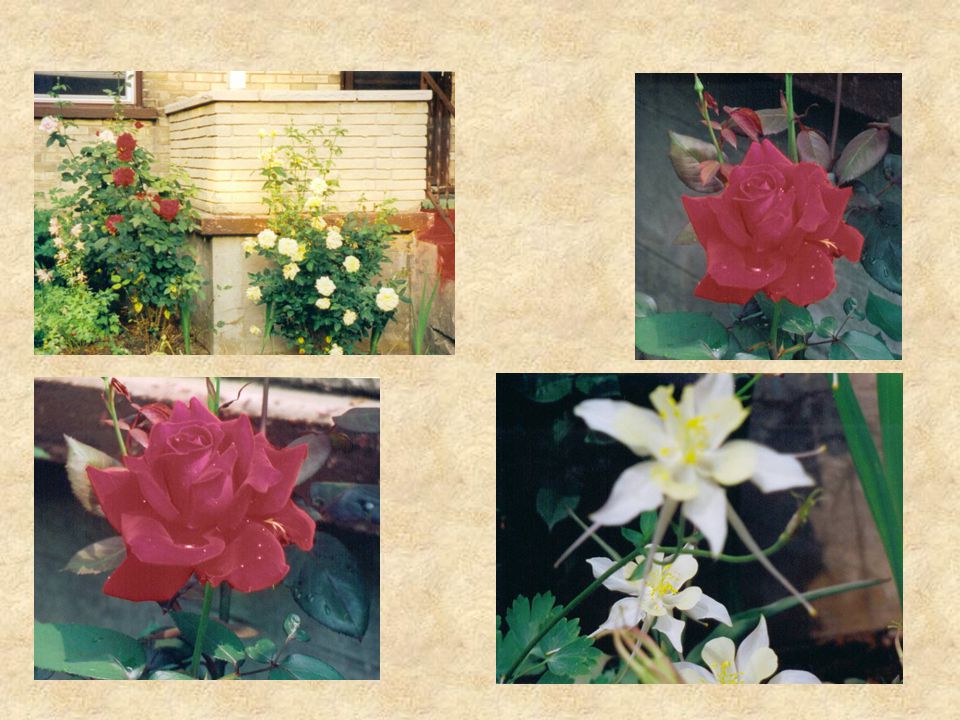
34
Stacey loves this photo. No, really she does!

35
Juan was such a happy worker!

36
No the room did not develop syphilis (a la the old valiant). The splotches are corrections of minor imperfections in the plaster. Foolishly we didn’t paint primer over this before going for the top coat! This room wound up with something like 7 coats of paint!

37
Chalk lines were dropped to create alternating 16 inch stripes of flat and semi- gloss paint. Of course when the red paint hit the blue chalk it turned to black!

38
Talking to mum on the phone. Stop laughing! It’s not funny! Just because I bitched and moaned about the Crimson Ave renos doesn’t mean I can’t like doing it myself!!!

39
et voila!

40
Just for comparison’s sake. Which would you prefer – the Victorian red or that lovely floral print in the background?

41
Complete with furniture.

42
Somewhere along the line we had time to build a cat scratcher to end all cat scratchers! It’s in significantly worse shape now which is an indication of success – the cat’s love it so much they rip it to shreds daily!

43
All the furniture was crowded into the dining room so we could do the living room. Cali was intent on something she could see through the pocket doors!

44
What are you looking at? Turns out she was looking at Tigger who found the old wallpaper a fun place to play.

45
The lounge room all taped up!

46
Juan hard at work – what a joker!

47
The back wall had to be drywalled. More of the old brown stuff!

48
More of the syphilis! He paints, he drywalls, is there anything Juan can’t do?

49
Finished product! The lounge room is in the same Victorian red (flat) as the dining room but without the stripes.
 as the dining room but without the stripes..")
50
Ahh, finally. We can live here!

51
The spare room – this room’s wallpaper was truly the least offensive.

53
Now does that not look like I’m a Mexican on the left? Hence the Juan jokes!

54
We painted Winnie the Pooh characters on the walls of the spare bedroom. For absolutely no reason at all!! We like the look of them is all, OK! Reminds me of the Jimminy Cricket picture Cathy made for me as a kid! I still love that picture! Tigger and Pooh.

55
Eyore!

56
Pooh with honey.

57
The whole gang!

58
Magician reveals his tricks! That’s about $7,000 of Canadian taxpayers money at work too!

59
Bathroom before! Toilet roll holder above the sink! Wooden seat – hmm, lovely! Carpeted floors – great for hiding the… Blue shower curtain! Walled in claw foot tub! Lovely row of mirrors going around the length of the room! BAD cupboards! Crappy wallpaper – complete with extra cut out flower sections!!!!

60
Interim solution to the bathroom. New seat, removed toilet roll holder, removed carpet and sanded pine floor boards, new shower curtain, removed bad mirrors and wallpaper. Stacey’s verdict – just acceptable! James’ verdict – whadayamean you want me to renovate it more?

61
So we called Juan and got him to work!

62
Stacey’s creative lighting solution!

63
We had to drywall as we went – waiting for plumbing to be finished before moving onto the next wall bit!

64
Put down the torch! Pipes for the pedestal sink.

65
Toilet was moved from the far wall to be under the window – this caused the most pain. Because of the various natural slants in our house it was tougher to get shit to flow downhill than it was to push it uphill! More creative lighting from Stace!

66
The tub was exposed and turned around to run along the short wall. Toilet was ‘ere

67
Still no trim or floor but usable nonetheless. Also, there was the small matter of the door – it wouldn’t be back up for another 3 weeks!

68
Vacuuming behind the tub! That’ll be the last time that’s ever done!!! Still no floor. Get a load of the plumber’s crack!!!

69
With trim and floor – hard to see in this photo. Good enough for a foot soak with wine!

70
Does this give you a better idea?

71
Finally onto the outside. Rob and Marg helped us turn this jungle into… … a smaller jungle! Really this was just an excuse to photograph Rob’s bum!

72
Our climbing rose.

74
The f**king pond! That bloody engineer again! I know, let’s build a pond! Great idea! Let’s put it in the back corner of the yard where it’s really pretty! Even better idea! How do we get power to it for the pump? Oh! Good question Arts boy! Oops!

75
It did look good though!

76
Front steps needed some work. We thought we’d paint them a nice terra cotta colour. These have since been covered over in mission brown!

77
And when it was all done we had to take a run through the sprinkler!

78
Lessons learned? 1.The hammer is your friend. 2.When it looks like it’s going to be easy it will be the hardest thing you’ve ever done. 3.Wallpaper is evil. 4.Sometimes the best way to renovate is with the phone. 5.Nothing ever works out like you saw it on t.v. 6.Whatever doesn’t kill you … can really, really hurt you just the same! 7.Cut away from yourself! 8.When fixing plumbing pipes avoid standing back and saying “Oh, shit!” 9.Never surrender!

Similar presentations