Download presentation
Presentation is loading. Please wait.

1
Technical Aspects of Peering Session 4

2
Overview Peering checklist/requirements Peering step by step Peering arrangements and options Exercises

3
Peering requirements BGP V4 router with enough memory to receive all routes: 256MB minimum for the global routing table 32MB for all African routes Less for just your country Portable address space (ie not received from your upstream ISPS; this space is already being advertised to peers upstream) AS Number Both obtainable from AfriNIC
 AS Number Both obtainable from AfriNIC")
4
Additional requirements List of prefixes that will be advertised and received from peers IP Address of each peer (including your own border router) Maximum number of hops between the BGP routers if they are not adjacent to each other eBGP multihop is not recommended, and not included in the handout
 Maximum number of hops between the BGP routers if they are not adjacent to each other eBGP multihop is not recommended, and not included in the handout")
5
Peering step by step: Step 1 John Doe Communications wants to peer with Expert Networks. Step 1: Write down all the necessary information for each party: A: Company Name:John Doe Communications AS number:AS100 Address space:12.1.1.0/24, 196.25.0.0/16 Border router:Cisco 2621 BGP peer address: 12.1.1.10 B: Company Name:Expert Networks AS number:AS200 Address space:150.200.54.0/23 Border router:Linux PC running Quagga BGP peer address:150.200.54.125 A:

6
Step 2.1 Configure a loopback interface on the router. This is necessary in order to have an BGP peer with an interface that will always be up even if some of the physical interfaces on the router go down. (Especially useful with iBGP.) interface Loopback0 ip address 12.1.1.10 255.255.255.255
 interface Loopback0 ip address")
7
Step 2.3 Define filters to advertise and receive only the routes we know about. This is very important. If this is omitted any peer can flood your routing table with bogus entries. It can also cause your router to crash if too many prefixes are accepted by your router. ! accept all prefixes smaller or equal to /24, ! but only from the address space that we know ! belongs to each AS. AS 100 is our own AS. ip prefix-list AS100 seq 5 permit 12.1.1.0/24 ip prefix-list AS100 seq 10 permit 196.25.0.0/16 le 24 ! AS200 is our peer ip prefix-list AS200 seq 5 permit 150.200.54.0/23 le 24

8
Step 2.4 The rest of the settings all reside in the BGP section of the configuration. Specify your AS number here. ! configure BGP sessions router BGP 100 By default BGP does not advertise a route until all routes within the AS have learned of the route through the IGP. This command enables BGP to advertise routes to peers without synchronizing the route to the IGP. no synchronization

9
Step 2.5 Log all changes such as BGP connections going down. These changes can be monitored by exporting the router logs to a syslog server. Most ISPs have a central log server and have technicians monitoring all events. bgp log-neighbour-changes Do not use “redistribute” commands to get routes into BGP. They make it too easy for unwanted routes to appear in your BGP tables.

10
Step 2.5 Add a network statement for each route that you will announce. Also add a null route for aggregates that might not already be in your IGP routing table. Without these commands no routes in our routing table would be advertised to any peers. ! ensure that the aggregate route is always present ip route 196.25.0.0 255.255.0.0 null0 254 ! add your own networks to BGP router bgp 100 network 12.1.1.0 mask 255.255.255.0 network 196.25.0.0 mask 255.255.0.0 Do the above on only one router, or only a few routers in your AS, not on every router.

11
Step 2.6 Do not attempt to summarize routes. This command is necessary if we want to exchange classless routes (i.e. routes other than Class A, B, or C routes). no auto-summary We now set up a peering session with Expert Networks (AS 200). If there was more than one peer we would have entered similar commands for each peer. The first command specifies the AS number of the peer (also known as a neighbour). neighbour 1.2.3.4 remote-as 200
. no auto-summary We now set up a peering session with Expert Networks (AS 200). If there was more than one peer we would have entered similar commands for each peer. The first command specifies the AS number of the peer (also known as a neighbour). neighbour remote-as 200.")
12
Step 2.6 Add a description. If there are many neighbours defined, it is useful to find the appropriate neighbour when configuration changes have to be made by looking at these descriptions. neighbour 1.2.3.4 description Expert Networks

13
Step 2.7 This command instructs the router to set the gateways for all routes added to the routing table to itself. Always enable this when peering with other autonomous systems. neighbour 1.2.3.4 next-hop-self

14
Step 2.8 Instruct the router to store received updates. This allows us to update a BGP session without having to restart the session. neighbour 1.2.3.4 soft-reconfiguration inbound This uses extra memory. In IOS 12 or later, you can get the same benefits using the BGP route refresh capability instead of using memory. Use “show ip bgp neighbor x.x.x.x”

15
Step 2.8 Only advertise and accept routes allowed by our filters to prevent flooding of our routing table. neighbour 1.2.3.4 prefix-list AS100 out neighbour 1.2.3.4 prefix-list AS200 in

16
Step 3: Verify The following commands can be used to diagnose problems with your BGP configuration: ! show a summary of peering sessions show ip bgp summary ! show neighbour details show ip bgp neighbours ! show routes received from neighbours show ip bgp ! show routes received from neighbour 192.168.4.1 show ip bgp neighbours 192.168.4.1 received-routes show ip bgp neighbours 192.168.4.1 routes ! show routes advertised to neighbour 192.168.4.3 show ip bgp neighbours 192.168.4.3 advertised-routes ! show all routes known via all protocols show ip route

17
Option 1: Mandatory multi-lateral peering All IXP participants peer with a central route server. This forces all to peer with all and reduces the number of peering sessions that has to be maintained by each peer. A central route server != a route reflector!! Route reflectors used within iBGP to eliminate the need for a fully meshed network.

18
Option 1: Mandatory multi-lateral peering Advantages Automatic peering with all - easy Complexity is centralised – easy for ISPs Easy to connect – only one BGP session Disadvantages Forced peering with all - inflexible Complexity is centralised – hard for IXP operator Complex policies are impossible

19
Option 2: Bilateral peering Option 1 doesn’t scale well: Some IXPs let all participants negotiate their own arrangements. This mesh network scales well, but it takes a lot more work by each ISP. If some participants choose not to peer with each other, then there will be a partial mesh instead of a full mesh.

20
Option 2: Bilateral peering Advantages Choose who to peer with or not All routers are managed by ISPs, not by IXP operator Complex policies are possible Disadvantages Non-peering may cause inefficient routing ISP router config becomes complex Difficult for new participant to connect

21
Option 3: Hybrid It is possible to have both models operating simultaneously at an IXP, with some ISPs peering with the central route server and the others manually configuring their routers for bilateral peering with selected peers. Not the most desirable! But can develop eg. if very large and very small ISPs are part of the same IXP – gives control over business relationships. One option is to start with a single central route server and multi-lateral peering, and allow bi-lateral peering to be added later.

22
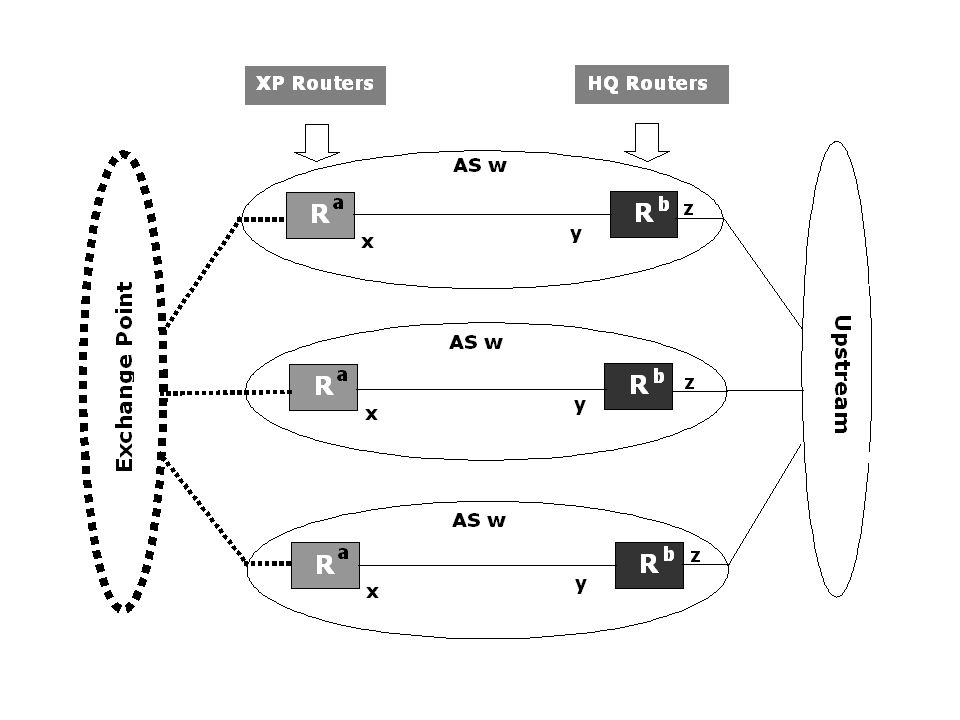
Exercise 1 Several ISPs Each ISP has a router at HQ, linked to upstream provider Each ISP adds a new router at exchange point (XP), connected to HQ router Start using iBGP between HQ and XP Not yet peering with other ISPs
, connected to HQ router Start using iBGP between HQ and XP Not yet peering with other ISPs")
24
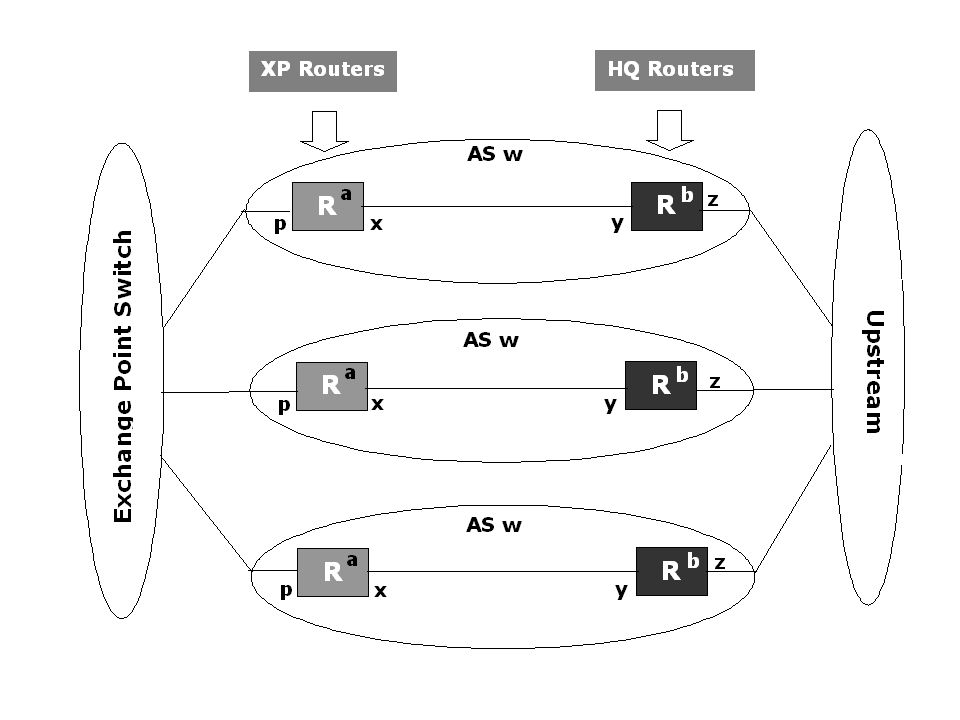
Exercise 2 Follows on from exercise 1 Each ISP starts BGP peering with all others (bi-lateral peering)
")
26
Exercise 3 Follows on from exercise 1 Undo part of exercise 2 first Each ISP starts BGP peering with a route server (multilateral peering)
")
Similar presentations


.>")


 is a region of the Internet that is administered by a single entity and.>")


>")


