Download presentation
Presentation is loading. Please wait.

1
CBR Suit Training Disaster Preparedness and Management Unit

2
Background Depending on incident location casualties will begin to arrive at hospitals within 30 minutes of impact. Most casualties arrive at the hospital within 1 to 1.5 hours of the first patient. Masks are the conventional respiratory protection system used by ED staff. They rely on the lungs drawing air through the filter, negative pressure, thus extremely fatiguing. The close fitting mask also reduces communication. Their use requires constant practice. Additionally facial hair and glasses prevent the correct sealing of respiratory masks to the face.

3
Background Hospitals are critical infrastructure and must be protected from contamination in order the maintain the capacity to treat patients and to protect staff. Patients delivered to a hospital by ST John Ambulance (SJA) from the site of a CBR incident will have been decontaminated at the incident site. Those that self present will include contaminated and the worried well.
 from the site of a CBR incident will have been decontaminated at the incident site. Those that self present will include contaminated and the worried well..")
4
Background Self presenters cannot be permitted to enter a hospital until they have been decontaminated. Hospitals must have the capacity to safely decontaminate all self presenters. The protective dress to be worn by Hospital staff conducting decontamination of self presented is the LED 500 CBR.

5
Objective To safely operate the supplied CBR suit

6
Before you get started Change into scrubs Drink some water Know your designated role in the decontamination team Go to the toilet Have your vital signs taken by the Safety Officer

7
Hazards of operating in CBR suit Reduced sensory input Work performance impacts Physical effects on operator Communication Psychological factors

8
Reduced sensory input Touch Reduced sensitivity Reduced manual dexterity Mobility Impaired balance, reaction time and agility

9
Physical effects to operator Body temperature and heart rate may increase Endurance times are reduced Warning signs will include Changes in gait (staggering) Changes in speech (slurring) Changes in behaviour (erratic) Many of these are difficult to monitor in CBR suit – this makes observation by buddy, communications and use of a safety officer essential.
 Changes in speech (slurring) Changes in behaviour (erratic) Many of these are difficult to monitor in CBR suit – this makes observation by buddy, communications and use of a safety officer essential.")
10
Your equipment In the bag Suit with camatril gloves attached Butyl outer gloves (optional) Blower – Gait C420 Belt assembly 2 filter cartridges Air pipe Contents list
 Blower – Gait C420 Belt assembly 2 filter cartridges Air pipe Contents list")
11
Your equipment Bag presentation (closed)
")
12
Your equipment Bag presentation (open)
")
13
Your equipment External Lithium battery Boots Radio

14
GAIT Positive Air Pressure Blower

15
Lithium battery Minimum 8 hours endurance Do not break or burn

16
Rechargeable battery Minimum 8 hours use Recharge time varies Should be used for training only

17
Filters TrainingOperations

18
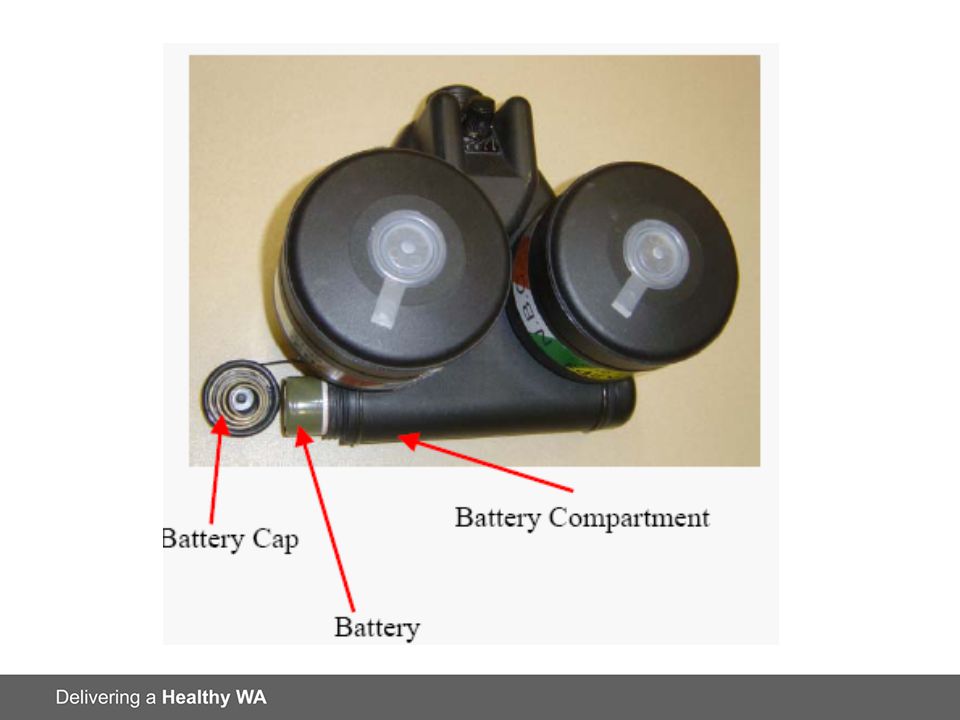
C420 PARP Blower Fan speed control Pipe intake Filter ports Battery Compartment

20
Donning of CBR suit Always use a buddy! Remove jewellery that might puncture the suit!

21
Step 1: Prepare blower Belt through top loops Attach Belt to the PAPR

22
Step 1: Prepare blower Ensure belt has buckle facing out

23
Remove the covers from the PAPR and the filters (place plastic covers from blower in bag)
")
24
Attach the filters to the PAPR

25
Then remove any remaining plastic covers (place plastic covers in bag)
")
26
Unscrew the battery compartment and insert battery

27
Step 2: Don suit Lay suit out flat and inspect for damage (both sides)
")
28
Open zip

29
Check glove size - change if necessary To change gloves: Turn sleeve inside out O ring

30
Changing gloves Remove rubber O ring Remove glove.

31
Changing gloves (cont) Ensure suit material covers plastic cuff with a 5 mm overhang Place new glove on (remember to check glove is orientated correctly onto sleeve) Plastic cuff covered by suit material
 Ensure suit material covers plastic cuff with a 5 mm overhang Place new glove on (remember to check glove is orientated correctly onto sleeve) Plastic cuff covered by suit material")
32
Changing gloves (cont) Ensure glove overhangs plastic cuff by approx 5 mm. Place on O ring (over glove onto first indentation then roll onto middle indentation). Pull glove back through sleeve.
. Pull glove back through sleeve..")
33
Feed the blower pipe through the pocket on the back of the suit. Attach pipe to the rear of the suit at back of head. Ensure O ring is in

34
Attach pipe to blower

35
Turn on to highest setting: ensure air is being blown into suit.

36
Put your right leg into suit first then left leg (Buddy to hold blower)
")
37
Put on boots Ensure the outer covering sleeve is rolled back

38
Roll down outer covering sleeve

39
Head into hood first. If air is missing and you begin to fog do not proceed

40
Then arms into the suit and adjust gloves.

41
Buddy to do up zip. Raise right arm to allow zip to go all the way to top. Then close velcro

42
Buddy to secure PAPR around your waist. PAPR to sit on left hip.

43
You are now ready to go!

44
Step 3: Doffing Always decontaminate first (use showers) Operator hold PAPR steady whilst buddy undoes belt Buddy unzips suits (do not turn off or disconnect blower) Buddy holds blower steady Operator removes arms from the sleeves and then lift hood off Blower may now be turned off Sit down, place blower on table or on seat, remove boots Pull on toes end to remove suit legs
 Operator hold PAPR steady whilst buddy undoes belt Buddy unzips suits (do not turn off or disconnect blower) Buddy holds blower steady Operator removes arms from the sleeves and then lift hood off Blower may now be turned off Sit down, place blower on table or on seat, remove boots Pull on toes end to remove suit legs")
45
Doffing Step out of suit Hand radio to supervisor, recharge batteries Replace plastic caps on blower and hose pipe, ensure the O ring is in the end of the hose pipe

46
Cleaning Wipe the inside and outside of the suit with a damp cloth Do not use detergents Hang to dry naturally Inspect suit for damage

47
Step 4: Packing of suit Remove battery from blower, hand to supervisor Remove operational filters, hand to supervisor or remove training filters and place in bag Place blower, pipe, butyl gloves (if not used) and belt in bag Blower to be places in mesh pocket bag
 and belt in bag Blower to be places in mesh pocket bag")
48
Step 4: Packing of suit Place suit down on a soft surface Pull up top suit and push in material that is behind the head to form a cavity

49
Fold arms to back of suit. Side of suit not to wider than width of visor

50
Fold legs up over arms

51
Fold up to base of hood (two folds required)
")
52
Fold into back of visor Pack into bag with visor facing up

Similar presentations
>")


>")


>")


 INSTRUCTIONS FOR USE Preventive Medicine Industrial Hygiene Service.>")
 Infection Control Unit.>")


