Download presentation
Presentation is loading. Please wait.

1
Lecture 10 Sharing Resources

2
Basics of File Sharing The core component of any server is its ability to share files. In fact, the Server service in all of the Windows NT family, including Server 2003, handles the servers ability to share file and print resources. But what exactly does that mean, and why is it so important?

3
Sharing By default, just because you have a server running doesnt mean it has anything available for your users. Before they can actually get to resources on the server, you must share out your resources.

4
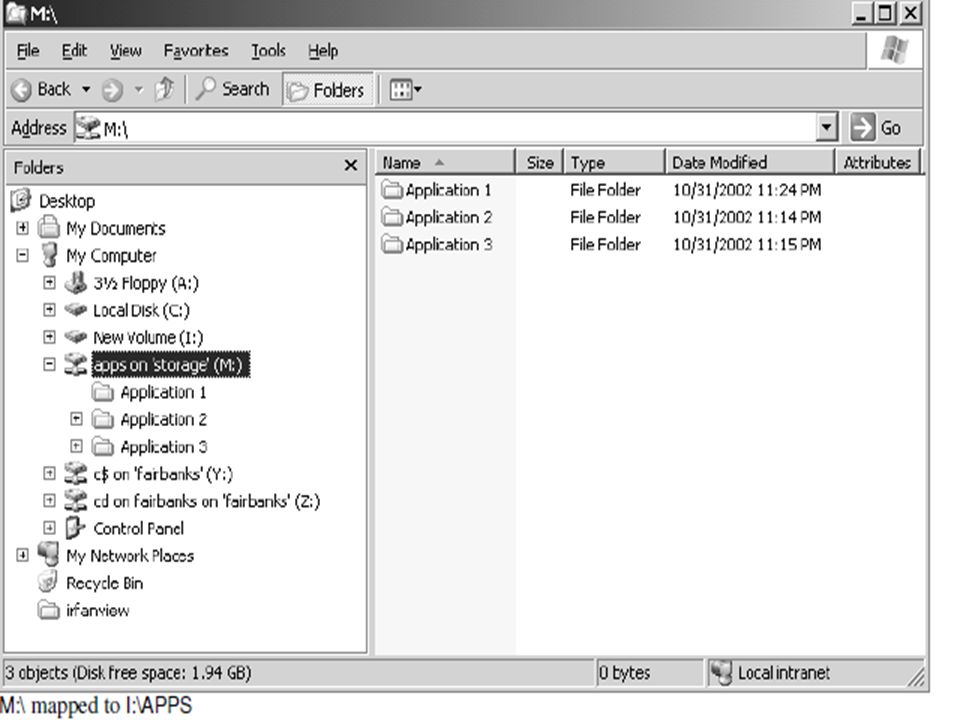
Example of sharing Lets say you have a folder on your local I: drive named APPS with three applications in subfolders, as shown in Figure 11.1. When you share this folder out to the network under the name of APPS, you allow your clients to map a new drive letter on their machines to your I:\APPS folder.

5
Mapping Drives By mapping a drive, you are placing a virtual pointer directly to where you connected. If you map your clients M: drive to the APPS share of the server, their M: drive will look identical to the servers I:\APPS, as shown in Figure 11.1

8
Sharing Resources Thats really all there is to it. Sharing resources means that you allow your users to access those resources from the network. No real processing goes into it as far as the server is concerned. It just hands out files and folders as they are.

9
Creating Shared Folders Before you can create a shared folder, you must have appropriate rights to do so. This requires that you are either an Administrator or a Power User. You can create shares in a few ways: You can use the Explorer interface when sitting at the server,or Use the Computer Management Console to create shares either at the server or remotely.

10
Creating Shares from Explorer If youre sitting at the server, the Explorer interface provides a simple and direct means for creating and managing all properties of a share. In windows explorer or my computer, go to the C: drive and create a new folder called APPS. In Explorer, right-click the APPS folder and select the Sharing and Security menu option. This will bring up the properties page for the folder APPS, already set to the Sharing tab. To share the folder, click the Share This Folder radio button, as shown in Figure below.

11
Note If you want to stop sharing this folder later through the Explorer interface, go back into the properties as you just did and select the Do Not Share This Folder button.

12
Share Name The Share Name option on this page is the most critical entry. This is how your users will reference this share. For our purposes, share this folder as APPS. The Description field is used to provide more descriptive information about this share. Technically, the description has no real bearing on the server or client; it just makes browsing a little less cryptic. Click OK, and your share is enabled and ready for immediate use by your users.

13
Seeing the Shared Folder To check it go to start run and type \\servername and you should see your new share name APPS. Or use windows explorer as shown below and in the address field type \\servername

15
Setting User Limits You can also configure how many users can connect to a share simultaneously in the User Limit area of the Sharing properties page. If the applications under your share are each licensed for 100 concurrent users you can configure your server share to maintain a that limit, even though you may have 200 users on your network. Just check the Allow This Number of Users radio button and fill in the appropriate number (it defaults to 10).
..")
16
User Limits

17
Managing Permissions Now that youve shared out your resources to the world, its time to protect them from the world. Of course, there are numerous ways to secure your server and its resources. From the outsideusing routers and firewalls, for instancebut by setting permissions on your files and shares, you are more likely to stop an intruder who does manage to make it all the way past your other barriers.

18
Permissions This also ensures that even the folks on the inside are only allowed access to what they need. The two kinds of permissions that we deal with here are share permissions and file and directory (NTFS) permissions. These permissions let you control who accesses your data and what they can do with it.
 permissions. These permissions let you control who accesses your data and what they can do with it..")
19
Share Permissions Share permissions are possibly the easiest forms of access control you will deal with in Windows Server. Remember that share permissions only take effect whenever you try to access a computer over the network. Consider share permissions to be a kind of access pass to a secure building. When you walk up to the front door and show your identification, the guard looks up your name and gives you a pass that shows your access level for everything else on the inside. If your pass says Level One access, then your pass will get you into every door on Level Oneand nowhere else. Once inside, try to get into a room with Level Two access requirements, and it wont work. By defining share permissions, you can safely control the access level for each person at the front door.

20
Keep in mind, though, that this front dooror share-level permissionisnt the entire picture. The share-level permission only represents the maximum level of access you will get on the inside. If you get read permissions at the share, the best you can do once youve connected remotely to the share is read. Likewise, change permissions will grant change at best. If you want full control to anything inside the share, you need full control at the share. But understand that when we say the share permission is the maximum level of access you will get inside the share, it is entirely possible to restrict access more once youre inside, using file-level (or NTFS) permissions. You can have full control at the share, but an object inside can still have NTFS permissions that say you can only read it.
 permissions. You can have full control at the share, but an object inside can still have NTFS permissions that say you can only read it..")
21
Defining Share Permissions To define share permissions, we will work through the Computer Management Console. Select the share you want to secure by right- clicking the share name and selecting Properties, then selecting the Share Permissions tab. You can get to the same place from Explorer by right-clicking the locally shared folder, selecting Sharing and Security, and then clicking the Permissions button Both methods will bring you to essentially the same dialog box which is shown in Figure below.

22
Note that the Everyone group, by default, has Read access permissions, which is a great step forward in the Windows world in terms of security. Until, Server 2003, the Everyone group was given Full Control access by default.

23
Permissions Example In this dialog, you are shown a Group or User Names box that lists users and groups assigned to the share; when a user or group is selected, the permissions for that user or group to access the share are revealed. You can assign different levels of permission for different users and groups. At the share level, you have the following types of permission:

24
Permission Level of Access Full Control - The assigned group can perform any and all functions on all files and folders through the share. Change - The assigned group can read and execute, as well as change and delete, files and folders through the share. Read - The assigned group can read and execute files and folders, but has no ability to modify or delete anything through the share.

25
Access Rights The example in Figure above shows read access for Everyone. Although you wont see the administrators account listed with any specific rights, note that local administrators always have full control of the shares on the computer. If you want to change share permissions to give all your network administrators full control, you will need to add the group and assign them rights. Select the Add button to see the dialog box shown in Figure below.

27
Select who to allow/deny You can either type in the name of the account or group that you want to add, or click the Advanced button, which will bring you to the second Select Users, Computers, or Groups dialog box, shown in Figure 11.14. This dialog box enables you to search the directory. You can either use the Active Directory search functions on the Common Queries tab to narrow down your choices or select the Find Now button, which will enumerate all of the users in the directory.

28
Locate a Group or a User From here you locate the group that you want to addthe Domain Administrators group in the exampleand click OK and then OK again. This brings you back to the Share Permissions tab with the Domain Administrators group added to the display and highlighted. Select the Full Control check box, and as you can see in Figure 11.15, everything else is checked automatically.

31
Care when assigning permissions Again, keep in mind that share-level permissions are just your first filter for users accessing files over the network. Whatever level of permissions you get at the share level will be the highest level of permissions you can get for files and directories (the most restrictive apply, remember?). If you get read-only rights to the share, but full- control rights to the file, the share will not let you do anything other than read.
. If you get read-only rights to the share, but full- control rights to the file, the share will not let you do anything other than read..")
Similar presentations


 © Abdou Illia, Spring 2015.>")


 © Abdou Illia, Spring 2006.>")


