Download presentation
Presentation is loading. Please wait.

1
Custom animation effects: curve up and grow (Intermediate)
To reproduce the first rectangle on this slide, do the following: Drag the yellow diamond adjustment handle to the left to reduce the size of the corner radius. On the Home tab, in the Drawing group, click Shapes, and then under Rectangles click Rounded Diagonal Corner Rectangle (ninth option from the left). On the slide, drag to draw a rounded rectangle. On the Home tab, in the Slides group, click Layout, and then click Blank. Select the rounded rectangle. Under Drawing Tools, on the Format tab, in the Size group, do the following: In the Shape Height box, enter 2.33”. On the Home tab, in the Drawing group, click Shape Effects, point to Reflection, under Reflection Variations, select Tight Reflection, touching (first row, first option from the left). On the Home tab, in the Drawing group, click the arrow next to Shape Fill, and select No Fill. In the Shape Width box, enter 2.32”. Also in the Format Shape dialog box, in the left pane, click Line Style. In the Line Style pane, do the following: In the Format Shape dialog box, in the left pane click Line Color, and then in the Line Color pane select Solid Line. Click the button next to Color, click More Colors, and then in the Colors dialog box, on the Custom tab, enter values for Red: 137, Green: 227, Blue: 231. On the Home tab, in the bottom right corner of the Drawing group, click the Format Shape dialog box launcher. In the Cap type list, select Round. In the Width box, enter 10 pt. Also in the Format Text Effects dialog box, in the left pane, click 3-D Format. In the 3-D Format pane, do the following: Under Bevel, click the button next to Top, and then under Bevel click Circle (first row, first option from the left). Next to Top, in the Width box, enter 10 pt, and in the Height box, enter 10 pt. Right-click the rounded rectangle, and then click Edit Text. Under Surface, click the button next to Material, and then under Standard click Matte (first row, first option from the left). Click the button next to Lighting, and then under Neutral click Soft (first row, third option from the left). In the Angle box, enter 315°. Under Contour, click the button next to Color, and then under Theme Colors click Olive Green, Accent 3, Lighter 60% (third row, seventh option from the left). On the Home tab, in the Paragraph group, click Center to center the text. Enter text in the text box, select the text, and then on the Home tab, in the Font group, select Gills Sans MT Condensed from the Font list, and select 28 from the Font Size list. To reproduce the animation effects for the first rectangle on this slide, do the following: On the Animations tab, in the Animations group, click Custom Animation. On the slide, select the round diagonal corner rectangle. In the Custom Animation task pane, do the following: Select the animation effect (curve-up effect for the rectangle), and under Modify Curve Up, do the following: Click Add Effect, point to Entrance, and then click More Effects. In the Add Entrance Effect dialog box, under Exciting, click Curve Up. In the Speed list, select Fast. In the Start list, select With Previous. Select the second animation effect (grow/shrink effect for the rectangle). Click the arrow next to the selected effect, and then click Effect Options. In the Grow/Shrink dialog box, do the following: Click Add Effect, point to Emphasis, and then click More Effects. In the Add Emphasis Effect dialog box, under Basic, click Grow/Shrink. On the Effect tab, do the following: Select Auto-reverse. In the Size list, in the Custom box, enter 5, and then press ENTER. Also in the Size list, select Vertical. On the Timing tab, do the following: In the Speed list, select Very Fast. To reproduce the second and third rectangle on this slide with animation effects, do the following: On the Home tab, in the Clipboard group, click the arrow under Paste, and then click Duplicate. Drag the second rounded rectangle next to the first rounded rectangle. Repeat this process one more time for a total of three rectangles. On the slide, select the rounded rectangle. In the Custom Animation task pane, do the following: Press and hold CTRL, and then select the third and fourth animation effects (curve up effect and grow/shrink effect for the second rectangle). Click the arrow next to one of the selected effects, and then click Timing. In the Effect Options dialog box, on the Timing tab, in the Delay box, enter 0.5. Press and hold CTRL, and then select the fifth and sixth animation effects (curve up effect and grow/shrink effect for the third rectangle). Click the arrow next to one of the selected effects, and then click Timing. In the Effect Options dialog box, on the Timing tab, in the Delay box, enter 1. To reproduce the background on this slide, do the following: On the Home tab, in the Drawing group, click Shapes, and then under Rectangles click Rectangle (first option from the left). On the slide, drag to draw a rectangle. Select the rectangle. Under Drawing Tools, on the Format tab, in the Size group, do the following: In the Shape Height box, enter 1.62”. In the Format Shape dialog box, click Fill in the left pane, select Solid fill in the Fill pane, and then do the following: Under Drawing Tools, on the Format tab, in the bottom right corner of the Shape Styles group, click the Format Shape dialog box launcher. In the Shape Width box, enter 10”. Click the button next to Color, click More Colors, and then in the Colors dialog box, on the Custom tab, enter values for Red: 137, Green: 227, Blue: 231. Drag the rectangle into the middle of the slide. Also in the Format Shape dialog box, in the left pane, click Line Color, and in the Line Color pane, select No line. In the Transparency box, enter 70%. Select the round diagonal corner rectangle. Under Drawing Tools, on the Format tab, in the Size group, do the following: On the Home tab, in the Drawing group, click Shapes, and then under Rectangles click Round Diagonal Corner Rectangle (ninth option from the left). On the slide, drag to draw a rectangle. In the Shape Height box enter 0.44”. Under Drawing Tools, on the Format tab, in the Shape Styles group, click the Format Shape dialog box launcher. In the Format Shape dialog box, click Fill in the left pane, select Solid fill in the Fill pane, and then do the following: In the Shape Width box enter 0.44”. In the Transparency box, enter 60%. Click the button next to Color, and then under Theme Colors click White, Background 1, Darker 5% (second row, first option from the left). On the slide, press and hold CTRL and select the seven round diagonal corner rectangles. On the Home tab, in the Drawing group, click Arrange, point to Align, and do the following: Select the round diagonal corner rectangle. On the Home tab, in the Clipboard group, click the arrow under Paste, and then click Duplicate. Repeat this process until there is a total of seven round diagonal corner rectangles. Click Distribute Horizontally. Click Align Top. Click Align Selected Objects. Right-click the slide background area, and then click Format Background. In the Format Background dialog box, click Fill in the left pane, select Gradient fill in the Fill pane, and then do the following: Click the button next to Direction, and then click Linear Diagonal (second row, third option from the left). In the Type list, select Linear. Also under Gradient stops, customize the gradient stops that you added as follows: Under Gradient stops, click Add or Remove until two stops appear in the drop-down list. Select Stop 1 from the list, and then do the following: Click the button next to Color, and then click White, Background 1 (first row, first option from the left). In the Stop position box, enter 50%. Select Stop 2 from the list, and then do the following: Click the button next to Color, and then click More Colors. In the Colors dialog box, on the Custom tab, enter values for Red: 204, Green: 244, Blue: 248. In the Stop position box, enter 100%.
. On the slide, drag to draw a rounded rectangle. On the Home tab, in the Slides group, click Layout, and then click Blank. Select the rounded rectangle. Under Drawing Tools, on the Format tab, in the Size group, do the following: In the Shape Height box, enter On the Home tab, in the Drawing group, click Shape Effects, point to Reflection, under Reflection Variations, select Tight Reflection, touching (first row, first option from the left). On the Home tab, in the Drawing group, click the arrow next to Shape Fill, and select No Fill. In the Shape Width box, enter Also in the Format Shape dialog box, in the left pane, click Line Style. In the Line Style pane, do the following: In the Format Shape dialog box, in the left pane click Line Color, and then in the Line Color pane select Solid Line. Click the button next to Color, click More Colors, and then in the Colors dialog box, on the Custom tab, enter values for Red: 137, Green: 227, Blue: 231. On the Home tab, in the bottom right corner of the Drawing group, click the Format Shape dialog box launcher. In the Cap type list, select Round. In the Width box, enter 10 pt. Also in the Format Text Effects dialog box, in the left pane, click 3-D Format. In the 3-D Format pane, do the following: Under Bevel, click the button next to Top, and then under Bevel click Circle (first row, first option from the left). Next to Top, in the Width box, enter 10 pt, and in the Height box, enter 10 pt. Right-click the rounded rectangle, and then click Edit Text. Under Surface, click the button next to Material, and then under Standard click Matte (first row, first option from the left). Click the button next to Lighting, and then under Neutral click Soft (first row, third option from the left). In the Angle box, enter 315°. Under Contour, click the button next to Color, and then under Theme Colors click Olive Green, Accent 3, Lighter 60% (third row, seventh option from the left). On the Home tab, in the Paragraph group, click Center to center the text. Enter text in the text box, select the text, and then on the Home tab, in the Font group, select Gills Sans MT Condensed from the Font list, and select 28 from the Font Size list. To reproduce the animation effects for the first rectangle on this slide, do the following: On the Animations tab, in the Animations group, click Custom Animation. On the slide, select the round diagonal corner rectangle. In the Custom Animation task pane, do the following: Select the animation effect (curve-up effect for the rectangle), and under Modify Curve Up, do the following: Click Add Effect, point to Entrance, and then click More Effects. In the Add Entrance Effect dialog box, under Exciting, click Curve Up. In the Speed list, select Fast. In the Start list, select With Previous. Select the second animation effect (grow/shrink effect for the rectangle). Click the arrow next to the selected effect, and then click Effect Options. In the Grow/Shrink dialog box, do the following: Click Add Effect, point to Emphasis, and then click More Effects. In the Add Emphasis Effect dialog box, under Basic, click Grow/Shrink. On the Effect tab, do the following: Select Auto-reverse. In the Size list, in the Custom box, enter 5, and then press ENTER. Also in the Size list, select Vertical. On the Timing tab, do the following: In the Speed list, select Very Fast. To reproduce the second and third rectangle on this slide with animation effects, do the following: On the Home tab, in the Clipboard group, click the arrow under Paste, and then click Duplicate. Drag the second rounded rectangle next to the first rounded rectangle. Repeat this process one more time for a total of three rectangles. On the slide, select the rounded rectangle. In the Custom Animation task pane, do the following: Press and hold CTRL, and then select the third and fourth animation effects (curve up effect and grow/shrink effect for the second rectangle). Click the arrow next to one of the selected effects, and then click Timing. In the Effect Options dialog box, on the Timing tab, in the Delay box, enter 0.5. Press and hold CTRL, and then select the fifth and sixth animation effects (curve up effect and grow/shrink effect for the third rectangle). Click the arrow next to one of the selected effects, and then click Timing. In the Effect Options dialog box, on the Timing tab, in the Delay box, enter 1. To reproduce the background on this slide, do the following: On the Home tab, in the Drawing group, click Shapes, and then under Rectangles click Rectangle (first option from the left). On the slide, drag to draw a rectangle. Select the rectangle. Under Drawing Tools, on the Format tab, in the Size group, do the following: In the Shape Height box, enter In the Format Shape dialog box, click Fill in the left pane, select Solid fill in the Fill pane, and then do the following: Under Drawing Tools, on the Format tab, in the bottom right corner of the Shape Styles group, click the Format Shape dialog box launcher. In the Shape Width box, enter 10 . Click the button next to Color, click More Colors, and then in the Colors dialog box, on the Custom tab, enter values for Red: 137, Green: 227, Blue: 231. Drag the rectangle into the middle of the slide. Also in the Format Shape dialog box, in the left pane, click Line Color, and in the Line Color pane, select No line. In the Transparency box, enter 70%. Select the round diagonal corner rectangle. Under Drawing Tools, on the Format tab, in the Size group, do the following: On the Home tab, in the Drawing group, click Shapes, and then under Rectangles click Round Diagonal Corner Rectangle (ninth option from the left). On the slide, drag to draw a rectangle. In the Shape Height box enter Under Drawing Tools, on the Format tab, in the Shape Styles group, click the Format Shape dialog box launcher. In the Format Shape dialog box, click Fill in the left pane, select Solid fill in the Fill pane, and then do the following: In the Shape Width box enter In the Transparency box, enter 60%. Click the button next to Color, and then under Theme Colors click White, Background 1, Darker 5% (second row, first option from the left). On the slide, press and hold CTRL and select the seven round diagonal corner rectangles. On the Home tab, in the Drawing group, click Arrange, point to Align, and do the following: Select the round diagonal corner rectangle. On the Home tab, in the Clipboard group, click the arrow under Paste, and then click Duplicate. Repeat this process until there is a total of seven round diagonal corner rectangles. Click Distribute Horizontally. Click Align Top. Click Align Selected Objects. Right-click the slide background area, and then click Format Background. In the Format Background dialog box, click Fill in the left pane, select Gradient fill in the Fill pane, and then do the following: Click the button next to Direction, and then click Linear Diagonal (second row, third option from the left). In the Type list, select Linear. Also under Gradient stops, customize the gradient stops that you added as follows: Under Gradient stops, click Add or Remove until two stops appear in the drop-down list. Select Stop 1 from the list, and then do the following: Click the button next to Color, and then click White, Background 1 (first row, first option from the left). In the Stop position box, enter 50%. Select Stop 2 from the list, and then do the following: Click the button next to Color, and then click More Colors. In the Colors dialog box, on the Custom tab, enter values for Red: 204, Green: 244, Blue: 248. In the Stop position box, enter 100%.")
3
ساز و كار هاي حركتي

4
طراحي پاورپوينت : محمد امين رخشاني فر
تدريس : مصطفي نجفي زاده متن درس : شايان شهركي قديمي Custom animation effects: object spins on end (Advanced) To reproduce the background effects on this slide, do the following: Right-click the slide background area, and then click Format Background. In the Format Background dialog box, click Fill in the left pane, and then select Solid fill in the Fill pane. Click the button next to Color, and then under Theme Colors click White, Background 1 (first row, first option from the left). On the Home tab, in the Slides group, click Layout, and then click Blank. To reproduce the rectangle on this slide, do the following: With the rounded rectangle still selected, under Drawing Tools, on the Format tab, in the Size group, do the following: Select the rectangle. Drag the yellow diamond adjustment handle to the left to decrease the amount of rounding on the corners. On the Home tab, in the Drawing group, click Shapes, and then under Rectangles click Rounded Rectangle (second option from the left). On the slide, drag to draw a rounded rectangle. In the Shape Height box, enter 3.5”. Under Drawing Tools, on the Format tab, in the bottom right corner of the Shape Styles group, click the Format Shape dialog box launcher. In the Format Shape dialog box, click Fill in the left pane. In the Fill pane, select Solid fill, click the button next to Color, and then under Theme Colors click White, Background 1, Darker 15% (third row, first option from the left). In the Shape Width box, enter 0.25”. Also in the Format Shape dialog box, click Shadow in the left pane. In the Shadow pane, click the button next to Presets, under Outer select Offset Bottom (first row, second option from the left), and then do the following: Also in the Format Shape dialog box, click Line Color in the left pane. In the Line Color pane, select No line. In the Blur box, enter 8.5 pt. In the Size box, enter 100%. In the Transparency box, enter 0%. Also in the Format Shape dialog box, click 3-D Format in the left pane. In the 3-D Format pane, do the following: In the Distance box, enter 1 pt. In the Angle box, enter 90°. Under Surface, click the button next to Material, and then under Standard click Matte (first row, first option from the left). Click the button next to Lighting, and then under Neutral click Soft (first row, third option from the left). Under Bevel, click the button next to Top, and then under Bevel click Circle (first row, first option from the left). Next to Top, in the Width box, enter 5 pt, and in the Height box, enter 5 pt. Select the duplicate rectangle. On the Home tab, in the Drawing group, do the following: On the slide, select the rounded rectangle. On the Home tab, in the Clipboard group, click the arrow under Paste, and then click Duplicate. Click the arrow next to Shape Fill, and then click No Fill. Press and hold CTRL, and then select both rectangles. On the Home tab, in the Drawing group, click Arrange, and do the following: Drag the second rectangle above the first rectangle until the lower edge overlays the top edge of the first rectangle. (Note: When the spinning animation effect is created later for these rectangles, the spin will center where the edges of the rectangles meet.) Click the arrow next to Shape Outline, and then click No Outline. Point to Align, and then click Align Center. Point to Align, and then click Align Selected Objects. On the Home tab, in the Drawing group, click Arrange, point to Align, and then do the following: On the slide, drag the group until it is centered horizontally on the left edge of the slide (straddling the edge). Click Group. Click Align Middle. Click Align to Slide. To reproduce the dashed arc on this slide, do the following: On the Home tab, in the Drawing group, click Shapes, and then under Basic Shapes click Arc (third row, 12th option from the left). On the slide, drag to draw an arc. Select the arc. Under Drawing Tools, on the Format tab, in the Size group, do the following: With the arc still selected, on the Home tab, in the Drawing group, click the arrow next to Shape Outline, and then do the following: In the Shape Width box, enter 7.5”. In the Shape Height box, enter 7.5”. Under Theme Colors, click White, Background 1, Darker 15% (third row, first option from the left). Drag the arc until the yellow diamond adjustment handles are on the left edge of the slide. On the slide, drag the yellow diamond adjustment handle on the right side of the arc to the bottom of the arc to create a half circle. Point to Dashes, and then click Dash (fourth option from the top). With the arc still selected, on the Home tab, in the Drawing group, click Arrange, point to Align, and then do the following: To reproduce the half circle on this slide, do the following: Select the duplicate arc. Under Drawing Tools, on the Format tab, in the Size group, do the following: On the slide, select the arc. On the Home tab, in the Clipboard group, click the arrow under Paste, and then click Duplicate. In the Shape Height box, enter 3.33”. Under Drawing Tools, on the Format tab, in the Shape Styles group, click the arrow next to Shape Outline, and then click No Outline. With the second arc still selected, under Drawing Tools, on the Format tab, in the Shape Styles group, click the arrow next to Shape Fill, and then under Theme Colors click White, Background 1, Darker 5% (second row, first option from the left). In the Shape Width box, enter 3.33”. Under Drawing Tools, on the Format tab, in the Shape Styles group, click Shape Effects, point to Shadow, and then click Shadow Options. In the Format Shape dialog box, click Shadow in the left pane. In the Shadow pane, click the button next to Presets, under Inner click Inside Right (second row, third option from the left), and then do the following: In the Angle box, enter 315°. In the Blur box, enter 24 pt. In the Transparency box, enter 86%. On the slide, drag the second arc until the yellow diamond adjustment handles are on the left edge of the slide. On the Home tab, in the Drawing group, click Arrange, and then do the following: In the Distance box, enter 4 pt. Point to Align, and then click Align Middle. Point to Align, and then click Align to Slide. Click Send to Back. To reproduce the button shapes on this slide, do the following: Select the oval. Under Drawing Tools, on the Format tab, in the Size group, do the following: On the Home tab, in the Drawing group, click Shapes, and then under Basic Shapes click Oval (first row, second option from the left). On the slide, drag to draw an oval. In the Shape Height box, enter 0.34”. Under Drawing Tools, on the Format tab, in the bottom right corner of the Shape Styles group, click the Format Shape dialog box launcher. In the Format Shape dialog box, click Fill in the left pane. In the Fill pane, select Solid Fill. Click the button next to Color, and then under Theme Colors click Olive Green, Accent 3, Lighter 80° (second row, seventh option from the left). Under Drawing Tools, on the Format tab, in the Shape Styles group, click More, and then click Light 1 Outline, Colored Fill – Dark 1 (third row, first option from the left). In the Shape Width box, enter 0.34”. Also in the Format Shape dialog box, click Shadow in the left pane. In the Shadow pane, click the button next to Presets, under Outer click Offset Bottom (first row, second option from the left), and then do the following: Also in the Format Shape dialog box, click 3-D Format in the left pane, and then do the following in the 3-D Format pane: Under Contour, click the button next to Color, and then under Theme Colors click White, Background 1 (first row, first option from the left). In the Size box, enter 3.5 pt. Under Bevel, click the button next to Top, and then under Bevel click Art Deco (third row, fourth option from the left). Next to Top, in the Width box, enter 5 pt, and in the Height box, enter 5 pt. On the slide, select the oval. Under Drawing Tools, on the Format tab, in the bottom right corner of the Size group, click the Size and Position dialog box launcher. In the Size and Position dialog box, on the Position tab, do the following: Select the oval. On the Home tab, in the Clipboard group, click the arrow under Paste, and then click Duplicate. In the Vertical box, enter 1.5”. In the Horizontal box, enter 2.98”. Select the duplicate oval. Under Drawing Tools, on the Format tab, in the bottom right corner of the Size group, click the Size and Position dialog box launcher. In the Size and Position dialog box, on the Position tab, do the following: In the Horizontal box, enter 3.52”. Repeat step 9 two more times, for a total of four ovals. Under Drawing Tools, on the Format tab, in the bottom right corner of the Size group, click the Size and Position dialog box launcher. In the Size and Position dialog box, on the Position tab, do the following to position the third and fourth ovals: In the Vertical box, enter 2.98”. Select the fourth oval on the slide, and then enter 2.99” in the Horizontal box and 5.66” in the Vertical box. Select the third oval on the slide, and then enter 3.52” in the Horizontal box and 4.27” in the Vertical box. To reproduce the text on this slide, do the following: On the Insert tab, in the Text group, click Text Box, and then on the slide, drag to draw the text box. Enter text in the text box and select the text. On the Home tab, in the Font group, do the following: In the Font list, select Corbel. On the Home tab, in the Paragraph group, click Align Text Left to align the text left in the text box. Click the arrow next to Font Color, and then under Theme Colors click White, Background 1, Darker 50% (sixth row, first option from the left). In the Font Size list, select 22. On the slide, drag the text box to the right of the first oval. Drag the second text box to the right of the second oval. Click in the text box and edit the text. Select the text box. On the Home tab, in the Clipboard group, click the arrow under Paste, and then click Duplicate. Repeat steps 5-7 to create the third and fourth text boxes, dragging them to the right of the third and fourth ovals. To reproduce the animation effects on this slide, do the following: On the Home tab, in the Editing group, click Select, and then click Selection Pane. On the Animations tab, in the Animations group, click Custom Animation. In the Selection and Visibility pane, select the rectangle group. In the Custom Animation task pane, do the following: Select the animation effect (spin effect for the rectangle group). Under Modify: Spin, do the following: Click Add Effect, point to Emphasis, and then click More Effects. In the Add Emphasis Effect dialog box, under Basic, click Spin. In the Amount list, in the Custom box, enter 123°, and then press ENTER. Also in the Amount list, click Counterclockwise. In the Start list, select With Previous. On the slide, select the first oval. In the Custom Animation task pane, do the following: In the Speed list, select Fast. Select the second animation effect (change fill color effect for the first oval). Under Modify: Change Fill Color, do the following: Click Add Effect, point to Emphasis, and then click More Effects. In the Add Emphasis Effect dialog box, under Basic, click Change Fill Color. In the Start list, select After Previous. On the slide, select the first text box. In the Custom Animation task pane, do the following: In the Speed list, select Very Fast. In the Fill Color list, click More Colors. In the Colors dialog box, on the Custom tab, enter values for Red: 130, Green: 153, Blue: 117. Select the third animation effect (fade effect for the first text box). Under Modify: Fade, do the following: Click Add Effect, point to Entrance, and then click More Effects. In the Add Entrance Effect dialog box, under Subtle, click Fade. Select the fourth animation effect (spin effect for the rectangle group). Under Modify: Spin, do the following: In the Start list, select On Click. In the Amount list, in the Custom box, enter 22°, and then press ENTER. Also in the Amount list, click Clockwise. On the slide, select the second oval. In the Custom Animation task pane, do the following: Select the fifth animation effect (change fill color effect for the second oval). Under Modify: Change Fill Color, do the following: On the slide, select the second text box. In the Custom Animation task pane, do the following: Select the sixth animation effect (fade effect for the second text box). Under Modify: Fade, do the following: Click Add Effect, point to Entrance and then click More Effects. In the Add Entrance Effect dialog box, under Subtle, click Fade. On the slide, select the third oval. In the Custom Animation task pane, do the following: Select the seventh animation effect (change fill color effect for the third oval). Under Modify: Change Fill Color, do the following: On the slide, select the third text box. In the Custom Animation task pane, do the following: Select the eighth animation effect (fade effect for the third text box). Under Modify: Fade, do the following: On the slide, select the fourth oval. In the Custom Animation task pane, do the following: Select the ninth animation effect (change fill color effect for the fourth oval). Under Modify: Change Fill Color, do the following: On the slide, select the fourth text box. In the Custom Animation task pane, do the following: Select the 10th animation effect (fade effect for the fourth text box). Under Modify: Fade, do the following: دبیر مربوطه : جناب آقای عباسی
 To reproduce the background effects on this slide, do the following: Right-click the slide background area, and then click Format Background. In the Format Background dialog box, click Fill in the left pane, and then select Solid fill in the Fill pane. Click the button next to Color, and then under Theme Colors click White, Background 1 (first row, first option from the left). On the Home tab, in the Slides group, click Layout, and then click Blank. To reproduce the rectangle on this slide, do the following: With the rounded rectangle still selected, under Drawing Tools, on the Format tab, in the Size group, do the following: Select the rectangle. Drag the yellow diamond adjustment handle to the left to decrease the amount of rounding on the corners. On the Home tab, in the Drawing group, click Shapes, and then under Rectangles click Rounded Rectangle (second option from the left). On the slide, drag to draw a rounded rectangle. In the Shape Height box, enter Under Drawing Tools, on the Format tab, in the bottom right corner of the Shape Styles group, click the Format Shape dialog box launcher. In the Format Shape dialog box, click Fill in the left pane. In the Fill pane, select Solid fill, click the button next to Color, and then under Theme Colors click White, Background 1, Darker 15% (third row, first option from the left). In the Shape Width box, enter Also in the Format Shape dialog box, click Shadow in the left pane. In the Shadow pane, click the button next to Presets, under Outer select Offset Bottom (first row, second option from the left), and then do the following: Also in the Format Shape dialog box, click Line Color in the left pane. In the Line Color pane, select No line. In the Blur box, enter 8.5 pt. In the Size box, enter 100%. In the Transparency box, enter 0%. Also in the Format Shape dialog box, click 3-D Format in the left pane. In the 3-D Format pane, do the following: In the Distance box, enter 1 pt. In the Angle box, enter 90°. Under Surface, click the button next to Material, and then under Standard click Matte (first row, first option from the left). Click the button next to Lighting, and then under Neutral click Soft (first row, third option from the left). Under Bevel, click the button next to Top, and then under Bevel click Circle (first row, first option from the left). Next to Top, in the Width box, enter 5 pt, and in the Height box, enter 5 pt. Select the duplicate rectangle. On the Home tab, in the Drawing group, do the following: On the slide, select the rounded rectangle. On the Home tab, in the Clipboard group, click the arrow under Paste, and then click Duplicate. Click the arrow next to Shape Fill, and then click No Fill. Press and hold CTRL, and then select both rectangles. On the Home tab, in the Drawing group, click Arrange, and do the following: Drag the second rectangle above the first rectangle until the lower edge overlays the top edge of the first rectangle. (Note: When the spinning animation effect is created later for these rectangles, the spin will center where the edges of the rectangles meet.) Click the arrow next to Shape Outline, and then click No Outline. Point to Align, and then click Align Center. Point to Align, and then click Align Selected Objects. On the Home tab, in the Drawing group, click Arrange, point to Align, and then do the following: On the slide, drag the group until it is centered horizontally on the left edge of the slide (straddling the edge). Click Group. Click Align Middle. Click Align to Slide. To reproduce the dashed arc on this slide, do the following: On the Home tab, in the Drawing group, click Shapes, and then under Basic Shapes click Arc (third row, 12th option from the left). On the slide, drag to draw an arc. Select the arc. Under Drawing Tools, on the Format tab, in the Size group, do the following: With the arc still selected, on the Home tab, in the Drawing group, click the arrow next to Shape Outline, and then do the following: In the Shape Width box, enter In the Shape Height box, enter Under Theme Colors, click White, Background 1, Darker 15% (third row, first option from the left). Drag the arc until the yellow diamond adjustment handles are on the left edge of the slide. On the slide, drag the yellow diamond adjustment handle on the right side of the arc to the bottom of the arc to create a half circle. Point to Dashes, and then click Dash (fourth option from the top). With the arc still selected, on the Home tab, in the Drawing group, click Arrange, point to Align, and then do the following: To reproduce the half circle on this slide, do the following: Select the duplicate arc. Under Drawing Tools, on the Format tab, in the Size group, do the following: On the slide, select the arc. On the Home tab, in the Clipboard group, click the arrow under Paste, and then click Duplicate. In the Shape Height box, enter Under Drawing Tools, on the Format tab, in the Shape Styles group, click the arrow next to Shape Outline, and then click No Outline. With the second arc still selected, under Drawing Tools, on the Format tab, in the Shape Styles group, click the arrow next to Shape Fill, and then under Theme Colors click White, Background 1, Darker 5% (second row, first option from the left). In the Shape Width box, enter Under Drawing Tools, on the Format tab, in the Shape Styles group, click Shape Effects, point to Shadow, and then click Shadow Options. In the Format Shape dialog box, click Shadow in the left pane. In the Shadow pane, click the button next to Presets, under Inner click Inside Right (second row, third option from the left), and then do the following: In the Angle box, enter 315°. In the Blur box, enter 24 pt. In the Transparency box, enter 86%. On the slide, drag the second arc until the yellow diamond adjustment handles are on the left edge of the slide. On the Home tab, in the Drawing group, click Arrange, and then do the following: In the Distance box, enter 4 pt. Point to Align, and then click Align Middle. Point to Align, and then click Align to Slide. Click Send to Back. To reproduce the button shapes on this slide, do the following: Select the oval. Under Drawing Tools, on the Format tab, in the Size group, do the following: On the Home tab, in the Drawing group, click Shapes, and then under Basic Shapes click Oval (first row, second option from the left). On the slide, drag to draw an oval. In the Shape Height box, enter Under Drawing Tools, on the Format tab, in the bottom right corner of the Shape Styles group, click the Format Shape dialog box launcher. In the Format Shape dialog box, click Fill in the left pane. In the Fill pane, select Solid Fill. Click the button next to Color, and then under Theme Colors click Olive Green, Accent 3, Lighter 80° (second row, seventh option from the left). Under Drawing Tools, on the Format tab, in the Shape Styles group, click More, and then click Light 1 Outline, Colored Fill – Dark 1 (third row, first option from the left). In the Shape Width box, enter Also in the Format Shape dialog box, click Shadow in the left pane. In the Shadow pane, click the button next to Presets, under Outer click Offset Bottom (first row, second option from the left), and then do the following: Also in the Format Shape dialog box, click 3-D Format in the left pane, and then do the following in the 3-D Format pane: Under Contour, click the button next to Color, and then under Theme Colors click White, Background 1 (first row, first option from the left). In the Size box, enter 3.5 pt. Under Bevel, click the button next to Top, and then under Bevel click Art Deco (third row, fourth option from the left). Next to Top, in the Width box, enter 5 pt, and in the Height box, enter 5 pt. On the slide, select the oval. Under Drawing Tools, on the Format tab, in the bottom right corner of the Size group, click the Size and Position dialog box launcher. In the Size and Position dialog box, on the Position tab, do the following: Select the oval. On the Home tab, in the Clipboard group, click the arrow under Paste, and then click Duplicate. In the Vertical box, enter In the Horizontal box, enter Select the duplicate oval. Under Drawing Tools, on the Format tab, in the bottom right corner of the Size group, click the Size and Position dialog box launcher. In the Size and Position dialog box, on the Position tab, do the following: In the Horizontal box, enter Repeat step 9 two more times, for a total of four ovals. Under Drawing Tools, on the Format tab, in the bottom right corner of the Size group, click the Size and Position dialog box launcher. In the Size and Position dialog box, on the Position tab, do the following to position the third and fourth ovals: In the Vertical box, enter Select the fourth oval on the slide, and then enter 2.99 in the Horizontal box and 5.66 in the Vertical box. Select the third oval on the slide, and then enter 3.52 in the Horizontal box and 4.27 in the Vertical box. To reproduce the text on this slide, do the following: On the Insert tab, in the Text group, click Text Box, and then on the slide, drag to draw the text box. Enter text in the text box and select the text. On the Home tab, in the Font group, do the following: In the Font list, select Corbel. On the Home tab, in the Paragraph group, click Align Text Left to align the text left in the text box. Click the arrow next to Font Color, and then under Theme Colors click White, Background 1, Darker 50% (sixth row, first option from the left). In the Font Size list, select 22. On the slide, drag the text box to the right of the first oval. Drag the second text box to the right of the second oval. Click in the text box and edit the text. Select the text box. On the Home tab, in the Clipboard group, click the arrow under Paste, and then click Duplicate. Repeat steps 5-7 to create the third and fourth text boxes, dragging them to the right of the third and fourth ovals. To reproduce the animation effects on this slide, do the following: On the Home tab, in the Editing group, click Select, and then click Selection Pane. On the Animations tab, in the Animations group, click Custom Animation. In the Selection and Visibility pane, select the rectangle group. In the Custom Animation task pane, do the following: Select the animation effect (spin effect for the rectangle group). Under Modify: Spin, do the following: Click Add Effect, point to Emphasis, and then click More Effects. In the Add Emphasis Effect dialog box, under Basic, click Spin. In the Amount list, in the Custom box, enter 123°, and then press ENTER. Also in the Amount list, click Counterclockwise. In the Start list, select With Previous. On the slide, select the first oval. In the Custom Animation task pane, do the following: In the Speed list, select Fast. Select the second animation effect (change fill color effect for the first oval). Under Modify: Change Fill Color, do the following: Click Add Effect, point to Emphasis, and then click More Effects. In the Add Emphasis Effect dialog box, under Basic, click Change Fill Color. In the Start list, select After Previous. On the slide, select the first text box. In the Custom Animation task pane, do the following: In the Speed list, select Very Fast. In the Fill Color list, click More Colors. In the Colors dialog box, on the Custom tab, enter values for Red: 130, Green: 153, Blue: 117. Select the third animation effect (fade effect for the first text box). Under Modify: Fade, do the following: Click Add Effect, point to Entrance, and then click More Effects. In the Add Entrance Effect dialog box, under Subtle, click Fade. Select the fourth animation effect (spin effect for the rectangle group). Under Modify: Spin, do the following: In the Start list, select On Click. In the Amount list, in the Custom box, enter 22°, and then press ENTER. Also in the Amount list, click Clockwise. On the slide, select the second oval. In the Custom Animation task pane, do the following: Select the fifth animation effect (change fill color effect for the second oval). Under Modify: Change Fill Color, do the following: On the slide, select the second text box. In the Custom Animation task pane, do the following: Select the sixth animation effect (fade effect for the second text box). Under Modify: Fade, do the following: Click Add Effect, point to Entrance and then click More Effects. In the Add Entrance Effect dialog box, under Subtle, click Fade. On the slide, select the third oval. In the Custom Animation task pane, do the following: Select the seventh animation effect (change fill color effect for the third oval). Under Modify: Change Fill Color, do the following: On the slide, select the third text box. In the Custom Animation task pane, do the following: Select the eighth animation effect (fade effect for the third text box). Under Modify: Fade, do the following: On the slide, select the fourth oval. In the Custom Animation task pane, do the following: Select the ninth animation effect (change fill color effect for the fourth oval). Under Modify: Change Fill Color, do the following: On the slide, select the fourth text box. In the Custom Animation task pane, do the following: Select the 10th animation effect (fade effect for the fourth text box). Under Modify: Fade, do the following: دبیر مربوطه : جناب آقای عباسی.")
5
در این پودمان پس از بررسی چند نمونه ساز و کار حرکتی، با استفاده از مهارت هایی که در سال های گذشته در کار با چوب، کار با فلز و برق و الکترونیک به دست آورده اید، کارهای خلاقانه ای از جمله ساخت یک ساز وکار حرکتی را انجام می دهید.

6
برخی از شایستگی هایی که در این پودمان به دست می آورید:
کارگروهی، مسئولیت پذیری، مدیریت منابع، فناوری اطلاعات و ارتباطات و اخلاق حرفه ای؛ تفکر سیستمی؛ مونتاژ و دمونتاژ کردن اجزای یک ساز و کار حرکتی؛ طراحی و ساخت یک ساز و کار حرکتی ساده؛ تعمیر و نگهداری از ساز و کارهای حرکتی؛ رعایت نکات ایمنی و بهداشت هنگام انجام دادن کار.

7
ســــــاز و كــار هاي حركتـــــي

8
در درس کار و فناوری پایه هفتم تعریف سیستم را خوانده اید
در درس کار و فناوری پایه هفتم تعریف سیستم را خوانده اید. سیستم مجموعه اى است که اجزاى آن با هم در ارتباط اند. این اجزا با فرایندهایی، ورودی ها را به خروجی ها تبدیل می کنند. مثال هایی نیز برای آن بیان شد. در چند کار کلاسی نمونه هایی از سیستم ها را بررسی کردید. برخی از اجزای سیستم ها را ساز و کار حرکتی می نامند و در واقع این ساز و کارهای حرکتی هستند که در سیستم ها نقش اصلی را دارند. شکل 1-3- برخی از ساز و کارهای حرکتی را نشان می دهد.

10
امروزه بیشتر سیستم ها، ماشینهایی هستند که از یک یا چند ساز و کار حرکتی تشکیل شده اند و یک انرژی را به انرژی دیگری تبدیل میکنند. مثلاً در سیستم پنکه، موتور الکتریکی، انرژی برق را به انرژی مکانیکی تبدیل میکند در نرم افزار کار و فناوری پایه نهم، روش کار ساز و کارهای حرکتی مختلف با فیلمها و تصاویر متحرک نمایش داده شده است

11
ساز و کار حرکتی چرخ دنده ساز و کار حرکتی چرخ دنده، سیستمی است که حداقل از دو چرخ دنده تشکیل شده و به صورت جفت کار میکند. به همین دلیل آن را ساز و کار حرکتی چرخ دنده مینامند. امروزه بیشتر دستگاه های موجود در صنعت دارای چرخ دنده هستند. چرخ دنده ها، برحسب موقعیت مکانی محورها نسبت به یکدیگر، در شکل های گوناگونی طراحی و ساخته میشوند و از طریق اتصال دندانه ها حرکت چرخشی یک محور را به محور دیگر منتقل میکنند

12
چرخ دنده چرخدنده وسیلهای است برای انتقال توان دورانی از یک محور به محور دیگر که طی آن مقدار گشتاور و یا سرعت دورانی و یا جهت چرخش و یا راستای محوری میتواند تغییر کند. تسمه و زنجیر نیز همین کار را می کنند اما با کیفیتی متفاوت.

13
شکل 2ــ 3انواع ساز و کار حرکتی چرخدنده ها را نشان داده است

14
چرخ دنده ساده سادهترین و پرکاربردترین نوع چرخدنده است. هر چرخ دنده شامل دیسکی است که دندانه های آن بصورت شعاعی قرار گرفتهاند و محور هر دو دنده میبایست موازی هم باشد .در تعداد زیادی از وسایل از این چرخ دندهها استفاده میشود. مثلاً ساعت های کوکی، ساعت های اتوماتیک، ماشین لباسشویی، پنکه و اما در اتومبیل به کار نمی آیند، چون سر و صدای زیادی دارند

15
چرخ دنده های مارپیچ دندانه های این چرخدنده برخلاف چرخدنده ساده موازی با محور چرخدنده نیستند، بلکه هر دندانه به شکل مقطعی از مارپیچ است. این قابلیت باعث میشود دندانه ها به آرامی با هم درگیر شوند، در حالی که دندانه های چرخدنده ساده به یکباره با هم درگیر شده و از هم جدا میشوند. این مسأله باعث میشود که چرخدنده ها مارپیچ نسبت به چرخدندههای ساده آرامتر و با صدای کمتر کار کنند. محور این چرخدنده ها میتواند بصورت موازی و یا متقاطع قرار گیرد. در مقایسه با چرخدنده های ساده، چرخدنده های مارپیچ بیشتر دارای کاربرد در سرعتهای بالا و توانهای بالا است. همچنین به دلیل آنکه این چرخدنده ها با سر و صدا و ارتعاشات کمتری کار میکنند، در مواردی که کنترل سر و صدای بالا حائز اهمیت است از این گونه چرخدنده استفاده میگردد .

16
چرخدنده مخروطی این نوع چرخ دنده عمدتاً جهت انتقال محور دوران از حالت محور عمودی به محور افقی و یا بالعکس استفاده میشود. و در صنایع خودرو سازی از کاربرد فراوانی برخوردار است. دیفرانسیل اتومبیلها و محورهای محرک همگی از این نوع میباشد.

17
چرخدنده حلزونی این چرخ دندهها زمانی مورد استفاده قرار میگیرند که بخواهیم تغییر زیادی در سرعت و یا قدرت ایجاد کنیم .معمولاً نسبت شعاع دو چرخ دنده 2:01است و گاهی حتی به 3::01و بیشتر نیز میرسد . این چرخ دندهها یک خاصیت جالب هم دارند که در هیچ چرخ دنده دیگری پیدا نمی شود. چرخ بالایی (حلزون) میتواند بهراحتی چرخ دیگر (چرخ دنده حلزونی) را حرکت دهد، ولی چرخ پایینی نمی تواند حلزون رابچرخاند. زاویه دنده های روی حلزون آنقدر کوچک است که وقتی چرخ پایینی بخواهد آن را بچرخاند، اصطکاک به حدی زیاد میشود که از حرکت حلزون جلوگیری میکند. این ویژگی به ما امکان استفاده از این چرخ دندهها را در جاهایی که به یک قفل خودکار نیاز داریم میدهد. فرض کنید از این چرخ دنده در یک بالابر استفاده کرده ایم؛ وقتی موتور بالابر از کار بیفتد، چرخ دندهها قفل میشوند و نمی گذارند بار پایین بیاید .معمولاً در دیفرانسیل کامیونها و خودروهای سنگین از این چرخ دندهها استفاده میشود.
 میتواند بهراحتی چرخ دیگر (چرخ دنده حلزونی) را حرکت دهد، ولی چرخ پایینی نمی تواند حلزون رابچرخاند. زاویه دنده های روی حلزون آنقدر کوچک است که وقتی چرخ پایینی بخواهد آن را بچرخاند، اصطکاک به حدی زیاد میشود که از حرکت حلزون جلوگیری میکند. این ویژگی به ما امکان استفاده از این چرخ دندهها را در جاهایی که به یک قفل خودکار نیاز داریم میدهد. فرض کنید از این چرخ دنده در یک بالابر استفاده کرده ایم؛ وقتی موتور بالابر از کار بیفتد، چرخ دندهها قفل میشوند و نمی گذارند بار پایین بیاید .معمولاً در دیفرانسیل کامیونها و خودروهای سنگین از این چرخ دندهها استفاده میشود.")
18
چرخدنده شانه ای این چرخ دنده ها برای تبدیل حرکت دورانی به حرکت خطی استفاده میشوند. یک مثال خوب برای این چرخ دنده ها فرمان اتومبیل است. فرمان، چرخ دنده ای را میچرخاند که با چرخ شانه ای در تماس است. وقتی شما فرمان را می چرخانید، با توجه به جهت چرخش فرمان، شانه به سمت چپ و یا راست حرکت میکند و باعث حرکت چرخ ها میشود. در برخی از ترازوها نیز برای چرخاندن عقربه از سیستم مشابهی استفاده میشود.

19
در گروه خود دستگاهی را که با کمک ساز و کار حرکتی چرخدنده کار کند، به کلاس بیاورید و آن را مورد بررسی قرار دهید. میتوانید یک موتور ساعت عقربه ای کوچک را انتخاب کنید، همانطور که در شکل 3ــ3 دیده میشود چرخدنده های این ساعت کوچک از جنس پلاستیک است. شما میتوانید دستگاهی انتخاب کنید که چرخدنده های آن از جنس فلز باشد.

20
تقویم مکانیکی بیرونی از جمله ابداعات مهم منسوب به ابوریحان بیرونی، تقویم مکانیکی بیرونی است. هدف اصلی از طراحی و ساخت این تقویم که یک ساز و کار حرکتی است، نمایش طلوع و غروب ماه و تعیین مدتی که از ماه گذشته و تعیین مدت تقریبی ماه و خورشید است. ابوریحان بیرونی در کتاب های خود به دقت نحوه ساخت و نصب چرخدنده ها را شرح داده است. همچنین اندازه ها، فواصل، جنس، تعداد و شکل دندانه ها را مشخص .(کرده است (شکل4ـ3

21
در گروه خود یک نمونه قفل را به کلاس آورده و آن را مورد بررسی قراردهید
در گروه خود یک نمونه قفل را به کلاس آورده و آن را مورد بررسی قراردهید. در مورد وظیفه و عملکرد هر یک از اجزای آن گفت وگو کنید. انواع مختلف قفل وجود دارد که از ساز و کارهای حرکتی مختلفی در آنها استفاده شده است. در شکل 5ــ 3یک نمونه قفل نشان داده شده است

22
در گروه خود، ساز و کار حرکتی چرخ زنجیر یک دوچرخه و اجزای آن را پس از تمیز کردن با دقت بررسی کنید و برای افزایش عمر و بالا رفتن کارایی، آنها را روغنکاری و گریسکاری نمایید. در صورت داشتن امکانات میتوانید ساز و کار حرکتی چرخ زنجیر آن را باز کنید. بعد از بررسی دقیق تر اجزاء، مجددا آنها را ببندید (شکل6ــ3). ج) روغن كاري اجزا ب) بررسي كردن اجزا الف ) تميز كردن اجزا
 روغن كاري اجزا. ب) بررسي كردن اجزا. الف ) تميز كردن اجزا.")
23
در حین تمیز کردن اجزای ساز و کار حرکتی چرخ زنجیر دوچرخه مواظب انگشتان خود باشید و حتما از دستکش ایمنی استفاده کنید. اجزای ساز و کار حرکتی چرخ زنجیر را به مقدار کم روغن کاری کنید، زیرا باعث جمع شدن سریع گرد وخاک بر روی اجزای آن میشود .

24
در گروه خود، خارج از کلاس، یک ساز و کار حرکتی چرخ تسمه را بررسی کنید
در گروه خود، خارج از کلاس، یک ساز و کار حرکتی چرخ تسمه را بررسی کنید. از اجزای آن و چگونگی کارکرد آن فیلم و عکس تهیه کنید و آن را در کلاس ارائه دهید.

25
هرگز به اجزای در حال حرکت ساز و کارهای حرکتی نباید دست زد. چرا؟
در هر مکانیزم سازوکار حرکتی بر اساس قانون اهرم ها قدرت و گشتاور بسیار زیادی تولید و خارج می شود که می تواند توان بسیاری داشته باشد حتی سازو کارهای حرکتی کوچک. حال اگر فردی دست ها یا هر یک از اجزای بدن خود را درگیر این مکانیزم ها کند چون با نیروی زیادی مواجه می شود آسیب بسیاری ممکن است به دست ها یا سایر اعضای بدن او وارد شود و حتی در مواردی باعث قطع عضو یا مرگ شود پس به هیچ عنوان نباید به سازوکارهای حرکتی از هرنوع که باشند دست زد.

26
در گروه خود، ساز و کار حرکتی گیره رومیزی یا گیره دستی کارگاه را بررسی و اجزای آنها را فهرست کنید و مشخص کنید که جزء کدام دسته از ساز و کارهای حرکتی میباشد. در شکل 7ــ 3 تصاویری از چند نمونه گیره آورده شده است. پ ــ گیرۀ دستی ب ــ گیرۀ لوله الف ــ گیرۀ رومیزی شکل7ــ3ــ چند نمونه گیره

27
جواب : در این نوع گیره ها با دوران یک دسته پیچ استوانه ای در داخل مهره چرخیده و فک ها به جلو و عقب می رود. پس نوع سازوکار در این گیره ها از نوع پیچ حرکتی است در تصویر زیر می توانید اجزای مختلف یک گیره کارگاهی را ببینید

28
ساز و کارهای حرکتی موجود در ماشین دوخت (چرخ خیاطی) را بررسی و اجزاء آن را فهرست کنید و بگویید که جزء کدام دسته از ساز وکارهای حرکتی میباشند. گزارشی به همراه تصاویر این اجزاء در کلاس ارائه دهید. در شکل 8ــ 3تصاویر برخی از ساز و کارهای حرکتی ماشین دوخت آورده شده است. الف ــ ساز و کار حرکتی تسمه و چرخ تسمه در ماشین دوخت ب ــ ساز و کار حرکتی بادامک درماشین دوخت پ ــ ساز و کار حرکتی شانه(دندانه) کار پیش بَر ماشین دوخت شکل 8ــ3ــ چند نمونه از ساز و کارهای حرکتی به کار رفته در ماشین دوخت
 کار پیش بَر ماشین دوخت. شکل 8ــ3ــ چند نمونه از ساز و کارهای حرکتی به کار رفته در ماشین دوخت.")
29
در گروه خود، با توجه به کارهای کلاسی انجام شده در صفحات قبل، جدول 1ــ 3را تکمیل کنید.
گردش گیربکس چرخ چرخ گوشت گردش پنکه کولر کولر آبی انقال حرکت به چرخ ها دو چرخه و موتور سیکلت حرکت و ترمز در خودرو تایر ماشین با جاده

30
جرثقیل، ابداعی منتسب به «ابن سینا» که ترکیبی از چرخ دنده، پیچ دنده و قرقره های ثابت و متحرک است، همچنین مبتنی بر قوانین مکانیک حاکم بر اهرم ها و چرخ دنده ها بوده، به گونه ای که با نیروی معادل ده من، باری به وزن ده هزار من را بلند میکرد. در شکل 9ــ 3دو نمونه از جرثقیل ِ های طراحی شده در کتاب معیار العقول ابن سینا آورده شده است. شکل 9ــ3ــ دو نمونه از جرثقیلهای طراحی شده در کتاب ِ معیارالعقول ابن سینا

31
یک نرم افزار ساده برای شبیه سازی است
یک نرم افزار ساده برای شبیه سازی است. در این نرم افزار میتوانید حرکات ساز وکارهای حرکتی را قبل از ساخت، شبیه سازی کنید. حرکت ساز وکارهای حرکتی را ببینید و طراحی خود را بهینه سازی کنید. در شکل 10ــ 3محیط این نرم افزار نشان داده شده است.نرم افزار پیشرفته تر از این نرم افزار برای طراحی ساز و کارهای حرکتی Working Modاست.

32
Interactive Physics محیط نرمافزارـ10ـ3ــ شکل

33
پروژه ای را برای طراحی و ساخت در این پودمان انتخاب کنید، ابتدا در نرم افزار Interactive Physics یا نرم افزاری مشابه شبیه سازی کنید و سپس به ساخت آن اقدام کنید. همچنین میتوانید برخی از ساز و کارهای حرکتی معرفی شده در این پودمان را در این نرم افزار شبیه سازی کنید.

34
پس از مشاهده مراحل دقیق طراحی و ساخت یک نمونه جرثقیل کوچک، در نرم افزار کار و فناوری پایه نهم، کار کلاسی زیر را انجام دهید.

35
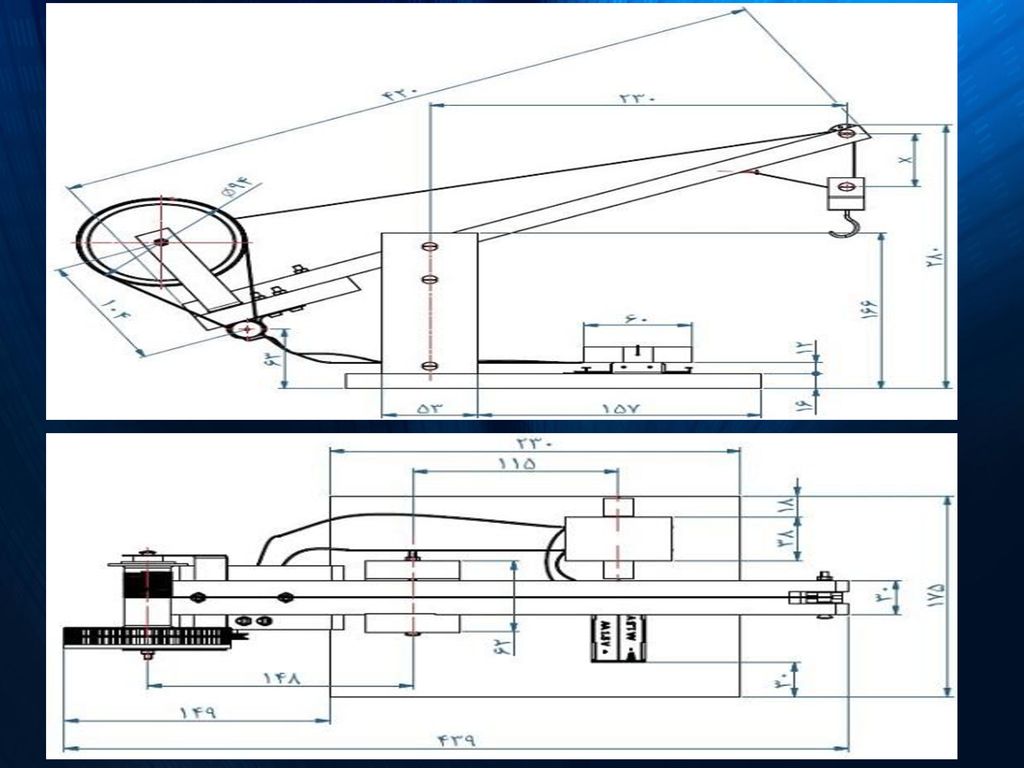
پروژۀ طراحی و ساخت جرثقیل: در این پروژه جرثقیل منتسب به «ابن سینا» را با ابعاد کوچکتر طراحی کنید و بَعد آن را بسازید. طرح آن را در شکل 9ــ3ــ الف ملاحظه کردید. همچنین شما می توانید نمونه دیگری که با انرژی برق کار کند و از نیروی اهرم ها نیز در آن استفاده شده باشد، طراحی کنید و بعد آن را بسازید. در شکل 11ــ 3یک نمونه نشان داه شده است. ابزار و وسایل مورد نیاز: پیچ گشتی، انبردست، گیره رومیزی، دریل، مته، چوب معمولی، ام دی اف، ورق یا تسمه با ضخامت یک یا دو میلیمتر و عرض ده میلیمتر، مفتول فلزی با قطر 2میلیمتر(میخ پرچ،) ماسوره چرخ خیاطی دو عدد، نخ محکم و نازک به طول 5متر، پیچ و مهره، درب بطری پلاستیکی، قرقره نخ پلاستیکی، موتور الکتریکی کوچک 9ولت، باتری 1/5ولت دو عدد، جا باتری و سیم و وسایل رنگ آمیزی.
 ماسوره چرخ خیاطی دو عدد، نخ محکم و نازک به طول 5متر، پیچ و مهره، درب بطری پلاستیکی، قرقره نخ پلاستیکی، موتور الکتریکی کوچک 9ولت، باتری 1/5ولت دو عدد، جا باتری و سیم و وسایل رنگ آمیزی..")
36
روش کار مرحله 1ــ ترسیم روندنمای انجام پروژه: با توجه به آنچه در پودمان الگوریتم آموخته اید، روندنمای پروژه طراحی وساخت جرثقیل را با رایانه ترسیم کنید. مرحله 2ــ طراحی و ترسیم نقشه ها: با توجه به آنچه در پودمان ترسیم با رایانه آموخته اید، ابتدا نقشه های مربوط به جرثقیل را ترسیم کنید، بعد از اندازه گذاری، نقشه ها را با دستگاه چاپگر چاپ کنید. در این بخش در صورت انتخاب پروژه دیگری نقشه های مربوط به آن را تهیه کنید. مرحله3ــ ساخت قطعات: در این مرحله، قطعات مورد نیاز را بر طبق نقشه بسازید. در این بخش شما از بیشتر مهارت هایی که در سال های گذشته به دست آورده اید، استفاده میکنید، از جمله آنها، پودمان های کار با چوب پایه هفتم و کار با فلز و برق و الکترونیک پایه هشتم را میتوان نام برد.

37
شکل 11ــ3ــ نمونه جرثقیل ساخته شده

40
شکل 12ــ 3مراحل ساخت برخی از قطعات را نشان داده است.
ت ــ ساخت قلاب و قرقرۀ جرثقیل پ ــ ساخت قطعات چرخ تسمه ب ــ سوراخ کاری قطعات الف ــ ساخت قطعات فلزی وتهیه پیچ ومهرههای آنها شکل12ــ3ــ مراحل ساخت برخی قطعات جرثقیل ج ــ ساخت قطعات پایه چوبی جرثقیل ث ــ اره کاری شیار بازوی چوبی

41
مرحله 4ـ مـونتاژ کـردن قـطعـات: در این مرحله، قطعات ساخته شده در مـرحله قبل را بـر روی هم مونتاژ کنید. شکل 13ـ 3مراحل مونتاژ برخی از قطعات را نشان داده است. ب ــ نصب نخ و قلاب؛ در این بخش از ماسوره به جای قرقره استفاده کنید. در این بخش از قرقره های مرکب استفاده شده است الف ــ نصب مـوتور الکتریکـی؛ برای جـانمـایی، آن را بـا استفـاده از تسمه خم کاری و سوراخ شده به وسیله پیچ و مهره ثابت کنید. ج ــ پس از مونتاژ کامل قطعات جرثقیل، آن را مـورد آزمایش قـرار دهیـد و در صورت وجـود اشکال، آن را بـرطرف کنید. ث ــ سوراخکاری و نصب کلید؛ در این قسمت تعـادل قطعه بالایی کلیـد بسیار مهم میباشد، زیرا در غیراینصورت، کلید همیشه باعث حرکت قلاب جرثقیل میشود. ت ــ لحیم کاری اتصالات الکترونیکی مهمترین بخش الکترونیکی این پروژه کلید دو جهته جرثقیل میباشد که مطابق تصویر بالا عمل میشود. پ ــ نصب سـاز و کـار حـرکتـی چـرخ تسمه؛ باید دقت کنید که تسمه از روی پولی های تعبیه شده خارج نشود.

42
مونتاژ 1) در کنار هم گذاشتن و به هم چسباندن فیلم ها یا عکس ها و... برای بوجود آوردن یک مجموعه . 2) سوار کردن و به هم بستن قطعات یک دستگاه یا ماشین.
 سوار کردن و به هم بستن قطعات یک دستگاه یا ماشین.")
43
الگوریتم ساخت جرثقیل

44
دلیل استفاده از ساز و کار حرکتی چرخ و تسمه را در پروژه ساخت جرثقیل مورد بررسی قرار دهید. روش های دیگری برای این کار پیدا کنید و آنها را در کلاس ارائه دهید. به دلایل زیر از از ساز و کار حرکتی چرخ و تسمه در این جرثقیل استفاده شده است. 1- سادگی و کم هزینه بودن چرخ و تسمه و ساخت آن با وسایل ساده و دور ریختنی 2- بی صدا بودن و روانی حرکت 3- دلیل اصلی - به علت سرعت بالا و زیاد موتور الکتریکی لازم است این سرعت به نسبت زیادی کم شود تا بتوان از این سرعت کم در جرثقیل استفاده کرد به همین دلیل با بستن یک پولی کوچک به سر موتور الکتریکی و انتقال حرکت تند پولی با تسمه به یک پولی خیلی بزرگ می توان سرعت کم و مناسبی را با کم ترین هزینه به دست آورد. 4- قابل انعطاف بودن و سهولت تنظیم مکانیزم اما برای این کار می توان از روش های دیگری نیز استفاده کرد مانند: استفاده از گیربکس چرخ دنده و سازوکار چرخ و زنجیر استفاده از روش های ذکر شده سرعت کم به همراه قدرت خیلی زیادی ایجاد خواهد کرد.

45
آیا میدانید جرثقیل ها امروزه چه کاربردهایی دارند؟
فهرستی از کاربردهای جرثقیل ها به همراه تصاویر آنها را درنرم افزار word تهیه كنید و فایل آن را برای دبیر خود از طریق رایانامه ارسال کنید. در شکل 14ــ 3 دو نمونه از کاربردهای جرثقیل آورده شده است. ب ــ نصب جرثقیل بر روی سکوی نفتی شهید رجایی خلیج فارس الف ــ نصب جرثقیل بر روی کشتی شکل 14ــ3ــ نمونههایی از جرثقیل

46
پاسخ : جرثقیل (crane) ماشینی بسیار کارآمد و مفیدی در صنعت است که با سازوکارهای مختلفی که دارد با استفاده و الهام از قانون اهرم ها در فیزیک می تواند بارهای سنگین را جابجا کند و کارها را ساده تر کند . جرثقیل بر اساس نوع کاری که انجام می دهد به 2 نوع عمده تقسیم می شود. الف - جرثقیل صنعتی ب - جرثقیل ساختمانی tower cranes از جرثقیل صنعتی در کلیه اعمال صنعتی در بنادر - کارخانه ها - شهرها و استفاده می شود ولی جرثقیل ساختمانی فقط در ساخت و ساز و انجام عملیات ساختمانی کاربرد دارد.
 ماشینی بسیار کارآمد و مفیدی در صنعت است که با سازوکارهای مختلفی که دارد با استفاده و الهام از قانون اهرم ها در فیزیک می تواند بارهای سنگین را جابجا کند و کارها را ساده تر کند . جرثقیل بر اساس نوع کاری که انجام می دهد به 2 نوع عمده تقسیم می شود. الف - جرثقیل صنعتی ب - جرثقیل ساختمانی tower cranes. از جرثقیل صنعتی در کلیه اعمال صنعتی در بنادر - کارخانه ها - شهرها و استفاده می شود ولی جرثقیل ساختمانی فقط در ساخت و ساز و انجام عملیات ساختمانی کاربرد دارد.")
47
در تصاویر زیر می توانید انواع جرثقیل را مشاهده نمایید.
در تصاویر زیر می توانید انواع جرثقیل را مشاهده نمایید.

48
شکل 15ــ3ــ نمونه اسباب بازی ساخته شده
پروژۀ طراحی و ساخت اسباب بازی: در این پروژه یک نمونه اسباب بازی، مشابه شکل 15ــ ،3خواهید ساخت. این اسباب بازی یک حلزون است که اساس حرکت آن یک چرخ لنگ میباشد. در واقع محور به صورت خارج از مرکز به چرخ ها متصل شده است. ابزار و وسایل مورد نیاز: پیچ گشتی، انبردستی، گیره رومیزی، دریل، مته، ابزار گردبُر دریل، چوب، سوهان، سنباده، چسب چوب، نخ به طول یک متر و وسایل رنگ آمیزی.

49
روش کار مرحله 1ــ ترسیم روندنمای انجـام پروژه: همانند پروژه قبل روندنمای پروژه را با رایانه ترسیم کنید. مرحله 2ــ طـراحی و ترسیم نقشه ها: همانند پروژه قبل، بعد از تهیه نقشه ها، آنها را چاپ کنید. مرحله3ــ ساخت قطعات: همانند پروژه قبل، قطعات را بر طبق نقشه ها بسازید.

50
نقشه ساخت حلزون

51
شکل 16ــ 3مراحل ساخت برخی از قطعات را نشان داده است.
ت ــ ساخت قطعات چوبیِ گرد چرخ پ ــ ساخت محور چرخ ب ــ ساخت پینهای چوبی الف ــ ساخت قطعات چوبی بدن حلزون شکل 16ــ3ــ مراحل ساخت برخی قطعات اسباب بازی ج ــ رنگ آمیزی قطعات ث ــ سوراخ کاری قطعات

52
مرحله 4ــ مونتاژ کردن قطعات: در این مرحله، قطعات ساخته شده در مرحله قبل را بر روی هم مونتاژ کنید. شکل 17ــ3 مراحل مونتاژ قطعات را نشان داده است. ت ــ اتصال بدن به چرخ و محور روی آن پ ــ اتصال محور به یکی از چرخها ب ــ اتصال قطعه سر حلزون به بدن الف ــ اتصال قطعه دم حلزون به بدن شکل17ــ3ــ مراحل مونتاژ برخی قطعات اسباب بازی ج ــ مونتاژ کامل قطعات حلزون ث ــ اتصال چرخ دوم

53
ساز و کار حرکتی استفاده شده در پروژه ساخت حلزون عبارت است از ساز وکار حرکت بادامک . با این ساز و کار میتوان حرکت رفت و برگشتی ایجاد کرد . سازوکار حرکتی استفاده شده در پروژه ساخت حلزون چیست؟ چند مثال از کاربردهای آن نام ببرید. ادامه در اسلاید بعد

54
این سازو کار در وسایل زیر نیز به کار می رود .
چرخ خیاطی - حرکت سوپاپ های خودرو - اسباب بازی و ...

55
پل متحرک خضر، یک ساز و کار حرکتی خلاقانه در دفاع مقدس
بعد از عملیات والفجر8 ، نیروهای مستقر در منطقه «فاو» نیازمند پشتیبانی و تدارکات بودند. غذا، سوخت و مهمات برای آنها حیاتی بود. در اثر بمباران های مکرر شیمیایی، آب سالم در فاو پیدا نمیشد و جبهه فاو به جبهه سختی تبدیل شده بود. پشت سر رزمندگان حاضر در فاو، رودخانه خروشان اروند با عرض حدود 900متر بود. انجام تدارکات سنگین با قایق، بسیار سخت و کند بود. مهندسین پشتیبانی و مهندسی جنگ جهاد چند پل روی اروند پیش بینی و نصب کردند ولی هواپیما های دشمن و سرعت حرکت آب، آن پلهای به زحمت نصب شده را از بین میبرد، از طرف دیگر نیاز به تدارکات سنگین، به شدت به فرماندهان جنگ فشار می آورد ولی راهی برای برقراری ارتباط نمانده بود. شرایط نیروهایی که در فاو مستقر بودند روز به روز سخت تر میشد. مهندسین جوان جهاد؛ در نهایت برای حل مشکل بزرگ عبور از اروند، «پل خضر» را که یک ساز و کار حرکتی بود، طراحی و اجرا کردند.

56
این پل از یک صفحه بزرگ شناور که «دوبه» نام داشت تشکیل میشد
این پل از یک صفحه بزرگ شناور که «دوبه» نام داشت تشکیل میشد. سه رشته سیم بکسل، با شمع کوبی و بتن ریزی در دو طرف اروند رود، محکم و مهار شده بودند. سیم بکسلها از داخل گوشواره هایی که بر روی دوبه تعبیه شده بود عبور داده شده بودند.دو سیم بکسل بزرگ، نقش هدایت دوبه را داشتند تا جریان شدید آب، آن را از مسیر مشخص شده (امتداد عرض رودخانه) خارج نکرده و با خود نبرد. بر روی نقطه محاسبه شده ای از دوبه، یک تراکتور جاسازی شده بود که لاستیک هایش را جدا کرده، به یکی از چرخهای عقب آن، رینگ مخصوصی بسته بودند و سیم بکسل سوم را چند بار دور آن رینگ چرخانده بودند.
 خارج نکرده و با خود نبرد. بر روی نقطه محاسبه شده ای از دوبه، یک تراکتور جاسازی شده بود که لاستیک هایش را جدا کرده، به یکی از چرخهای عقب آن، رینگ مخصوصی بسته بودند و سیم بکسل سوم را چند بار دور آن رینگ چرخانده بودند.")
57
شکل 18ــ3ــ تصاویری از پل خضر
وقتی راننده خضر دنده جلوی تراکتور را میزد، خضر به عقب میرفت و هر وقت دنده عقب را میزد، خضر به جلو میرفت. چون سیم بکسل های اول و دوم، خضر را در امتداد عرض رودخانه نگاه میداشتند، لذا نیازی به فرمان نبود و مثل قطاری بود که ریل آن ، دو سیم بکسل اطرافش بودند. قابل ذکر است که مهندسین جهاد سازندگی، از این ابتکارات در جنگ زیاد داشته اند (شکل 18ــ3.) شکل 18ــ3ــ تصاویری از پل خضر
 شکل 18ــ3ــ تصاویری از پل خضر.")
58
شکل19ــ3ــ شهید حاج ّ اسدالله هاشمی
ارزان بودن و سریع النصب بودن پل خضر و همچنین پیچیده نبودن کار با آن، از مزیتهای این طرح بود. هواپیماهای عراقی هیچگاه نتوانستند این پل متحرک را که برایشان نامرئی بود، مورد حمله قرار دهند. یکی از تیمهای اجرایی قوی در ساخت پلهای خضر، تیم شهید «اسداللّه هاشمی» بود. تیم ایشان کارکردن با سیم بکسل را بسیار عالی بلد بود. او یک کانتینر همراه خود داشت که در آن همه جور وسیله برای تعمیر ماشین آلات یا ساخت و تعمیرات دیگر، وجود داشت. هر جا تیم حاج اسداللّه هاشمی بود، خیال فرماندهی پشتیبانی و مهندسی جنگ جهاد از بابت حل مشکلات آن منطقه راحت بود. شهید اسداللّه هاشمی، یکی از فرماندهان دلیر پشتیبانی و مهندسی جنگ جهاد بود (شکل19ـ3.) شکل19ــ3ــ شهید حاج ّ اسدالله هاشمی
 شکل19ــ3ــ شهید حاج ّ اسدالله هاشمی.")
59
پروژه های نیمه تجویزی دیگری در جدول 2ــ 3 معرفی شده اند که مراحل ساخت آنها را میتوانید از سایت گروه کار و فناوری دریافت کنید. جدول 2_3 در اسلاید بعد

61
جدول خودارزیابی پروژه

62
بخش اول :

63
بخش دوم : ٭ مدیریت منابع شامل: مدیریت زمان، استفاده بهینه از مواد و وسایل، صرفه جویی

64
FINISH

Similar presentations


>")
>")

