Download presentation
Presentation is loading. Please wait.

2
To add an effect to your clip go to the effect window then select the folder video effect, drag the interested effect to add to the clip in the time line. You can adjust the parameters of the added effect from the effect control panel. You can add video transition in the same manner. The following slides summarized the main objective of each effect

3
Auto Color, Auto Contrast, and Auto Levels effects The Auto Color, Auto Contrast, and Auto Levels effects make quick global adjustments to a clip. Auto Color adjusts contrast and color by neutralizing the midtones and clipping the white and black pixels. Auto Contrast adjusts the overall contrast and mixture of colors, without introducing or removing color casts. Auto Levels automatically corrects the highlights and shadows. Because Auto Levels adjusts each color channel individually, it may remove or introduce color casts. Each effect has one or more of the following settings:

4
Convolution Kernel effect The Convolution Kernel effect changes the brightness values of each pixel in the clip according to a mathematical operation known as a convolution. A convolution overlays a matrix of numbers onto a matrix of pixels, multiplies each underlying pixel's value by the number that overlays it, and replaces the central pixel's value with the sum of all of these multiplications. This is performed for each pixel in the image.

5
The Convolution Kernel Settings include a set of controls that represent cells in a 3x3 grid of pixel brightness multipliers. Labels on the controls, which begin with the letter “M,” indicate their position in the matrix. The M11 control, for example, affects the cell in the first row and first column of the grid; the M32 control affects the cell in the third row and second column. The pixel being evaluated falls in the center of the grid, at the M22 location. Use this effect for fine control over the properties of various emboss, blur, and sharpen effects. For a given effect, it is easier to apply one of the Convolution Kernel presets and to modify it, than to create the effect from scratch using the Convolution Kernel effect itself.

7
Extract effect The Extract effect removes colors from a video clip, creating a grayscale image. Pixels with luminance values less than the Black Input Level or greater than the White Input Level are made black. Everything between those points will appear gray or white. Note: The controls for this effect are similar to those of the Extract effect in Adobe After Effects, but the purpose and results of the effect are different.

8
Levels effect The Levels effect manipulates the brightness and contrast of a clip. It combines the functions of the Color Balance, Gamma Correction, Brightness & Contrast, and Invert effects. This effect functions much the same as the Levels effect in After Effects. The Levels Settings dialog box displays a histogram of the current frame (Windows only)
.")
9
Lighting Effects effect The Lighting Effects effect applies lighting effects on a clip with up to five lights to introduce creative lighting. Lighting Effects lets you control lighting properties such as lighting type, direction, intensity, color, lighting center, and lighting spread. There is also a Bump Layer control to use textures or patterns from other footage to produce special lighting effects such as a 3D-like surface effect.

10
ProcAmp effect The ProcAmp effect emulates the processing amplifier found on standard video equipment. This effect adjusts the brightness, contrast, hue, saturation, and split percent of a clip's image.

11
Shadow/Highlight effect The Shadow/Highlight effect brightens shadowed subjects in an image and reduces the highlights in an image. This effect doesn’t darken or lighten an entire image; it adjusts the shadows and highlights independently, based on the surrounding pixels. You can also adjust the overall contrast of an image. The default settings are for fixing images with backlighting problems.

12
Camera Blur effect (Windows only) The Camera Blur effect simulates an image leaving the focal range of the camera, blurring the clip. For example, by setting keyframes for the blur, you can simulate a subject coming into or going out of focus, or the accidental bumping of the camera. Drag the slider to specify a blur amount for the selected keyframe; higher values increase the blur.

13
Channel Blur effect The Channel Blur effect blurs a clip’s red, green, blue, or alpha channels individually. You can specify that the blur is horizontal, vertical, or both. Repeat Edge Pixels blurs the pixels beyond the edge of the clip as though they have the same values as the edge pixels. This effect keeps edges sharp, preventing the edges from darkening and becoming more transparent— which would result from them being averaged with many zeroes. Deselect this option to make the blur algorithm operate as if the pixel values beyond the edge of the clip are zero.

14
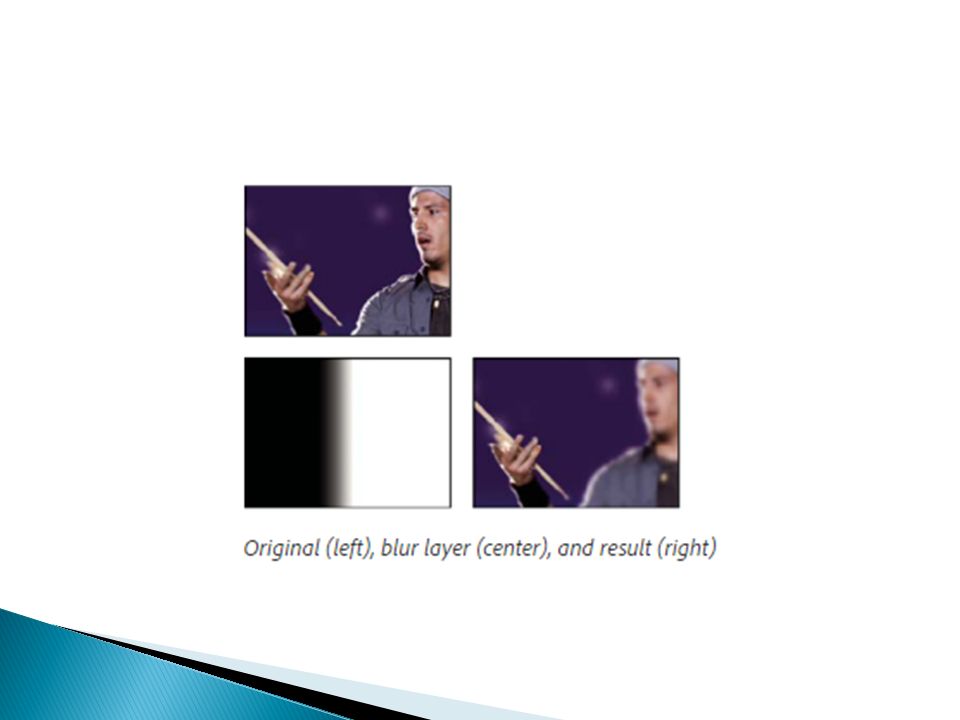
Compound Blur effect The Compound Blur effect blurs pixels based on the luminance values of a control clip, also known as a blur layer or blurring map. By default, bright values in the blur layer correspond to more blurring of the effect clip. Dark values correspond to less blurring. Select Invert Blur for light values to correspond to less blurring. This effect is useful for simulating smudges and fingerprints. Also, it can simulate changes in visibility caused by smoke or heat, especially when used with animated blur layers.

15
Maximum Blur: The maximum amount, in pixels, that any part of the affected clip can be blurred. Stretch Map To Fit: Stretches the control clip to the dimensions of the clip to which it is applied; otherwise, the control clip is centered on the effect clip.

17
Directional Blur effect The Directional Blur effect gives a clip the illusion of motion. Direction: The direction of the blur. The blur is applied equally on either side of a pixel’s center. Therefore, a setting of 180° and a setting of 0° look the same

19
Fast Blur effect Fast Blur is a close approximation of Gaussian Blur, but Fast Blur blurs large areas more quickly.

21
Gaussian Blur effect The Gaussian Blur effect blurs and softens the image and eliminates noise. You can specify that the blur is horizontal, vertical, or both.

22
Sharpen effect The Sharpen effect increases the contrast where color changes occur.

23
Unsharp Mask effect The Unsharp Mask effect increases the contrast between colors that define an edge. Radius: The distance from the edge at which pixels are adjusted for contrast. If you specify a low value, only pixels near the edge are adjusted. Threshold: The greatest difference between adjacent pixels for which contrast isn’t adjusted. A lower value produces a greater result. A value that is too low causes an adjustment to the contrast of the entire image. A low value can also generate noise or cause unexpected results.

25
Arithmetic effect The Arithmetic effect performs various simple mathematical operations on an image’s red, green, and blue channels.

26
Blend effect The Blend effect blends two clips using one of five modes. After you blend clips using this effect, disable the clip you selected from the Blend With Layer menu. Select the clip and choose Clip > Enable.

27
Calculations effect The Calculations effect combines the channels of one clip with the channels of another clip.

29
Compound Arithmetic effect The Compound Arithmetic effect mathematically combines the clip to which it’s applied with a control layer. The Compound Arithmetic effect is intended only to provide compatibility with projects created in earlier versions of After Effects that use the Compound Arithmetic effect.

30
Invert (video) effect The Invert (video) effect inverts the color information of an image.
 effect The Invert (video) effect inverts the color information of an image.")
31
Set Matte effect The Set Matte effect replaces the alpha channel (matte) of a clip with a channel from a clip in a different video track. This creates traveling matte results. Note: The Set Matte effect was originally developed for After Effects. It is included in Premiere Pro only to provide compatibility with projects created in earlier versions of After Effects that use the Set Matte effect.

33
Solid Composite effect The Solid Composite effect offers a quick way to create a composite of a solid color behind the original source clip. You can control the opacity of the source clip, control the opacity of the solid, and apply blend modes all within the effect’s controls.

34
Brightness & Contrast effect The Brightness & Contrast effect adjusts the brightness and contrast of an entire clip. The default value of 0.0 indicates that no change is made. Using the Brightness & Contrast effect is the easiest way to make simple adjustments to the tonal range of the image. It adjusts all pixel values in the image at once—highlights, shadows, and midtones.

36
Change Color effect The Change Color effect adjusts the hue, lightness, and saturation of a range of colors

37
Change To Color effect The Change To Color effect changes a color you select in an image to another color using hue, lightness, and saturation (HLS) values, leaving other colors unaffected. Change To Color offers flexibility and options unavailable in the Change Color effect. These options include tolerance sliders for hue, lightness, and saturation for exact color matching, and the ability to select the exact RGB values of the target color that you wish to change to.

39
Channel Mixer effect The Channel Mixer effect modifies a color channel by using a mix of the current color channels. Use this effect to make creative color adjustments not easily done with the other color adjustment tools: Create high-quality grayscale images by choosing the percentage contribution from each color channel, create high-quality sepia-tone or other tinted images, and swap or duplicate channels.

41
Color Balance effect The Color Balance effect changes the amount of red, green, and blue in the shadows, midtones, and highlights of an image.

42
Color Balance (HLS) effect The Color Balance (HLS) effect alters an image’s levels of hue, luminance, and saturation.
 effect The Color Balance (HLS) effect alters an image’s levels of hue, luminance, and saturation.")
43
Equalize effect The Equalize effect alters an image’s pixel values to produce a more consistent brightness or color component distribution. The effect works similarly to the Equalize command in Adobe Photoshop. Pixels with 0 alpha (transparent) values aren’t considered.
 values aren’t considered..")
44
Fast Color Corrector effect The Fast Color Corrector effect adjusts a clip’s color using hue and saturation controls. This effect also has levels controls for adjusting intensity levels of image shadows, midtones, and highlights. This effect is recommended for making simple color corrections that preview quickly in the Program monitor.

45
The Leave Color effect removes all colors from a clip except those similar to the Color To Leave. For example, a shot of a basketball game could be decolored except for the orange of the ball itself.

46
Luma Corrector effect The Luma Corrector effect lets you adjust the brightness and contrast in the highlights, midtones, and shadows of a clip. You can also specify the color range to be corrected by using the Secondary Color Correction controls.

47
Luma Curve effect The Luma Curve effect adjusts the brightness and contrast of a clip using a curve adjustment. You can also specify the color range to be corrected by using the Secondary Color Correction controls.

48
RGB Color Corrector effect The RGB Color Corrector effect adjusts the color in a clip by applying adjustments to the tonal ranges that you define for the highlights, midtones, and shadows. The effect lets you make tonal adjustments to each color channel individually. You can also specify the color range to be corrected by using the Secondary Color Correction controls.

49
RGB Curves effect The RGB Curves effect adjusts a clip’s color using curve adjustments for each color channel. Each curve lets you adjust up to 16 different points throughout an image’s tonal range. You can also specify the color range to be corrected by using the Secondary Color Correction controls.

50
Three-Way Color Corrector effect The Three-Way Color Corrector effect lets you make subtle corrections by adjusting a clip’s hue, saturation, and brightness for the shadow, midtones, and highlights. You can further refine your adjustments by specifying the color range to be corrected by using the Secondary Color Correction controls.

51
Tint effect The Tint effect alters an image’s color information. For each pixel, the luminance value specifies a blend between two colors. Map Black To and Map White To specify to which colors dark and bright pixels are mapped. Intermediate pixels are assigned intermediate values. Amount To Tint specifies the intensity of the effect

52
Video Limiter effect The Video Limiter effect lets you limit the luminance and color in a clip so that they fall within parameters that you define. These parameters are useful for preserving the video as much as possible while making its signal fall within the broadcasting limits.

53
Corner Pin effect The Corner Pin effect distorts an image by changing the position of each of its four corners. Use it to stretch, shrink, skew, or twist an image, or to simulate perspective or movement that pivots from the edge of a clip, such as a door opening.

55
Lens Distortion effect The Lens Distortion effect simulates a distorted lens through which the clip is viewed.

56
Magnify effect The Magnify effect enlarges all or part of an image. This effect can act like a magnifying glass placed over an area of the image, or you can use it to scale the entire image far beyond 100% while maintaining resolution

58
Mirror effect The Mirror effect splits the image along a line and reflects one side onto the other.

59
Offset effect The Offset effect pans the image within a clip. Visual information pushed off one side of the image appears on the opposite side.

60
Spherize effect The Spherize effect distorts a layer by wrapping a region of the image onto a sphere.

61
Transform effect The Transform effect applies two-dimensional geometric transformations to a clip. Apply the Transform effect instead of using clip Fixed effects if you want to render clip anchor point, position, scale, or opacity settings before other Standard effects are rendered. Anchor Point, Position, Rotation, Scale, and Opacity properties function much the same as the Fixed effects.

62
Turbulent Displace effect The Turbulent Displace effect uses fractal noise to create turbulent distortions in an image. For example, use it to create flowing water, funhouse mirrors, and waving flags.

64
Twirl effect The Twirl effect distorts an image by rotating a clip around its center. The image is distorted more sharply in its center than at the edges, causing a whirlpool result at extreme settings.

65
Wave Warp effect The Wave Warp effect produces the appearance of a wave traveling across an image. You can produce a variety of different wave shapes, including square, circular, and sine waves. The Wave Warp effect is automatically animated at a constant speed across the time range (without keyframes). To vary speeds, you need to set keyframes.
. To vary speeds, you need to set keyframes..")
66
4-Color Gradient effect The 4-Color Gradient effect produces a four- color gradient. You define the gradient by four effect points, the positions, and colors of which can be animated using the Positions & Colors controls. The gradient is composed of four solid-color circles blended together, each with an effect point as its center.

67
Cell Pattern effect The Cell Pattern effect generates cellular patterns based on cellular noise. Use it to create static or moving background textures and patterns. The patterns can be used in turn as textured mattes, as transition maps, or as a source for displacement maps.

69
Checkerboard effect The Checkerboard effect creates a checkerboard pattern of rectangles, half of which are transparent.

71
Circle effect The Circle effect creates either a customizable solid circle or ring.

72
Ellipse effect The Ellipse effect draws an ellipse.

74
Eyedropper Fill effect The Eyedropper Fill effect applies a sampled color to the source clip. This effect is useful for quickly picking a solid color from a sample point on the original clip or picking a color value from one clip and using blend modes to apply this color to a second clip.

76
Grid effect Use the Grid effect to create a customizable grid. Render this grid in a color matte or as a mask in the alpha channel of the source clip. This effect is good for generating design elements and mattes within which other effects can be applied.

78
Lens Flare effect The Lens Flare effect simulates the refraction caused by shining a bright light into the camera lens.

79
Lightning effect The Lightning effect creates lightning bolts, Jacob’s Ladders, and other electrical visuals between two specified points in a clip. The Lightning effect is automatically animated without keyframes across the time range of the clip.

80
Paint Bucket effect The Paint Bucket effect is a nondestructive paint effect that fills an area with a solid color. It works much like the Paint Bucket tool in Adobe Photoshop. Use Paint Bucket for colorizing cartoon-type outlined drawings or replacing areas of color in an image.

82
Ramp effect The Ramp effect creates a color gradient. You can create linear or radial ramps and vary the position and colors of the ramp over time. Use the Start Of Ramp and End Of Ramp properties to specify the start and end positions. Use the Ramp Scatter control to disperse the ramp colors and eliminate banding.

83
Write-on effect The Write-on effect animates strokes on a clip. For example, you can simulate the action of hand-writing of cursive text or signatures.

85
Black & White effect The Black & White effect converts any color clip to grayscale; that is, colors appear as shades of gray. You cannot animate this effect with keyframes.

86
Color Balance (RGB) effect The Color Balance (RGB) effect changes the amount of red, green, and blue in a clip.
 effect The Color Balance (RGB) effect changes the amount of red, green, and blue in a clip.")
87
Color Pass effect The Color Pass effect converts a clip to grayscale, with the exception of a single specified color. Use the Color Pass effect to highlight a particular area of a clip. For example, in a clip of a basketball game, you could highlight the basketball by selecting and preserving its color, while keeping the rest of the clip displayed in grayscale. Note, however, that with the Color Pass effect, you can isolate only colors, not objects within the clip.

88
Color Replace effect The Color Replace effect replaces all occurrences of a selected color with a new color, preserving any gray levels. Using this effect, you could change the color of an object in an image by selecting it and then adjusting the controls to create a different color.

89
Gamma Correction effect The Gamma Correction effect lightens or darkens a clip without substantially changing the shadows and highlights. It does this by changing the brightness levels of the midtones (the middle-gray levels), while leaving the dark and light areas unaffected. The default gamma setting is 10. In the effect’s Settings dialog box, you can adjust the gamma from 1 to 28
, while leaving the dark and light areas unaffected. The default gamma setting is 10. In the effect’s Settings dialog box, you can adjust the gamma from 1 to 28.")
90
Alpha Adjust effect Use the Alpha Adjust effect in place of the Opacity effect when you need to change the default render order of Fixed effects. Change the opacity percentage to create levels of transparency. The following Alpha Adjust effect settings let you interpret the alpha channel in the clip: -Ignore Alpha :Ignores the alpha channel of the clip. -Invert Alpha: Reverses the transparency and opaque areas of the clip. -Mask Only: Applies the effect only to a masked area.

91
Chromakey with the Ultra Key effect The Ultra Key effect is GPU accelerated, for improved playback and rendering performance, in computers with a supported nVIDIA card.

92
Color Key effect The Color Key effect keys out all image pixels that are similar to a specified key color. This effect modifies only the alpha channel of a clip.

94
Difference Matte effect The Difference Matte effect creates transparency by comparing a source clip with a difference clip, and then keying out pixels in the source image that match both the position and color in the difference image. Typically, it’s used to key out a static background behind a moving object, which is then placed on a different background. Often the difference clip is simply a frame of background footage (before the moving object has entered the scene). For this reason, the Difference Matte effect is best used for scenes that have been shot with a stationary camera and an unmoving background.
. For this reason, the Difference Matte effect is best used for scenes that have been shot with a stationary camera and an unmoving background..")
96
Image Matte Key effect The Image Matte Key effect keys out areas of a clip’s image based on the luminance values of a still image clip, which serves as a matte. The transparent areas reveal the image produced by clips in lower tracks. You can specify any still image clip in the project to serve as the matte; it does not have to be in the sequence. To use a moving image as the matte, use the Track Matte Key effect instead.

98
Luma Key effect The Luma Key effect keys out all the regions of a layer with a specified luminance or brightness. Use this effect if the object from which you want to create a matte has a greatly different luminance value than its background. For example, if you want to create a matte for musical notes on a white background, you can key out the brighter values; the dark musical notes become the only opaque areas.

99
Non Red Key effect The Non Red Key effect creates transparency from green or blue backgrounds. This key is similar to the Blue Screen Key effect, but it also lets you blend two clips. In addition, the Non Red Key effect helps reduce fringing around the edges of nontransparent objects. Use the Non Red Key effect to key out green screens when you need to control blending, or when the Blue Screen Key effect doesn’t produce satisfactory results.

100
Remove Matte effect The Remove Matte effect removes color fringes from clips that are premultiplied with a color. It is useful when combining alpha channels with fill textures from separate files. If you import footage with a premultiplied alpha channel, or if you create alpha channels with After Effects, you may need to remove halos from an image. Halos are caused by a large contrast between the image's color and the background, or matte, color. Removing or changing the color of the matte can remove the halos. Use Background Color to specify the new background color when you want to change the color of a matte.

101
Track Matte Key effect Move or change the transparent area with Track Matte Key The Track Matte Key reveals one clip (background clip) through another (superimposed clip), using a third file as a matte that creates transparent areas in the superimposed clip. This effect requires two clips and a matte, each placed on its own track. White areas in the matte are opaque in the superimposed clip, preventing underlying clips from showing through. Black areas in the matte are transparent, and gray areas are partially transparent.

102
A matte containing motion is called a traveling matte or moving matte. This matte consists of either motion footage, such as a green-screen silhouette, or a still image matte that has been animated. You can animate a still by applying the Motion effect to the matte. If you animate a still image, consider making the matte frame size larger than the sequence frame size so that the edges of the matte don’t come into view when you animate the matte.

104
Dust & Scratches effect The Dust & Scratches effect reduces noise and defects by changing dissimilar pixels within a specified radius to be more like their neighboring pixels. To achieve a balance between sharpness of the image and hiding defects, try various combinations of radius and threshold settings.

106
Median effect The Median effect replaces each pixel with a pixel that has the median color value of neighboring pixels with the specified Radius. At low Radius values, this effect is useful for reducing some types of noise. At higher Radius values, this effect gives an image a painterly appearance.

108
Noise effect The Noise effect randomly changes pixel values throughout the image. -Amount Of Noise: The amount of noise to add. -Noise Type: Use Color Noise to add random values to the red, green, and blue channels individually. Otherwise, the same random value is added to all channels for each pixel. -Clipping: Clips color channel values. Deselecting this option causes more apparent noise.

109
Noise Alpha effect The Noise Alpha effect adds noise to the alpha channel.

110
Noise HLS and Noise HLS Auto effects The Noise HLS effect generates static noise in clips that use still or moving source footage. The Noise HLS Auto effect automatically creates animated noise. Both effects offer various types of noise that can be added to the hue, saturation, or lightness of a clip. Controls for these effects are the same except for the final control that determines noise animation.

112
Basic 3D effect The Basic 3D effect manipulates a clip in 3D space. You can rotate an image around horizontal and vertical axes and move it toward or away from you. With Basic 3D, you can also create a specular highlight to give the appearance of light reflecting off a rotated surface. The light source for the specular highlight is always above, behind, and to the left of the viewer. Because the light comes from above, the image must be tilted backward to see this reflection. Specular highlights can enhance the realism of the 3D appearance.

114
Bevel Alpha effect The Bevel Alpha effect adds a beveled edge and lights to the alpha boundaries of an image, often giving 2D elements a 3D appearance. If the clip has no alpha channel or if the clip is completely opaque, then the effect is applied to the edges of the clip. The edge created by this effect is somewhat softer than that created by the Bevel Edges effect. This effect works well with text containing an alpha channel.

115
Bevel Edges effect The Bevel Edges effect gives a chiseled and lighted 3D appearance to the edges of an image. Edge locations are determined by the alpha channel of the source image. Unlike Bevel Alpha, the edges created in this effect are always rectangular, so images with non rectangular alpha channels don’t produce the proper appearance. All edges have the same thickness.

116
Drop Shadow effect The Drop Shadow effect adds a shadow that appears behind the clip. The shape of the Drop Shadow is determined by the clip’s alpha channel. When you add a drop shadow to a clip, a soft- edged outline of the clip’s alpha channel appears behind it, as if a shadow is cast on the background or underlying objects. Unlike most other effects, Drop Shadow can create a shadow outside the bounds of the clip (the dimensions of the clip’s source).
..")
118
Radial Shadow effect The Radial Shadow effect creates a shadow from a point light source over the clip it’s applied to, rather than from an infinite light source (as with the Drop Shadow effect). The shadow is cast from the alpha channel of the source clip, allowing the color of that clip to influence the color of the shadow as light passes through semitransparent areas.

120
Alpha Glow effect The Alpha Glow effect adds color around the edges of a masked alpha channel. You can have a single color either fade out or change to a second color as it moves away from the edge. -Glow: Controls how far the color extends from the alpha channel edge. Higher settings produce larger glows (and can cause very slow processing before playback or export). -Brightness: Controls the initial opacity of the glow. -Start Color: Shows the current glow color. Click the swatch to choose another color. -Use End Color: Lets you add an optional color at the outer edge of the glow. Fade Out: Specifies whether the colors fade out or stay solid.
. -Brightness: Controls the initial opacity of the glow. -Start Color: Shows the current glow color. Click the swatch to choose another color. -Use End Color: Lets you add an optional color at the outer edge of the glow. Fade Out: Specifies whether the colors fade out or stay solid..")
121
Brush Strokes effect The Brush Strokes effect applies a rough painted look to an image. You can also use this effect to achieve a pointillist style by setting the length of the brush strokes to 0 and increasing the stroke density. Although you specify the direction of strokes, they are scattered randomly by a small amount to give a more natural result. This effect alters the alpha channel, as well as the color channels; if you’ve masked out a portion of the image, the brush strokes paint over the edges of the mask.

123
Color Emboss effect The Color Emboss effect works like the Emboss effect, without suppressing the image’s original colors.

124
Emboss effect The Emboss effect sharpens the edges of objects in the image and suppresses colors. The effect also highlights the edges from a specified angle.

125
Find Edges effect The Find Edges effect identifies the areas of the image that have significant transitions and emphasizes the edges. Edges can appear as dark lines against a white background or colored lines against a black background. If the Find Edges effect is applied, images often look like sketches or photographic negatives of the original. -Invert: Inverts the image after the edges are found. When Invert isn’t selected, edges appear as dark lines on a white background. When Invert is selected, edges appear as bright lines on a black background.

126
Mosaic effect The Mosaic effect fills a clip with solid-color rectangles, pixelating the original image. This effect is useful for simulating low-resolution displays and for obscuring faces. You can also animate it for a transition. -Horizontal/Vertical Blocks: The number of blocks in each row and column. -Sharp Colors: Gives each tile the color of the pixel in the center of the corresponding region in the original image. Otherwise, each tile is given the average color of the corresponding region in the original image.

127
Posterize effect The Posterize effect lets you specify the number of tonal levels (or brightness values) for each channel in an image. The Posterize effect then maps pixels to the closest matching level. For example, choosing two tonal levels in an RGB image gives you two tones for red, two tones for green, and two tones for blue. Values range from 2 to 255. -Level: The number of tonal levels for each channel.

128
Replicate effect The Replicate effect divides the screen into tiles and displays the whole image in each tile. Set the number of tiles per column and row by dragging the slider

129
Roughen Edges effect The Roughen Edges effect roughs up the edges of a clip’s alpha channel by using calculations. It gives rasterized text or graphics a naturally rough look, like that of eroded metal or typewriter text.

131
Solarize effect The Solarize effect creates a blend between a negative and positive image, causing the image to appear to have a halo. This effect is analogous to briefly exposing a print to light during developing.

132
Strobe Light effect The Strobe Light effect performs an arithmetic operation on a clip or makes the clip transparent at periodic or random intervals. For example, every five seconds the clip could become completely transparent for one-tenth of a second, or a clip’s colors could invert at random intervals

133
Texturize effect The Texturize effect gives a clip the appearance of having the texture of another clip. For example, you could make the image of a tree appear as if it had the texture of bricks, and you can control the depth of the texture and the apparent light source. -Texture Layer: The source of the texture. -Light Direction: The angle at which light hits the texture. -Texture Contrast:The magnitude of the result. -Texture Placement: How the texture layer is applied to the clip:

134
Threshold effect The Threshold effect converts grayscale or color images to high-contrast, black-and- white images. Specify a luminance level as a threshold; all pixels that are as bright as or brighter than the threshold are converted to white, and all darker pixels are converted to black

136
Echo effect The Echo effect combines frames from different times in a clip. The Echo effect has a variety of uses, from a simple visual echo to streaking and smearing effects. The results of this effect are visible only if the clip contains motion. By default, any previously applied effects are ignored when you apply the Echo effect.

138
Posterize Time effect The Posterize Time effect locks a clip to a specific frame rate. Posterize Time is useful on its own as a special effect, but it also has more subtle uses. For example, 60-field video footage can be locked to 24 fps (and then field rendered at 60 fields per second) to give a filmlike look. This effect is sometimes called Strobe in hardware devices. Animating the value of the Frame Rate slider can give unpredictable results. For this reason, the only interpolation method allowed for the frame rate is Hold.
 to give a filmlike look. This effect is sometimes called Strobe in hardware devices. Animating the value of the Frame Rate slider can give unpredictable results. For this reason, the only interpolation method allowed for the frame rate is Hold..")
139
Camera View effect (Windows only) The Camera View effect distorts a clip by simulating a camera viewing the clip from different angles. By controlling the location of the camera, you distort the shape of the clip. -Latitude: Moves the camera vertically. The effect makes the clip appear to be flipping vertically. -Longitude: Moves the camera horizontally. The effect makes the clip appear to be flipping horizontally. -Roll: Rolls the camera, thus appearing to rotate the clip. -Focal length: Changes the focal length of the camera lens. Shorter lengths provide wider views, whereas longer focal lengths provide narrower but closer views.

140
-Distance: Sets the distance between the camera and the center of the clip. -Zoom: Enlarges or reduces the view of the clip. -Fill Color: Specifies the background color. -Fill Alpha Channel: Makes the background transparent (useful if the clip with the effect is superimposed). In the Effect Controls panel, click Setup to access this option.
. In the Effect Controls panel, click Setup to access this option..")
141
Crop effect The Crop effect trims pixels from the edges of a clip. The Left, Top, Right, and Bottom properties specify what percentage of the image to remove.

142
Edge Feather effect The Edge Feather effect lets you vignette the video in a clip by creating a soft black border on all four sides. The border width is controlled by entering an Amount value.

143
Horizontal Flip effect The Horizontal Flip effect reverses each frame in a clip from left to right; however, the clip still plays in a forward direction.

144
Horizontal Hold effect (Windows only) The Horizontal Hold effect skews the frames to the left or to the right; the effect is similar to the horizontal hold setting on a television set. Drag the slider to control the clip’s slant.

145
Vertical Flip effect The Vertical Flip effect flips a clip upside down. Keyframes cannot be applied to this effect.

146
Vertical Hold effect (Windows only) The Vertical Hold effect scrolls the clip upward; the effect is similar to adjusting the vertical hold on a television set. Keyframes cannot be applied to this effect.

147
Transition effects can be used in place of transitions for added controls. For the appearance of a transition effect, overlap clips on different video tracks, adding the effect to the overlapping clip. Keyframe the Animation Completion parameter to ramp the effect as a transition effect.

148
Block Dissolve effect The Block Dissolve effect makes a clip disappear in random blocks. The width and height of the blocks, in pixels, can be set independently.

150
Gradient Wipe effect The Gradient Wipe effect causes pixels in the clip to become transparent based on the luminance values of corresponding pixels in another video track, called the gradient layer. Dark pixels in the gradient layer cause the corresponding pixels to become transparent at a lower Transition Completion value. For example, a simple grayscale gradient layer that goes from black on the left to white on the right causes the underlying clip to be revealed from left to right as Transition Completion increases.

152
Customize a Gradient Wipe transition You can use a grayscale image as a gradient wipe. In a gradient wipe, image B fills the black area of the grayscale image and then shows through each level of gray as the transition progresses until the white area becomes transparent.

154
Linear Wipe effect The Linear Wipe effect performs a simple linear wipe of a clip in a specified direction. -Wipe Angle: The direction that the wipe travels. For example, at 90° the wipe travels from left to right.

156
Radial Wipe effect The Radial Wipe effect reveals an underlying clip using a wipe that circles around a specified point. -Start Angle: The angle at which the transition starts. With a start angle of 0°, the transition starts at the top. -Wipe: Specifies whether the transition moves clockwise or counterclockwise, or alternates between the two.

158
Venetian Blinds effect The Venetian Blinds effect reveals an underlying clip using strips of specified direction and width.

160
Cineon Converter effect The Cineon Converter effect provides a high degree of control over color conversions of Cineon frames. To use the Cineon Converter effect, import a Cineon file and add the clip to a sequence. You can then apply the Cineon Converter effect to the clip and precisely adjust the colors while interactively viewing the results in the Program monitor. Set keyframes to adjust for changes in tone over time—use keyframe interpolation and ease handles to precisely match the most irregular lighting changes, or leave the file in its default state and use the converter. The 10 bits of data available in each Cineon channel for each pixel make it easier to enhance an important range of tones while preserving overall tonal balance. By carefully specifying the range, you can create a version of the image that faithfully resembles the original.

161
Video effects SDR conform To conform HDR media to SDR, choose Effects panel > Video Effects > Video > SDR Conform. SDR conform is also available in the Effects tab of the Export settings.

162
Clip Name effect The Clip Name effect overlays the clip name display on your video to make pinpointing scenes and collaborating with team members and clients easier. Settings in the Clip Name effect let you control the display position, size, and opacity, as well as display and sound track. Position : Adjusts the horizontal and vertical position of the clip name. Size: Specifies the size of text. Opacity: Specifies the opacity of the black box behind the timecode. Display : Specifies whether to display sequence clip name, project clip name, or the clip file name. Sound Track: Specifies which video track name should be displayed

163
Timecode effect The Timecode effect overlays a timecode display on your video to make pinpointing scenes and collaborating with team members and clients easier. The timecode display indicates whether the clip is progressive or interlaced. If the clip is interlaced video, the symbol indicated whether the frame is the upper or lower field. Settings in the Timecode effect let you control the display position, size, and opacity, as well as format and source options.

Similar presentations