Download presentation
Presentation is loading. Please wait.

1
Introduction to Processing David Meredith Aalborg University Art &Technology, 3rd Semester Programming

2
Introduction Course will teach you how to build interactive, image and sound systems using the Processing language (www.processing.org)www.processing.org Recommended reading: – Shiffman, D. (2008). Learning Processing: A Beginner’s Guide to Programming Images, Animation, and Interaction. Morgan-Kaufmann. ISBN: 978-0-12-373602-4 – Rease, C. and Fry, B. (2007). Processing: A Programming Handbook for Visual Designers and Artists. MIT Press. ISBN: 978-0-262-18262-1 Shiffman book has an accompanying website: www.learningprocessing.com
. Learning Processing: A Beginner’s Guide to Programming Images, Animation, and Interaction. Morgan-Kaufmann. ISBN: – Rease, C. and Fry, B. (2007). Processing: A Programming Handbook for Visual Designers and Artists. MIT Press. ISBN: Shiffman book has an accompanying website:")
3
Overview of this lecture Pixels – Graph paper, simple shapes, grayscale, RGB, transparency Processing – Installing Processing, menus, the Sketchbook, coding, errors, reference, Play button, writing and publishing a program Interaction – setup() and draw(), mouse input Based on Chapters 1 to 3 of Shiffman (2008)
 and draw(), mouse input Based on Chapters 1 to 3 of Shiffman (2008)")
4
Graph paper Can specify a straight line by giving its end points On a normal cartesian, “xy” graph, x increases to the right and y increases upwards The Processing instruction for drawing the line above is line(1,0,4,5); “line” is the command or function in Processing for drawing a line To specify precisely which line to draw, we give the line function 4 arguments: the x and y co-ordinates of the two end points of the line
; line is the command or function in Processing for drawing a line To specify precisely which line to draw, we give the line function 4 arguments: the x and y co-ordinates of the two end points of the line")
5
Pixels The screen is divided up into tiny square areas called pixels (short for “picture cells”) Each pixel has a single colour – you cannot draw different things on different parts of the same pixel Each pixel has an x and y coordinate, but the origin is in the upper left corner of the screen (unlike a standard mathematical graph) To draw something on the screen, we simply have to set the colours of some or all of the pixels on the screen
 Each pixel has a single colour – you cannot draw different things on different parts of the same pixel Each pixel has an x and y coordinate, but the origin is in the upper left corner of the screen (unlike a standard mathematical graph) To draw something on the screen, we simply have to set the colours of some or all of the pixels on the screen")
6
Simple shapes Can build up complex graphics by combining primitive shapes: points, lines, rectangles and ellipses We’ll learn how to draw these in Processing and exactly what information we need to provide about each type of shape

7
Point For a point, we just provide the x and y co- ordinate of the pixel that has to be coloured: point(4,5);
;")
8
Line Line requires two points to specify its position: line(1,3,8,3); line function colours endpoints and all points in between to form a straight line
; line function colours endpoints and all points in between to form a straight line")
9
Rectangle Specify a rectangle by giving the coordinates of the top left corner as well as width and height rect(2,3,5,4); Draws a border in the “stroke” colour (default black), and colours in the pixels inside this border using the “fill” colour (default is white)
; Draws a border in the stroke colour (default black), and colours in the pixels inside this border using the fill colour (default is white)")
10
rectMode CENTER Can also specify a rectangle by giving its centre coordinates along with width and height But must precede rect function call with a rectMode function call that changes the rect drawing mode to CENTER (from the default which is CORNER) rectMode(CENTER); rect(3,3,5,5);
 rectMode(CENTER); rect(3,3,5,5);")
11
rectMode CORNERS If change rectMode to CORNERS, then can specify a rectangle by giving its top left and bottom right corners: rectMode(CORNERS); rect(5,5,8,7);
; rect(5,5,8,7);")
12
Ellipses Ellipses drawn like rectangles using ellipseMode to determine meaning of arguments to ellipse function Default ellipseMode is CENTER Ellipse drawn in bounding box of rectangle defined by arguments

13
Greyscale Can specify the shade of a pixel using greyscale in a black and white image 0 means black, 255 means white – 256 different values since this is the number of different values that can be stored in a byte = 8 bits

14
stroke(n), fill(n) & background(n) stroke(n) sets the greyscale colour of the outline of a shape – default is n=0, black fill(n) sets the greyscale colour of the colour inside the outline of a shape – default is n=255, white background(n) sets the greyscale colour of the background – default is grey
, fill(n) & background(n) stroke(n) sets the greyscale colour of the outline of a shape – default is n=0, black fill(n) sets the greyscale colour of the colour inside the outline of a shape – default is n=255, white background(n) sets the greyscale colour of the background – default is grey")
15
noStroke() and noFill() noStroke() makes the outline invisible noFill() makes the area inside the outline completely transparent
 and noFill() noStroke() makes the outline invisible noFill() makes the area inside the outline completely transparent")
16
RGB colour fill(r,g,b) defines fill colour using RGB code – each value of r, g and b must be between 0 and 255 red + green = yellow red + blue = magenta green + blue = cyan red + green + blue = white
 defines fill colour using RGB code – each value of r, g and b must be between 0 and 255 red + green = yellow red + blue = magenta green + blue = cyan red + green + blue = white")
17
Colour transparency Optional fourth argument to fill function that gives “alpha” – that is, degree of opacity The alpha values for an image are called its “alpha channel”

18
Processing Processing is free and open-source – “Open source” means you can download the source code if you want, customise it and find out how it works Developed by Ben Fry and Casey Rease at MIT Media Lab Built on Java – Means that you can extend it when you know enough Java Interactive development environment which lets you see immediately the effects of changes in your code For some examples of what you can do with Processing, see http://www.processing.org/exhibition/ http://www.processing.org/exhibition/ Download and install from the www.processing.org site (Very simple!)www.processing.org
")
19
The IDE (Development Environment)
")
20
Examples Can run a Processing sketch full screen by SHIFT- clicking the run button

21
Sketchbook Processing stores your programs (“sketches”) in a folder called the the “sketchbook” Sketch stored in a folder in the sketchbook as a file with a.pde extension
 in a folder called the the sketchbook Sketch stored in a folder in the sketchbook as a file with a.pde extension")
22
Coding in Processing Three types of statement in Processing: – Function calls, e.g., line(0,0,100,100); – Assignment operations, e.g., int x = 5; – Control structures, e.g., if (a == b) println(“Found it!”); For now we focus on function calls We have already met some functions: – background(), stroke(), fill(), point(), line(), rect(), rectMode(), ellipse(), ellipseMode(), noStroke(), noFill(), size()
; – Assignment operations, e.g., int x = 5; – Control structures, e.g., if (a == b) println( Found it! ); For now we focus on function calls We have already met some functions: – background(), stroke(), fill(), point(), line(), rect(), rectMode(), ellipse(), ellipseMode(), noStroke(), noFill(), size()")
23
Coding in Processing Processing simply executes the lines of code one at a time and displays the result in the output window Editor colours keywords that have a special meaning in Processing (e.g., function names) Can use println() function to print messages to the message window Number in status bar indicates current line of cursor You can write two different types of comment: – Single line comments: // This is a comment – Multi-line comments: /* This is the start of a comment that extends over a couple of lines */
 Can use println() function to print messages to the message window Number in status bar indicates current line of cursor You can write two different types of comment: – Single line comments: // This is a comment – Multi-line comments: /* This is the start of a comment that extends over a couple of lines */")
24
Errors If you make an error in your code, then you get a message when you try to run the sketch The line in which the error occurs will be highlighted Processing is case- sensitive, so “Ellipse” is not the same as “ellipse”

25
The Processing Reference Right-click on a keyword and choose “Find in Reference” to get help

26
The Play button Pressing the Play button makes your sketch run The following steps take place: 1.Your Processing sketch is translated into Java source code 2.The Java source code is compiled by the Java compiler into Java byte code 3.The Java byte code is bundled up into an executable.jar file 4.The.jar file is run by the Java Virtual Machine and the output window opens, showing you what you have made

27
The Zoog sketch smooth() enables anti-aliasing which smooths the edges of shapes – no smooth() disables anti-aliasing size(width, height) resizes the canvas – use it first in your sketch You can download examples from www.learningprocessing.com www.learningprocessing.com Remember SHIFT-clicking the Run button causes the sketch to run in full screen
 enables anti-aliasing which smooths the edges of shapes – no smooth() disables anti-aliasing size(width, height) resizes the canvas – use it first in your sketch You can download examples from Remember SHIFT-clicking the Run button causes the sketch to run in full screen")
28
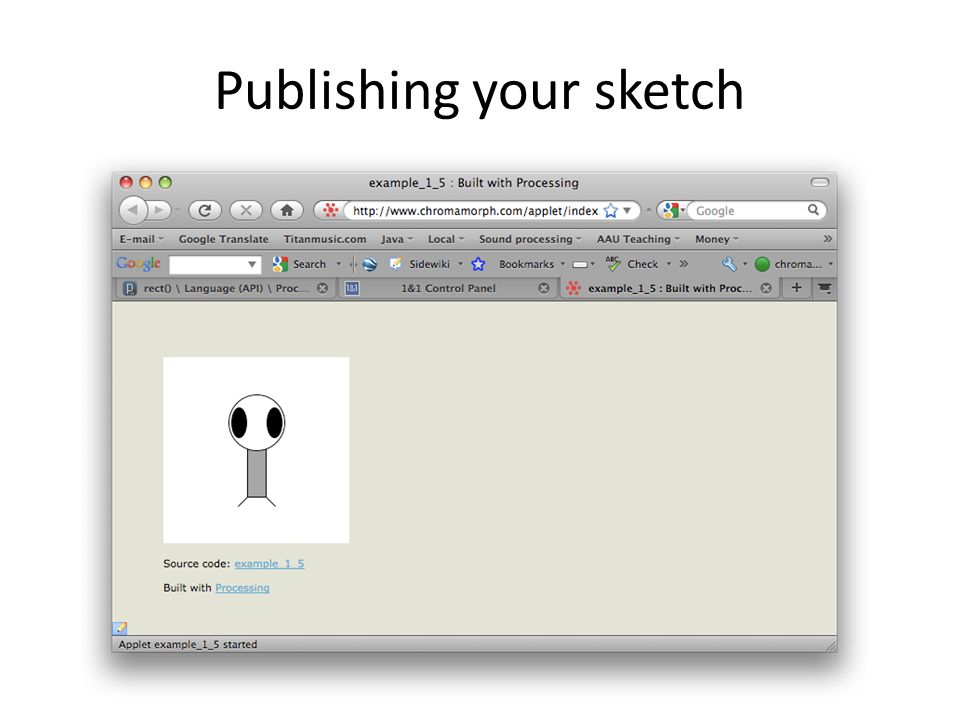
Publishing a sketch You can produce an applet from your sketch that you can upload to your web site and then run in a browser Press the Export button or choose Export from the File menu This creates a folder called “applet” in your sketch folder Upload the whole applet folder and open the index.html file in your browser

29
Publishing your sketch

30
https://87.106.101.49:4643/vz/cp
31
Interaction In an animated or interactive sketch, the image changes over time – ideally, at least 30 times per second There are two parts to writing such a sketch: 1.Setup the initial conditions for the animation 2.Draw the screen over and over again, possibly getting user input in between redraws

32
setup() and draw() Define two functions within your sketch: setup() and draw() setup() is run once when the program starts draw() is then run over and over again until the program terminates
 and draw() Define two functions within your sketch: setup() and draw() setup() is run once when the program starts draw() is then run over and over again until the program terminates")
33
Zoog as a dynamic sketch draw() executed over and over again until STOP button pressed But draws the same thing each time, so we can’t see any change!
 executed over and over again until STOP button pressed But draws the same thing each time, so we can’t see any change!")
34
Tracking the mouse’s location On each frame, Processing updates the values stored in mouseX and mouseY so that they give the current co- ordinates of the mouse pointer background() clears the display window, so see trails if leave it out of draw() Display actually updated once per cycle at the end of the draw() function
 clears the display window, so see trails if leave it out of draw() Display actually updated once per cycle at the end of the draw() function")
35
pmouseX and pmouseY

36
Drawing lines with the mouse

37
Using the mouse to control strokeWeight() abs(mouseX-pmouseX)
 abs(mouseX-pmouseX)")
38
mousePressed() and keyPressed() To get our sketch to respond to a mouse click, we have to define a function called mousePressed() which tells the program what to do when a mouse button is pressed Similarly, a function called keyPressed() defines what the program does when a key is pressed
 and keyPressed() To get our sketch to respond to a mouse click, we have to define a function called mousePressed() which tells the program what to do when a mouse button is pressed Similarly, a function called keyPressed() defines what the program does when a key is pressed")
Similar presentations


