Download presentation
Presentation is loading. Please wait.

1
SECOND GRADING TOPIC 2b: The MICROSCOPE

2
Getting to know The microscope

3
What is a microscope for? An instrument for viewing objects that are too small to be seen easily by the naked eye.

4
HISTORY : Circa 1000AD – The first vision aid was invented (inventor unknown) called a reading stone. It was a glass sphere that magnified when laid on top of reading materials. Circa 1284 - Italian, Salvino D'Armate is credited with inventing the first wearable eye glasses.eye glasses

5
THE READING STONE & FIRST EYE GLASSES

6
1590 Two Dutch eye glass makers, Zaccharias Janssen and son Hans Janssen experimented with multiple lenses placed in a tube. The Janssens observed that viewed objects in front of the tube appeared greatly enlarged, creating both the forerunner of the compound microscope and thetelescope.telescope

7
Microscopes by Janssen Zaccharias Janssen

8
1665 – English physicist, Robert Hooke looked at a sliver of cork through a microscope lens and noticed some "pores" or "cells" in it.Robert Hooke 1674 – Anton van Leeuwenhoek built a simple microscope with only one lens to examine blood, yeast, insects and many other tiny objects. Leeuwenhoek was the first person to describe bacteria, and he invented new methods for grinding and polishing microscope lenses that allowed for curvatures providing magnifications of up to 270 diameters, the best available lenses at that time.Anton van Leeuwenhoek

10
18th century – Technical innovations improved microscopes, leading to microscopy becoming popular among scientists. Lenses combining two types of glass reduced the "chromatic effect" the disturbing halos resulting from differences in refraction of light. 1830 – Joseph Jackson Lister reduces spherical aberration or the "chromatic effect" by showing that several weak lenses used together at certain distances gave good magnification without blurring the image. This was the prototype for the compound microscope.

12
1872 – Ernst Abbe, then research director of the Zeiss Optical Works, wrote a mathematical formula called the "Abbe Sine Condition". His formula provided calculations that allowed for the maximum resolution in microscopes possible.Ernst Abbe 1903 – Richard Zsigmondy developed the ultramicroscope that could study objects below the wavelength of light. He won the Nobel Prize in Chemistry in 1925.

13
Ultramicroscope

14
1932 – Frits Zernike invented the phase-contrast microscope that allowed for the study of colorless and transparent biological materials for which he won the Nobel Prize in Physics in 1953. 1931 – Ernst Ruska co-invented the electron microscope for which he won the Nobel Prize in Physics in 1986. An electron microscope depends on electrons rather than light to view an object, electrons are speeded up in a vacuum until their wavelength is extremely short, only one hundred-thousandth that of white light. Electron microscopes make it possible to view objects as small as the diameter of an atom.electron microscope

15
PHASECONTRASTPHASECONTRAST MICROSCOPeMICROSCOPe

16
1981 Gerd Binnig and Heinrich Rohrer invented the scanning tunneling microscope that gives three-dimensional images of objects down to the atomic level. Binnig and Rohrer won the Nobel Prize in Physics in 1986. The powerful scanning tunneling microscope is the strongest microscope to date.scanning tunneling microscope

17
Scanning Tunnelling Microscope and images

18
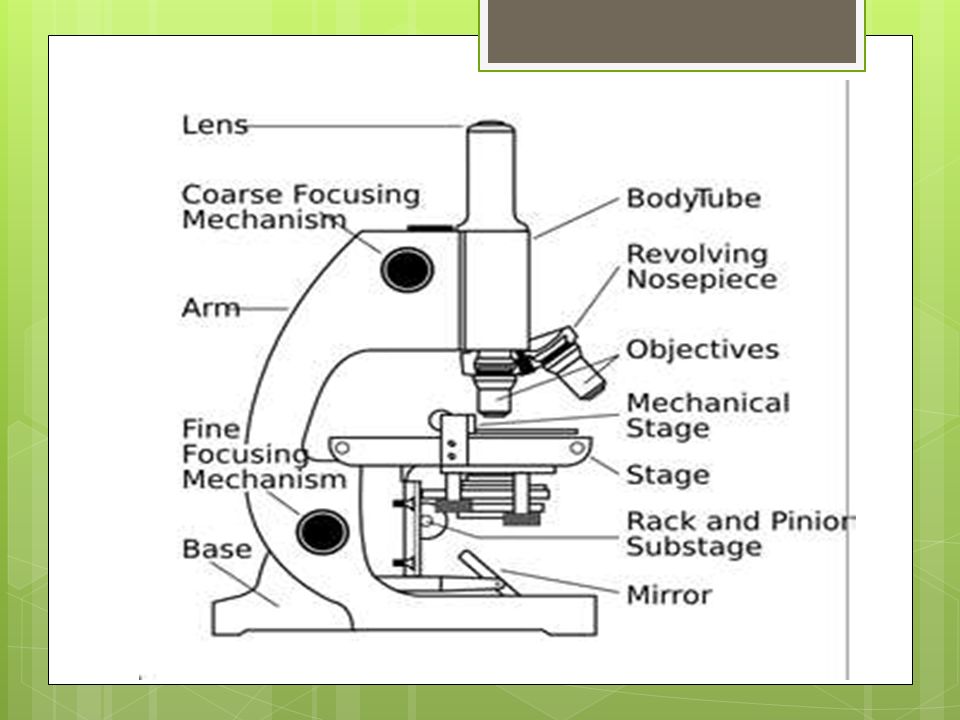
Parts & Functions of the Microscope

19
The compound microscope uses lenses and light to enlarge the image and is also called an optical or light microscope. The simplest optical microscope is the magnifying glass and is good to about ten times (10X) magnification.
 magnification..")
20
The compound microscope has two systems of lenses for greater magnification, 1) the ocular, or eyepiece lens that one looks into and 2) the objective lens, or the lens closest to the object.
 the ocular, or eyepiece lens that one looks into and 2) the objective lens, or the lens closest to the object.")
22
Eyepiece Lens: the lens at the top that you look through. They are usually 10X or 15X power. Tube : Connects the eyepiece to the objective lenses Arm : Supports the tube and connects it to the base Base : The bottom of the microscope, used for support Illuminator: A steady light source (110 volts) used in place of a mirror. If your microscope has a mirror, it is used to reflect light from an external light source up through the bottom of the stage.
 used in place of a mirror. If your microscope has a mirror, it is used to reflect light from an external light source up through the bottom of the stage..")
23
Stage: The flat platform where you place your slides. Stage clips hold the slides in place. If your microscope has a mechanical stage, you will be able to move the slide around by turning two knobs. One moves it left and right, the other moves it up and down. Objective Lenses : Usually you will find 3 or 4 objective lenses on a microscope. They almost always consist of 4X, 10X, 40X and 100X powers. shortest lens is the lowest power, the longest one is the lens with the greatest power. Revolving Nosepiece or Turret : This is the part that holds two or more objective lenses and can be rotated to easily change power.

24
Condenser Lens : The purpose of the condenser lens is to focus the light onto the specimen. Condenser lenses are most useful at the highest powers (400X and above). Diaphragm or Iris: Many microscopes have a rotating disk under the stage. This diaphragm has different sized holes and is used to vary the intensity and size of the cone of light that is projected upward into the slide
. Diaphragm or Iris: Many microscopes have a rotating disk under the stage. This diaphragm has different sized holes and is used to vary the intensity and size of the cone of light that is projected upward into the slide.")
25
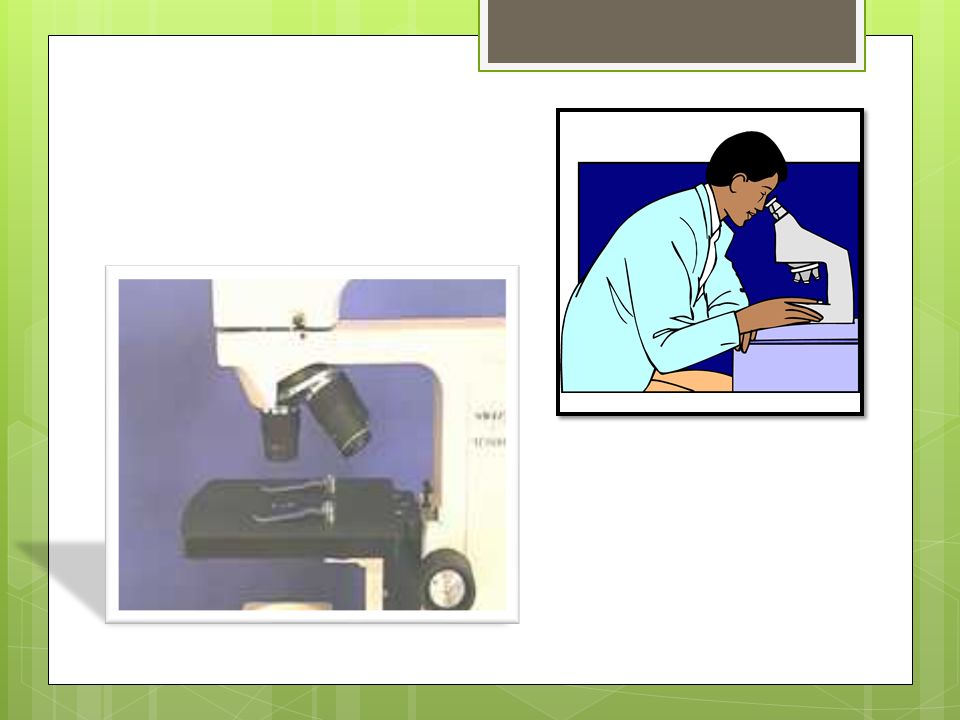
Proper Handling of the Microscope: The are a number of important procedures to follow when using a microscope. Review the points that follow.

26
1. Always carry the microscope in an upright position with two hands. One hand should support the base and the other should be on the arm.

27
2. Sunlight should not be used as a source of light for microscopes that have a mirror rather than a projection lens.

28
3. Use lens paper and lens cleaning solution to clean the lenses on the microscope. Paper towel will scratch the lenses. Use a soft cloth to Clean other parts Of the microscope.

29
4. Always set your microscope on a clean, flat surface. 5. Always remove slides from the stage and rotate the nosepiece to the lowest power before returning the microscope to its storage area.

Similar presentations


, is given credit as the “Father of Microscopy”. He developed simple microscopes that used only.>")

