Download presentation
Presentation is loading. Please wait.

1
The Compound Light Microscope
Students will have their microscopes out, for reference as we go through each of the steps. As an introduction, students will be asked what kinds of things they can do with this tool.

2
What is the Compound Light Microscope?
A tool to magnify small objects

3
How does it work? A lens is a curved piece of glass that bends light to make an image smaller or larger.

4
How does it work? A microscope has either one or two lenses.
As light passes through each lens, the image gets larger.

5
Early Microscopes 1 lens Compound means more than one! 1 lens 2 lenses

6
2 lenses

9
Microscope Parts This is the exact version of the microscope used in class. Students will be identifying the parts on the microscopes at their desks as we go along and what their functions are.

10
Microscope Parts Eyepiece Body Tube Arm Objective Lenses Aperture
Nosepiece Arm Objective Lenses Aperture Stage Stage Clips Coarse Adjustment Knob This is the exact version of the microscope used in class. Students will be identifying the parts on the microscopes at their desks as we go along and what their functions are. Diaphragm Fine Adjustment Knob Light Source Base Power Switch

11
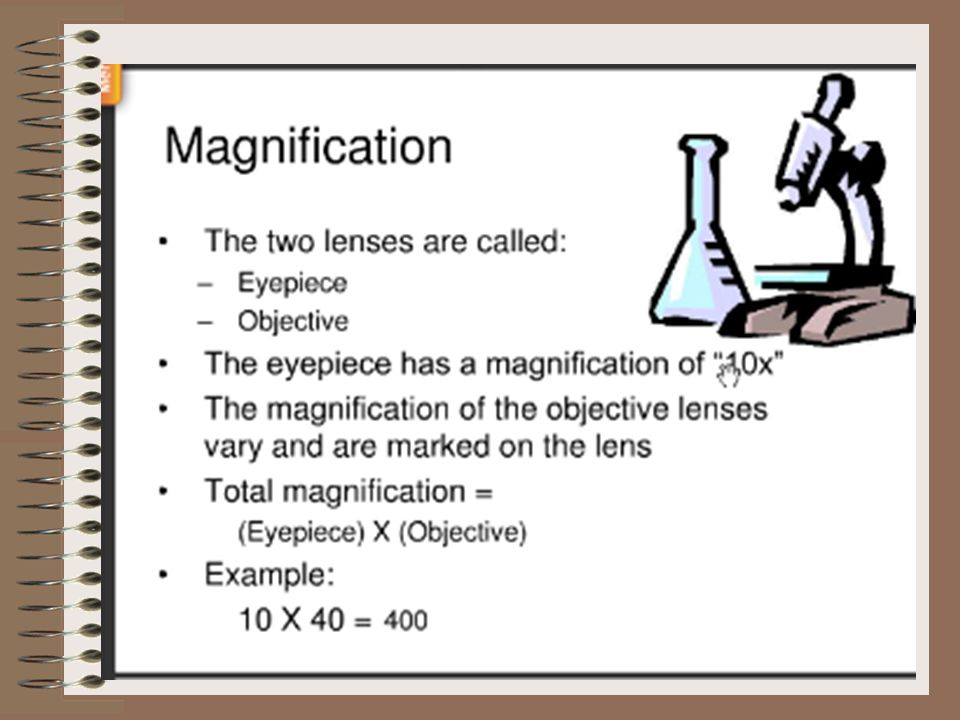
Microscope Parts Contains a lens to magnify 10X Eyepiece
This is the exact version of the microscope used in class. Students will be identifying the parts on the microscopes at their desks as we go along and what their functions are.

12
Microscope Parts Separates the lenses Body Tube
This is the exact version of the microscope used in class. Students will be identifying the parts on the microscopes at their desks as we go along and what their functions are.

13
Microscope Parts A handhold to carry the microscope Arm
This is the exact version of the microscope used in class. Students will be identifying the parts on the microscopes at their desks as we go along and what their functions are.

14
Microscope Parts Nosepiece Holds the objective lenses. Rotates to change magnification This is the exact version of the microscope used in class. Students will be identifying the parts on the microscopes at their desks as we go along and what their functions are.

15
Microscope Parts 3 different lenses to magnify 4x, 10x or 40x
Objective Lenses 3 different lenses to magnify 4x, 10x or 40x This is the exact version of the microscope used in class. Students will be identifying the parts on the microscopes at their desks as we go along and what their functions are.

16
Microscope Parts To hold the slide Stage
This is the exact version of the microscope used in class. Students will be identifying the parts on the microscopes at their desks as we go along and what their functions are.

17
Microscope Parts To secure the slide Stage Clips
This is the exact version of the microscope used in class. Students will be identifying the parts on the microscopes at their desks as we go along and what their functions are. To secure the slide

18
Microscope Parts A hole that lets light pass through Aperture
This is the exact version of the microscope used in class. Students will be identifying the parts on the microscopes at their desks as we go along and what their functions are.

19
Microscope Parts Regulates the amount of light Diaphragm
This is the exact version of the microscope used in class. Students will be identifying the parts on the microscopes at their desks as we go along and what their functions are. Diaphragm Regulates the amount of light

20
Microscope Parts Directs light up to the eyepiece Light Source
This is the exact version of the microscope used in class. Students will be identifying the parts on the microscopes at their desks as we go along and what their functions are. Light Source Directs light up to the eyepiece

21
Microscope Parts Turns on the light Power Switch
This is the exact version of the microscope used in class. Students will be identifying the parts on the microscopes at their desks as we go along and what their functions are. Turns on the light Power Switch

22
Microscope Parts Focuses the image at low power Coarse Adjustment Knob
This is the exact version of the microscope used in class. Students will be identifying the parts on the microscopes at their desks as we go along and what their functions are. Focuses the image at low power

23
Microscope Parts Focuses the image at high power Fine Adjustment Knob
This is the exact version of the microscope used in class. Students will be identifying the parts on the microscopes at their desks as we go along and what their functions are. Fine Adjustment Knob Focuses the image at high power

24
Microscope Parts Supports the microscope Base
This is the exact version of the microscope used in class. Students will be identifying the parts on the microscopes at their desks as we go along and what their functions are. Supports the microscope Base

26
Quiz

27
Using the Microscope Turn on the power.
Place the Slide on the Microscope Use Stage Clips (optional) Click Nosepiece to the 4X Low power Look into the Eyepiece Move the slide until you see the specimen. Use the Coarse Knob to focus it. Then use the Fine Knob to focus it. Give students a slide from the “common things” set, each student will practice focusing and changing objectives.
 Click Nosepiece to the 4X Low power. Look into the Eyepiece. Move the slide until you see the specimen. Use the Coarse Knob to focus it. Then use the Fine Knob to focus it. Give students a slide from the common things set, each student will practice focusing and changing objectives.")
28
Using High Power 1. Follow steps to focus using low power (it must be in focus at low power first!) 2. Click the nosepiece to the next longest objective - 10X power 3. Do NOT use the Coarse Focusing Knob 4. Use the Fine Focus Knob to bring the slide into focus. 5. If you can’t see the object, start over at low power. Have students exchange slides so they can look at different things, walk them through using the high power objective to focus slides. Emphasize not using the coarse objective during this process, as it will crack the slides.

29
Using the Microscope 1. Turn on the ________________.
2. Place the _____ on the Microscope. 3. Use Stage ________ (optional). 4. Click ________ to the _____Low power 5. Look into the ___________ 6. Move the slide until you see the ___________. 7. Use the ________ Knob to focus it. 8. Then use the ________ Knob to focus it. Give students a slide from the “common things” set, each student will practice focusing and changing objectives.
. 4. Click ________ to the. _____Low power. 5. Look into the ___________. 6. Move the slide until you see the ___________. 7. Use the ________ Knob to focus it. 8. Then use the ________ Knob to focus it. Give students a slide from the common things set, each student will practice focusing and changing objectives.")
30
Using High Power 1. Follow steps to focus using low power (it must be in focus at _________first!) 2. Click the _________ to the next longest objective - _______ power 3. Do NOT use the _______ Focusing Knob 4. Use the ____Focus Knob to bring the slide into focus. 5. If you can’t see the object, start over at ___________. Have students exchange slides so they can look at different things, walk them through using the high power objective to focus slides. Emphasize not using the coarse objective during this process, as it will crack the slides.

31
Types of Microscopes Compound Dissecting SEM TEM

32
Compound Light Microscope
The most common in biology classrooms Uses light to pass through a specimen Used different lenses Magnifies up to 1500 X Ours will magnify 400 X View living or non-living

33
Dissecting (Stereoscope)
Uses light to observe a larger specimen. Has one lens Around 50 X Can view things 3-D Can view living or non-living things.

34
SEM (Scanning Electron Microscope)
Uses electrons (not light) Specimens are dead Scans the surface of a specimen Produces a 3-D image 100,000 X
 Specimens are dead. Scans the surface of a specimen. Produces a 3-D image. 100,000 X.")
35
SEM images

36
TEM (Transmission Electron Microscope)
Uses electrons (not light) Specimens are dead Transmits electrons through a specimen Produces a 2-D image 1,000,000 X
 Specimens are dead. Transmits electrons through a specimen. Produces a 2-D image. 1,000,000 X.")
37
TEM images

38
Make a Venn Diagram comparing: compound microscope, SEM, TEM.

Similar presentations
- focuses image under lowest power. Cannot use with other lenses. 2.Fine adjustment knob (E)- used to focus images under.>")


