Download presentation
Presentation is loading. Please wait.

1
Multimedia Capture & storage

2
Introduction A rich set of API for recording of audio & video. A developer has two choices launch the built-in app using intent use the in-app mechanism (more flexibility & fine grained control).
..")
3
Built-in app mechanism Recording audio using intent 1 Intent intent= new Intent( MediaStore.Audio.Media.RECORD_SOUND_ACTION); 2 startActivityForResult(intent,REQUEST_CODE); Recording video using intent 1 Intent intent = new Intent (MediaStore.ACTION_VIDEO_CAPTURE); 2 intent.putExtra(MediaStore.EXTRA_VIDEO_QUALITY,1); 3 startActivityForResult(intent,REQUEST_CODE);
; 2 startActivityForResult(intent,REQUEST_CODE); Recording video using intent 1 Intent intent = new Intent (MediaStore.ACTION_VIDEO_CAPTURE); 2 intent.putExtra(MediaStore.EXTRA_VIDEO_QUALITY,1); 3 startActivityForResult(intent,REQUEST_CODE);")
4
CAPTURE IMAGE USING AN INTENT Intent intent = new Intent(MediaStore.ACTION_IMAGE_CAPTURE); String filepath=Environment.getExternalStorageDirectory()+ “/mypicture.jpg”; File myImage = new File(filepath); Uri imageUri = Uri.fromFile(myImage); intent.putExtra(MediaStore.EXTRA_OUTPUT,imageUri); startActivityForResult(intent,REQUEST_CODE);
; String filepath=Environment.getExternalStorageDirectory()+ /mypicture.jpg ; File myImage = new File(filepath); Uri imageUri = Uri.fromFile(myImage); intent.putExtra(MediaStore.EXTRA_OUTPUT,imageUri); startActivityForResult(intent,REQUEST_CODE);")
5
IN-APP MECHANISM More control & flexibility. MediaRecorder API is used. Steps 1.MediaRecorder object is created & take it to initial state. 2.It is assigned with input sources to record from(using setAudioSource()/setVedioSource()). 3.Define the output format(using setOutputFormat()) & take to data source configured state 4.setAudioEncoder()/setVedioEncoder() for media encoding
/setVedioSource()). 3.Define the output format(using setOutputFormat()) & take to data source configured state 4.setAudioEncoder()/setVedioEncoder() for media encoding.")
6
5. setVideoFrameRate()/setVideoSize() used to specify the frame rate & output size 6.The setOutputFile() used to set the path of the output file. MediaRecorder object moves to prepared state by calling prepare(). The recording by start() then correspondingly use stop() & release().
/setVideoSize() used to specify the frame rate & output size 6.The setOutputFile() used to set the path of the output file. MediaRecorder object moves to prepared state by calling prepare(). The recording by start() then correspondingly use stop() & release()..")
7
The key life-cycle methods & states of the MediaRecorder objects are setAudioSource()/setVedioSource() Initialized setOutputFormat() datasource configured prepare() prepared start() recording stop() Initial release() released
/setVedioSource() Initialized setOutputFormat() datasource configured prepare() prepared start() recording stop() Initial release() released")
10
The general steps for creating a custom camera interface for your application are as follows: Detect and Access Camera - Create code to check for the existence of cameras and request access. Create a Preview Class - Create a camera preview class that extends SurfaceView and implements the SurfaceHolder interface. This class previews the live images from the camera. Build a Preview Layout - Once you have the camera preview class, create a view layout that incorporates the preview and the user interface controls you want.

11
Setup Listeners for Capture - Connect listeners for your interface controls to start image or video capture in response to user actions, such as pressing a button. Capture and Save Files - Setup the code for capturing pictures or videos and saving the output. Release the Camera - After using the camera, your application must properly release it for use by other applications.

12
Detecting camera hardware If your application does not specifically require a camera using a manifest declaration, you should check to see if a camera is available at runtime. To perform this check, use the PackageManager.hasSystemFeature() method
 method.")
13
Android devices can have multiple cameras, for example a back-facing camera for photography and a front-facing camera for video calls. Android 2.3 (API Level 9) and later allows you to check the number of cameras available on a device using the Camera.getNumberOfCameras() method.
 and later allows you to check the number of cameras available on a device using the Camera.getNumberOfCameras() method..")
14
Checking camera features Camera.getParameters() Once you obtain access to a camera, you can get further information about its capabilities using the Camera.getParameters() method and checking the returned Camera.Parameters object for supported capabilities. Camera.getCameraInfo() When using API Level 9 or higher, use the Camera.getCameraInfo() to determine if a camera is on the front or back of the device, and the orientation of the image.
 When using API Level 9 or higher, use the Camera.getCameraInfo() to determine if a camera is on the front or back of the device, and the orientation of the image..")
15
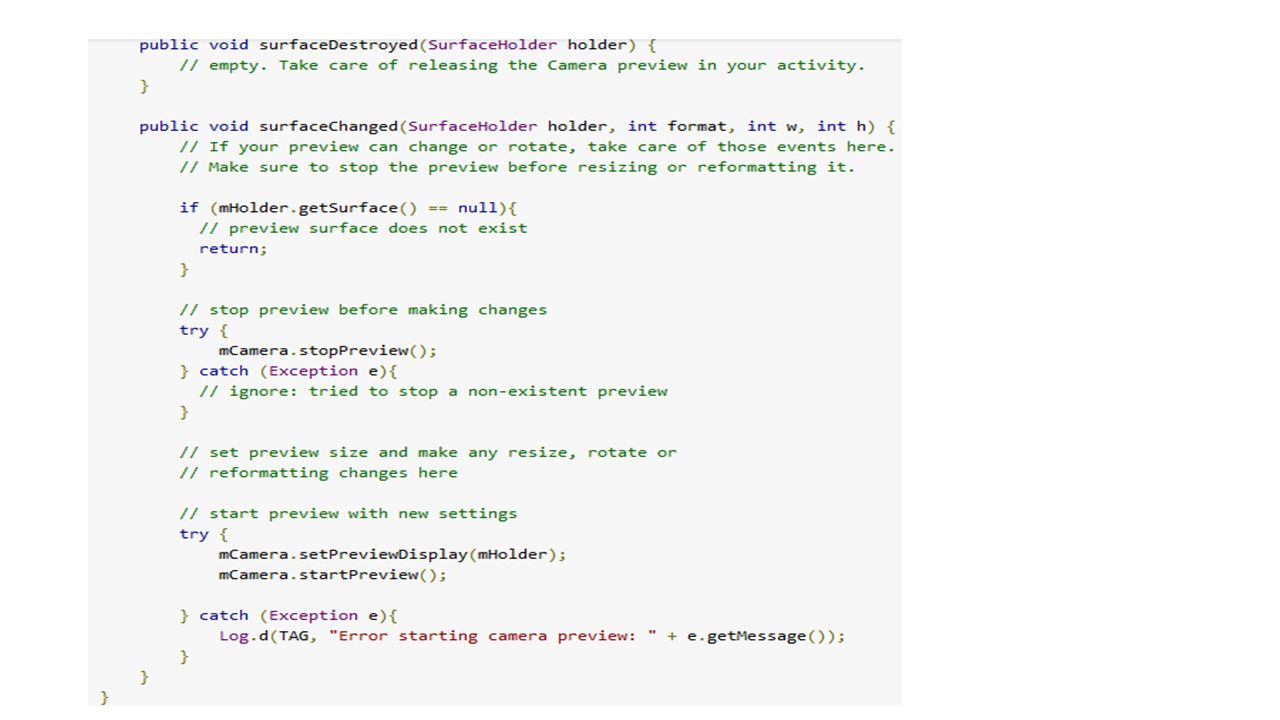
Creating a preview class For users to effectively take pictures or video, they must be able to see what the device camera sees. SurfaceView A camera preview class is a SurfaceView that can display the live image data coming from a camera, so users can frame and capture a picture or video.

16
The following example code demonstrates how to create a basic camera preview class that can be included in a View layout. This class implements SurfaceHolder.Callback in order to capture the callback events for creating and destroying the view, which are needed for assigning the camera preview input.

18
On most devices, the default orientation of the camera preview is landscape. For simplicity in rendering a camera preview, you should change your application's preview activity orientation to landscape by adding the following to your manifest.

19
The following example shows how to modify a camera activity to attach the preview class shown in Creating a preview class.

20
Capturing pictures In your application code, you must set up listeners for your user interface controls to respond to a user action by taking a picture. Camera.takePicture() In order to retrieve a picture, use the Camera.takePicture() method. This method takes three parameters which receive data from the camera. Camera.PictureCallback In order to receive data in a JPEG format, you must implement an Camera.PictureCallback interface to receive the image data and write it to a file.
 In order to retrieve a picture, use the Camera.takePicture() method. This method takes three parameters which receive data from the camera. Camera.PictureCallback In order to receive data in a JPEG format, you must implement an Camera.PictureCallback interface to receive the image data and write it to a file..")
21
example

22
Trigger capturing an image by calling the Camera.takePicture() method. The following example code shows how to call this method from a button View.OnClickListener

23
Capturing videos MediaRecorder class Video capture using the Android framework requires careful management of the Camera object and coordination with the MediaRecorder class. Camera.lock() Camera.unlock() Camera.open() Camera.release() When recording video with Camera, you must manage the Camera.lock() and Camera.unlock() calls to allow MediaRecorder access to the camera hardware, in addition to the Camera.open() and Camera.release() calls.
 Camera.unlock() Camera.open() Camera.release() When recording video with Camera, you must manage the Camera.lock() and Camera.unlock() calls to allow MediaRecorder access to the camera hardware, in addition to the Camera.open() and Camera.release() calls..")
24
Unlike taking pictures with a device camera, capturing video requires a very particular call order. You must follow a specific order of execution to successfully prepare for and capture video with your application, as detailed below. Camera.open() Open Camera - Use the Camera.open() to get an instance of the camera object. Camera.setPreviewDisplay(). Connect Preview - Prepare a live camera image preview by connecting a SurfaceView to the camera using Camera.setPreviewDisplay(). Camera.startPreview() Start Preview - Call Camera.startPreview() to begin displaying the live camera images.
 Open Camera - Use the Camera.open() to get an instance of the camera object. Camera.setPreviewDisplay(). Connect Preview - Prepare a live camera image preview by connecting a SurfaceView to the camera using Camera.setPreviewDisplay(). Camera.startPreview() Start Preview - Call Camera.startPreview() to begin displaying the live camera images..")
25
Start Recording Video - The following steps must be completed in order to successfully record video: Camera.unlock() Unlock the Camera - Unlock the camera for use by MediaRecorder by calling Camera.unlock(). Configure MediaRecorder - Call in the following MediaRecorder methods in this order. setCamera() setCamera() - Set the camera to be used for video capture, use your application's current instance of Camera. setAudioSource() setAudioSource() - Set the audio source, use MediaRecorder.AudioSource.CAMCORDER. setVideoSource() setVideoSource() - Set the video source, use MediaRecorder.VideoSource.CAMERA.
 setCamera() - Set the camera to be used for video capture, use your application s current instance of Camera. setAudioSource() setAudioSource() - Set the audio source, use MediaRecorder.AudioSource.CAMCORDER. setVideoSource() setVideoSource() - Set the video source, use MediaRecorder.VideoSource.CAMERA..")
26
Set the video output format and encoding. setOutputFormat() setOutputFormat() - Set the output format, specify the default setting or MediaRecorder.OutputFormat.MPEG_4. setAudioEncoder() setAudioEncoder() - Set the sound encoding type, specify the default setting or MediaRecorder.AudioEncoder.AMR_NB. setVideoEncoder() setVideoEncoder() - Set the video encoding type, specify the default setting or MediaRecorder.VideoEncoder.MPEG_4_SP.
 setOutputFormat() - Set the output format, specify the default setting or MediaRecorder.OutputFormat.MPEG_4. setAudioEncoder() setAudioEncoder() - Set the sound encoding type, specify the default setting or MediaRecorder.AudioEncoder.AMR_NB. setVideoEncoder() setVideoEncoder() - Set the video encoding type, specify the default setting or MediaRecorder.VideoEncoder.MPEG_4_SP..")
27
setOutputFile() setOutputFile() - Set the output file, use getOutputMediaFile(MEDIA_TYPE_VIDEO).toString() from the example method in the Saving Media Files section. setPreviewDisplay() setPreviewDisplay() - Specify the SurfaceView preview layout element for your application. Use the same object you specified for Connect Preview.
 setPreviewDisplay() - Specify the SurfaceView preview layout element for your application. Use the same object you specified for Connect Preview..")
28
Stop Recording Video - Call the following methods in order, to successfully complete a video recording: Stop MediaRecorder MediaRecorder.stop() Stop MediaRecorder - Stop recording video by calling MediaRecorder.stop(). MediaRecorder.reset() Reset MediaRecorder - Optionally, remove the configuration settings from the recorder by calling MediaRecorder.reset(). MediaRecorder.release() Release MediaRecorder - Release the MediaRecorder by calling MediaRecorder.release(). Camera.lock() Lock the Camera - Lock the camera so that future MediaRecorder sessions can use it by calling Camera.lock().
 Reset MediaRecorder - Optionally, remove the configuration settings from the recorder by calling MediaRecorder.reset(). MediaRecorder.release() Release MediaRecorder - Release the MediaRecorder by calling MediaRecorder.release(). Camera.lock() Lock the Camera - Lock the camera so that future MediaRecorder sessions can use it by calling Camera.lock()..")
29
Camera.stopPreview(). Stop the Preview - When your activity has finished using the camera, stop the preview using Camera.stopPreview(). Camera.release() Release Camera - Release the camera so that other applications can use it by calling Camera.release().
. Camera.release() Release Camera - Release the camera so that other applications can use it by calling Camera.release()..")
30
Releasing the camera Cameras are a resource that is shared by applications on a device. Activity.onPause() Your application can make use of the camera after getting an instance of Camera, and you must be particularly careful to release the camera object when your application stops using it, and as soon as your application is paused (Activity.onPause())
 Your application can make use of the camera after getting an instance of Camera, and you must be particularly careful to release the camera object when your application stops using it, and as soon as your application is paused (Activity.onPause()).")
31
To release an instance of the Camera object, use the Camera.release() method
 method")
32
Saving Media Files Media files created by users such as pictures and videos should be saved to a device's external storage directory (SD Card) to conserve system space and to allow users to access these files without their device. there are only two standard locations you should consider as a developer: Environment.getExternalStoragePublicDirectory(Environment.DIRECT ORY_PICTURES) Context.getExternalFilesDir(Environment.DIRECTORY_PICTURES)
 Context.getExternalFilesDir(Environment.DIRECTORY_PICTURES).")
33
Environment.getExternalStoragePublicDir ectory(Environment.DIRECTORY_PICTU RES) This method returns the standard, shared and recommended location for saving pictures and videos. This directory is shared (public), so other applications can easily discover, read, change and delete files saved in this location. If your application is uninstalled by the user, media files saved to this location will not be removed. To avoid interfering with users existing pictures and videos, you should create a sub-directory for your application's media files within this directory.
, so other applications can easily discover, read, change and delete files saved in this location. If your application is uninstalled by the user, media files saved to this location will not be removed. To avoid interfering with users existing pictures and videos, you should create a sub-directory for your application s media files within this directory..")
34
Context.getExternalFilesDir(Environment. DIRECTORY_PICTURES) This method returns a standard location for saving pictures and videos which are associated with your application. If your application is uninstalled, any files saved in this location are removed. Security is not enforced for files in this location and other applications may read, change and delete them.
 This method returns a standard location for saving pictures and videos which are associated with your application. If your application is uninstalled, any files saved in this location are removed. Security is not enforced for files in this location and other applications may read, change and delete them..")
35
The following example code demonstrates how to create a File or Uri location for a media file that can be used when invoking a device's camera with an Intent or as part of a Building a Camera App.

Similar presentations


, Mandy Minuti (WSE), Jean Paul Galea (TL)>")


