Download presentation
Presentation is loading. Please wait.

1
Grants Application Workshop October 25, 2013 Komen Southeastern Colorado Affiliate

2
Introductions 2

3
Agenda Introductions About Susan G. Komen Breast-Self Awareness Grant Process & Community Profile Review Lessons Learned GeMS Instruction 3

4
4 Founded in 1982 by Nancy G. Brinker World's largest grassroots network of breast cancer survivors and activists Invested more than $1.9B since inception Our promise: to save lives and end breast cancer forever. Susan G. Komen

5
Southeastern Colorado Affiliate Granted more than $6 million in local breast health and breast cancer awareness projects in El Paso, Pueblo and Teller counties. Up to 75 percent of net proceeds generated by the Komen Southeastern Colorado Affiliate stay in the three county area. The remaining income goes to the national Susan G. Komen for the Cure Grants Program for energizing science to find the cures. The next race will be our 20 th year

6
6 Affiliate Grants Non-profit organizations in their service area Address the priorities of the community profile Aim to change behaviors and health care systems Ensure information and resources reach those who need it most.

7
Breast Self-Awareness Messaging developed by Susan Brown, M.S., R.N. Managing Director, Community Health

8
BREAST SELF-AWARENESS MESSAGES 1.Know your risk 2.Get screened 3.Know what is normal for you 4.Make healthy lifestyle choices

9
1. KNOW YOUR RISK Talk to both sides of your family about your family health history Talk to your doctor about your personal risk of breast cancer

10
2. GET SCREENED Talk with your doctor about which screening tests are right for you if you are at higher risk Have a mammogram every year starting at age 40 if you are at average risk Have a clinical breast exam at least every 3 years starting at age 20,and every year starting at age 40 Sign up for your screening reminder at komen.org/reminder

11
MAMMOGRAPHY IN THE U.S. Best screening tool widely available for finding breast cancer early Screening every year at age 40 for women at average risk If a woman is under 40 and has a family history or other concerns, she should talk with her doctor Can be used as a diagnostic test for women (and men) at any age
 at any age.")
12
CLINICAL BREAST EXAMINATION (CBE) Clinical breast exam by a health care provider at least every 3 years starting at age 20, and every year after age 40
 Clinical breast exam by a health care provider at least every 3 years starting at age 20, and every year after age 40")
13
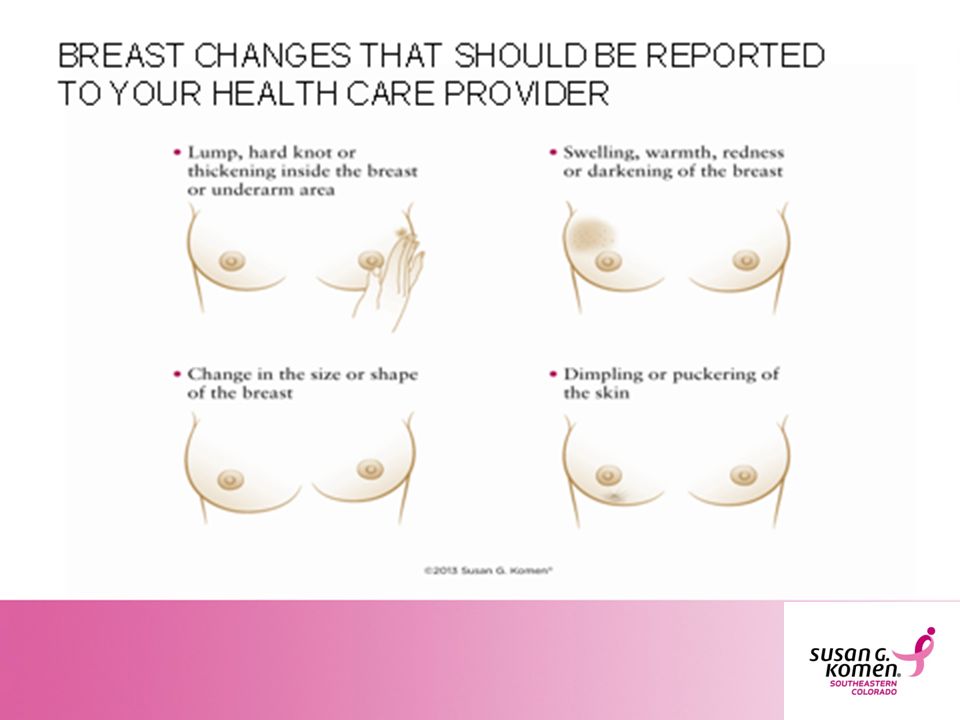
3. KNOW WHAT IS NORMAL FOR YOU Know how your breasts look and feel and report changes to your health care provider

14
BREAST CHANGES THAT SHOULD BE REPORTED TO YOUR HEALTH CARE PROVIDER

16
4. MAKE HEALTHY LIFESTYLE CHOICES Maintain a healthy weight Add exercise into your routine Limit alcohol intake Limit menopausal hormone use Breastfeed, if you can

17
TO REVIEW: BREAST SELF-AWARENESS 1.Know your risk 2.Get screened 3.Know what is normal for you 4.Make healthy lifestyle choices

18
Grant Process 18

19
Our Grants Process Community Profile 2 Year Process (postponed to 2015) Data gathering, focus groups, surveys RFA Posted on Website (www.komensecolorado.org) Priorities fill the gaps Statement of Collaboration Compliance Review by Grants Committee 19
 Data gathering, focus groups, surveys RFA Posted on Website ( Priorities fill the gaps Statement of Collaboration Compliance Review by Grants Committee 19")
20
Our Grants Process (Cont’d) Review Panel Community Representatives Confidential Create Slate Board Approval Entire Slate Funding Levels Grants Awards 20
 Review Panel Community Representatives Confidential Create Slate Board Approval Entire Slate Funding Levels Grants Awards 20")
21
Lessons Learned from Past Grant Reviews 21

22
Who Reviews Grants Recruited from all three counties Term limited to three years Medical Nursing Education Business Survivor Ethnic minority Male 22

23
What Are They Looking For? Proposal Identifies a Problem Prove it needs attention How will you mitigate a problem? What have you done? What is the timeline? Supported By: Statistics, Demographics Historic data, research Factually show corrective actions/solutions Past success, growth Outlined plans for implementation 23

24
Keys to Success Proposal Establish Goals (SMART) Evaluation/Feedback Growing your grant Supported By: Defined reasonable objectives Tracking mechanism Demonstrate the potential growth and impact of funding on data/behavior 24
 Evaluation/Feedback Growing your grant Supported By: Defined reasonable objectives Tracking mechanism Demonstrate the potential growth and impact of funding on data/behavior 24")
25
Red Flag Warnings Proposal Budget Personnel Repeat Grants Collaboration Supported By: Realistic/Reasonable Personnel, Explain it Demonstrate improvements Demonstrate In-kind support 25

26
Helpful Hints Proof read your document Re-check your budget Use graphs, charts, and historic data Use current statistical data Define your population, goals and objectives Demonstrate collaboration with existing agencies Budget conservatively Have someone unfamiliar with your program read it 26

27
Grants eManagement System GeMS

28
EVERYTHING is Online: Contract Grant Changes Reports Payment Processes 28

29
GeMS 29 GeMS is a complete online grant management system that will allow grant applicants to complete their applications, Affiliates to complete the review process, and grantees to submit progress and final reports online. GeMS is the tool Susan G. Komen for the Cure will utilize to complete all community grantmaking processes currently being completed at each Affiliate.

30
30 User Roles 1. Affiliate Grants Administrator 2. Project Director 3. Authorized Signer 4. Viewer 5. Writer

31
User Roles Affiliate Grants Administrator (AGA): The Affiliate Grants Administrator is responsible for executing the tasks related to the day to day management of the grant process. This is the highest level Affiliate user and this individual will have all of the administrative functions available for use. This individual will approve all Project Director positions. 31

32
User Roles Project Director: The role of Project Director should be assigned to the individual at your organization that will serve as the project’s lead contact. This individual is responsible for validating all new users when they register for the system under their organization. This individual will have the highest level of access in the system and will be responsible for overseeing all of the administrative functions available such as application creation and completion. There is only one project director per organization. 32

33
User Roles Authorized Signer: The role of Authorized Signer should be assigned to the individual at your organization that has the authority to sign legal documents on behalf of the organization. This individual is responsible for electronically signing the application before submission and the grant contract if the organization is awarded funds. There may be more than one authorized signer (i.e., one for the application and another for the contract as needed) 33
 33.")
34
User Roles Viewer: The role of viewer should be assigned to any individual at your organization that needs access to view the organization’s information but does not need the functionality to save, add, edit, or change anything within the organization’s information. There may be more than one viewer assigned. 34

35
User Roles Writer: The role of writer should be assigned to any individual that needs access to an organization’s application process to help complete the application but does not have the authority to complete the submission process. This individual cannot change the status of an application and will not have administrative function availability. There may be more than one writer approved in your organization. 35

36
Registration https://affiliategrants.komen.org 36

37
Registration 37

38
Registration 38

39
Registration After you save your contact and organization information, your account must be approved before you have access to the system. You will receive two email communications as part of the registrations process: Registration Submitted Access Granted 39

40
User Homepage 40

41
User Approval 41

42
42 Approving Users Every user that registers must be approved. The Affiliate Grant Administrator (Paula Simon) approves all Affiliate level users and each organizations’ project director. Each organization’s project director approves other users within their own organization.
 approves all Affiliate level users and each organizations’ project director. Each organization’s project director approves other users within their own organization..")
43
43 Validating Users (Paula’s Job) 1.Log in. 2.Select the My Administration link. 3.Click the link for User Approval. 4.Search for new system users. 5.Complete the validation process.

44
Application Creation and Submission 44

45
45 Application Creation 1.Applicant enters GeMS. 2.Click on View Opportunities under the View Available Proposals Section. 3.Click the Apply Now button. 4.Click the I Agree button. 5.Under View, Edit, and Complete Forms, click View Forms. 6.Click on the section of the application you would like to complete.

46
Application Creation 46 An applicant must select View Opportunities under View Available Proposals section to create a new application.

47
Application Creation 47 An applicant should review the organization name and the application period. Then click the Apply Now button.

48
Application Creation 48 If the applicant would like to complete the creation of the application, they should click I Agree. If the applicant decides not to create the application, they should click I Do Not Agree.

49
User Homepage 49

50
Application Process 50 Applicants can search for the Application they are looking for.

51
Application Process 51 Once the search is completed, the applicant will click on the application name they would like to work on.

52
Application Process 52 The information at the top of the page is the applications unique name. To begin viewing the pieces of the application, the applicant will click View Forms.

53
Application Process 53 The applicant will click on any of the application pieces to begin completing the application.

54
Submitting the Application Project Director: completes the online application. Enters “Change the Status” from the CG Application Menus. Changes the status to “Authorized Signature Required.” Authorized Signer: enters “Change the Status. ” Changes the status to “Application Submitted.” 54

55
Application Revision After Compliance Review 55

56
Application Revision 56 Search for all applications in the status “Budget Revisions Required”.

57
Application Revision 57 Select the application name for the project in which revisions are required.

58
Application Revision 58 From the CG Application Menu, select “View Forms” below “View, Edit and Complete Forms”.

59
Application Revision 59 The pages of the application that needs revisions made to it will be marked with a notepad. Select the notepad next to the page you plan to revise. Select the “Show Notes” section at the top of the page.

60
Application Revision 60 Review the notes provided by the Affiliate and make any necessary changes. ****Repeat previous steps for all pages marked with notes.

61
Application Revision 61 Once all revisions are completed, return to the application menu and select “View Status Options” under change the status.

62
Application Revision 62 Select “Apply Status” under Authorized Signature for Budget Revisions Required.

63
Application Revision 63 Authorized Signer logs in to GeMS and clicks “Open my tasks” and then selects the application name they would like to submit revisions for. Once in the application, they will click “View Status Options” to see possible statuses.

64
Application Revision 64 They will select “Apply Status” under Application Budget Revisions Submitted

65
Contract Acceptance and Budget/Application Revision 65

66
66 Now that all applications have been submitted, each applicant will begin one of the below tasks within GeMS: Budget and Application Revisions Contract Acceptance

67
67 The Authorized Signer will select “MY CG Applications” at the top of the user homepage.

68
Contract Acceptance 68 Search for all applications in the status “Contract Acceptance Required”

69
Contract Acceptance 69 Select the Application name for the project the contract is being reviewed for.

70
Contract Acceptance 70 From the CG Application Menu, select “View Forms” below View, Edit and Complete Forms. Select the “Contract Acceptance page from the application page list.

71
Contract Acceptance 71 Complete the “Contract Acceptance” page. At this time the Insurance Certification and W9 must be uploaded and the contract must be accepted or declined. Project Manager must attach these forms Authorized Signer must click agree

72
Contract Acceptance 72 Return to the application menu and select “View Status Options” under Change the Status.

73
Contract Acceptance 73 If the contract is accepted select “Apply Status” under Contract Accepted.

74
Contract Acceptance 74 If the contract is declined select “Apply Status” under Contract Modifications Requested.

75
Contract Modifications 75 Return to the application menu. Select “View Forms” under View, Edit and Complete Forms.

76
Contract Modifications 76 Select the “Contract Modification Request” page from the application page list.

77
Contract Modifications 77 Complete the “Contract Modification Request” page. At this time input any change you would like to make to the contract verbiage. This information will be used to create a letter of clarification for the initial contract.

78
Contract Modifications 78 Return to the application menu and select “View Status Option” under Change the Status.

79
Contract Modifications 79 Select “Apply Status” under Contract Modifications Submitted.

80
Contract Modifications 80 Once you have been notified that the application is again in the status of “Contract Acceptance Required” return to the application menu. Select “View Forms” under View, Edit and Complete forms.

81
Contract Modifications 81 Select the “Contract Acceptance” page from the application page list and then complete the “Contract Acceptance” page. There will now be a letter of clarification available as an attachment to the initial contract.

82
Contract Modifications 82 If the contract and letter of clarification are accepted, return t the application menu and select “View Status Options” under Change the status.

83
Contract Modifications 83 Select “Apply Status” under Contract Accepted.

84
Helpful Hints 84

85
Reminders 85 All correspondence will be through GeMS process Reports will be on-line Site-Visit will be an attached document Bottom line – no paper records in future

86
Always hit the “go” button next to a field if there is one before going to the next field. Always hit “save” to save your data. If you do not hit “save” and you navigate away from the screen, your data will be lost. If you scroll over the first aid kits, help content will be available for that specific question. The system will log out after 45 minutes with no activity. If the system logs out automatically, the last data entered will not be saved if the save button was not selected prior to the log out. 86

87
If you copy and paste text from Word, you must hit the backspace button within the text field for the character count to be shown. Print versions of the blank report and completed report are available within the Access Management Tools section of the application menu. Always use the “Back” button within the system when trying to return to a previous page. 87

88
Explorer 10 Many Affiliates have reported issues regarding the save, submit, and processing buttons in GeMS not functioning properly and the system eventually freezing during this process. This issue has been tied to the launch and utilization of Internet Explorer 10 as a user’s web browser. Short-term solution to the issue. Please follow the directions to follow to run compatibility mode within IE10. Making this small set-up change will prevent users from running into these issues. 88

89
Internet Explorer 10 By default Internet Explorer 10 in Windows 8 does not run in compatibility mode. This is easily tested by logging into GeMS. If the compatibility mode is not enabled, the progress wheel in GeMS will simply spin without ever completing the action. To enable the compatibility mode for Internet Explorer 10, follow these steps: 89

90
(Windows 7 users start at step 2.) 1. Windows 8 only - From the Windows 8 start screen select the Desktop. 2. From the Desktop launch Internet Explorer 10. 3. Press the Alt key on your keyboard to bring up the top menu. 4. Go to Tools | Compatibility View settings 5. Either Add affiliategrants.komen.org to the Compatibility View websites or Select Display all websites in Compatibility Viewaffiliategrants.komen.org NOTE: enabling the compatibility mode using either option will affect all GeMS web sites.. 90

91
Question and Answer 91

Similar presentations


 Presented To: Grantees EHBs version 2.0 – Overview for Grantees.>")


 Community Based Abstinence Education September, 2009.>")

 G5 APPLICATION SUBMISSION OVERVIEW FOR A FELLOW.>")


