Download presentation
Presentation is loading. Please wait.

1
Module 2: Hardware and Terminology
PLC Fundamentals Module 2: Hardware and Terminology

2
Module Objectives Upon successful completion of this module, students will be able to: Name the PLC hardware parts. Differentiate between analog and digital inputs, and give examples for each. List the inputs and outputs for a given application, and categorize them as analog and digital. Name the LOGO! Basic module parts. Connect input and output devices and program the LOGO! to perform simple tasks.

3
2.1 PLC Inputs and Outputs PLC is a device that can be programmed to perform control functions. It is a Digital Device, it stores information in the form of ON/OFF conditions referred to as binary digits or bits. Even though the PLC uses both digital and analog signals, the CPU can understand only digital signals.

4
The Hardware parts of a PLC consists of:

5
Input Module The Input Module consists of the Digital Inputs and the Analog Inputs Go to section “2.1 PLC Hardware” and find the meaning of: Digital Input Analog Input

6
Digital and Analog Signals

7
What do we mean by Logic 1 and Logic 0 ?
Logic 1 a signal is present switch is ON. Logic 0 signal is absent switch is OFF. Is the switch a digital input or an analog input? What do you think?

8
What is the type of PB that is used in the circuit ?
What are the types of PBs ?

9
Symbols of PBs

10
Is a level transmitter a digital or an analog input?
A level transmitter checks the level of liquid in the tank and provides a varying voltage to the PLC input. Is a level transmitter a digital or an analog input? Video

11
Analog Inputs Digital Inputs

12
2.4 Lab Activity 1 – Page 12 Objective: To identify the difference between normally open (NO) and normally closed (NC) pushbuttons.
 and normally closed (NC) pushbuttons.")
13
All sensors can be connected as inputs to a PLC, some examples are given
Classify which are Analog and which are digital Inputs …

14
The Table below shows more examples of Inputs
The Table below shows more examples of Inputs. Classify them as digital and analog.

15
Output Module The output module is used to connect output devices to the PLC unit. Examples of output devices include Lamps, Motors, Solenoids and Buzzers. All of these outputs can be turned ON/OFF by the PLC output module.

16
Central Control Unit The Central Control Unit contains the Central Processor which is the brain of the PLC. The CPU monitors the inputs and makes decisions based on instructions in its program memory. It performs: Counting Timing Data comparison Sequential operations

17
Analog or Digital Output?

18
Class Activity Refer to the Case Study on page-4, and list all the inputs and outputs and classify them as analog and digital. gsystems/Home/hardware# _61119 Input Output Analog/ Digital

19
2.4 Sensors and Actuators A SENSOR: is an input device that senses a physical condition and converts it to an electrical signal. The pushbutton sends an electrical signal to the PLC’s input informing the condition of the pushbutton’s contacts.

20
ACTUATORS: convert Electrical Signals from PLC outputs into physical conditions.
A motor starter is an example of an actuator. It will either start or stop the motor depending on the state of the PLC output.

21
Conduct Lab Activity 1 LOGO! Basic Module
LOGO!12/24 RC is the LOGO! Controller.

22
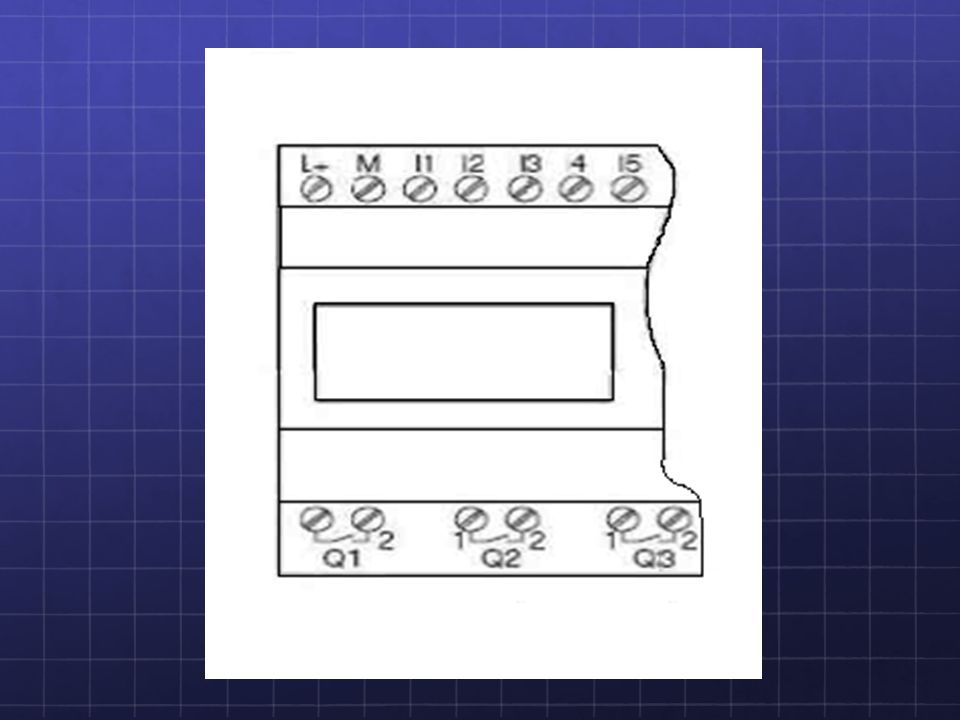
LOGO! Basic module components
Inputs: The LOGO! Basic Module has: 8 inputs and they are designated as I1, I2, I3, …. I8. Inputs I1 to I6 are digital inputs. Inputs I7 and I8 can function as digital or analog. Outputs: The LOGO! Has: 4 digital outputs Q1, Q2, Q3, Q4. Display Unit (LCD) Control Panel Module Slot: to connect the programming cable from the PLC to computer
 Control Panel. Module Slot: to connect the programming cable from the PLC to computer.")
23
2.5 PLC Wiring Connecting the power supply:
PLC devices need an electrical power supply that can be either an AC, or DC supply. LOGO! 12/24RC needs a DC supply.

24
Connecting LOGO! Inputs
Figure shows the hardware/wiring details of connecting the inputs to the LOGO! Switch S1 is connected to I1 and switch S2 is connected to I2.

25
Connecting sensors to the LOGO!
For two wires sensor the connection can be done easily by taking one wire to the positive terminal of the power supply and the second wire to the LOGO! Input.

26
For three wire sensor, sensor’s type must be taken into consideration while programming.

27
Connecting LOGO! Outputs
LOGO! is equipped with relay outputs. As shown in fig 2.22, various loads can be connected to the relay outputs, for example, lamps, motors, relays etc.

28
Lab Activities 2.4 Lab Activity 1 2.4 Lab Activity 2

Similar presentations


 4/19/2017 A digitally operating electronic apparatus which uses a programming.>")


 AND AUTOMATION>")
