Download presentation
Presentation is loading. Please wait.

1
Team Hubble Jr. Final Presentation Rachel Small, Holly Zaepfel, Ryan Del Gizzi, Kyle Norman, and Evan Levy December 5, 2006

3
Mission Statement Primary Mission: measure light intensity (frequency in wavelength) with a photometer –showing light intensity varies with altitude –data recorded on BASIC Stamp 2 from TSL230 photometer –input light diffused through ping pong ball collect temperature and humidity data from HOBO –relationship with atmosphere level, altitude Secondary Mission: integrate monocular lens with video camera to produce telescope –obtain close-up horizon pictures –determine functionality capture images of the horizon with still camera
 with a photometer –showing light intensity varies with altitude –data recorded on BASIC Stamp 2 from TSL230 photometer –input light diffused through ping pong ball collect temperature and humidity data from HOBO –relationship with atmosphere level, altitude Secondary Mission: integrate monocular lens with video camera to produce telescope –obtain close-up horizon pictures –determine functionality capture images of the horizon with still camera")
4
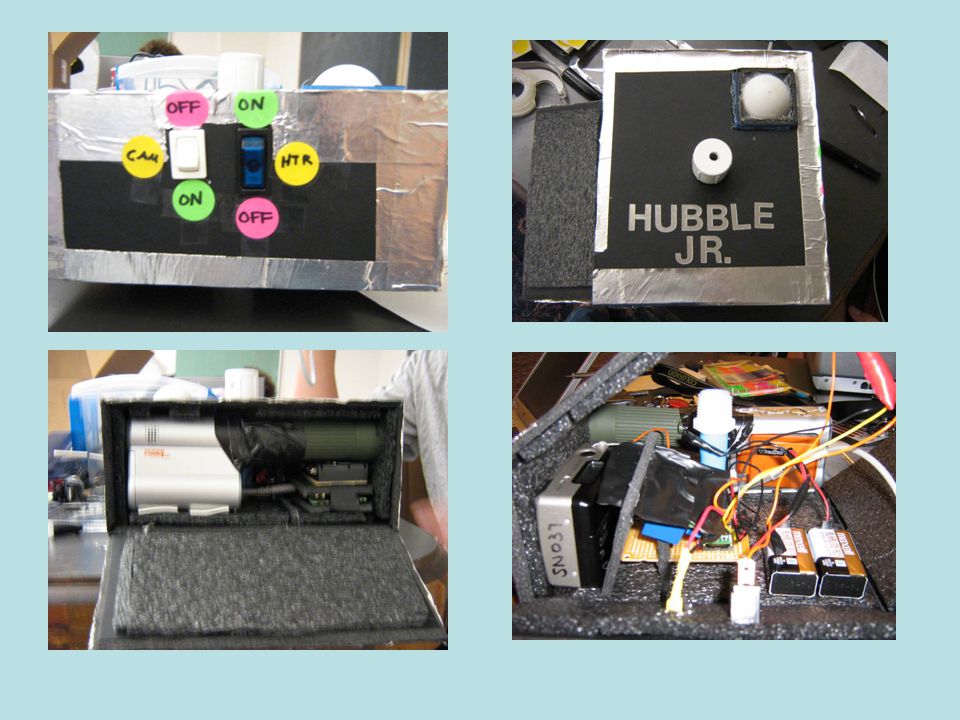
Summary of Design and Experiment Photometer HOBO Still image camera Telescope –Video camera with zoom lens attached

6
RFP Compliance Photometer qualifies as additional experiment Video Camera with attached monocular qualify as additional camera Payload is working and ready to fly Flight string interface follows requirements and was successful Hobo included in design Payload constructed of foam core Contact information and American Flag located on payload Money and Mass were not over budget No one got hurt, and we all had fun!

7
Results and Analysis TELESCOPE SYSTEM Record button was not easily accessible Button was pressed and camera began to record Button was mistakenly pressed again Only a few seconds of footage, not enough to analyze

8
FILM CAMERA SYSTEM Only two pictures taken in the minutes before launch The wire running from the battery pack to the timing circuit was pulled out Loose screw combined with force of launch

11
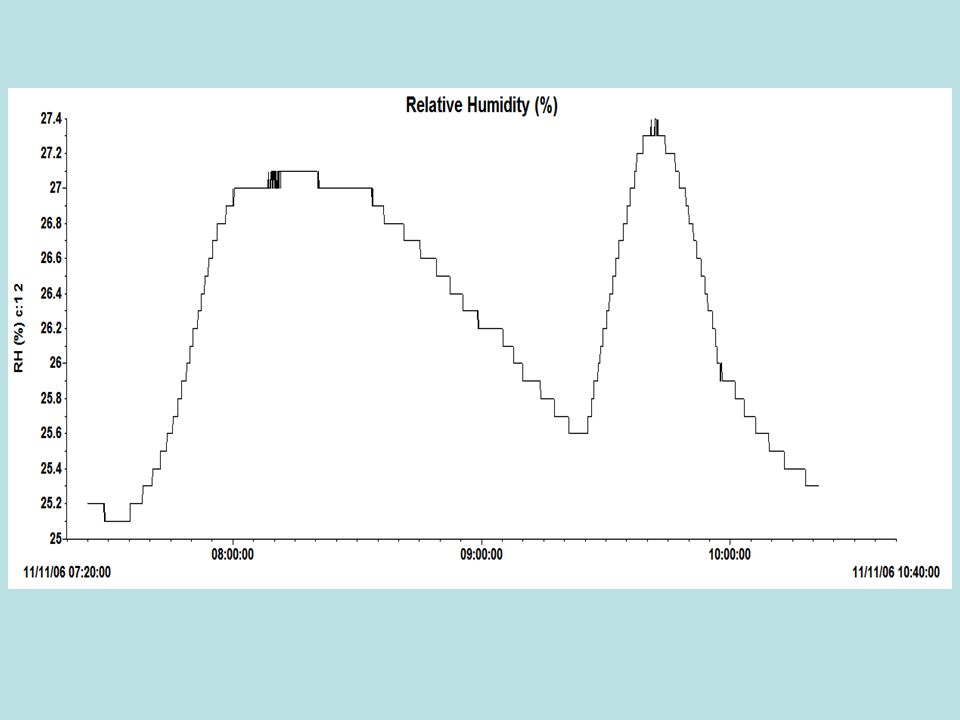
HOBO SYSTEM Our biggest success Humidity –Minimum percent humidity of 25.1 at 7:15am –Maximum percent humidity of 27.3 at 9:45am –The graph accurately shows the satellite ascending and passing through the cloud layer, and, after reaching maximum altitude, decending and passing through the cloud layer again before landing. Temperature –Graph shows temperature data as predicted –Temperature fluctuated with different layers of the atmosphere, as expected

12
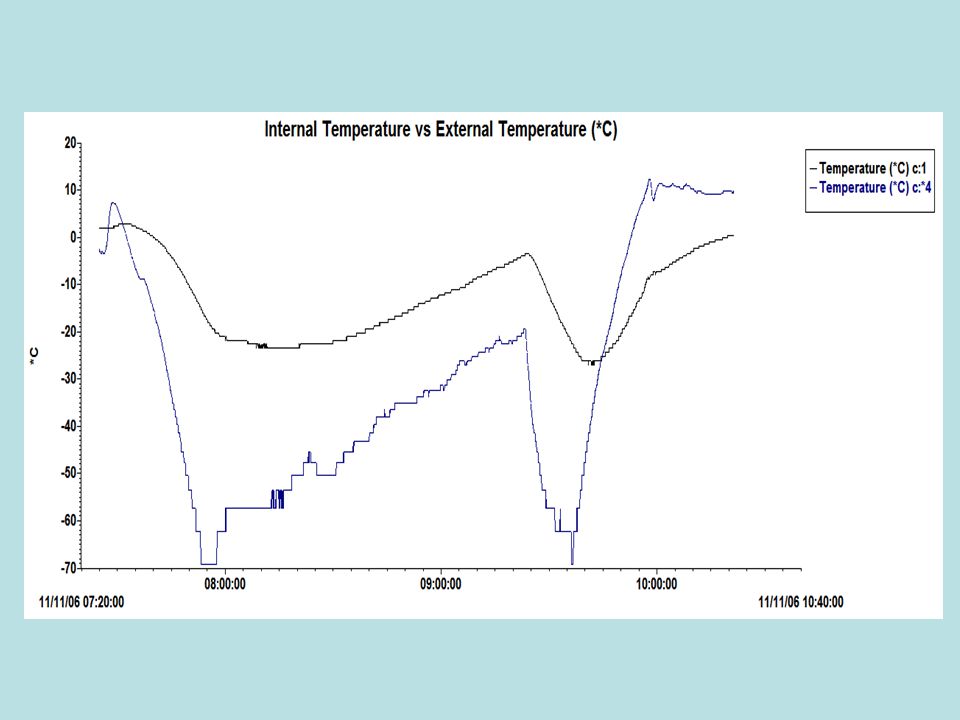
THERMAL SYSTEM internal temperature stayed above external for most of flight thermal system was successful, preformed operations designed for internal temp low: -35°C, average about -10°C external temp low: -70°C changes in external temp much more sharp, severe than changes in internal temp external temp overtook internal temp during descent

13
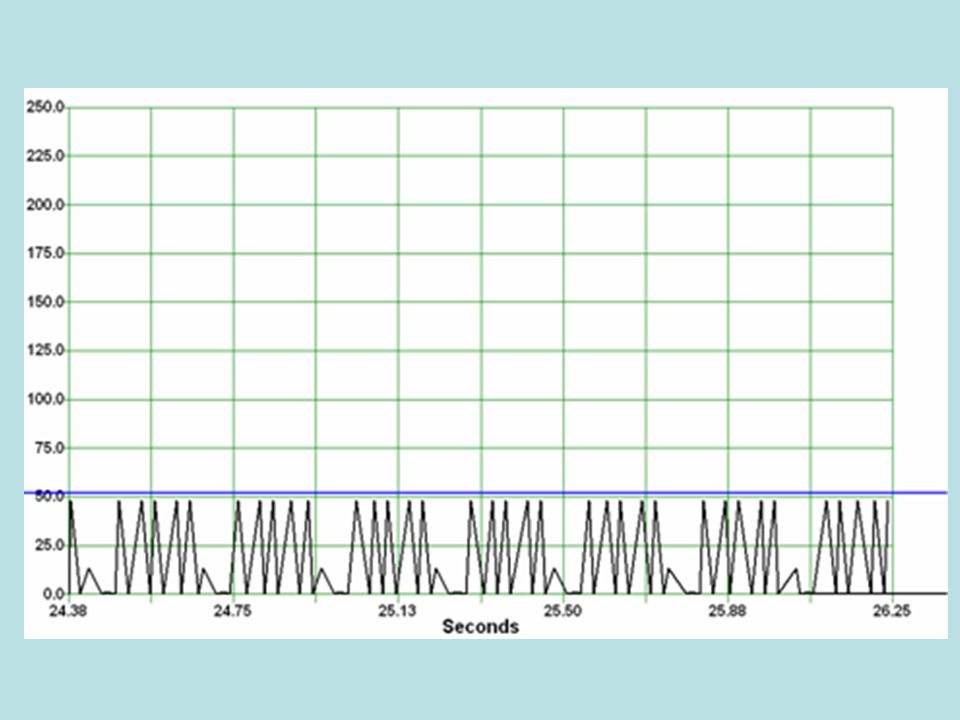
PHOTOMETER SYSTEM Only 3 seconds of data after launch Before launch, photometer switch was tested, turned on briefly, recorded for a few seconds Photometer did not record during launch because it was set not to overwrite once data was on the stamp We did not realize that checking the switch had recorded data and since we did not erase the stamp, no data from launch was obtained Data graph does indicate functionality however

15
Ready To Fly Video Camera Corrections Cut holes in the roof for easy access to buttons Leave a second side open so we can see the video camera screen and have confirmation that it is on. Photometer Corrections Make sure the data has been cleared from the basic stamp Still Frame camera Corrections Make sure screws are very tight on the timing circuit Dab hot glue on the ends to ensure the connection is tight

16
Payload Storage Payload should be stored in a cool, dry place Two sides will not be hot glued in place, however they will be held in place by scotch tape

17
Payload Activation Turn on 2 switches located on outside of box (heater and still camera) Turn photometer by flipping switch located under the monocular (red light will come on) Turn the power on the video camera, then hit the record button. Look at the video monitor to confirm it is recording. The close the monitor to conserve battery. Stuff the holes for the video camera with insulation Seal the sides with aluminum tape

19
Conclusions Although we did not get many results, we are confident that if we had a second chance at launch, all systems would be functional Simple mistakes, not large system errors

20
Lessons Learned Have more than one person work on every system Keep a better track of mass Design everything with an idea of what the final system needs to be able to do, don’t design everything around one or two important systems. Keep to the schedule!

21
Message to next semester 1.Everything very easy to turn with visual confirmation 2.Stay on schedule, have a good schedule 3.Make sure more than one person knows about each system 4.Mass everything, budget for extra mass… tape and glue weigh more than you think 5.Video all of your experiences and work as you go 6.Dress very warmly for launch!

Similar presentations


 Construction, Integration, and Test Construction, Integration, and Test.>")


