Download presentation
Presentation is loading. Please wait.

1
A tutorial on acoustic measurements for the non-technician
Svante Granqvist Royal Institute of Technology (KTH) Dept of Speech Music and Hearing (TMH) Stockholm, Sweden
 Dept of Speech Music and Hearing (TMH) Stockholm, Sweden.")
2
Today’s topics Sound and microphones Room acoustics Calibration
Recommendations

3
Conclusions Use omni-directional electret or condenser microphones whenever possible Do not use directed (e.g. cardioid) microphones unless you really need the directivity Especially not close to the speaker Avoid dynamic microphones Place the microphone within the reverberation radius of the room Keep noise level low Establish a routine for level calibration
 microphones unless you really need the directivity. Especially not close to the speaker. Avoid dynamic microphones. Place the microphone within the reverberation radius of the room. Keep noise level low. Establish a routine for level calibration.")
4
What is sound? Demo of sound field Sound pressure (pascals, Pa)
Sound pressure level, SPL (decibels, dB) Particle velocity (metres per second, m/s) Particle velocity level? Rarely!
 Particle velocity (metres per second, m/s) Particle velocity level Rarely!")
5
Sound pressure Simple relation to sound intensity
Our ears are mainly pressure sensitive Simple relation to distance (~1/r) Doubled distance => halved SP <=> SPL: -6dB Pressure has no direction Pressure sensitive microphones are omni-directional (no directivity) So: how do they make directed microphones?
 Doubled distance => halved SP <=> SPL: -6dB. Pressure has no direction. Pressure sensitive microphones are omni-directional (no directivity) So: how do they make directed microphones")
6
Particle velocity Particle velocity has a direction
So it can be used to create directivity! Particle velocity only => figure of eight Mainly sensitive in two directions

7
Cardioid Particle velocity and sound pressure combined => cardioid
Mainly sensitive in one direction

8
Directivity Omni-directional (SP only)
Directed (involves particle velocity) Figure of eight Cardioid Super-cardioid Other special directivity patterns Great! ...or is it?
 Figure of eight. Cardioid. Super-cardioid. Other special directivity patterns. Great! ...or is it")
9
Directed microphones We are primarily interested in sound pressure
...but also measure particle velocity ...then PV and SP have to be proportional to one another! Are they?

10
NO!

11
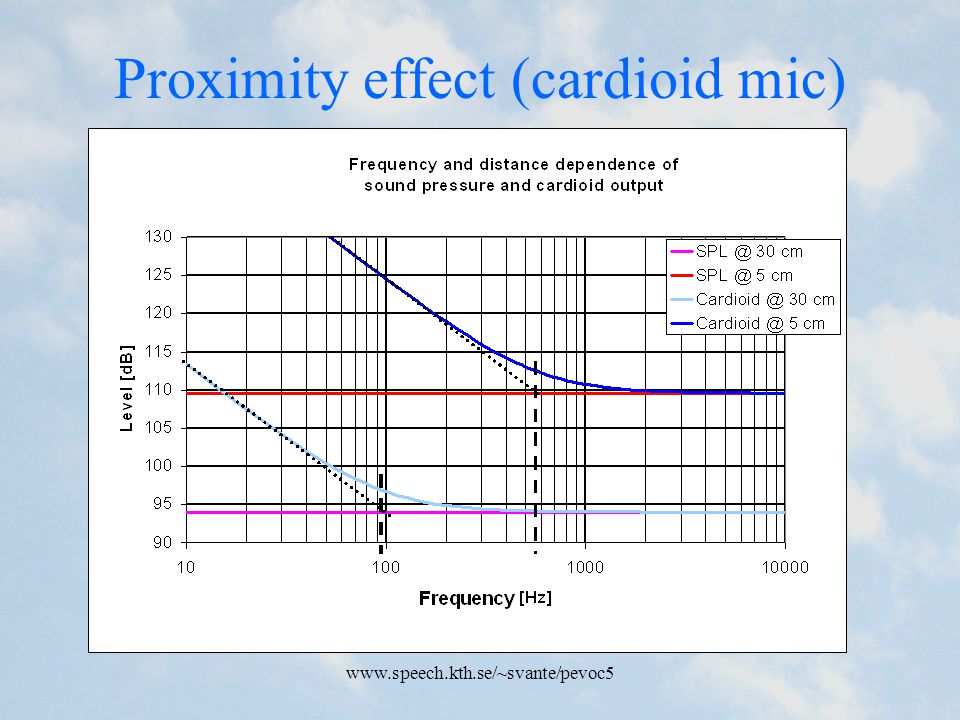
Particle velocity Particle velocity is proportional to sound pressure, but only in the far field (~1/r) In the close field, it differs! (~1/r2) The limit between far and close field depends on frequency
 The limit between far and close field depends on frequency.")
12
Particle velocity Particle velocity exhibits a bass lift in the close field proximity effect

13
Proximity effect (cardioid mic)
14
Proximity effect Demo

15
Manufacturers’ data sheets
Cardioid

16
Manufacturers’ data sheets
Cardioid

17
Manufacturers’ data sheets
Cardioid

18
Manufacturers’ data sheets
Omni-directional

19
Manufacturers’ data sheets
Frequency responses are mostly measured in the far field, even for microphones that obviously are intended to be mounted in the close field You have to add the proximity effect for directed microphones to those curves!

20
Proximity effect (cardioid mic)

21
Manufacturers’ data sheets
Cardioid

22
Manufacturers’ data sheets
Cardioid

23
Manufacturers’ data sheets
Cardioid

24
Manufacturers’ data sheets
Omni-directional

25
Demo Proximity effect: Hear the bass lift from the directed microphone
26
OK, point taken, he doesn’t like directed microphones
But then, why are there so many directed microphones out there? Music industry, broadcasting, stage use etc: A bass boost of a few dBs does not matter much or might even be desired (sound ”better”) Noise supression may be more important than a flat frequency response Most recordings do not have a scientific purpose
 Noise supression may be more important than a flat frequency response. Most recordings do not have a scientific purpose.")
27
Transducer type Electret/condenser Dynamic
Can easily be made to have flat response Cheap electret microphones (< €30 ) can be of sufficient quality Requires battery/power supply Sensitivity may decrease towards end of battery life Dynamic Difficult to acheive a flat response Good dynamic microphones are expensive Rarely purely pressure sensitive (even though data-sheet may say so) No need for battery/power supply
 can be of sufficient quality. Requires battery/power supply. Sensitivity may decrease towards end of battery life. Dynamic. Difficult to acheive a flat response. Good dynamic microphones are expensive. Rarely purely pressure sensitive (even though data-sheet may say so) No need for battery/power supply.")
28
Bottom line... Use omni-directional, electret/condenser microphones for scientific purposes! Make sure batteries are fresh or use some other type of power supply

29
Room acoustics In a room sound originates from:
the sound source, directly or from reflections at the walls

30
Room acoustics

31
Room acoustics Reverberation radius, rr
The distance where reflected and direct sound are equally loud Less absorbtion => stronger reflections => smaller rr

32
Room acoustics

33
Room acoustics Reverberation radius Reverberation time
At what distance is the direct sound as loud as the sound that has been reflected from the walls Typical value 4 – 0.5 meters Reverberation time How long does it take for the sound level to drop by 60 dB? Typical value 0.5 – 4 seconds

34
Room acoustics How to measure Reverberation time/radius
Several ways, one would be to record a ”bang” and see at what rate the sound level drops The time for a 60dB drop corresponds to reverberation time Calculate reverberation radius from this time:

35
Bottom line... Within the reverberation radius, conditions are similar to free field Outside, reflections from the walls dominate the sound So, put the microphone (well) within the reverberation radius!
 within the reverberation radius!")
36
Level calibration Most common method:
Record a signal with a known level i.e. a calibration tone By relating the level of the calibration tone to the levels of the signals of interest, absolute calibration is acheived

37
Calibration file, example
Calibration tone ”The level was 89 dB”

38
Calibration Calibrator
Procedure: Mount and start the calibrator (2-10 seconds) Unmount calibrator and say the level of the calibrator Advantages: Stable calibration tone No sensitivity to room acoustics or surrounding noise Disadvantage: Calibrator that fits the microphone required Important that the seal is tight!
 Unmount calibrator and say the level of the calibrator. Advantages: Stable calibration tone. No sensitivity to room acoustics or surrounding noise. Disadvantage: Calibrator that fits the microphone required. Important that the seal is tight!")
39
Calibration Loudspeaker + SPL meter
Procedure: Beep at 1kHz ~ 80 dB (2-10 seconds) say the level as read on the level meter Advantages: Stable calibration tone Disadvantage: Loudspeaker + signal source reqiured Some sensitivity to room and surrounding noise
 say the level as read on the level meter. Advantages: Stable calibration tone. Disadvantage: Loudspeaker + signal source reqiured. Some sensitivity to room and surrounding noise.")
40
Calibration Voice + SPL meter
Procedure: Sustain /a/ ~80 dB (5-10 seconds) say the level as read on the level meter Advantages: No loudspeaker required Calibration signal (voice) has approximately the same spectrum as the signals of interest Disadvantages: Hard to keep the level of the /a/ stable Some sensitivity to room and surrounding noise
 say the level as read on the level meter. Advantages: No loudspeaker required. Calibration signal (voice) has approximately the same spectrum as the signals of interest. Disadvantages: Hard to keep the level of the /a/ stable. Some sensitivity to room and surrounding noise.")
41
Calibration Voice + SPL meter
Procedure Sustain /a/ ~80 dB (5-10 seconds) say the level as read on the level meter Advantages: No loudspeaker required Calibration signal (voice) has approximately the same spectrum as the signals of interest Automatic compensation for microphone distance Disadvantage: Hard to keep the level of the /a/ stable Only valid for this particular distance Some sensitivity to room and surrounding noise dB meter should be within rr
 say the level as read on the level meter. Advantages: No loudspeaker required. Calibration signal (voice) has approximately the same spectrum as the signals of interest. Automatic compensation for microphone distance. Disadvantage: Hard to keep the level of the /a/ stable. Only valid for this particular distance. Some sensitivity to room and surrounding noise. dB meter should be within rr.")
42
Calibration, directed microphones ?
>30cm Only in the far field (>30 cm), but still within rr Only for rough estimation of SPL Never use SPL calibrators! ”Don’t try this at home”
, but still within rr. Only for rough estimation of SPL. Never use SPL calibrators! Don’t try this at home")
43
Distance compensation
Sound pressure drops as ~1/r Re-calculate SPL to appear as recorded at a different distance, e.g. record at d2=5 cm, but report at d1=30 cm. Only for omni-directional microphones! Formula:

44
Bottom line... Establish a routine for calibrations
Don’t calibrate directed microphones Report SPL at 30 cm Compensated or actual Beware of the ”mixer” on most PC soundcards

45
Recommendations microphone and room acoustics
Depend on the purpose of recording the recording environment Noise Room acoustics Example of purposes: SPL Spectrum F0 Inverse filtering HNR Perceptual evaluation

46
SPL Omni-directional electret/condenser microphone
If noisy environment: Try to attenuate the noise Shorten microphone distance (10 cm to the side of the mouth) Avoid directed microphones for this purpose! Put the microphone well within the reverberation radius of the room (~rr/2) Re-calculate or calibrate for 30 cm
 Avoid directed microphones for this purpose! Put the microphone well within the reverberation radius of the room (~rr/2) Re-calculate or calibrate for 30 cm.")
47
Spectral properties (spectrogram)
Omni-directional electret/condenser microphone If noisy environment: Try to attenuate the noise Shorten microphone distance (5-10cm to the side of the mouth) If background noise still is a problem a directed microphone can be used, but beware of the proximity effect and keep microphone distance constant! Put microphone well within rr
 If background noise still is a problem a directed microphone can be used, but beware of the proximity effect and keep microphone distance constant! Put microphone well within rr.")
48
Spectral properties (LTAS, H1-H2, line spectra)
Omni-directional electret/condenser microphone If noisy environment: Try to attenuate the noise Shorten microphone distance (5-10cm to the side of the mouth) Do not use a directed microphone Put microphone well within rr Pay attention to reflective surfaces such as windows, manuscripts etc. Added proximity effect, cardioid at 5 cm
 Do not use a directed microphone. Put microphone well within rr. Pay attention to reflective surfaces such as windows, manuscripts etc. Added proximity effect, cardioid at 5 cm.")
49
F0, jitter/shimmer Any decent microphone is OK, since periodicity is independent of frequency response If noisy environment: Try to attenuate the noise Shorten microphone distance (5-10 cm) Use a directed microphone Check if F0 algorithm is affected by a bass lift!
 Use a directed microphone. Check if F0 algorithm is affected by a bass lift!")
50
Inverse filtering Omni-directional electret/condenser microphone flower < 10 Hz Reduce background noise as much as possible Never use a directed microphone Microphone distance 5-10 cm Within rr/10 Pay attention to reflective surfaces such as windows, manuscripts etc. Anechoic chamber is preferred Addition of reflection to the direct signal

51
Harmonics-to-noise ratio
Omni-directional electret/condenser microphone Background noise must be lower than voice noise Microphone distance 5-50 cm Well within rr

52
Perceptual evaluation
Omni-directional electret/condenser microphone Reduce background noise as much as possible Microphone distance 5-50 cm Well within rr

53
But you never know... For example, the first intention may be to only extract F0 It might turn out, after the recordings are made, that the recorded material would be suitable for some other measurement, like SPL Therefore, do it ”right” from the start!

54
Conclusions Use omni-directional electret or condenser microphones whenever possible Do not use directed (e.g. cardioid) microphones unless you really need the directivity Especially not close to the speaker Avoid dynamic microphones Place the microphone within the reverberation radius of the room Keep noise level low Establish a routine for level calibration
 microphones unless you really need the directivity. Especially not close to the speaker. Avoid dynamic microphones. Place the microphone within the reverberation radius of the room. Keep noise level low. Establish a routine for level calibration.")
55
These were my recommendations
You may find reasons to not follow them But they better be good...

56
Questions? This presentation is available on the web

Similar presentations
 dynamic vocal microphone designed for professional vocal use in live performance, sound reinforcement, and.>")


. This detection was used to cut the audio waveform in two.>")

>")

.>")
, Royal.>")


 1. Sound sources Sound source can be characterized by power and directivity Directivity factor Q – ratio of sound intensity.>")
