Download presentation
Presentation is loading. Please wait.

2
The Kronos application utilizes single sign-on. You will see a short-cut to Kronos on your desktop.

3
Dual Entry Sign in and out on paper sheets Fill out AU-15 Turn into Manager Manager turn into timekeeper Timekeepers enter into OnTime RFL – Put time off requests in RFL & Kronos Enter time into Kronos via your assigned method

4
Enter sign in and sign out time daily Several different methods Replacing Sign In / Sign Out Sheets; OnTime Time off Requests Replacing RFL Approve Time Cards Replacing AU-15; OnTime Check Accrual Balances Replacing RFL

5
Sign in and out of Kronos daily Enter time off requests Approve time card at the end of the pay period By 10 am on the Monday after payday

6
4 Methods to Signing In and Out Web Application Via a PC Most everyone in Pilot will be in this group InTouch Device Teletime Mobile Application

7
Web Application Done via a computer connected to the ODOT network The most common way for office employees or employees with an ODOT PC to sign in and out Kronos has single sign on and there will not be a log in page

8
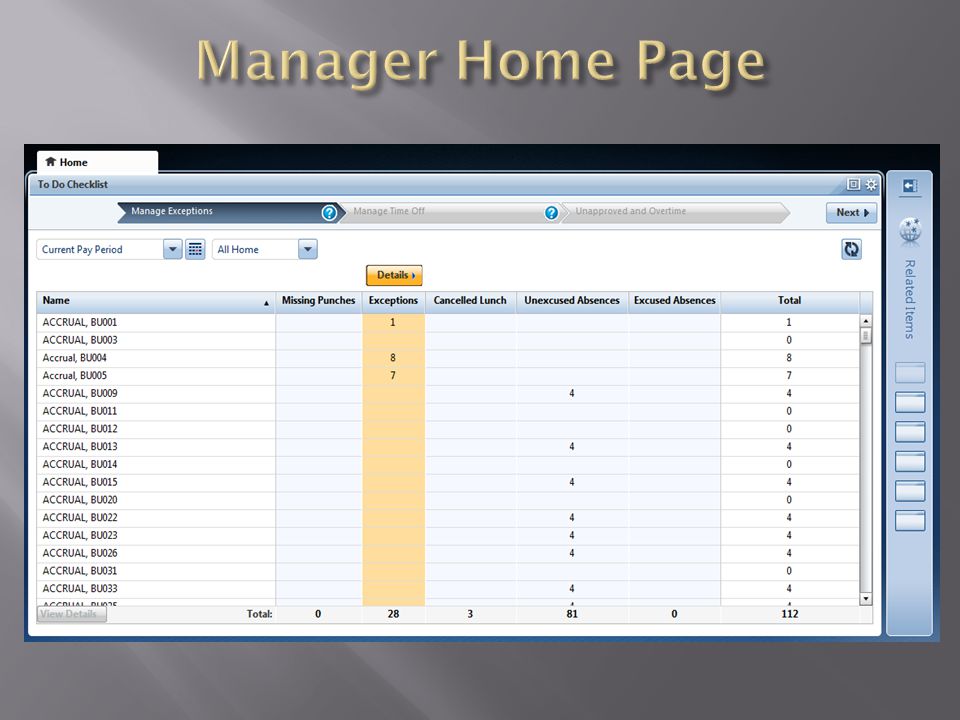
Today we will show how you will interact with the system as an employee first. However please note managers have a different home page from employees.

10
As a manager, to access your time card click on Workspaces

11
Workspace Carousel. Click on My Information

13
Time Card

14
Totals

15
Timestamp

16
Accrual Balances

17
Related Items as an employee

18
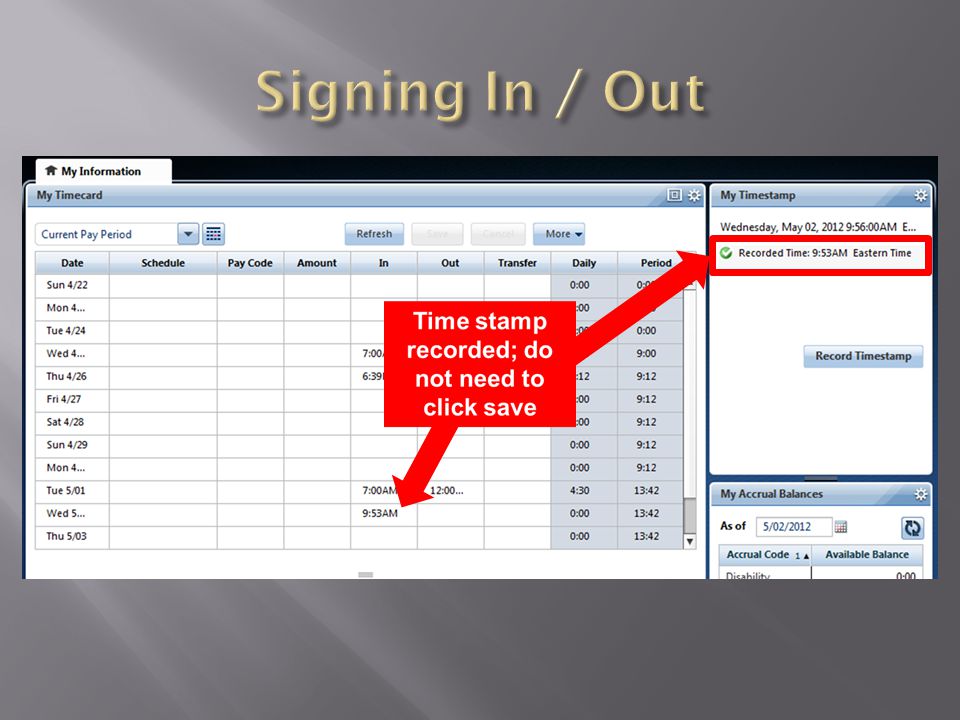
Click Record Timestamp

19
Confirmation of time stamp recorded Click Refresh for the time stamp to appear on time card

21
Enter Time Manually

22
Once you click out of the box where you typed in the time, the save button enables. Since the time was manually entered, you must click save for the timecard to be populated

23
If you manually type in your time, the system will time stamp the entry. Entered an in punch of 7:00AM for 5/2/12 Date / Time and User who entered the in punch

24
Everyone is defaulted to a 30 minute lunch deduction. If you take a 60 minute lunch let payroll know so they can move you to the appropriate lunch group. If you take longer than your standard lunch, sign in and out to override your lunch. You can cancel your lunch deduction and it will be sent to your manager for approval.

25
Kronos is programmed to automatically deduct lunch after 4 hours of work. Employees working more than 4 hours who do not take a lunch will need to cancel the lunch deduction. A notification will be sent to the manager so they know the employee cancelled their lunch.

29
Click Save

31
The system is set to round each individual punch to the nearest 10 th of an hour 0 stays at 0 1, 2, or 3 rounds back 4 or 5 rounds forward 6 stays at 6

32
Example: In at 6:58 AM, will round to 7:00 AM Out at 3:29 PM, will round to 3:30 PM Total of 8 hours In at 7:05 AM, will round to 7:06 AM Out at 3:33 PM, will round to 3:30 PM Total of 7:54 hours Kronos will still show your actual in and out times but will calculate total hours based on rounding

33
In At 6:58

34
Out at 3:29 PM

35
Total of 8:00 Hours

36
In At 7:05 AM

37
Out At 3:33 PM

38
Total of 7:54 or 7.9 hours for the day

40
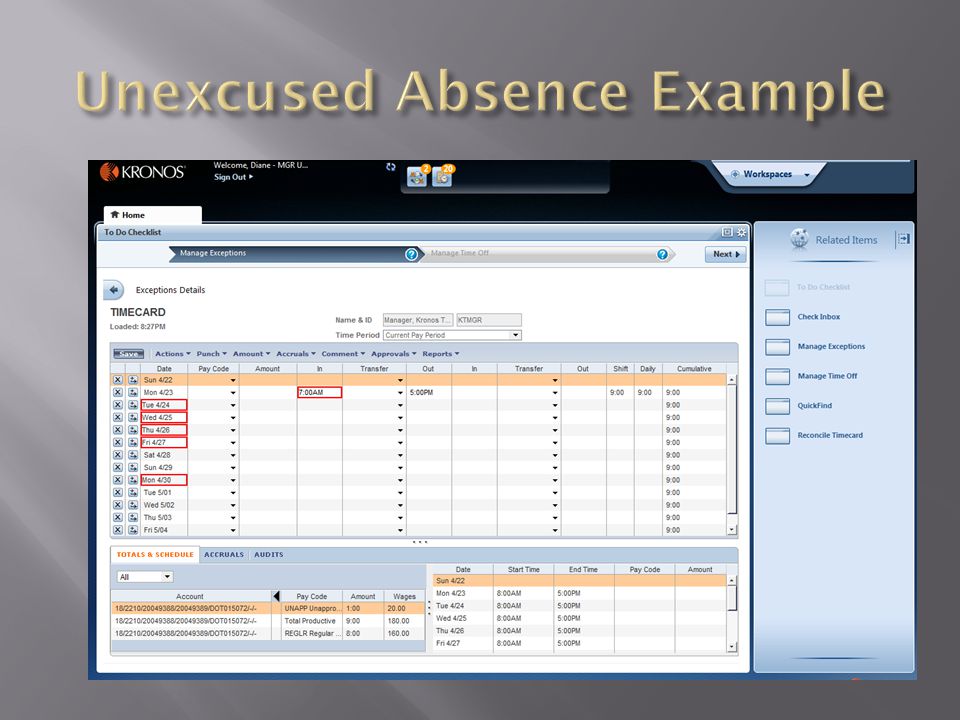
If assigned a schedule within Kronos: Signing in 31 minutes or more early will show as an exception to your manager All time prior to scheduled time will go into an unapproved bucket which will not be paid until your manager approves the time Signing out 31 minutes or more later will show as an exception to your manager

41
Anyone who uses an InTouch device will be on a schedule. Each District or Division will determine whether other employees will be on a schedule.

43
Before an employee can be compensated for Overtime, the Overtime must be approved by the manager. Approved overtime will default to paid Employees can move the Overtime to Comp Time when they approve their timesheet.

44
Employee has time in excess of 40 hours.

45
Overtime has been approved by manager.

47
Each employee must approve their timecard by 10:00 AM on the Monday after payday. Move overtime to comp time Once you approve your timecard you cannot make changes without having your manager remove the approval. After the employee approves their timecard, it will go to the Manager for final approval before being sent to Central Office Payroll.

48
Review Daily In and Out

49
Review Totals

50
Click More

51
When ready, Click Approve

52
Timecard will be put into an Approved status

53
Once an employee has approved his or her timecard, they cannot make any more changes.

55
Time off requests are submitted by the employee and sent to their manager for approval. In the Future: I want to take July 2 nd – 6 th off. - OR - For a day in the past: I took a personal day Monday

56
My Time Off Requests can be found in Related Items. Click on a related item to open a new tab

57
Clicking on a related item opens a new tab. To return to your time card, click My Information

58
Shows any time off requested/approved

59
Shows accrual balances

60
The days shown default to the first week of the current pay period. To move to the next week of the pay period, click on the forward arrow next to the dates being displayed.

61
To view the week of July 2, click on the Select Dates Icon next to the down arrow

62
In the Select Dates box, click on the calendar icon

63
Use the left and right arrows to go to the month; then select the date.

64
Once a Start Date is selected, the end date will be populated with the start date. To change the end date, click on the calendar icon in the end date row and select an end date.

65
Once you have the Start Date and End Dates you would like to view, click OK

66
The drop down now indicates the time frame available to view.

67
The screen changes to the week that includes July 2 nd – July 6 th.

68
The dates available to view have changed as well.

69
Indicates July 4 th is a holiday. This is important when requesting time off.

70
Click Request Time Off. Note: If you click Request Time Off without changing the dates, request dates will default to the time period listed in the drop down

71
Request Time Off screen appears

72
Defaults to the first date in the dates selected.

73
Use the calendars to select a start and end date

74
Since July 4 th is a holiday 2 lines are needed in this request. The first line is for July 2 nd and 3 rd.

75
The Pay code defaults to VACLV. If you want to change it to another leave type select from the drop down.

76
Enter the start time for your request.

77
Enter how many hours you would like to take off each day.

78
To add a line for July 5 th and 6 th, click Add another time-off period

79
Make the appropriate changes to the dates, pay code, start time and length

80
Once the request is ready, click submit.

81
Request is in a submitted status.

82
To see the details of the request, click on the request and select Details

83
Shows Date submitted; who submitted it and the status

84
Shows Pay Code being used; Start date; End date and time. Scroll to see the details of the second line in the request.

85
To retract/void the request, click on the request and select Retract

86
If an employee enters multiple lines of time off in the same time off request and later wants to retract only one day/line in the request, the entire request must be retracted and re-entered.

87
Shows Date submitted; who submitted it and the status

88
Shows Pay Code being used; Start date; End date and time for each line – scroll to see the additional lines requested

89
Click Submit

90
Indicates the request has been retracted

92
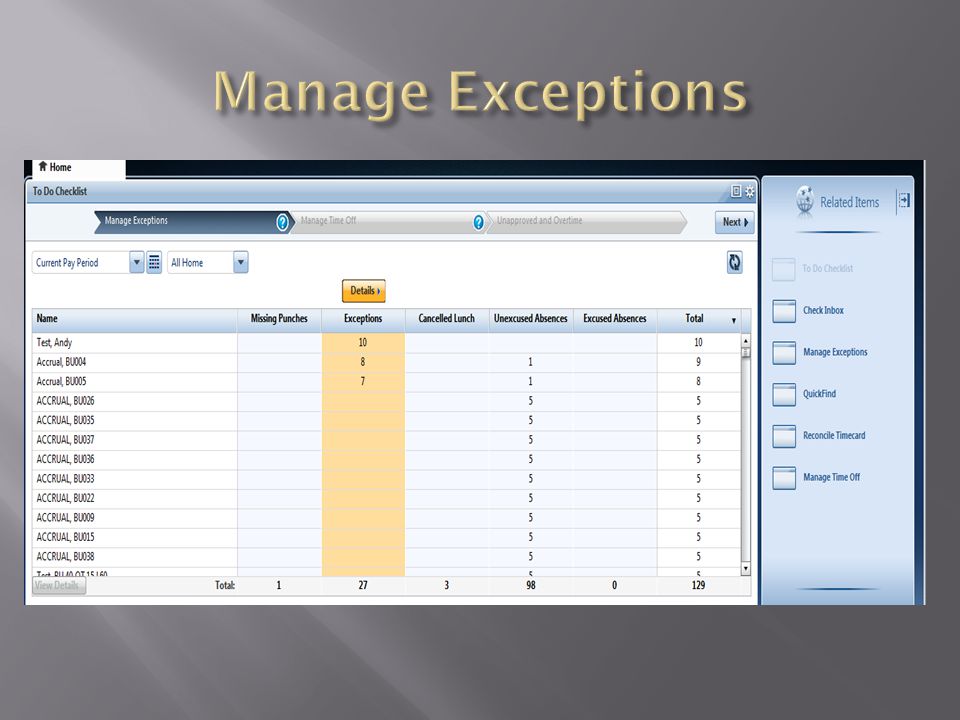
Managing Exceptions Daily Reviewing Exceptions Adding Missed Punches Cancelling Meal Deductions Managing Time Off Requests Approving Overtime

93
Click on the Home Tab

95
Missing Punches

96
Missed Punch

97
Exceptions

99
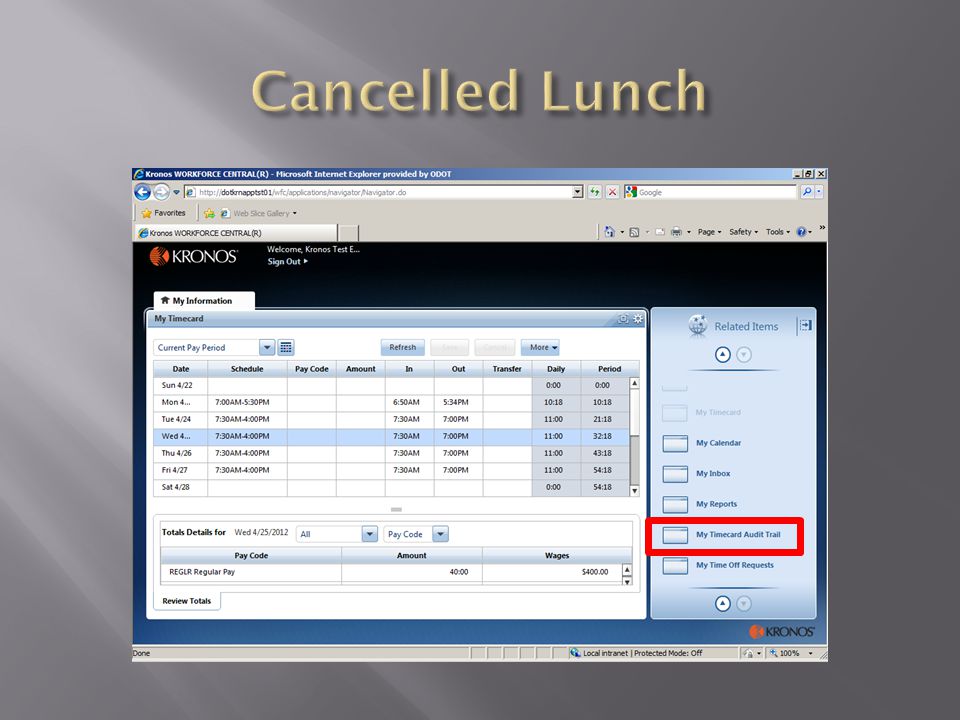
Cancelled Lunch

100
Kronos is programmed to automatically deduct lunch after 4 hours of work. Employees working more than 4 hours who do not take a lunch will need to cancel the lunch deduction. This will then have to be approved by their manager.

105
Click Save

106
Unexcused Absences

108
Excused Absences

111
Related Items

112
Check Inbox

113
Two types of Inbox Notifications: Tasks Example: Delegation that needs actions taken on Messages Example: Confirmation from delegator of acceptance or declined. Kronos system messages General messages will come to your ODOT e-mail in Outlook

114
Tasks

115
Messages

116
Manage Exceptions

118
Manage Time Off

120
Review and manage requests in the request grid. IMPORTANT: Ensure the time period is set correctly. You will only see requests for the period that is loaded.

122
View Time Off Requests by Status

123
To manage requests, click on one and then use the action buttons, e.g. Approve, Refuse, Retract, etc. You can also submit a request for time off for an employee by clicking on Request Time Off and filling out the form.

125
Request Time Off

126
All columns in the table can be sorted. Modified By – Indicates the last person to touch the request. Example – When entered, it will show the employee’s name. When approved, it will show the manager’s name.

128
Overtime that has been submitted

129
Approve Overtime

130
Approve Overtime - Must be in 6 minute increments

131
Overtime has been approved

132
Links, which appear as icons, enabling you to quickly view the type and number of tasks and issues that you need to address.

133
Alerts

136
Clear exceptions daily. Approve all time off requests for the pay period. Chevrons will guide you through the steps. All employee timecards must be approved by noon on the Monday after payday (subject to change).
..")
138
Manually entering time

139
Visual indicators appear on a timecard when an exception occurs.

140
Visual indicators key:

141
Words in Orange: Need to SAVE

144
Click on Workspaces and use the arrows to go to Approve Timecards Checklist. Click on Approve Timecards Checklist

145
The Approve Timecards Checklist tab appears.

146
Chevrons to guide you through

147
Items to take action on prior to approving timecards

148
Once all exceptions are resolved, press next for to be taken to the next step

149
Resolve any time off requests

150
Once all time off request are resolved, press next for to be taken to the next step

151
Double check all items are resolved

152
To approve all time cards, select Actions and then Select All

153
To approve select time cards, Ctrl + Click

154
Once you have selected the time cards to be approved, select Approvals and then Approve

155
Timecards are marked as approved

157
How to Delegate Work carousel Manage Delegations Select Manager Select Start and End Date Save Once you delegate to another manager and they accept, the application automatically provides you access to the task defined for the set period. A Switch Role link appears as a quick link so you do not have to log on as the manager who delegated you the tasks.

158
Manage Delegations

163
2 1

164
On the day the accepted delegation begins, the delegated user may switch between their role and the delegating manager. If the start day is today, then the manager must log off and log back in to see the “Switch Role” functionality.

166
FMLA Time Off Requests will be approved by the managers. Employees who have an approved FMLA will submit Time Off Requests using the appropriate Code; FMVAC, FMSCK, etc. It is important that the Manager works with the District FLMA Coordinator, to verify the usage of FMLA.

167
If you encounter issues during the Pilot, please report them to your manager. Your manager should contact the district payroll office.

Similar presentations


>")


 is a new integrated system for all human.>")


 Absence Entry.>")

 Employees>")


