Download presentation
Presentation is loading. Please wait.

1
WBSCM Tips & Tricks

2
Agenda WBSCM User Registration WBSCM User Security Roles WBSCM Tips & Tricks Catalog Administration Direct-Ship Delivery Periods Maintenance Requisitions Consolidation Workbench Returned FNS Orders Entitlements Recalls Complaints Redistribution Reporting WBSCM Recommended Web Browser Settings FNS WBSCM Website Links WBSCM Webinar Training Schedule (Spring/Summer 2013)
")
3
WBSCM User Registration

5
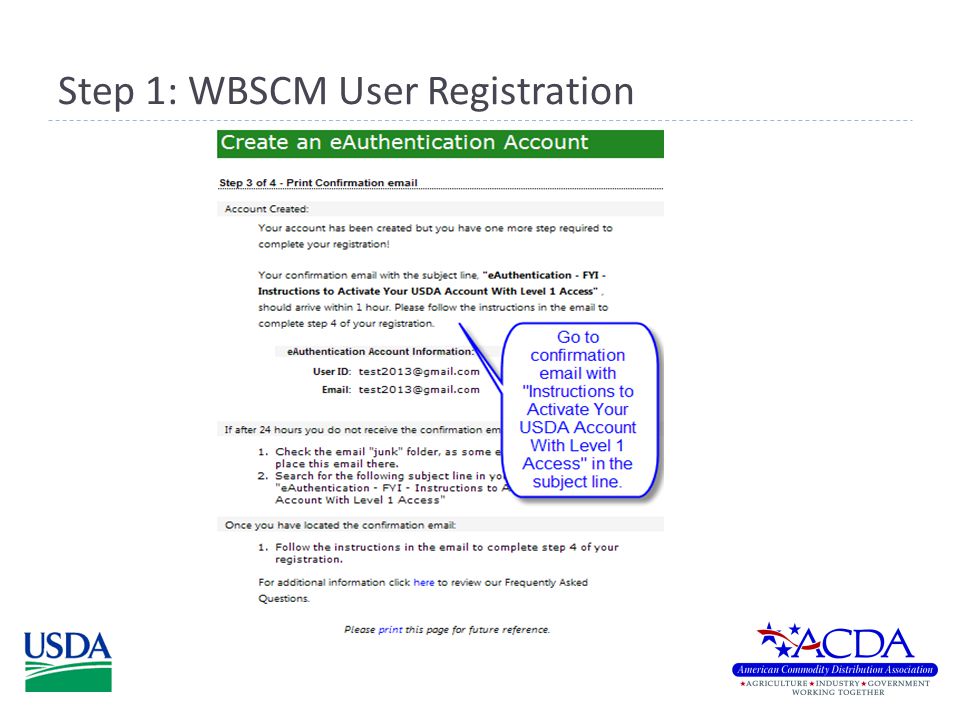
Step 1: WBSCM User Registration

6
Your Password must include at least 12, but no more than 24 alphanumeric and special characters with no spaces including at least 12-24 characters One number One uppercase letter One lower case letter One special character !#$% Dictionary Words may not be used in passwords The previous 24 passwords may not be re-used Answer Security Questions

7
Step 1: WBSCM User Registration

10
Step 2: WBSCM User Registration Continue by clicking the link in step 2. Proceed to log in using your eAuth ID and password and then accept the “WBSCM Rules of Behavior”. You should now see the WBSCM Homepage.

11
Step 3: WBSCM User Registration All future WBSCM logins can be made using the following URL link: http://www.usda.gov/wbscm http://www.usda.gov/wbscm This link will take you to the USDA WBSCM splash page where you can then click “WBSCM Login” to access WBSCM. You may bookmark this link for quick access to the login page by adding it as a Favorite.

12
Key Tips: WBSCM Registration/Logon Remember your eAuth ID once you complete your WBSCM registration. If you forget it, you can click the “Forgot Your User ID?” link on the eAuth login page to retrieve your eAuth ID (you will need to enter your First Name, Last Name, and Email address in order to perform the lookup) Use the eAuth “Forgot Your Password?” link to establish a new password. Remember to select the “accept” within the notification received from USDA eAuthentication after you create your eAuth account. This must be done within 7 days of creation of your eAuthentication account. Registration emails that are sent to users when their WBSCM profile is created are for that specific user only and SHOULD NOT BE SHARED. If a user tries to register using another person’s registration email it will not work. When a user leaves the organization their ID must be deleted. It cannot be recycled for another person to use. A new ID must be created for each new user.
 Use the eAuth Forgot Your Password link to establish a new password. Remember to select the accept within the notification received from USDA eAuthentication after you create your eAuth account. This must be done within 7 days of creation of your eAuthentication account. Registration s that are sent to users when their WBSCM profile is created are for that specific user only and SHOULD NOT BE SHARED. If a user tries to register using another person’s registration it will not work. When a user leaves the organization their ID must be deleted. It cannot be recycled for another person to use. A new ID must be created for each new user..")
13
WBSCM User Security Roles

14
WBSCM User Security Roles: SDA/ITO Manage RA Catalog Views Export Catalog User Security Report Create Co-op Organization Create RA Organization Import New RA Organizations Import RA Updates Maintain Domestic Ship-to Assignment Maintain RA Entitlement Maintain RA to Co-op Assignment Maintain RA to SDA Assignment Modify Co-op Organization Modify RA Organization Modify SDA/ITO Organization Upload RA Entitlement Data View Co-op Organization View RA Organization View SDA/ITO Organization Create Co-op Org Admin Create Co-op User Org Admin - SDA/ITO

15
WBSCM User Security Roles: SDA/ITO Maintain RA NLT Dates and Delivery Periods RA Entitlement/Bonus Detail Report Entitlement/Bonus Summary Report SDA Entitlement/Bonus Detail Report Maintain National Warehouse Delivery Calendar Consolidate Requisitions to Create Standard Domestic Order Create Domestic Requisition Order Manager - SDA/ITO Download PO Data from WBSCM Download Sales Orders from WBSCM Modify Domestic Requisition Reallocate Returned Order Quantities to Requisitions Upload Sales Orders into WBSCM View/Post Messages to Forums Enter Customer Shipment Receipt Upload Customer Shipment Receipt

16
WBSCM User Security Roles: SDA/ITO Submit FNS Recall Survey Response Form View FNS Recall - External Domestic Recall Specialist - SDA/ITO Create Domestic Complaint Modify Domestic Complaint (up to point of submission) View Domestic Complaint Complaint Specialist - SDA/ITO User Security Report Create SDA/ITO Org Admin Create SDA/ITO User User Admin - SDA/ITO Create RA Org Admin Create RA User Admin Receive Recall Alert Notifications Recall Contact - External
 View Domestic Complaint Complaint Specialist - SDA/ITO User Security Report Create SDA/ITO Org Admin Create SDA/ITO User User Admin - SDA/ITO Create RA Org Admin Create RA User Admin Receive Recall Alert Notifications Recall Contact - External")
17
WBSCM User Security Roles: SDA/ITO Material Outlay Report Order Status Report Domestic Price Support Report List of Materials Material Pricing Report Multi-Food Requisition Report Multi-Food Received Shipment Report Redistribution/Redonation Detail Report View-Only - SDA/ITO Received Shipment Report Value of Materials Received - Domestic & Price Support Value of Materials Received - Multi- Food Value of Commodities Received - RA NW Delivery Calendar Report Requisition Status Report View Messages (Forum)
")
18
WBSCM User Security Roles: RA User Admin - RA RA Entitlement/Bonus Detail Report Entitlement/Bonus Summary Report Create Domestic Requisition Modify Domestic Requisition Order Manager - RA User Security Report Modify RA Organization Org Admin - RA User Security Report Create RA Org Admin Create/Modify RA User Modify Domestic Requisition View Domestic Requisition Enter Customer Shipment Receipt Upload Customer Shipment Receipt Create RA User Admin (backup)
")
19
WBSCM User Security Roles: RA List of Materials Material Pricing Report Multi-Food Requisition Report Multi-Food Received Shipment Report Received Shipment Report Value of Commodities Received - RA Value of Materials Received - Multi-Food Requisition Status Report Redistribution/Redonation Detail Report View Messages (Forum) View-Only - RA
 View-Only - RA")
20
WBSCM User Security Roles: Ship-to User Admin - Domestic Ship-To Order Status Report List of Materials Material Pricing Report Multi-Food Received Shipment Report Redistribution/Redonation Detail Report View-Only - Domestic Ship-to User Security Report Modify Domestic Ship-to Organization Enter Customer Shipment Receipt Upload Customer Shipment Receipt Org Admin - Domestic Ship-To User Security Report Create/Update Domestic Ship-to User Received Shipment Report Requisition Status Report NW Delivery Calendar Report View Domestic Ship-to Organization Note: Initial Ship-to setup is performed by USDA. SDA cannot create Ship-to users. Create User Admin (backup)
.")
21
WBSCM Tips & Tricks

22
Catalog Administration Tip #1: Always click the "Save View and Organization" button even before making any changes to the Catalog View. This is recommended so that any new materials added by FNS to the master catalog will become available in the Catalog View for activation.

23
Catalog Administration Tip #2: In the Manage RA Catalog Views 'View' tab, use the Find Product search box to type in a Material # if you know the material you want to add/remove. This saves time from having to drill down from the left side catalog hierarchy to locate a specific material. Be sure to select the material from your search result that matches the Catalog view / Program you wish to work with.

24
Catalog Administration Tip #3: When adding products to an RA Cview, you may add products in one of two ways: 1. Click the Select All button on the right side of the screen to select all materials under Entitlement / Bonus on the page 2. If you wish to select individual materials, select the checkbox next to each material you wish to include in the RA Cview Then click the lowest level hyperlink on the left side pane. This will indicate that material(s) are selected in that Cview sub-area. Example: click the “Entitlement” hyperlink under Beans to refresh both the Beans and Entitlement checkboxes Checkboxes are refreshed after “Entitlement” hyperlink is clicked
 are selected in that Cview sub-area. Example: click the Entitlement hyperlink under Beans to refresh both the Beans and Entitlement checkboxes Checkboxes are refreshed after Entitlement hyperlink is clicked.")
25
Catalog Administration Tip #4: Create a “test” RA to preview how your RA Cview will look by your RAs prior to publishing.

26
Direct-Ship Delivery Periods Maintenance Tip #5: On the Maintain Direct-Ship Delivery Periods search screen, filter your data set by entering multiple variables. This will help to reduce the amount of data that returns so you can more easily work with records that you want to update. Example: Catalog Program: NSLP SFSP Commodity: 100158 100159

27
Requisitions Tip #6: In the Domestic Order Entry screen, you can search for a single material by entering the material # in the Quick Search box and then picking the material/program to place the order against. *Method only applies to Domestic Direct Ship Ordering

28
Requisitions Tip #7: To opt out of receiving Sales Order or Requisition Change emails, have user check the “Opt out from order change notification emails?” checkbox in the Manage User Profile view.

29
Consolidation Workbench (CWB) Tip #8: Use the filter feature on the right hand side to place a blank line at the top of the consolidation table. Enter information into the blank line within the column you wish to use as your filter. For this example use the FTL qty in the Quantity column. Press Enter. you will now only see those reqs that are a FTL. To remove the filter, click the Delete Filter link.

30
Returned FNS Orders Tip #9: After making changes to a returned order in the Returned FNS Orders screen, be sure to click the Update Order/Req button to update the order with the changes you made. This will also flow changes back down to the original requisition. When your RAs or Co-ops navigate to the Domestic Order Entry screen and display their requisition, they will be able to see changes you made to it as well as any comments explaining those changes. Tip #10: Remember to click the Submit Order for Approval button to submit your updated orders back to FNS.

31
Entitlements Tip #11: There are 2 options to get RAs to display on the entitlement budgeting screen so that entitlement $ can be rolled down from SDA to RAs: Option #1: Use the entitlement file upload functionality to specify the RA BP IDs which you want to roll down entitlement for in the upload file. Only those RAs in the file will display on the screen. Once you have the upload file, you can edit the same file and re-upload to refresh the entitlement data for your RAs. Option #2: Click the "New Record" button to load the RA table with ALL RAs associated to your org. Then you can edit the entitlement fields directly on screen for each RA. However, this option may cause some RAs that you may consider inactive to appear on the screen which may clutter your entitlement screen. You cannot delete these RAs from the view. Note: RA entitlement planning data is refreshed nightly in WBSCM. As a result, data is not readily available for entitlement reporting or use immediately following roll- down of entitlement to RAs.

32
Entitlements Before RAs are loaded in the entitlement screen

33
Entitlements After RAs are loaded in the entitlement screen

34
Recalls Tip #12: To receive recall notifications, users need the "Recall Contact - External" role. Users will then need to update their recall contact preferences by going to the Manage User Profile view (next slide) to set the devices they wish to be contacted on. WBSCM does not default contact preferences so it's the responsibility of the user to set this up. Note: A recall specialist will not receive notification unless they have the "Recall Contact - External" role.
 to set the devices they wish to be contacted on. WBSCM does not default contact preferences so it s the responsibility of the user to set this up. Note: A recall specialist will not receive notification unless they have the Recall Contact - External role..")
35
Recalls Update Recall Contact Preferences in the Manage User Profile view

36
Complaints Tip #13: If you don’t have the actual order # or complaint # to use for your search, you can use the search criteria "In Period" from the dropdown. Then enter the From & To date range for when the order or complaint was created.

37
Complaints Tip #14: Remember to click the "Submit" button on a Saved complaint when ready for FNS to review. Else, the complaint will remain in Draft status and not be reviewed by FNS.

38
Redistribution Tip #15: You can now redistribute from a redonated order (as of Release 2.2.15). Enter the Redonation Order # and perform search. Then create a requisition from the redonation order and then follow normal procedures for redistribution off a requisition.

39
Redistribution Tip #16: If you are distributing order quantities to more than 10 RAs at once, it is recommended that you run the “Process Orders in Background” job. The SDA may also submit additional redistribution background tasks for processing (for other sales orders) although the first task must complete before subsequent ones execute. An email notification will be sent to the SDA user that submitted the job notifying that the redistribution job has completed.
 although the first task must complete before subsequent ones execute. An notification will be sent to the SDA user that submitted the job notifying that the redistribution job has completed..")
40
Redistribution Tip #17: Use the Redistribution/Redonation Detail Report to view the entire chain of sales docs tied to a Sales Order. At top most level is the Sales Order. By entering the SO# into the search screen, an SDA can view all the redistribution and redonation activity that has taken place against the SO. If a req # is entered, the SDA will see all the redistribution activity that has taken place against the requisition. If a redonation # is entered, the SDA will see the redonation order and all the redistribution activity that has taken place against the redonation order.

41
Reporting Tip #18: You can create a custom view where only the columns that are useful to you will be visible. After executing a report, scroll to the right towards the end of the report and click on “Settings”. A pop-up box will appear allowing you to change your column setting. On the “Column Selection” tab, add, remove, or resequence columns.

42
Reporting Click the “Apply” button to preview how your report will look with the column changes made. You can preview your changes on the bottom portion of the screen.

43
Reporting Click the ‘Save As’ button if you would like to have the column change settings saved. Enter a name for your view

44
Reporting After executing your report, click on the View dropdown box to select your custom view.

45
Reporting Tip #19: Perform filters and/or sorts in the report's result set view (Example: you could sort by status, material, delivery periods, programs) before you export to your computer hard drive for save. Records will be exported in the same sort order displayed on-screen.

46
Reporting - WBSCM Reports (SDA Reports) Link: http://www.fns.usda.gov/fdd/WBSCM/WBSCMfiles/CrossWalks/EC OSvsWBSCMcrosswalk.pdf http://www.fns.usda.gov/fdd/WBSCM/WBSCMfiles/CrossWalks/EC OSvsWBSCMcrosswalk.pdf
 Link: OSvsWBSCMcrosswalk.pdf OSvsWBSCMcrosswalk.pdf")
47
WBSCM Recommended Web Browser Settings

48
Supported Web Browsers WBSCM officially supports Internet Explorer (IE) as the browser client, specifically versions IE6 SP2, IE7, and IE8 (running in "compatibility mode"). WBSCM does not officially support Internet Explorer version 9. Even though IE9 can be run in 'compatibility mode', our users have reported issues and inconsistent results while using IE9 with WBSCM. Users of IE9 and higher should consider downgrading to IE8 should they encounter issues when using WBSCM. Other browsers (e.g. Firefox, Google Chrome, Safari, Google/MSN/Bing Bot, etc.) are not officially supported as they may work for some WBSCM functions but not all.
 are not officially supported as they may work for some WBSCM functions but not all..")
49
Enabling Compatibility Mode View Internet Explorer Compatibility Mode Settings – Option 1 Open Internet Explorer. Navigate to the WBSCM URL: http://www.usda.gov/wbscmhttp://www.usda.gov/wbscm Click on the WBSCM Login link Authenticate with USDA eAuthentication to arrive at the WBSCM portal home page Browser header bar should have the compatibility mode button toggled off as shown below Click the compatibility mode button in the address bar to enable IE7 compatibility mode. Button should switch states and become dim indicating that compatibility mode is running.

50
Enabling Compatibility Mode View

52
IE8 Zoom Setting for WBSCM For WBSCM, users should check their Internet Options Advanced tab and deselect “Reset zoom level for new windows and tabs”. Users should then manually set the Zoom Level to 100% using the ‘Zoom level option’ at the bottom right of their browser screen.

53
FNS WBSCM Website Links

54
Useful Links FNS WBSCM Newsletter: http://www.fns.usda.gov/fdd/WBSCM/Newsletters.htm http://www.fns.usda.gov/fdd/WBSCM/Newsletters.htm FNS WBSCM FAQs: http://www.fns.usda.gov/fdd/WBSCM/WBSCM_General.htm http://www.fns.usda.gov/fdd/WBSCM/WBSCM_General.htm External Roles: http://www.fns.usda.gov/fdd/WBSCM/WBSCMfiles/CrossWalks/WBSC M_Ext_Roles_Act.xlsx http://www.fns.usda.gov/fdd/WBSCM/WBSCMfiles/CrossWalks/WBSC M_Ext_Roles_Act.xlsx Data Files Templates: http://www.fns.usda.gov/fdd/WBSCM/datafiles.htm http://www.fns.usda.gov/fdd/WBSCM/datafiles.htm

55
Useful Links Crosswalk: http://www.fns.usda.gov/fdd/WBSCM/crosswalks.htm http://www.fns.usda.gov/fdd/WBSCM/crosswalks.htm FNS Defects and Releases: http://www.fns.usda.gov/fdd/WBSCM/ http://www.fns.usda.gov/fdd/WBSCM/ WBSCM Help Desk: Wbscmhelp@ams.usda.gov Wbscmhelp@ams.usda.gov

56
Maintaining State Ship-To Business Partners Coming Soon! FNS will post a new and improved Ship-To Business Partner Report on the FDD site that will make it easier to identify Ship-To’s that are assigned to your state. This report will be used to help maintain accurate address and contact information in WBSCM. It will not include National Processors More information will be sent detailing: Where to find the report? How to use it? What FNS will need from you?

57
WBSCM Webinar Training (Spring/Summer 2013)
")
58
WBSCM Webinar Training Schedule April 23: User Registration April 30: Complaints May 14: Catalog Maintenance May 28: Requisition & Sales Order Creation June 21: Processor training June 25: Reports July 9: Multi-food Ordering July 23: Redistributions Aug 6: User and Organization Administration Aug 20: Receipting

59
Q&A

Similar presentations


 Community Based Abstinence Education September, 2009.>")


