Download presentation
Presentation is loading. Please wait.

1
Pelvic Girdle Lab Exercise Presentation based on the textbook by Stanley Hoppenfeld: Physical Examination of the Spine & Extremities Presentation Created By: Jennifer Hurrell, PT, MS Associate Professor Community College of Rhode Island Rehabilitative Health Department RHAB1110: Kinesiology

2
Jennifer Hurrell, PT, MS September 2004/ Rev. May 2007 Learning Objectives 1) Identify the specified bony landmarks of the bones of the pelvic girdle on disarticulated bones 2) Identify the joints of the pelvic girdle on a skeletal model 3) Locate the origins and insertions of the pelvic girdle muscles on a skeletal model 4) Demonstrate the anatomical course of the pelvic girdle muscles on a skeletal model 5) Identify bony and soft tissue structures that are palpable in the pelvic girdle region 6) Palpate specified pelvic girdle structures by correlating anatomical structures with surface anatomy landmarks 7) Perform, describe and name various special tests that screen for common pathological conditions of the pelvic girdle
 Identify the specified bony landmarks of the bones of the pelvic girdle on disarticulated bones 2) Identify the joints of the pelvic girdle on a skeletal model 3) Locate the origins and insertions of the pelvic girdle muscles on a skeletal model 4) Demonstrate the anatomical course of the pelvic girdle muscles on a skeletal model 5) Identify bony and soft tissue structures that are palpable in the pelvic girdle region 6) Palpate specified pelvic girdle structures by correlating anatomical structures with surface anatomy landmarks 7) Perform, describe and name various special tests that screen for common pathological conditions of the pelvic girdle.")
3
Jennifer Hurrell, PT, MS September 2004/ Rev. May 2007 Bony Landmarks Identify these landmarks on the disarticulated bones Sacrum Sacral Base Sacral Promontory Superior Articular Process Ala Sacral Hiatus Foramina Auricular Surface Ilium Iliac Crest Iliac Fossa Anterior Superior Iliac Spine Anterior Inferior Iliac Spine Posterior Superior Iliac Spine Posterior Inferior Iliac Spine Auricular Surface Tuberosity

4
Jennifer Hurrell, PT, MS September 2004/ Rev. May 2007 Bony Landmarks Cont. Identify these landmarks on the disarticulated bones Ischium Ischial Tuberosity Body Ramus Spine Combine Ilium, Ischium, Pubis Acetabulum Obturator Foramen Greater Sciatic Notch Pubis Body Inferior Ramus Superior Ramus Pubic Tubercle

5
Jennifer Hurrell, PT, MS September 2004/ Rev. May 2007 Lumbosacral Joint Sacroiliac Joint Pubic Symphysis Joints & Articulations Identify these joints & articulations on the skeleton

6
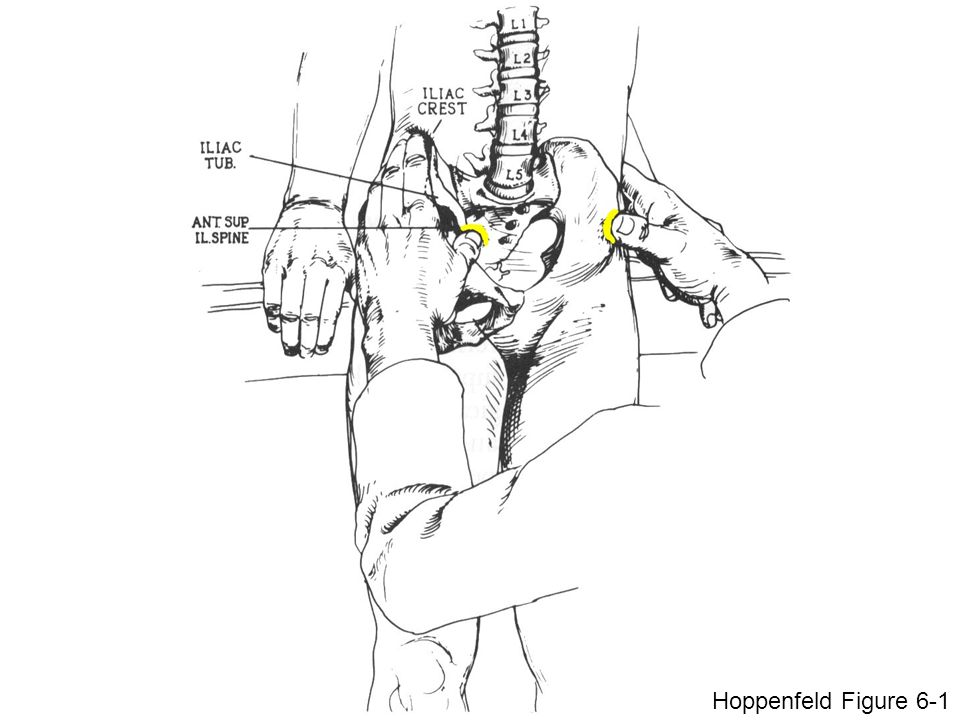
Jennifer Hurrell, PT, MS September 2004/ Rev. May 2007 Bony Palpation Anterior Superior Iliac Spine Stand in front of your patient and palpate both ASIS’s simultaneously with your thumbs. If they are not on the same plane, the patient may have a pelvic obliquity. Hoppenfeld Figure 6-1

8
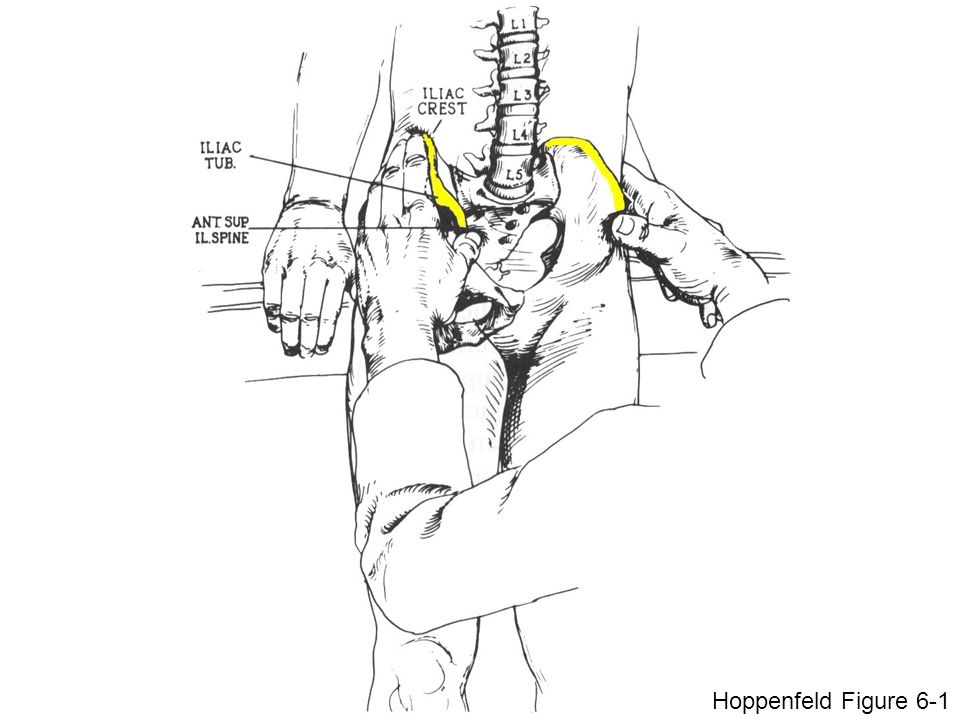
Jennifer Hurrell, PT, MS September 2004/ Rev. May 2007 Bony Palpation Iliac Crest Stand in front of your patient and palpate both iliac crests simultaneously. With your palm facing the floor, place both hands on top of the iliac crests and press down gently. Males tend to have higher iliac crests, or a “taller” pelvis than women. If both iliac crests are not on the same plane, the patient may have a pelvic obliquity. Hoppenfeld Figure 6-1

10
Jennifer Hurrell, PT, MS September 2004/ Rev. May 2007 Bony Palpation Pubic Tubercles The pubic tubercles are best palpated with your patient lying supine. Start with your thumbs a bit higher than the level of the tubercles and palpate down to the most superior edge of them. Take caution to protect modesty and ask specific permission from your patient prior to palpating in this region. If they are not on the same plane, the patient may have a pelvic obliquity. Hoppenfeld Figure 6-4

12
Jennifer Hurrell, PT, MS September 2004/ Rev. May 2007 Bony Palpation Posterior Superior Iliac Spines Standing behind your patient, palpate both PSIS’s simultaneously using your thumbs. The PSIS’s lie at the most posterior end of the iliac crest and are noted to be just deep to the visible “dimples” on the buttock. If they are not on the same plane, the patient may have a pelvic obliquity. Hoppenfeld Figure 9-12

14
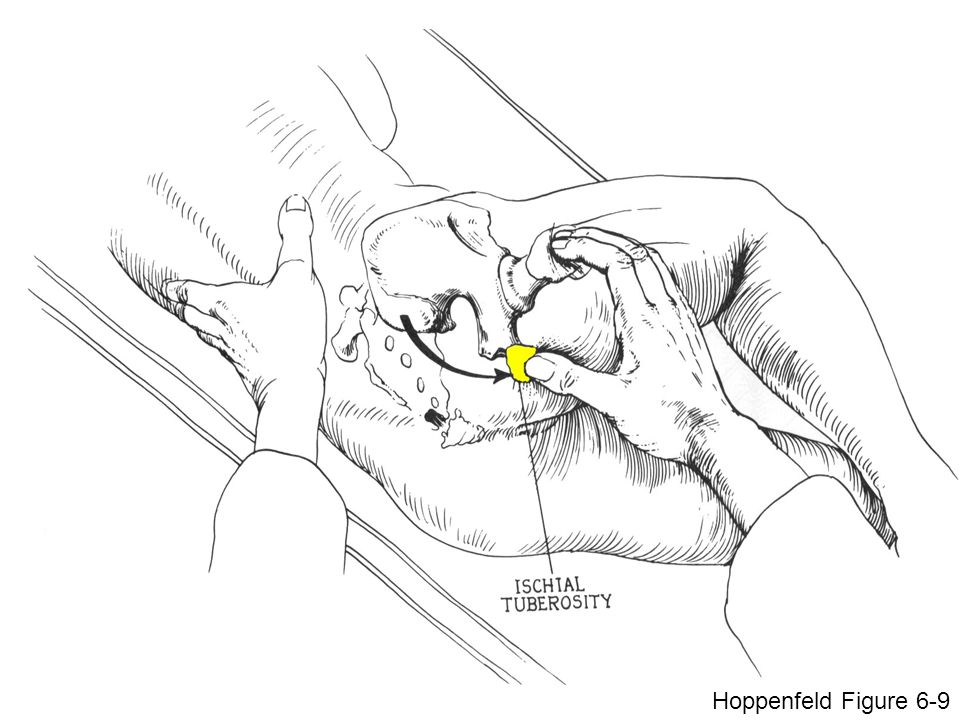
Jennifer Hurrell, PT, MS September 2004/ Rev. May 2007 Bony Palpation Ischial Tuberosity The ischial tuberosity is located at the level of the gluteal fold. It is most easily palpated with the patient in the sidelying position with the hip in flexion, however to compare the symmetry between both ischial tuberosities, the prone position should be used. If they are not on the same plane, the patient may have a pelvic obliquity. Hoppenfeld Figure 6-9

16
Jennifer Hurrell, PT, MS September 2004/ Rev. May 2007 Bony Palpation Sacroiliac Joint/ Sacral Base While the sacroiliac joint and sacral base themselves are not palpable due to obstruction from the ilium and supporting ligaments, the position of the sacral base can be assessed indirectly by the following method. Place your patient in the prone position and palpate both PSIS’s with your thumbs. Move both thumbs medially until they drop onto the sacrum at about the S2 level. Observe the position of your thumbs for symmetry with respect to depth. Hoppenfeld Figure 6-10

18
Jennifer Hurrell, PT, MS September 2004/ Rev. May 2007 Special Tests Leg Length Discrepancy True Leg Length Measurement: Measure from the concavity just below the ASIS to the most distal margin of the medial malleolus. Apparent Leg Length Measurement: Measure from the umbilicus to the medial malleolus of the ankle. Hoppenfeld Figures 6-58, 6-61

19
Hoppenfeld Figure 6-58

20
Hoppenfeld Figure 6-61

21
Jennifer Hurrell, PT, MS September 2004/ Rev. May 2007 Special Tests Gillet test This test is used to identify if one or both SI joints are hypomobile or fixated. The subject stands while the examiner palpates the PSISs. The subject is asked to flex the hip and bring the knee toward the chest. The examiner should feel the PSIS move inferiorly during this maneuver. If the PSIS does not move inferiorly, this is a positive test, indicating SI hypomobility or fixation on that side. Konin Figures 8-2A, 8-2B

22
Jennifer Hurrell, PT, MS September 2004/ Rev. May 2007 Jennifer Hurrell, PT, MS September 2004/ Rev. May 2007 Konin Figures 8-2A, 8-2B

23
Jennifer Hurrell, PT, MS September 2004/ Rev. May 2007 Special Tests Long-Sit Test This test is used to screen for an anteriorly or posteriorly rotated innominate bone. The subject assumes a hooklying position, then performs a bridge (lifting the buttocks off the table) in order to assure normal alignment. The subject then moves into a supine position with the LEs fully extended. The examiner stands with their thumbs on the patient’s medial malleoli and assesses relative position. The subject then moves into long sitting, and the examiner reassesses the position of the malleoli. Interpretation of lower extremity change in length from supine to long sitting is as follows: Short to Long = Posterior Innominate Rotation Long to Short = Anterior Innominate Rotation Konin Figures 8-2A, 8-2B
 in order to assure normal alignment. The subject then moves into a supine position with the LEs fully extended. The examiner stands with their thumbs on the patient’s medial malleoli and assesses relative position. The subject then moves into long sitting, and the examiner reassesses the position of the malleoli. Interpretation of lower extremity change in length from supine to long sitting is as follows: Short to Long = Posterior Innominate Rotation Long to Short = Anterior Innominate Rotation Konin Figures 8-2A, 8-2B.")
24
Jennifer Hurrell, PT, MS September 2004/ Rev. May 2007 Jennifer Hurrell, PT, MS September 2004/ Rev. May 2007 Konin Figures 8-8A, 8-8D

25
Jennifer Hurrell, PT, MS September 2004/ Rev. May 2007 References Hoppenfeld, Stanley. (1976). Physical Examination of the Spine and Extremities. Norwalk: Appleton & Lange Konin, J.G. et al. (2006). Special Tests for Orthopedic Examination 3 rd Ed. Thorofare: SLACK Inc. Lippert, Lynn S. (2000). Clinical Kinesiology for Physical Therapist Assistants. 3 rd Ed. Philadelphia: F.A. Davis Company. Minor, M.D. & L.S. Lippert. (1998). Kinesiology Lab Manual for Physical Therapist Assistants. Philadelphia: F.A. Davis Company. Netter, Frank H. (2003). Atlas of Human Anatomy. Teterboro: Icon Learning Systems.
. Physical Examination of the Spine and Extremities. Norwalk: Appleton & Lange Konin, J.G. et al. (2006). Special Tests for Orthopedic Examination 3 rd Ed. Thorofare: SLACK Inc. Lippert, Lynn S. (2000). Clinical Kinesiology for Physical Therapist Assistants. 3 rd Ed. Philadelphia: F.A. Davis Company. Minor, M.D. & L.S. Lippert. (1998). Kinesiology Lab Manual for Physical Therapist Assistants. Philadelphia: F.A. Davis Company. Netter, Frank H. (2003). Atlas of Human Anatomy. Teterboro: Icon Learning Systems..")
Similar presentations


 (Lower) Leg Foot The lower appendages are attached to the axial skeleton via the pelvic girdle.>")


