Download presentation
Presentation is loading. Please wait.

1
Welcome to the Exchange 2013 Webcast Deployment & Coexistence

9
AuthN, Proxy, Re-direct AuthN, Proxy, Re-direct Protocols, API, Biz-logic Protocols, API, Biz-logic Assistants, Store, CI Exchange 2010 Architecture AuthN, Proxy, Re-direct AuthN, Proxy, Re-direct Store, CI Protocols, Assistants, API, Biz-logic Exchange 2013 Architecture Client Access Mailbox Client Access Hub Transport, Unified Messaging Mailbox Hardware Load Balancer L4 LB L7 LB

10
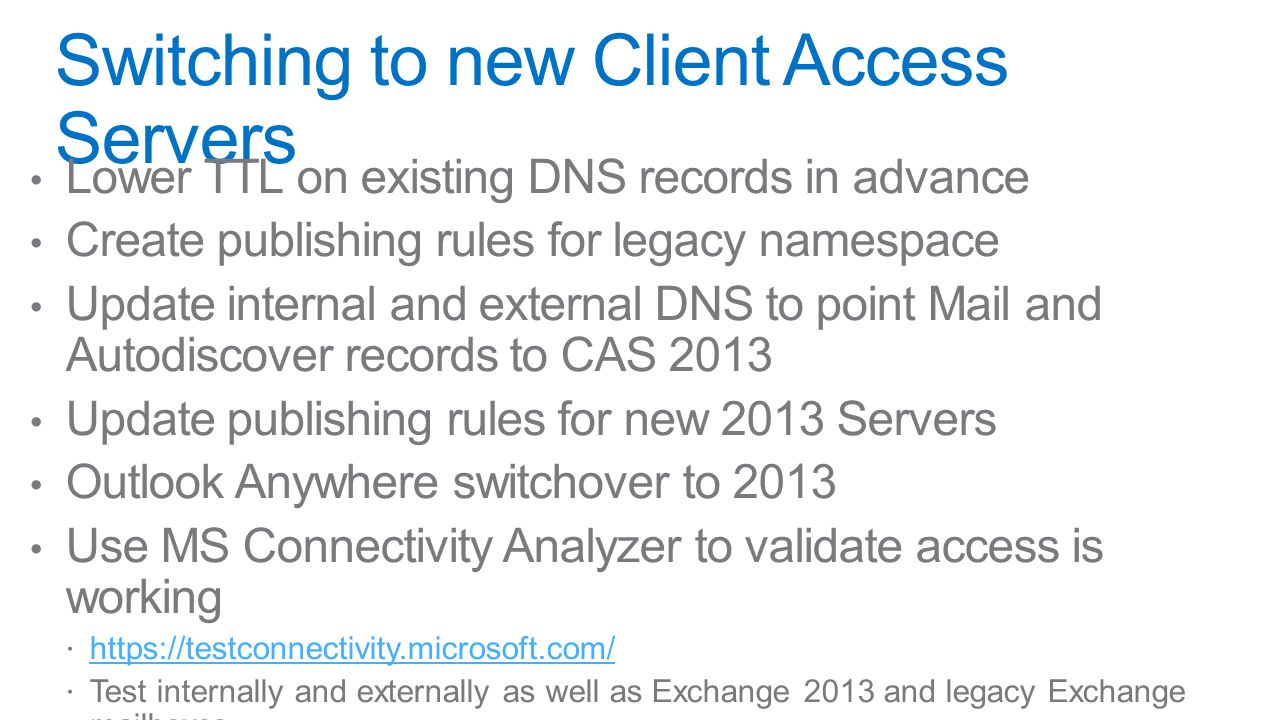
SP3 E2010 CAS E2010 HUB E2010 MBX Clients Internet-facing site – upgrade first autodiscover.contoso.com mail.contoso.com Intranet site Exchange 2010 Servers SP3 1. Prepare Install Exchange 2010 SP3 across the ORG Prepare AD with Exchange 2013 CU1 schema Validate existing Client Access using Remote Connectivity Analyzer and test connectivity cmdlets 4. Switch primary namespace to Exchange 2013 CAS Exchange 2013 fields all traffic, including traffic from Exchange 2010 users Validate using Remote Connectivity Analyzer 5. Move Mailboxes Build out DAG Move Exchange 2010 users to Exchange 2013 MBX 6. Repeat for additional sites 2. Deploy Exchange 2013 CU1 servers Install both Exchange 2013 MBX and CAS roles SP3 E2013 CAS E2013 MBX 3. Obtain and deploy certificates Obtain and deploy certificates on Exchange 2013 Client Access Servers 124356

11
RU10 E2007 SP3 CAS E2007 SP3 HUB E2007 SP3 MBX Clients Internet-facing site – upgrade first autodiscover.contoso.com mail.contoso.com Intranet site Exchange 2007 Servers RU10 1. Prepare Install Exchange 2007 SP3 + RU10 across the ORG Prepare AD with Exchange 2013 CU1 schema 5. Switch primary namespace to Exchange 2013 CAS Validate using Remote Connectivity Analyzer 6. Move mailboxes Build out DAG Move Exchange 2007 users to Exchange 2013 MBX 7. Repeat for additional sites 2. Deploy Exchange 2013 CU1 servers Install both Exchange 2013 MBX and CAS servers RU10 E2013 CAS E2013 MBX 3. Create legacy namespace Create DNS record to point to legacy Exchange 2007 CAS 4. Obtain and Deploy Certificates Obtain and deploy certificates on Exchange 2013 CAS servers configured with legacy namespace, Exchange 2013 namespace, and autodiscover namespace Deploy certificates on Exchange 2007 CAS legacy.contoso.com 3125 4 6 7

12
SP/RU E2010 or 2007 CAS E2010 or 2007 HUB E2010 or 2007 MBX Clients Internet facing site – Upgrade first autodiscover.contoso.com mail.contoso.com Intranet site Exchange 2010 or 2007 Servers SP/RU 1. Prepare Install Exchange SP and/or updates across the org Prepare AD with Exchange 2013 CU1 schema and validate 5. Switch primary namespace to Exchange 2013 CAS 6. Move mailboxes 7. Repeat for additional sites 3. Create legacy namespace 4. Obtain and deploy certificates 1 2. Deploy Exchange 2013 CU1 servers

13
Prepare 1

14
SP/RU E2010 or 2007 CAS E2010 or 2007 HUB E2010 or 2007 MBX Clients Internet-facing site – upgrade first autodiscover.contoso.com mail.contoso.com Intranet site Exchange 2010 or 2007 Servers SP/RU 1. Prepare Install Exchange SP and/or updates across the org Prepare AD with Exchange 2013 CU1 schema 5. Switch primary namespace to Exchange 2013 CAS 6. Move mailboxes 7. Repeat for additional sites 2. Deploy Exchange 2013 servers Install both E2013 MBX and CAS servers E2013 CAS E2013 MBX 3. Create legacy namespace 4. Obtain and deploy certificates 2 2. Deploy Exchange 2013 CU1 servers Install both Exchange 2013 MBX and CAS servers

15
Install − Setup.exe /mode:install /roles:clientaccess − Setup.exe /mode:install /roles:mailbox − Setup.exe /mode:install /roles:ManagementTools Other required parameter - /IAcceptExchangeServerLicenseTerms 1 2

16
E2010 or 2007 CAS E2010 or 2007 HUB E2010 or 2007 MBX Clients Internet-facing site – upgrade first autodiscover.contoso.com mail.contoso.com Intranet site Exchange 2010 or 2007 Servers 1. Prepare Install Exchange SP and/or updates across the org Prepare AD with Exchange 2013 CU1 schema 5. Switch primary namespace to Exchange 2013 CAS 6. Move mailboxes 7. Repeat for additional sites 2. Deploy Exchange 2013 CU1 servers Install both Exchange 2013 MBX and CAS servers E2013 CAS E2013 MBX 4. Obtain and deploy certificates legacy.contoso.com 3 3. Create legacy namespace SP/RU

17
Create Legacy Namespace 1 3

18
E2010 or 2007 CAS E2010 or 2007 HUB E2010 or 2007 MBX Clients Internet-facing site – upgrade first autodiscover.contoso.com mail.contoso.com Intranet site Exchange 2010 or 2007 Servers 1. Prepare Install Exchange SP and/or updates across the org Prepare AD with Exchange 2013 CU1 schema 5. Switch primary namespace to Exchange 2013 CAS 6. Move mailboxes 7. Repeat for additional sites 2. Deploy Exchange 2013 CU1 servers Install both Exchange 2013 MBX and CAS servers E2013 CAS E2013 MBX 4. Obtain and deploy certificates Obtain and deploy certificates on Exchange 2013 CAS configured with legacy namespace, Exchange 2013 namespace, and Autodiscover namespace Deploy certificates on Exchange 2007 CAS legacy.contoso.com 4 3. Create legacy namespace SP/RU

19
1 4

20
Minimize the number of certificates Minimize number of host names Use split DNS for Exchange host names mail.contoso.com for Exchange connectivity on intranet and Internet mail.contoso.com has different IP addresses in intranet/Internet DNS Don’t list machine host names in certificate host name list Use load-balanced (LB) arrays for intranet and Internet access to servers Use “Subject Alternative Name” (SAN) certificate Certificates 1 4
 arrays for intranet and Internet access to servers Use Subject Alternative Name (SAN) certificate Certificates 1 4")
21
E2010 or 2007 CAS E2010 or 2007 HUB E2010 or 2007 MBX Clients Internet-facing site – upgrade first autodiscover.contoso.com mail.contoso.com Intranet site Exchange 2010 or 2007 Servers 1. Prepare Install Exchange SP and/or updates across the org Prepare AD with Exchange 2013 CU1 schema 5. Switch primary namespace to Exchange 2013 CAS Validate using Remote Connectivity Analyzer 6. Move mailboxes 7. Repeat for additional sites 2. Deploy Exchange 2013 CU1 servers Install both Exchange 2013 MBX and CAS servers E2013 CAS E2013 MBX 4. Obtain and deploy certificates Obtain and deploy certificates on Exchange 2013 CAS configured with legacy namespace, Exchange 2013 namespace, and Autodiscover namespace Deploy certificates on Exchange 2007 CAS legacy.contoso.com 3. Create legacy namespace SP/RU 5

24
Layer 4 LB E2013 CAS IIS HTTP Proxy E2013 MBX Protocol Head DB E2010 CAS Protocol Head E2010 MBX Store DB Site Boundary E2010 CAS Protocol Head E2010 MBX Store DB RPC Cross-Site Proxy Request Layer 7 LB Cross-Site Redirect Request OWA europe.mail.contoso.commail.contoso.com

25
Layer 4 LB E2013 CAS IIS HTTP Proxy E2013 MBX Protocol Head DB E2007 CAS Protocol Head E2007 MBX Store DB Site Boundary E2007 CAS Protocol Head E2007MBX Store DB RPC Layer 7 LB Cross-Site Redirect Request OWA Layer 7 LB legacy.contoso.commail.contoso.comeurope.mail.contoso.com Cross-Site Proxy Request

26
Load Balancer Layer 7 LB mail.contoso.com HTTP PROXY RPC/HTTP Clients E2007/E2010 MBX Internet-facing site RPC/HTTP Intranet-facing site E2007/E2010 MBX OA Enabled Client Settings IIS Auth: NTLM E2007/E2010 CAS OA Client Settings IIS Auth: E2007/E2010 CAS HTTP PROX Y 3. Client settings Make legacy OA settings the same as 2013 CAS so all clients get the same proxy hostname 1. Enable Outlook Anywhere on all legacy CAS 2. IIS authentication methods IIS Auth must have NTLM enabled on all legacy CAS RPC Client Auth: Basic IIS Auth: Basic NTLM E2013 CU1 CAS E2013 CU1 MBX RPC Disabled Enabled NTLM 4. DNS cutover A low TTL on the existing record the days prior to the cutover is a good idea.

27
ProtocolExchange 2007 user accessing Exchange 2010 namespace Exchange 2007 user accessing Exchange 2013 namespace Exchange 2010 user accessing Exchange 2013 namespace RequiresLegacy namespace No additional namespaces OWA Same AD site: silent or SSO FBA redirect Externally facing AD site: manual or silent/SSO Cross-site redirect Internally facing AD site: proxy Non-silent redirect (not SSO) to CAS 2007 externally facing URL Proxy to CAS 2010 Cross-site silent redirect (not SSO), which may redirect to CAS 2010 or CAS 2013 EAS EAS v12.1+ : Autodiscover & redirect Older EAS devices: proxy Proxy to MBX 2013Proxy to CAS 2010 Outlook Anywhere Direct CAS 2010 supportProxy to CAS 2007Proxy to CAS 2010 AutodiscoverExchange 2010 answers Autodiscover query for 2007 User Exchange 2013 answers Autodiscover query for 2007 User Proxy to CAS 2010 EWSUses Autodiscover to find CAS 2007 EWS External URL Proxy to CAS 2010 POP/IMAPProxyProxy to CAS 2007Proxy to CAS 2010 OABDirect CAS 2010 supportProxy to CAS 2007Proxy to CAS 2010 RPSn/a Proxy to CAS 2010 ECPn/a Proxy to CAS 2010 Cross-site redirect, which may redirect to CAS 2010 or CAS 2013
 to CAS 2007 externally facing URL Proxy to CAS 2010 Cross-site silent redirect (not SSO), which may redirect to CAS 2010 or CAS 2013 EAS EAS v12.1+ : Autodiscover & redirect Older EAS devices: proxy Proxy to MBX 2013Proxy to CAS 2010 Outlook Anywhere Direct CAS 2010 supportProxy to CAS 2007Proxy to CAS 2010 AutodiscoverExchange 2010 answers Autodiscover query for 2007 User Exchange 2013 answers Autodiscover query for 2007 User Proxy to CAS 2010 EWSUses Autodiscover to find CAS 2007 EWS External URL Proxy to CAS 2010 POP/IMAPProxyProxy to CAS 2007Proxy to CAS 2010 OABDirect CAS 2010 supportProxy to CAS 2007Proxy to CAS 2010 RPSn/a Proxy to CAS 2010 ECPn/a Proxy to CAS 2010 Cross-site redirect, which may redirect to CAS 2010 or CAS 2013")
28
E2010 or 2007 CAS E2010 or 2007 HUB E2010 or 2007 MBX Clients Internet-facing site – upgrade first autodiscover.contoso.com mail.contoso.com Intranet site Exchange 2010 or 2007 Servers 1. Prepare Install Exchange SP and/or updates across the org Prepare AD with Exchange 2013 CU1 schema 5. Switch primary namespace to Exchange 2013 CAS Validate using Remote Connectivity Analyzer 6. Move mailboxes Build out DAG Move users to Exchange 2013 MBX 7. Repeat for additional sites 2. Deploy Exchange 2013 CU1 servers Install both Exchange 2013 MBX and CAS servers E2013 CAS E2013 MBX 4. Obtain and deploy certificates Obtain and deploy certificates on Exchange 2013 CAS configured with legacy namespace, Exchange 2013 namespace, and Autodiscover namespace Deploy certificates on Exchange 2007 CAS legacy.contoso.com 3. Create legacy namespace SP/RU 6

Similar presentations


 Client.>")


