Download presentation
Presentation is loading. Please wait.

1
Surgical Asepsis Chapter 20

2
Assigned Reading Chapter 20, volumes one and two

3
Principles of Surgical Asepsis
Touching one sterile item with another sterile item Touching one sterile item with a non-sterile item yields it contaminated Partially unwrapped sterile package is contaminated If a question arises about sterility it is contaminated A commercially packaged sterile item is not considered sterile past its recommended expiration date Once a sterile item is opened it is only a matter of time before it becomes contaminated- set up immediately before using A sterile wrapper, if it becomes wet, wicks microorganisms from its supporting surface, causing contamination

4
Principles of Surgical Asepsis (cont.)
Any opened sterile item or sterile area is considered contaminated if it is left unattended (in OR and Delivery, covered with a sterile field) Coughing, sneezing, or excessive talking over a sterile field causes contamination Reaching across an area that contains sterile equipment has a high potential for causing contamination and therefore is avoided Sterile items that are located or lowered below the waist are considered contaminated Avoid use of one inch perimeter margin of a sterile field
 Coughing, sneezing, or excessive talking over a sterile field causes contamination. Reaching across an area that contains sterile equipment has a high potential for causing contamination and therefore is avoided. Sterile items that are located or lowered below the waist are considered contaminated. Avoid use of one inch perimeter margin of a sterile field.")
5
Sterilization Physical & chemical techniques that destroy all microorganisms and spores

6
Physical Sterilization
Radiation- (generally combined with other means). Effective for TB. Home means includes sunlight Boiling (212F X 15 minutes) Free-flowing steam (212F heat vapors) Dry heat- Similar to baking in oven ( F X 3 hours) Steam under pressure-most dependable. Autoclave method. Temperature over 212F. Pressure allows for hotter temperature than boiling. Heat sensitive tapes may be used.
. Effective for TB. Home means includes sunlight. Boiling (212F X 15 minutes) Free-flowing steam (212F heat vapors) Dry heat- Similar to baking in oven ( F X 3 hours) Steam under pressure-most dependable. Autoclave method. Temperature over 212F. Pressure allows for hotter temperature than boiling. Heat sensitive tapes may be used.")
7
Chemical Sterilization
Peracetic Acid-quick and reliable for sterilizing heat sensitive instruments. 30 minutes Ethylene Oxide Gas-destroys microorganisms in 3 hours. Must air following (5 days) to remove traces of gas (could cause chemical burns)
 to remove traces of gas (could cause chemical burns)")
8
Surgical Asepsis Includes: Creation of a sterile environment
Use of sterile equipment/supplies/solutions Sterilization of reusable supplies Surgical hand scrub Surgical attire if in OR Sterile gloves Sterile field Use of sterile technique

9
Other Examples of Sterile Supplies
Dressing supplies (gauze, kerlix) Injection supplies (needles) IV catheters Sutures Foley catheters
 Injection supplies (needles) IV catheters. Sutures. Foley catheters.")
10
Surgical Asepsis Donning sterile gloves-Skill
Donning sterile gown (during surgery and delivery of infants). Apply mask and hair cover first, then gown and last gloves. Gown will be wrapped from central supply with inside facing towards you so you can grasp and put on without contaminating outside of gown which must remain sterile.
. Apply mask and hair cover first, then gown and last gloves. Gown will be wrapped from central supply with inside facing towards you so you can grasp and put on without contaminating outside of gown which must remain sterile.")
11
Sterile Technique Used for . . . Operating room Dressings
Insertion of Foley catheters Assisting physicians with procedures

12
Gloves and Sterile Fields

13
Creating a Sterile Field
A work area free of microorganisms Formed using the inner surface of a cloth or paper wrapper that holds sterile items The field enlarges the area where sterile equipment or supplies are placed Set the field up immediately before planning to use

14
Creating a Sterile Field Skill
Inspect the work area to determine the cleanliness and orderliness of the surface on which you will work Obtain supplies Check the package to assure it is sealed and that the date has not expired Explain what you will do to the patient

15
Perform handwashing or hand antisepsis
Open the barrier/field and lift one inch from the edge straight up from the wrapper, keeping the long edge from touching the work station Keep above waist level Two ways to open the sterile field: Long way or short way are both acceptable as long as contamination does not occur

16
Without shaking, lie the sterile field onto the work station without touching the sterile side of the field (keep your hands on the underside of the field)
")
17
Donning Sterile Gloves
Select a package of sterile gloves of the appropriate size Remove unnecessary items from the overbed table Perform handwashing or alcohol-rub antisepsis Open the outer wrapper of the gloves Carefully open the inner package and expose the sterile glove with the cuff end closest to you

19
Pick up one glove at the folded edge of the cuff using your thumb and fingers
Insert your fingers while pulling and stretching the glove over your hand, taking care not to touch the outside of the glove to anything that is nonsterile Unfold the cuff so the glove extends above the wrist, but touch only the surface that will be in direct contact with the skin

20
Insert the gloved hand beneath the sterile folded edge of the remaining glove
Insert the fingers within the second glove while pulling and stretching it over the hand May use gloved hands to fix fingers Take care to avoid touching anything that is not sterile Maintain your gloved hands at or above waist level

22
Disposal of Contaminated Gloves
Handout Grasp outside of one cuff with other gloved hand; avoid touching wrist. Pull glove off, turning it inside out and discard. See handout

23
Nursing Implications: Nursing Diagnoses
Risk for infection Risk for Infection Transmission Ineffective Protection Delayed Surgical Recovery Deficient Knowledge

24
Lab Practice for Sterile Gloves (pair)
Lab Practice for Opening a Sterile Field

25
Dressings and Wound Management
Combination of Chapter 20 –Principles of Surgical Asepsis and Chapter 34 – Wound Care Assigned readings-chapter 20 and chapter 34, volumes one and two

26
Goal of Wound Management
To reapproximate the tissue to restore its integrity

27
Wound Management Dressings Drains Sutures and Staples
Bandages and Binders Irrigations

28
PURPOSES OF A DRESSING Keep the wound clean (use sterile supplies and sterile technique) Absorbing drainage (various dressing materials) Controlling bleeding (pressure dressings, wraps) Protecting the wound from further injury (i.e. duoderm) Holding medication in place Maintaining a moist environment (hydrocolloid dressings, saline dressings, Alldress system)
 Protecting the wound from further injury (i.e. duoderm) Holding medication in place. Maintaining a moist environment (hydrocolloid dressings, saline dressings, Alldress system)")
29
TYPES OF DRESSINGS Gauze dressings-highly absorbent to cover fresh wounds that are likely to bleed or exude drainage (woven cloth fibers). Allows air flow to wound. Can debride new granulation, may need to moisten with NS if adhered to prevent debridement. Transparent dressings-Allows the nurse to assess the wound; commonly used to cover peripheral and central IV insertion sites Hydrocolloid dressing-They keep wounds moist because they heal more quickly in a wet environment. Self adhesive. May stay on 1 week.
. Allows air flow to wound. Can debride new granulation, may need to moisten with NS if adhered to prevent debridement. Transparent dressings-Allows the nurse to assess the wound; commonly used to cover peripheral and central IV insertion sites. Hydrocolloid dressing-They keep wounds moist because they heal more quickly in a wet environment. Self adhesive. May stay on 1 week.")
30
Dressing Supplies for Typical Surgical Dressing
2 X 2 gauze 4 X 4 gauze (come single packs and multipacks) Fluffs Drain sponges ABD pad (Combine dressing) Rolled gauze- Kerlix or Kling Some agency have commercially packaged dressing kits (expensive) Solution to clean the wound (need to lip the containers to remove contamination) Sterile field (barrier) Sterile gloves Unsterile gloves to remove the old dressing Bag/receptacle for disposal of old dressing
 Fluffs. Drain sponges. ABD pad (Combine dressing) Rolled gauze- Kerlix or Kling. Some agency have commercially packaged dressing kits (expensive) Solution to clean the wound (need to lip the containers to remove contamination) Sterile field (barrier) Sterile gloves. Unsterile gloves to remove the old dressing. Bag/receptacle for disposal of old dressing.")
31
One Swipe per Gauze- BUNCH UP 4 X 4

32
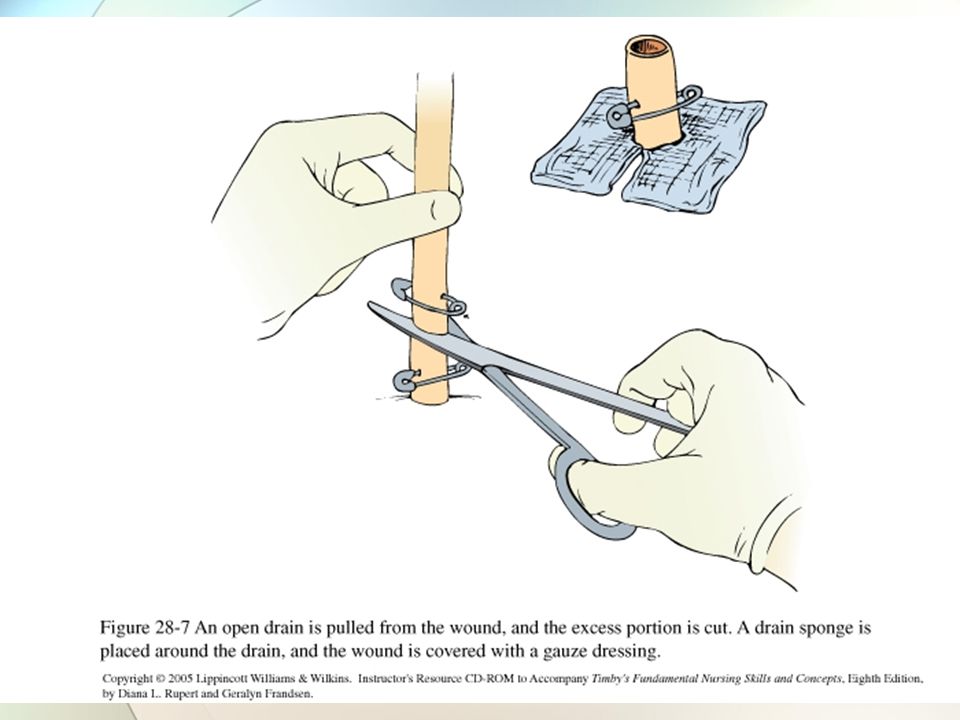
TYPES OF DRAINS Purpose of drain is to remove blood and cellular debris Open drains-flexible tubes that provide a pathway for drainage toward the dressing. Called penrose and often used for abdominal surgery or kidney surgery. Drainage occurs by passive gravity & by capillary action (movement of a liquid at the point of contact with a solid, which would be the gauze) Closed drains-Hemovac and Jackson Pratt to pull fluid by creating a vacuum or negative pressure. Hemovac often used for orthopedic surgery. T-tube often used for gallbladder surgery or biliary surgery.
 Closed drains-Hemovac and Jackson Pratt to pull fluid by creating a vacuum or negative pressure. Hemovac often used for orthopedic surgery. T-tube often used for gallbladder surgery or biliary surgery.")
33
Closed drains pull fluid by creating a vacuum or negative pressure
Closed drains pull fluid by creating a vacuum or negative pressure. Open the vent on the receptacle, squeeze the drainage collection chamber and then cap the vent.

34
Cleaning Around Drains
Circular motion Start closest to the drain and go outward Drains are often located beside a surgical wound, rather than within the wound line. After cleaning around the drain, a pre-cut drain sponge is placed around the drain. Expect more drainage from the exit point of an open drain, more gauze needed at this spot.

35
Types of Dressings Dry Sterile Dressing (DSD)-clean wound and apply dry gauze, dressing material Newer recommendations may include clean technique rather than sterile technique. Follow agency protocols. For lab pass offs, will do sterile technique with a penrose drain in place. Wet to dry dressing-cover wound only with wet dressing then top with a dry gauze dressing; now expect wet to moist dressings rather than wet to dry Packing-follow medical orders for type, length, width and if packing is medicated packing or gauze packing (can be used for tunneling-use Q-tips to pack or sterile forceps)
")
36
Dressing Change Follow medical orders for time, frequency
Often “initial” (original) dressing is done by physician
 dressing is done by physician.")
37
Other Orders for Dressing Change
Reinforce dressing- add to existing dressing

38
Assessing Wound Drainage
Amount and Color: Serous-clear, watery, thin, may be straw colored Sanguineous-bright red, active bleeding Serosanguineous-pale red, mixture of clear & red fluid, more watery than sanquinous Purulent-thick yellow, green, tan or brown

39
Wound Complications Dehiscence-reopening of surgical wound
Evisceration-spilling of abdominal contents-many factors; usually follows dehiscence, abscess formation (should evisceration occur, cover with normal saline gauze to keep moist) Infection/abscess-associated with bowel/appendix-wound expect to see open wound
 Infection/abscess-associated with bowel/appendix-wound expect to see open wound.")
40
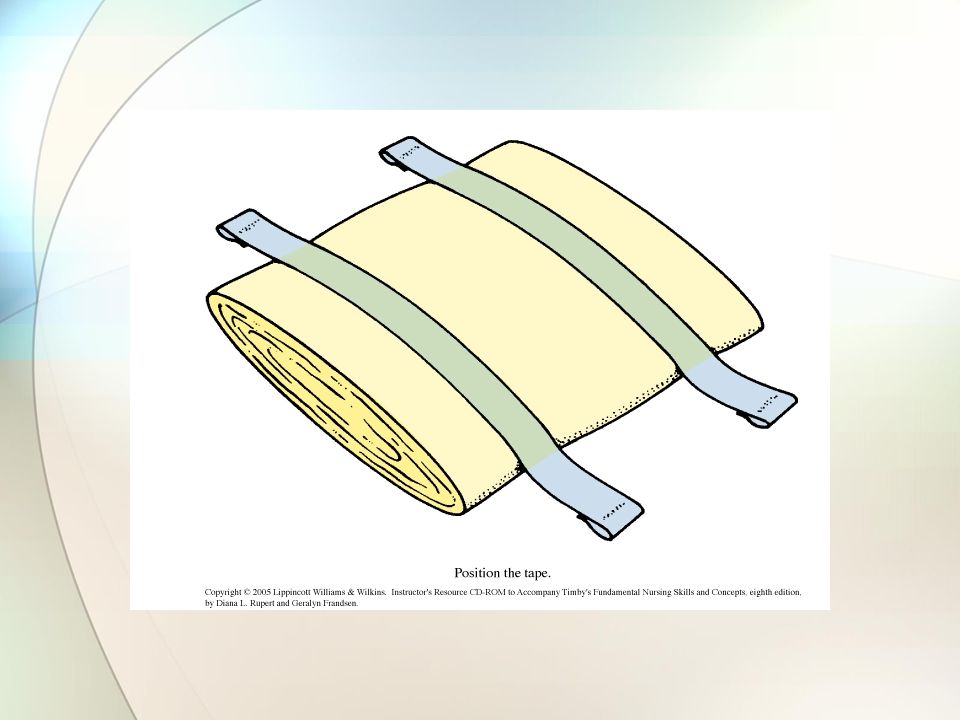
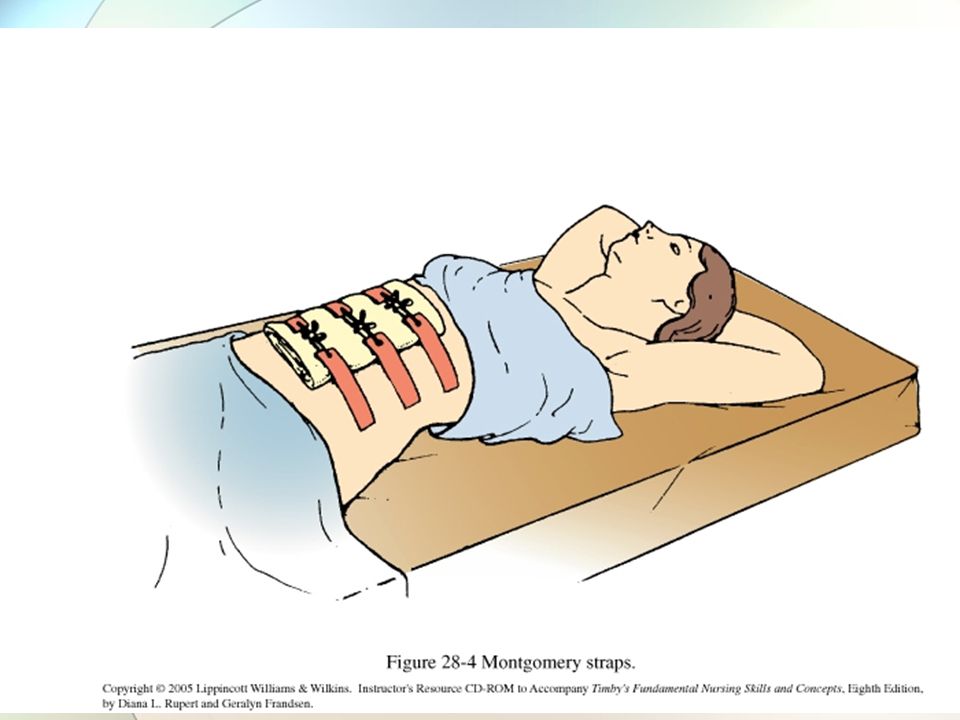
Techniques to Keep a Dressing in Place
Tape (different types of tape, dependent on patient’s tolerance/allergies Montgomery straps- often used if need frequent dressing changes Netting (comes in several different sizes)
")
42
To Remove Tape Remove tape by pulling it toward the wound- prevents separation of wound

44
Documentation of Dressing Change
Describe the drainage on old dressing Assess and describe the wound, measure Clean the wound (and drain site if applicable) Apply dressing material Document your assessment data, actions and patient response (DAR)
 Apply dressing material. Document your assessment data, actions and patient response (DAR)")
45
NURSING IMPLICATIONS: NURSING DIAGNOSES
Acute Pain Impaired Skin Integrity Ineffective Tissue Perfusion Impaired Tissue integrity Risk for Infection

46
BANDAGES AND BINDERS Bandage-Strip or roll of cloth wrapped around a body part (example: Ace bandage) Binder-Type of bandage generally applied to a particular body part Binders and bandages hold dressings in place when tape cannot be used or the dressing is large Supporting the area around a wound or injury to reduce pain Limiting movement in the wound area to promote healing

47
Ace Bandages Wrap from distal to proximal direction Avoid gaps
Equal tension Free of wrinkles Remove twice a day Check CSM-color, sensation, movement

48
Irrigations Purpose: Rinse out cellular debris
Remove purulent drainage Bathe tissue with medications Keep area moist

49
Types of Irrigations Clean technique: Sterile technique: Eyes Ears
Vagina Feeding tubes Nasogastric tubes Sterile technique: Wounds Bladder

50
Irrigations Kits Solution Padding Basin Dressing Supplies
Date and time all containers Sterile solutions expire 24 hours after opening Irrigations done with smaller needle rather than irrigation syringe in kit

51
Lab Practice Personal Dressing Kits- keep all supplies
Lab demonstration by instructor Step by Step Set up disposal bag for old dressing Apply unsterile (clean) gloves and remove old dressing. (If dressing sticks, apply saline and remove with clean glove). Assess wound and drainage, discard dressing, remove and discard gloves. Perform hand hygiene Set up field Apply items to field (only add one sterile glove, other will be put on from bedside) Lip solution (i.e. normal saline) to clean the wound Apply one sterile glove that was not on the field Clean incision first using one of the appropriate cleaning techniques (hold cleaning container with non gloved hand). Bunch up the 4 x4 for cleaning the incision. Clean incision before drain site With gloved hand go into field and apply second glove Apply dressing (gauze, drain sponge, gauze on top of drain sponge, abd. pads) Secure dressing with tape (make a tab for easy removal)
 gloves and remove old dressing. (If dressing sticks, apply saline and remove with clean glove). Assess wound and drainage, discard dressing, remove and discard gloves. Perform hand hygiene. Set up field. Apply items to field (only add one sterile glove, other will be put on from bedside) Lip solution (i.e. normal saline) to clean the wound. Apply one sterile glove that was not on the field. Clean incision first using one of the appropriate cleaning techniques (hold cleaning container with non gloved hand). Bunch up the 4 x4 for cleaning the incision. Clean incision before drain site. With gloved hand go into field and apply second glove. Apply dressing (gauze, drain sponge, gauze on top of drain sponge, abd. pads) Secure dressing with tape (make a tab for easy removal)")
55
DEBRIDEMENT – this is a review
Sharp debridement-Removal of necrotic tissue with a sterile scissors. Enzymatic debridement-Use of a topical chemical substance that breakdown and liquefy wound debris. Autolytic debridement-Painless, natural physiologic process that allows the body’s enzymes to soften, liquefy, and release devitalized tissue Mechanical debridement-Use of wet-dry dressing to remove debris

56
FACTORS WHICH AFFECT WOUND HEALING
Type of wound injury Expanse or depth of wound Quality of circulation Amount of wound debris Presence of infection Status of the client’s health

57
HEALING- review First Intention Healing-Primary intention is a reparative process in which the wound edges are directly next to each other. Second Intention Healing-The wound edges are widely separated, leading to a more time-consuming and complex reparative process. Third Intention Healing-The wound edges are widely separated and are later brought together with some type of closure material.

59
Lab Practice Personal Dressing Kits- keep all supplies
Lab demonstration by instructor Step by Step Set up disposal bag for old dressing Apply unsterile (clean) gloves and remove old dressing. (If dressing sticks, apply saline and remove with clean glove). Assess wound and drainage, discard dressing, remove and discard gloves. Perform hand hygiene Set up field Apply items to field (only add one sterile glove, other will be put on from bedside) Lip solution (i.e. normal saline) to clean the wound Apply one sterile glove that was not on the field Clean incision first using one of the appropriate cleaning techniques (hold cleaning container with non gloved hand). Bunch up the 4 x4 for cleaning the incision. Clean incision before drain site With gloved hand go into field and apply second glove Apply dressing (gauze, drain sponge, gauze on top of drain sponge, abd. pads) Secure dressing with tape (make a tab for easy removal)
 gloves and remove old dressing. (If dressing sticks, apply saline and remove with clean glove). Assess wound and drainage, discard dressing, remove and discard gloves. Perform hand hygiene. Set up field. Apply items to field (only add one sterile glove, other will be put on from bedside) Lip solution (i.e. normal saline) to clean the wound. Apply one sterile glove that was not on the field. Clean incision first using one of the appropriate cleaning techniques (hold cleaning container with non gloved hand). Bunch up the 4 x4 for cleaning the incision. Clean incision before drain site. With gloved hand go into field and apply second glove. Apply dressing (gauze, drain sponge, gauze on top of drain sponge, abd. pads) Secure dressing with tape (make a tab for easy removal)")
Similar presentations